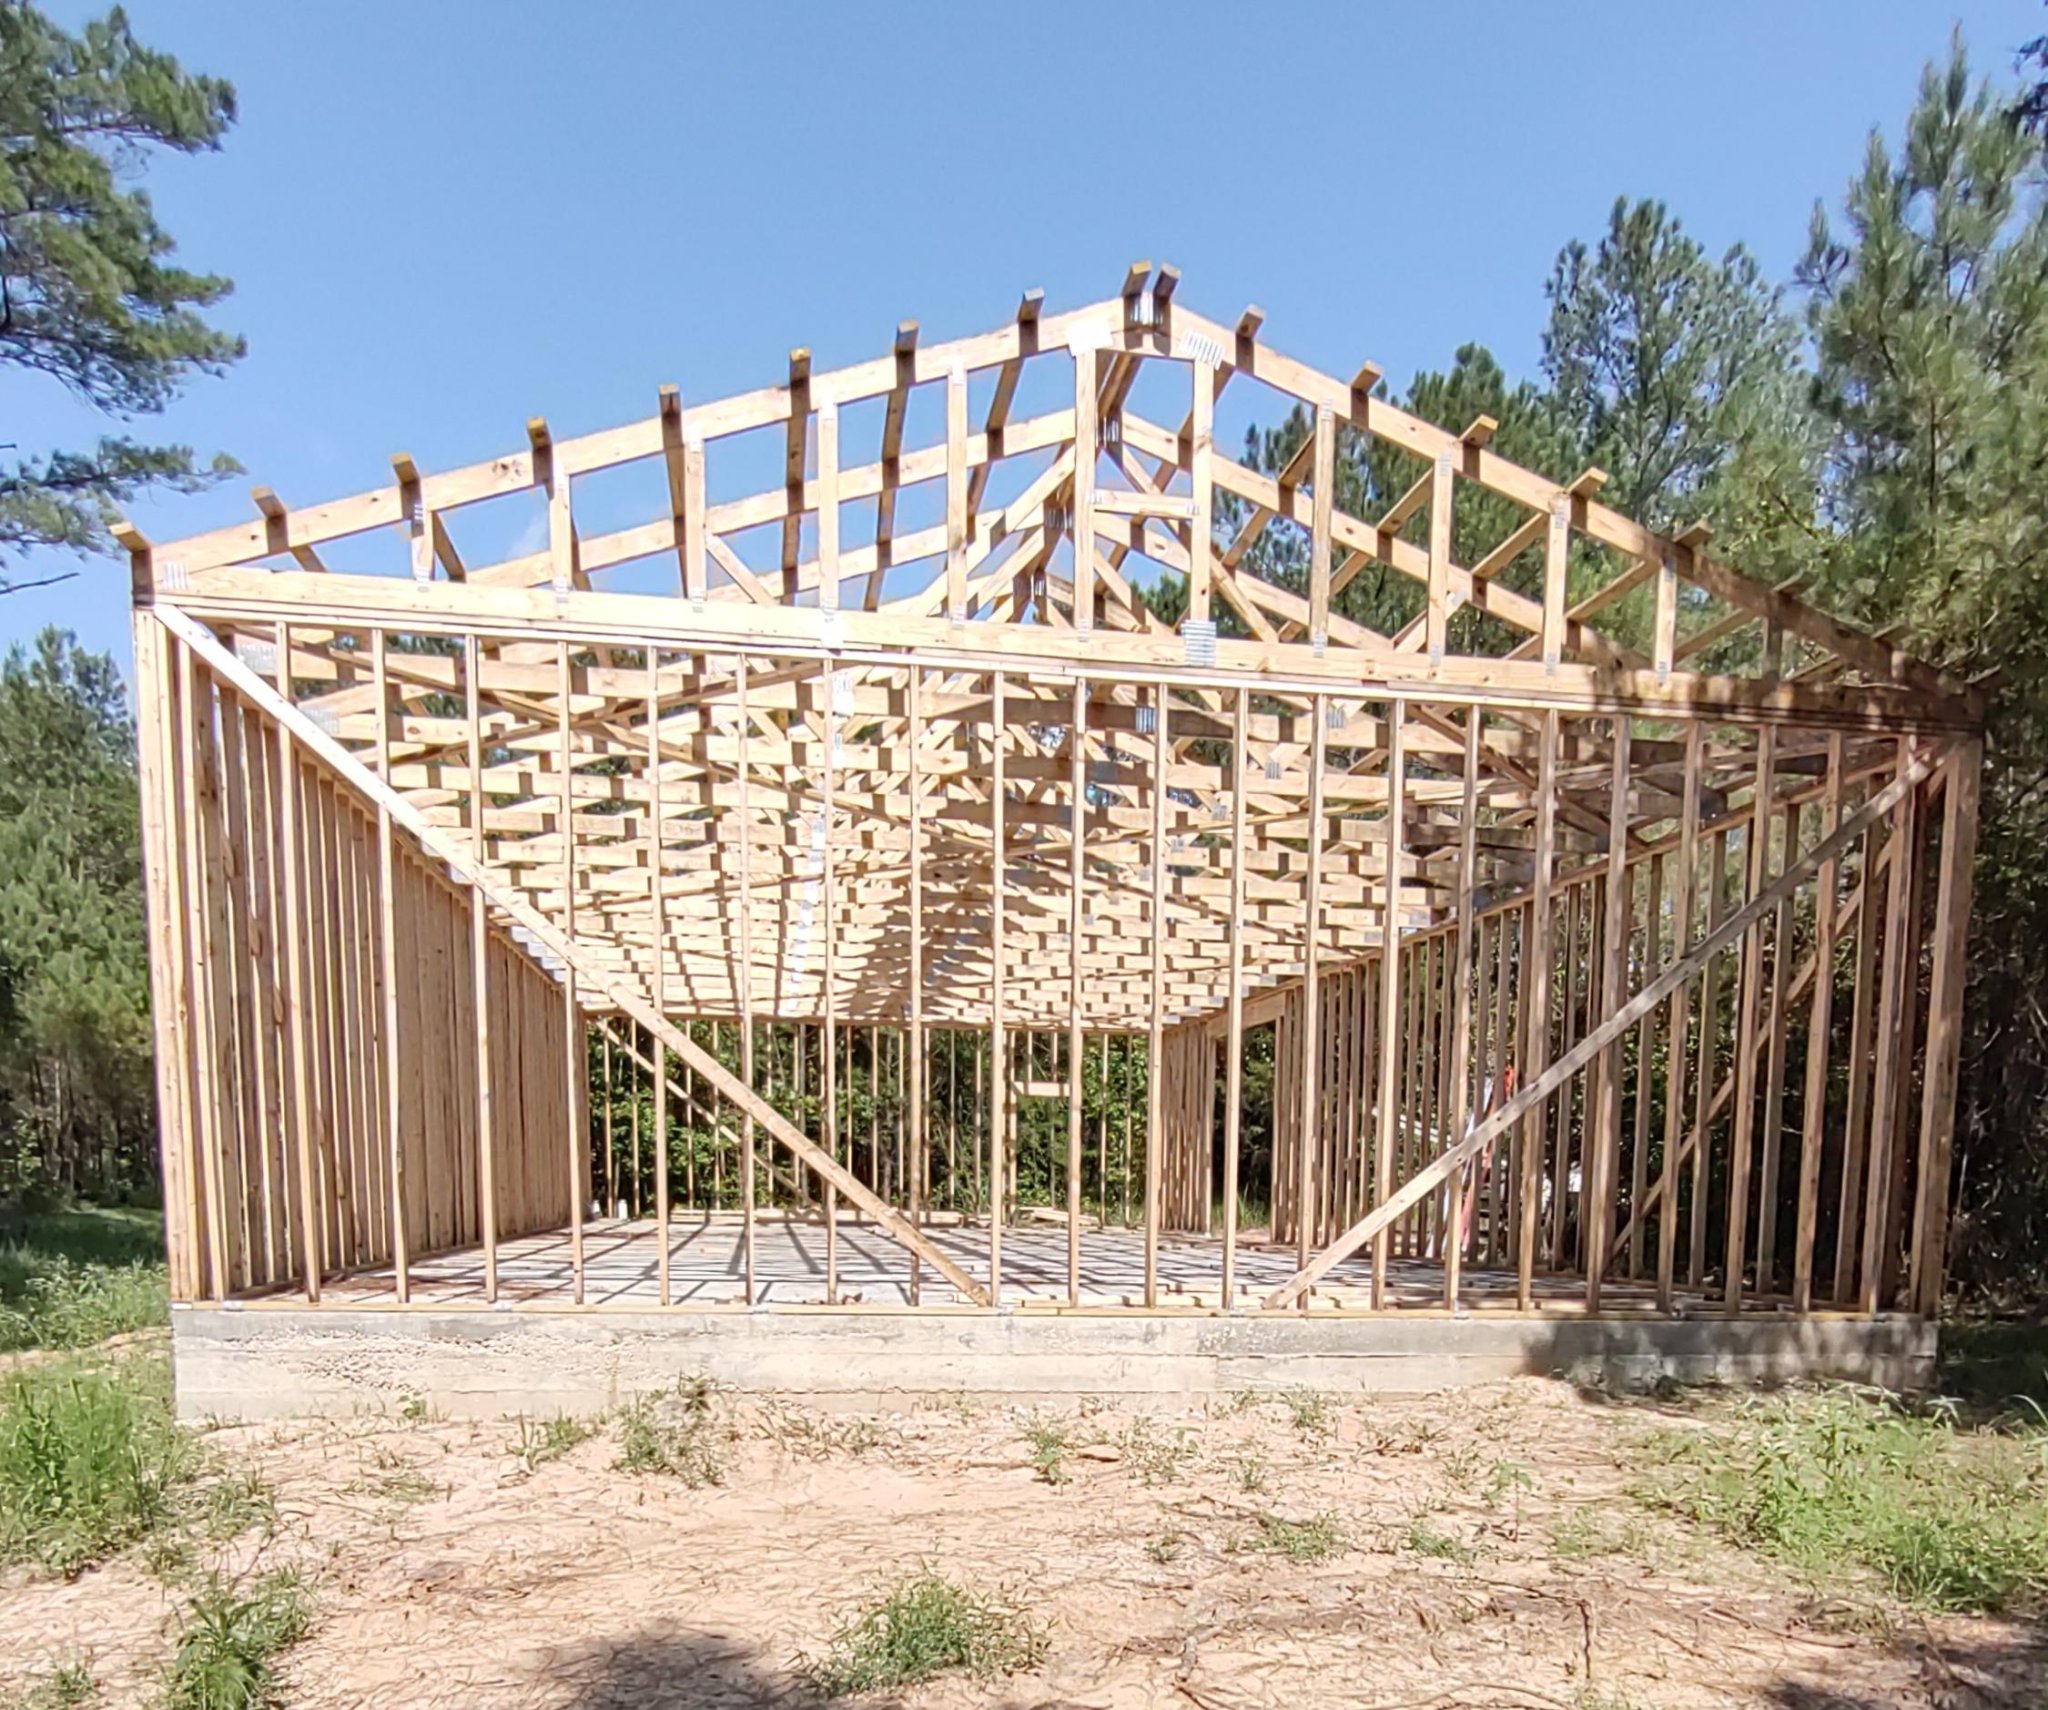
7/22-23 Installed X- bracing in the 'ceiling' plane and removed all the temporary bracing. Between my mis-hits and dismantling the braces, I think I pulled more nails than I drove. The weather was nice, high of 84 Saturday, The roofing will be delivered Monday (today) and I'll take a shot at putting some on. So far, the metal roofers around here are scarce. I'm thinking Katy will come in handy.
Shop/Shed 30x60
- Thread starter PoTreeBoy
- Start date
Runs With Scissors
Well-known member
Equipment
L2501 TLB , Grappel, Brush Hog, Box Blade, Ballast box, Forks, Tiller, PH digger
Nice job! Looks like it's coming together nicely.The weather was nice, high of 84 Saturday,
However at 84 degrees, I'd be sweating like a whore sitting in church.
Thats a "sit in the a/c and have an umbrella drink " weather for me. LOL
It’s looks like it is really taking shape. Looks great. Your post me me laugh today regarding the mis hits…made me think about my dad (we lost him just over a year ago), but any time I have a mis hit I think of him telling me “that means your pecker is still growing”. I laughed as a kid when when he told me that and as an adult and still laugh when I have an mis hit now. Maybe some of you have heard that before too?7/22-23 Installed X- bracing in the 'ceiling' plane and removed all the temporary bracing. Between my mis-hits and dismantling the braces, I think I pulled more nails than I drove. The weather was nice, high of 84 Saturday, The roofing will be delivered Monday (today) and I'll take a shot at putting some on. So far, the metal roofers around here are scarce. I'm thinking Katy will come in handy.
View attachment 107952
ken erickson
Well-known member
Equipment
B7100 hst, 2650 front mount snowblower, L2501 hst qa loader
lol, never heard that but when I was just learning to swing a hammer helping out dad he would kid me by saying, “Ken, your just like lightning, you never strike twice in the same spot! “.It’s looks like it is really taking shape. Looks great. Your post me me laugh today regarding the mis hits…made me think about my dad (we lost him just over a year ago), but any time I have a mis hit I think of him telling me “that means your pecker is still growing”. I laughed as a kid when when he told me that and as an adult and still laugh when I have an mis hit now. Maybe some of you have heard that before too?
Sheds looking great! keep up the good work!
North Idaho Wolfman
Moderator
Staff member
Lifetime Member
Equipment
L3450DT-GST, Woods FEL, B7100 HSD, FEL, 60" SB, 743 Bobcat with V2203, and more
Miss hits and BAD hammer skills is why I have 20 some odd air nailers / staplers.
With my nephew's help after he got off work, we got 12 of the 42 sheets on the roof. Katy came in handy getting the sheets up there.
I'm putting some blocks in between the trusses to nail a trim board to, and it is much easier before the roof is in the way, so I need to get that done before proceeding. And I have home chores calling, so this will have to wait a while.
Good progress.View attachment 108150
With my nephew's help after he got off work, we got 12 of the 42 sheets on the roof. Katy came in handy getting the sheets up there.
I'm putting some blocks in between the trusses to nail a trim board to, and it is much easier before the roof is in the way, so I need to get that done before proceeding. And I have home chores calling, so this will have to wait a while.
So I take it you will not be nailing a rain gutter or facia directly to the end grain of the trusses? Is the purpose the block you mention above to provide a good connection between the facia trim board at the end the trusses. It sounds like you’re doing it right.
I’ve seen rain gutters nailed right to the end grain of the end of the truss. That is the weakest connection that can be made with nailing. Saved one 2x6 the length of the roof on each side and provided a nice long term problem.
As expensive as lumber is any more, the last two decks I’ve built were 100% screwed together. Plus I’m pretty good with getting the screw where I want it with an impact driver. Nailing, I’m not as good.
I remember when Dad built our house, before air nailers existed, I would collect all the bent nails he pulled back out (I guess he couldn’t stand to just bend them over). He paid me something like a penny for ten nails. Then he’d let me sort of straighten them and mess around with making things out of the scrap lumber (which he had very few cut offs). I recall the Easter Bunny bringing us kids little hammers at the time. We beat the heck out of those.
I'm not an expert carpenter, but seeing nails into the end grain really irks me. You know it's going to fail.Good progress.
So I take it you will not be nailing a rain gutter or facia directly to the end grain of the trusses? Is the purpose the block you mention above to provide a good connection between the facia trim board at the end the trusses. It sounds like you’re doing it right.
I’ve seen rain gutters nailed right to the end grain of the end of the truss. That is the weakest connection that can be made with nailing. Saved one 2x6 the length of the roof on each side and provided a nice long term problem.
As expensive as lumber is any more, the last two decks I’ve built were 100% screwed together. Plus I’m pretty good with getting the screw where I want it with an impact driver. Nailing, I’m not as good.
I remember when Dad built our house, before air nailers existed, I would collect all the bent nails he pulled back out (I guess he couldn’t stand to just bend them over). He paid me something like a penny for ten nails. Then he’d let me sort of straighten them and mess around with making things out of the scrap lumber (which he had very few cut offs). I recall the Easter Bunny bringing us kids little hammers at the time. We beat the heck out of those.
I'm just letting the metal (26 ga) hang off about 9". I extended the purlins about 8" and will leave them open. <Rant> Here's framing today. I pre-cut pressure-treated purlins, short and long, for the ends that'll be exposed, so the purlin joints would be staggered. 3 - 16'ers plus one short and one long would make my 60' length plus overhang. So I get back, and they've used all short pieces on one end and all the joints are lined up
 . It gets worse. Later, I notice that, instead of using the long pieces on the other end, they cut 4' off those pieces and then used 4' pieces of untreated to make up the length. So I have a nice stack of 4' long PT scrap and 4 or 5 16' 2x4s wasted. All to get a substandard (and overpriced) job. <Rant off>
No kidding? I was thinking you were doing most of the work yourself. Good hired help is hard to find. Overpaying for poor quality is very frustrating. In the big picture, life of the structure, likely it won’t matter. But just the lack of thought and waste (that your paying for) to end up with poorer quality is ridiculous.I'm not an expert carpenter, but seeing nails into the end grain really irks me. You know it's going to fail.
I'm just letting the metal (26 ga) hang off about 9". I extended the purlins about 8" and will leave them open. <Rant> Here's framing today. I pre-cut pressure-treated purlins, short and long, for the ends that'll be exposed, so the purlin joints would be staggered. 3 - 16'ers plus one short and one long would make my 60' length plus overhang. So I get back, and they've used all short pieces on one end and all the joints are lined up
So far, I've contracted the concrete and truss setting. I'm batting .500, and that's all I anticipate, except maybe insulate and paint.No kidding? I was thinking you were doing most of the work yourself. Good hired help is hard to find. Overpaying for poor quality is very frustrating. In the big picture, life of the structure, likely it won’t matter. But just the lack of thought and waste (that your paying for) to end up with poorer quality is ridiculous.
fried1765
Well-known member
Equipment
Kubota L48 TLB, Ford 1920 FEL, Ford 8N, SCAG Liberty Z, Gravely Pro.
THAT is EXACTLY how it goes when you are not ALWAYS there to supervise.I'm not an expert carpenter, but seeing nails into the end grain really irks me. You know it's going to fail.
I'm just letting the metal (26 ga) hang off about 9". I extended the purlins about 8" and will leave them open. <Rant> Here's framing today. I pre-cut pressure-treated purlins, short and long, for the ends that'll be exposed, so the purlin joints would be staggered. 3 - 16'ers plus one short and one long would make my 60' length plus overhang. So I get back, and they've used all short pieces on one end and all the joints are lined up
My son gave me 60 bundles of double stain dipped cedar shakes.($$$$$$)
Mostly all gray, (but several subtly different shades of gray.), and eight bundles of pure white.
I separated the whites, and left instructions to only use gray (I would spray after install).
Came back 4 hours later to find some white ones mixed in with the gray on the wall.
Gray stain does not cover white stain well when sprayed with one coat.
GRRRRRR!
Idiots live around us!
Suggest you add "wind bracing". These are 2x4s running from the peak at the end walls diagonally down to the eaves. Four of them. Typically nailed to the bottoms of the purlins with their ends butting against the end rafter or a truss. [Cut angles on the ends of the 2x4s to match.]
Without wind bracing, there is very little structure that can resist a failure where all the trusses lean so they don't stand plumb. I've seen that failure in the windy Midwest.
I used to build pole barns for a living. And, stick-wall sheds. When we were swinging trusses, if the day was getting short, we would purlin up the 3 or 4 bays from the endwalls in, and be SURE to install the wind braces before we quit for the day. Two guys (one on each of two adjacent trusses) would hold a 2x4 up against the bottom edge of the upper chord, mark the cut line, and then send it down to the ground for cutting.
Those diagonal braces nailed to the lower chords of the trusses probably aren't doing much. I've never seen those in a shed. Plus, they're really going to mess with ceiling installation. If it was my shed, I'd take those down and repurpose them as wind braces.
Also, we never butted purlin ends. We overlapped them a foot at each truss (10-foot 2x4 on a 9-foot bay).
I built for Wick. Their design has the purlins standing on edge on each truss. Allows you to face-nail the purlin overlap (three 10D ring shank). A 60D ring shank driven through each purlin edge-to-edge and into the truss. The theory was that having 3.5 inches of wood for the roofing nails/screws is more secure than just 1.5 inches. Plus, the purlins are stiffer in the span between the trusses if they're on edge.
-Paul
I read that a couple times. It makes good sense technically.Suggest you add "wind bracing". These are 2x4s running from the peak at the end walls diagonally down to the eaves. Four of them. Typically nailed to the bottoms of the purlins with their ends butting against the end rafter or a truss. [Cut angles on the ends of the 2x4s to match.]
Without wind bracing, there is very little structure that can resist a failure where all the trusses lean so they don't stand plumb. I've seen that failure in the windy Midwest.
I used to build pole barns for a living. And, stick-wall sheds. When we were swinging trusses, if the day was getting short, we would purlin up the 3 or 4 bays from the endwalls in, and be SURE to install the wind braces before we quit for the day. Two guys (one on each of two adjacent trusses) would hold a 2x4 up against the bottom edge of the upper chord, mark the cut line, and then send it down to the ground for cutting.
Those diagonal braces nailed to the lower chords of the trusses probably aren't doing much. I've never seen those in a shed. Plus, they're really going to mess with ceiling installation. If it was my shed, I'd take those down and repurpose them as wind braces.
Also, we never butted purlin ends. We overlapped them a foot at each truss (10-foot 2x4 on a 9-foot bay).
I built for Wick. Their design has the purlins standing on edge on each truss. Allows you to face-nail the purlin overlap (three 10D ring shank). A 60D ring shank driven through each purlin edge-to-edge and into the truss. The theory was that having 3.5 inches of wood for the roofing nails/screws is more secure than just 1.5 inches. Plus, the purlins are stiffer in the span between the trusses if they're on edge.
-Paul
Here on the west coast, most stick built barns with metal roofing (like the OP’s) only use 1x4 purlins, laid the flat (weak direction) at 2’ centers. I’ve never seen the diagonal bracing on the bottom of the top member of the trusses. I like it.
With the way you guys overlap the purlins, does that cause the roofing screws to be offset up/down every other length of purlin?
On a pole barn, with double trusses at 10’ then we use 2x6 purlins laid the strong way on 2’ centers. But no overlaps, just butt joints. And no diagonal bracing like you described, but the structure would be better with it too be sure.
I do have some vertical bracing left to do. My 'erector' left one brace from the peak to the bottom chord brace, sticks below the truss bottom, complete with nails. None of the webs are vertical, so the braces will splay out some.Suggest you add "wind bracing". These are 2x4s running from the peak at the end walls diagonally down to the eaves. Four of them. Typically nailed to the bottoms of the purlins with their ends butting against the end rafter or a truss. [Cut angles on the ends of the 2x4s to match.]
Without wind bracing, there is very little structure that can resist a failure where all the trusses lean so they don't stand plumb. I've seen that failure in the windy Midwest.
I used to build pole barns for a living. And, stick-wall sheds. When we were swinging trusses, if the day was getting short, we would purlin up the 3 or 4 bays from the endwalls in, and be SURE to install the wind braces before we quit for the day. Two guys (one on each of two adjacent trusses) would hold a 2x4 up against the bottom edge of the upper chord, mark the cut line, and then send it down to the ground for cutting.
Those diagonal braces nailed to the lower chords of the trusses probably aren't doing much. I've never seen those in a shed. Plus, they're really going to mess with ceiling installation. If it was my shed, I'd take those down and repurpose them as wind braces.
Also, we never butted purlin ends. We overlapped them a foot at each truss (10-foot 2x4 on a 9-foot bay).
I built for Wick. Their design has the purlins standing on edge on each truss. Allows you to face-nail the purlin overlap (three 10D ring shank). A 60D ring shank driven through each purlin edge-to-edge and into the truss. The theory was that having 3.5 inches of wood for the roofing nails/screws is more secure than just 1.5 inches. Plus, the purlins are stiffer in the span between the trusses if they're on edge.
-Paul
I'm sensitive to bracing. Once, I watched a small (60x150?) office building being built along my route to/from work. One morning they were all rigged up to set trusses. That afternoon, all the trusses (including hips) were set and no one was around. The next morning, it looked like pixie sticks, I don't think a single stick was standing. They ended up clearing the slab and starting over.
We have a roof thanks to BIL and nephew. Still lack several hundred screws, but it's all up there and in place.
Also, I met with county code and got back on the ag building plan so I can get electricity without plumbing. Met with electric coop to formulate a plan and get a meter base before they discontinue providing them.

Also, I met with county code and got back on the ag building plan so I can get electricity without plumbing. Met with electric coop to formulate a plan and get a meter base before they discontinue providing them.
UnEasyRider
Active member
Equipment
L3302 LA 526 loader, Box Scraper, Grappler, Forks, Rotary mower, Big Tool Rack.
Was wondering what the cost was on the slab. I'm considering a 40X60 metal building and I heard concrete like everything is thru the roof.I specified 5" in the slab, but I think it's a little more. I wanted an 8" wide footing, 12" minimum depth below grade. But Humberto's used to local code, so he made the footing 16" wide and same depth. I calculated 37 yards, his worker said they used 5 - 8 yd loads, but Humberto told me they used 6 - 8 yd loads, which I don't doubt for that huge footing.
There's 3 - #4 rebar in the footing and wire mesh in the slab. I didn't see any effort to raise the mesh, so it's probably not adding much. He preferred mesh over fiber, but I'm not sure why. Maybe the fiber doesn't finish as well?
It's supposed to be 3500 psi mix. I tried to keep it damp for 4 days. There's one small shrinkage crack about 1/3 from one end, all the way across. Overall, I'm pleased with it.
For me, I just need concrete to roll a creeper or a floor jack around on. So, to me, paying for concrete floor that's just used to park machines on is a waste of money.Was wondering what the cost was on the slab. I'm considering a 40X60 metal building and I heard concrete like everything is thru the roof.
For my (small, 1000SF) shed, I'm going to concrete just the half that will be the shop/workbench area.
I will have a couple of woodworking machines in there as well (planer, table saw), so concrete will be handy for sweeping up the sawdust.
Parking area will be gravel over a THICK vapor barrier.
-Paul
$13,500Was wondering what the cost was on the slab. I'm considering a 40X60 metal building and I heard concrete like everything is thru the roof.
RCW
Well-known member
Lifetime Member
Equipment
BX2360, FEL, MMM, BX2750D snowblower. 1953 Minneapolis Moline ZAU
UnEasyRider
Active member
Equipment
L3302 LA 526 loader, Box Scraper, Grappler, Forks, Rotary mower, Big Tool Rack.
Thank you!$13,500
I figured on around 15-20k. Unfortunately now that's been more or less confirmed.