Overheating Kubota Z482 enduro

vwaudiwelder

New member
Aug 31, 2015
8
0
0
Ohio
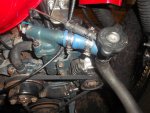
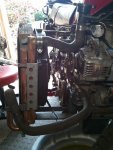
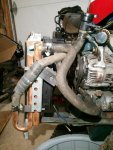
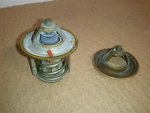
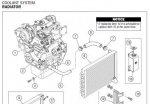
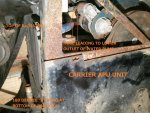
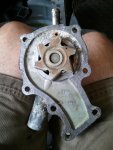
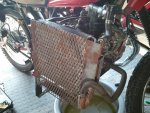
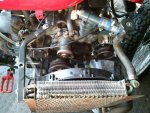
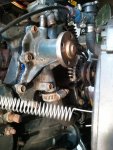
Hello all, I have been on this site as well as Dieselbike.net for many, many hours gaining inspiration for my first diesel motorcycle build. It is a 200cc enduro now powered by a Kubota Z482 from a Carrier APU unit. I will most certainly post info and photos of the entire build process but first I hope that you all might assist me with 2 problems, overheating and the cvt. First off, my bike overheats very quickly. The top radiator hose nearest the thermostat housing reaches 240 F while the lower hose remains at ambient temperature. I have forced water both directions through the radiator and the engine at thermostat housing/water pump mounting cavity: Neither are clogged. As far as the water pump itself, I am only aware of 3 failure modes: 1. leaking weephole. 2. bad bearings. 3. impeller broken from or freewheeling on belt driven shaft. I have determined none of these are the case. The Carrier APU unit this came from actually had the radiator mounted approximately 10" lower in relation to the engine that what you see I have mounted to the right side of the bike where my radiator is nearly flush to the valve cover. The top of the radiator on the APU leads directly into the lower hose coming off the water pump. The lower hose off the radiator connects to a 180 degree copper u bend and then up around and back to the top thermostat housing. This routing (which has been confirmed correct by a Carrier service manual) makes absolutely no sense to me as every radiator I have ever seen has its uppermost top hose leading directly to the thermostat that when reaches operating temperature allows the hot fluid to flow from the motor downwards through the cooling passages and back up to the pump to complete the circuit. I have routed my hoses in both configurations with the same results: severe and immediate overheating. I am using 50/50 premix coolant. The spare thermostat I have starts to open at 160 degrees F. The faulty thermostat has been cut in half and only the "shell" is being used at the moment. I would expect this shell to delay the heating of the engine until ultimately both radiator hoses and the radiator itself reach 230 F at which point I am overheating. Does the system need to be "burped"? If so, how is that done quickly? I should mention I am using a Kawasaki Ninja 250 radiator cap and hose elbow which obviously is mounted at the absolute highest point. If any of you would provide some insight into what I am missing I would appreciate it immensely!!! Thank you all, I love this website!
 

Attachments

coachgeo

Well-known member

Equipment
L225 w/woods Few Mowers & Back Blade, D722 in Motorcycle (Triumph Tiger), LMTV
Nov 16, 2012
2,460
32
48
Southern OH
I see now your fan is electric. Could that be a puller fan set up in a pusher fashion thus it's not able to effectively cool?

Anyone in here got any idea on how to determine best PSI of a cap to run?

Might I suggest you pressure test the cooling system? Maybe your cap is not holding pressure?
 
Last edited:

D2Cat

Well-known member
Lifetime Member

Equipment
L305DT, B7100HST, TG1860, TG1860D, L4240
Mar 27, 2014
13,023
4,393
113
40 miles south of Kansas City
vwaudiwelder, good to have you here looking for ideas. It broadens our horizons.

An idea that may help you get feedback is to use paragraphs when you change thoughts. It's difficult to read your post all bunched together.
 

Daren Todd

Well-known member
Lifetime Member

Equipment
Massey Ferguson 1825E, Kubota Z121S, Box blade, Rotary Cutter
May 18, 2014
9,074
4,547
113
Vilonia, Arkansas
Burp the air behind the thermostat if you haven't done so. Most times when I've filled a radiator or replaced a water pump, I'll have it run hot real fast till you can get the air removed from behind the thermostat to allow it to open.

Usually takes two to three tries to get the air burped. Run it hot. Shut it down before it over heats. Let sit for a couple minutes. Then release pressure by loosening radiator cap. Be careful to not get burned. The other option is loosening the thermostat bolts, and let the air out, then tighten.


Sent from my iPhone using Tapatalk
 

85Hokie

Moderator
Staff member
Lifetime Member

Equipment
BX-25D ,PTB. Under Armor, '90&'92-B7100HST's, '06 BX1850 FEL
Jul 13, 2013
10,355
2,171
113
Bedford - VA
I see now your fan is electric. Could that be a puller fan set up in a pusher fashion thus it's not able to effectively cool?

Anyone in here got any idea on how to determine best PSI of a cap to run?

Might I suggest you pressure test the cooling system? Maybe your cap is not holding pressure?

them thar caps can tricky.......

if it is a cap with a recovery tank - then the caps needs to be closed then allow to open slightly to pull the fluid back in.....if a completely sealed unit, then try a 13 psi cap.....

i did some careful measuring on my B7100 thermosiphon system .......coming out of top of head = 210, top of radiator , 218, bottom of radiator about 145.......

you have a lot of variables to play with on this situation....

have you tried without a thermostat - just to see if the fluid is moving ?
 

vwaudiwelder

New member
Aug 31, 2015
8
0
0
Ohio
Hello all, I truly appreciate your thoughts, ideas and expertise on solving this problem. I would like to get this bike up and running and on the road this week if possible. This is the only hindrance to that happening.

As far as the thermostat, I have not yet used my functioning thermostat which cracks open at 160F. I have only used the gutted shell I have pictured. Are you all of the opinion that this is CAUSING my overheating? I would think this will actually INCREASE the amount of time it takes the engine to reach operating/overheat temperature as it would hopefully be flowing through the radiator via the water pump.

The electric fan is not now connected to anything. Since the radiator is parallel to the direction of travel I can choose to either have it wired as a "pusher" or a "puller". Since the shroud is not completely tight up against the cooling fins I suppose I will wire it as a "pusher" in the near future.

As I mentioned I have tried routing the hoses in both directions. Both provide for a very hot and severely swollen hose connected to and nearest the radiator cap. Both routings provide for cold/ambient lower hoses leading to/from the bottom of the water pump. Should I revert back to the original routing with the top of the radiator outlet leading directly to the radiaor cap/thermostat housing with the short rubber elbow? This makes sense to me. The APU unit pictured in the PDF diagram I provided is routed backwards/opposite this logic with the top of the radiator outlet leading to/from the bottom of the water pump.

I do not intend to use an expansion tank though there is a nipple on the Ninja 250 radiator cap elbow assembly. I was hoping to fill the system to 80% capacity and allow for expansion within. Plenty of older vehicles had no expansion tanks (late 70s/early 80s VW rabbits etc).

I do have a "spare" water pump mounted in place to the extra APU unit/z482 I pictured. I have thought of pulling it and mounting to my bike engine. I have also thought of purchasing a brand new water pump. Since my current water pump does not exhibit any of the 3 symptoms of being faulty in my original post I think either option will be a waste of time. Do you agree?

I have not seen any "chocolate milk" appearance to my coolant from engine case oil mixing. I have also not seen any white smoke from the combustion of coolant/glycol/water. I don't imagine the head gasket is bad though if I keep this up that will change.

Again, thank you all!
 

Attachments

Last edited:

North Idaho Wolfman

Moderator
Staff member
Lifetime Member

Equipment
L3450DT-GST, Woods FEL, B7100 HSD, FEL, 60" SB, 743 Bobcat with V2203, and more
Jun 9, 2013
28,726
5,134
113
Sandpoint, ID
Looking at the radiator, I don't think that design or model will work for you.
your feeding it on the side and it's trapping air in it thus not letting it work properly.

You might be able to get it to somewhat function by either turning the radiator 90 deg or better yet get a standard style radiator that will allow it to move coolant in the right manner.

If you think it's working right then, Put it all together, fill the radiator to the top, with the cap off, start the engine watch for bubbles, if it has bubbles it has a bad head gasket.
 

Lil Foot

Well-known member
Lifetime Member

Equipment
1979 B7100DT Gear, Nissan Hanix N150-2 Excavator
May 19, 2011
7,282
2,236
113
Peoria, AZ
I'm at a loss to add anything new, except fro this little tidbit- a nibble for thought.
I used to own a '69 Mach 1 with the 390HO. It ran cool until I changed the coolant & thermostat, then it overheated. Several mechanic examinations, thermostats & coolant changes later, it still overheated, & I was at a loss.
A guru in the Shelby Mustang owners club told me to go to the Ford dealer & get the factory Ford thermostat for this particular serial number engine. I did, and all problems were cured. Turns out it had a flow restrictor on it because without it, the coolant circulated so fast that it wasn't in the radiator long enough to shed any heat.

I think NIW is right, that radiator looks more like an oil cooler, and probably needs to be a more conventional design.
 
Last edited:

85Hokie

Moderator
Staff member
Lifetime Member

Equipment
BX-25D ,PTB. Under Armor, '90&'92-B7100HST's, '06 BX1850 FEL
Jul 13, 2013
10,355
2,171
113
Bedford - VA
I'm at a loss to add anything new, except fro this little tidbit- a nibble for thought.
I used to own a '69 Mach 1 with the 390HO. It ran cool until I changed the coolant & thermostat, then it overheated. Several mechanic examinations, thermostats & coolant changes later, it still overheated, & I was at a loss.
A guru in the Shelby Mustang owners club told me to go to the Ford dealer & get the factory Ford thermostat for this particular serial number engine. I did, and all problems were cured. Turns out it had a flow restrictor on it because without it, the coolant circulated so fast that it wasn't in the radiator long enough to shed any heat.

I think NIW is right, that radiator looks more like an oil cooler, and probably needs to be a more conventional design.
I too have heard of people "taking out" the thermostat in the summer, thinking that the rush of water will cool the engine better, quite the opposite, the water moves at such a high rate that it cannot pick up the heat and thus cool the engine......

engine overheats while surrounded by cool water......

not sure about that radiator ....seems overly complicated for a simplistic use!:)
 

coachgeo

Well-known member

Equipment
L225 w/woods Few Mowers & Back Blade, D722 in Motorcycle (Triumph Tiger), LMTV
Nov 16, 2012
2,460
32
48
Southern OH
I'm still thinking pressure is an issue. Part of the design is to raise the pressure of the circuit the coolant runs in cause higher pressure raises the boiling point of liquid. If radiator cap does not hold pressure enough you will reach boiling point sooner/faster. Also if I'm not mistaken when you lower the boiling point the transfer of heat from engine to coolant is less effective. So play with that some. Pressure test it etc.

Play also with burping it. Put front wheel up to raise neck of radiator higher than all things. At same time tilt the bike away from radiator to further put neck at highest point. With this done then do the burping run and cool down as others have suggested. The front up and lean of bike is to help force air to rise the top where you are set to have it escape/burp out.

Also USE AN OVERFLOW bottle. The engine appears to be designed to have one.. (closed circuit) which is part of the way it builds pressure and maintains it. No way for air to get in once burped out. sure there has been older engines designed not to have overflow bottle.... but their cooling system were designed with that in mind. This one was apparently not designed with that in mind.

Now with that in mind... what tractors used the Z482 OTT guys? Did they have overflow bottles and if so... and if not even... what was the pressure of their caps for that model tractor. VWAudieWelder; see in your manual if it says what pressure the original radiator cap is suppose to be in the carrier setup.

Remember Too much pressure raises boiling point too high so your engine can actually be running hot before water coolant boils/expands/overflows. To low of a boiling point and it boils/expands/overflows about the time the engine is at the temp. it should be.

Course the reality is liable to be the issue is some combination of all that has been suggested. I would put a lot of credence to what NIWolfman says cause time and time again he's proven himself in here to hit the ball in the pocket most often.
 
Last edited:

vwaudiwelder

New member
Aug 31, 2015
8
0
0
Ohio
Hello all, I do appreciate the advice. I will try burping the system as has been suggested. I don't think I need to swap out the water pump from my other 482 or purchase a new one.

I noticed the functioning thermostat I have has a small red rubber plug on the flat disc surface. I have also read of others intentionally drilling a hole that essentially mimics this oem capped hole. This hole is to allow any air trapped between it (when closed) and the water pump to escape. I will install this thermostat in place of the shell I have been using and I will carefully remove the rubber cap as well.

I will also try opening the water drain on the block just below the mechanical diaphragm fuel pump to allow any air trapped inside to escape. I will do the same to the temperature switch located on the opposite side of the cylinder head just above the cvt and flywheel. Though both these points are much lower than the highest point (radiator cap) I will try it anyways.

I will also revert back to the original hose routing with the short 90 degree elbow leading from the top radiator outlet directly to the Ninja 250 plastic elbow which retains the radiator cap. I ONLY switched the 2 hoses in order to replicate the Carrier APU I have pictured with my orange text and arrow as well as to match the PDF diagram from the service manual.

I am most certain this radiator is sufficiently sized for this engine as it came supplied with this motor by Carrier. (One item of note is the throttle was intentionally fixed in one spot, 2,500rpm. This was confirmed via a digital tachometer with a magnet bonded to the flywheel. The setscrews have been backed out and idle is maintained at 1,200 as anything lower rattles the teeth out of my head and all the bolts out of the bike. The radiator assembly was tack welded together while I waited to see if there were any pinhole leaks thus making any permanent fabrication pointless. Max rpm seems to climb to 3,700 or so.) I will finish welding the radiator supports and mesh screen since it appears to be ok.

The only item of concern once I solve the immediate overheating I think is the current configuration of the radiator not receiving adequate airflow. I believe the pusher electric fan will evacuate enough heat once switched on. If not, I can always install a louvered panel just over/in place of the expanded metal currently there to help force air through. If this were done I would need to switch the polarity on the fan to pull air through the cooling fins to assist in moving the air in the same direction.

I hope burping the system solves this issue. I expect the upper and lower radiator hoses to be within 40 degrees or so. Most importantly, I hope the lower hose does not remain at ambient temp while the upper is ready to burst as is the case now. If this burping does not work I don't know what will.

I will also try removing the rubber cap covering the Ninja 250 overflow nipple and connecting it to a expansion tank of some sort. I do not currently have a return port anywhere in the cooling system. I will need to install a "T" fitting for this somewhere lower.

Anything different I should try? Thank you everyone.
 

coachgeo

Well-known member

Equipment
L225 w/woods Few Mowers & Back Blade, D722 in Motorcycle (Triumph Tiger), LMTV
Nov 16, 2012
2,460
32
48
Southern OH
....I will also try removing the rubber cap covering the Ninja 250 overflow nipple and connecting it to a expansion tank of some sort. I do not currently have a return port anywhere in the cooling system. I will need to install a "T" fitting for this somewhere lower. ????.
:confused: lost here by what you mean by this? Are you referencing the overflow bottle? There is no additional return for this. Coolant flows out into the bottom of the bottle and coolant gets sucked back thru same line back into the coolant system as things cool. But I'm guessing you know that and I'm just misunderstanding you.

Oh and you asked about my bike...... it's in TX* sadly but come up this way anyway once yours is running. I'm near Dayton.

Oh and I know where another guy in OH has z482 mated to a BMW trans for sell at a fair price. Perfect for anyone who wants to build a shaft drive bike. He was going to do a bobber but I think that engine is too small for that. A shaft drive "small" adventure bike, or light shaft drive street bike sounds better for that combo.

*anyone in TX coming my way got room for large Adventure bike, engines and other spare parts...... Im desperately trying to find an economical way to get it and all that I have stored there up to here. I now work by the hour and would loose incredible income taking time to go get it, ..... income I need to finish the project. Then there is renting something to get it with etc. on top of that.
 
Last edited:

Tooljunkie

Well-known member
Lifetime Member

Equipment
L1501,home built carry all, mini plow blade.
May 13, 2014
4,150
27
48
59
Lac Du Bonnet, Manitoba,Canada
There is no flow into or through rad. If engine temp rises beyond operating temp and lower rad hose is ambient, then pump isnt operating or rad is not allowing sufficient flow.
Overflow resevoir requires a specific cap,air in pressurized system will purge through cap. As fluid reaches cap it seals causing pressure to build.
Throttling up engine with air in system will draw in coolant and burp air out through reservoir.
Cap along with raising boiling point, will also prevent suction from water pump collapsing rad hose. Is a common problem in automotive systems.

As rpms increase,a low pressure is created,as engine approaches idle , air purges. So a constant rpm will not purge air as well as simulating driving conditions.

Coolant must be suitable for diesel engine, containing anti-foaming agent which could cavitate water pump. Will also foam near cylinder walls.

Many small engine shops use something called an airlift device for filling cooling sysyems,creating vacum to load coolant under vacuum thus eliminating airlocks.

Forgot about all this stuff, except in the last weeks i have had to troubleshoot some odd cooling problems.
 

vwaudiwelder

New member
Aug 31, 2015
8
0
0
Ohio
Hello all, I have some good news. The lower radiator hose is no longer staying at ambient temperature. The upper hose is no longer ready to burst at 230 F. Here is what I did differently: First I rerouted the hoses in the logical manner as they were initially: top radiator outlet to thermostat housing, lower radiator outlet to bottom of water pump- Forget what the routing is on my 2nd Carrier APU unit as it makes no sense whatsoever.

From the advice of others that have drilled a small bypass hole in their thermostats, I removed the small silicone plug from the oem drilled hole in my functioning cap that cracks open at 160 F. With the bike leaned over on the kickstand I positioned this hole up to the highest relative position so as to allow air to escape. I am no longer using the gutted out thermostat shell.

In the spirit of bleeding air pockets I also removed the temperature sending unit atop the head just above the flywheel nearest the injectors. I opened the draincock on the back side of the block nearest the oil dipstick.

I think the most important of all, I allowed the engine to heat up with the radiator cap off. I also filled the system and routinely squeezed the lower radiator hose in an attempt to remove any and all air that may be trapped in the funky 180 degree copper u bend.

Though water never flowed from the open draincock, I did notice immediately water flowing from the sending unit on the head so I threaded it back in. This has a spade connector and the varying electrical resistance which leads me to believe this is for a temperature gauge, not a fan. Is this correct? I will find a fan switch around 190 and T it off here. I did find another much larger switch just below the alternator/behind the starter. I believe this is the oil pressure switch, correct? Many diagrams I have seen show the oil filter here while mine is just below the injection pump.

I have not installed yet an expansion tank or run both hoses through buckets of water to check for water pump flow. The coolant seemed to be flowing through the upper radiator hoses ok. I did install just above my tachometer readout a Harbor Freight digital temperature gauge with a meat probe thermocouple pressed into the overflow nipple.

Again, I would like to thank you all for your help. I do appreciate it.

Now to get this cvt to fully engage into its highest ratio and stiffen the springs in forks somehow to handle the weight of this beautiful iron beast....:D
 

Attachments

coachgeo

Well-known member

Equipment
L225 w/woods Few Mowers & Back Blade, D722 in Motorcycle (Triumph Tiger), LMTV
Nov 16, 2012
2,460
32
48
Southern OH
....

Now to get this cvt to fully engage into its highest ratio and stiffen the springs in forks somehow to handle the weight of this beautiful iron beast....:D
Don't know if there are any tractor folk here who dabble with CVT's also. Speak up folk if you do.

Over at Suckindiesel there is a whole CVT forum to read up on and address CVT questions. What CVT you have Comet?
 

vwaudiwelder

New member
Aug 31, 2015
8
0
0
Ohio
Hello Coachgeo, yes I have a Comet 40 series. I have taken off the cover to watch the engagement (intermittently) while I ride. I have seen 2 halfway cast holes just opposite either side of the center hole on the secondary/primary clutch. Neither of these holes were drilled all the way through, they are now. I have shifted the spring into the hole providing the least amount of tension.

I have not yet disassembled the drive/primary clutch. It engages the drive belt at 1,600 rpm however it is NOT fully pulling the belt up into the highest possible circumference even when the engine is screaming at 3,700 rpm. This is only providing for a 45-50 mph top speed as of yet. I suppose I can somehow add weight to the existing weights inside. I have yet to find from a kart supplier heavier weights. I don't imagine why the oem weights are not fully allowing the belt to be grabbed and shifted to the outermost circumference when at full speed? If I were to add/replace the weights for something heavier then I am concerned the engagement rpm will significantly be reduced. If I set the idle lower than 1,000 to compensate I think the whole bike will rattle itself into pieces on the ground.

Just to clarify, coolant fan switches are on/off while temperature gauges resistance varies based upon temperature? I have seen some with two prongs meant to pass power while others (like mine) have a single prong that only provide a ground to an already powered up fan. It would be a good idea to get this fan going since there is not much airflow. I will see if I can find a panel with louvers at the local scrapyard.

Thanks again everyone.
 

Attachments

Last edited:

coachgeo

Well-known member

Equipment
L225 w/woods Few Mowers & Back Blade, D722 in Motorcycle (Triumph Tiger), LMTV
Nov 16, 2012
2,460
32
48
Southern OH
Hello Coachgeo, yes I have a Comet 40 series. I have taken off the cover to watch the engagement (intermittently) while I ride. I have seen 2 halfway cast holes just opposite either side of the center hole on the secondary/primary clutch. Neither of these holes were drilled all the way through, they are now. I have shifted the spring into the hole providing the least amount of tension. ....
check with these guys for their suggestion of best set up. Before you contact them look close at the spec's of powercurve of the engine. http://www.m-k.com/pdf/Z482.pdf

This shows your best torque is between 2400 and 2900rpm and highest HP (but lower torque) at 3600. They probably don't deal with diesels as much so this information may help guide them to thinking "diesel/torque" instead of petrol RPM. Petrol takes more RPM to reach torque figures of diesel and torque is what actually moves you. Granted all this I'm still trying to get my head around.

You probably will have to change sprockets as part of the package to make it all work right.

http://www.mfgsupply.com/gomini/gominiclutch/gominiclutchtorq.html
 
Last edited: