Summit 3rd Function Kit Install on Kubota B2650

B737

Well-known member
Lifetime Member

Equipment
LX3310
Jun 9, 2019
2,024
2,194
113
New Jersey
I can’t help you Dave but hopefully our member eserv will drop by and shed some light. He is a wealth of knowledge when it comes to these 3rd function systems and he’s the one that caught my install mistake and explained some things to me.

Your install came out incredibly clean and polished.

I’m interested to learn the community input on your points.
 

bird dogger

Well-known member
Vendor Member

Equipment
Kubota B2650 and lots of other equipment
Feb 24, 2019
1,571
1,416
113
North Dakota
I can’t help you Dave but hopefully our member eserv will drop by and shed some light. He is a wealth of knowledge when it comes to these 3rd function systems and he’s the one that caught my install mistake and explained some things to me.

Your install came out incredibly clean and polished.

I’m interested to learn the community input on your points.
I'm curious, too, B737. I'm not too worried about it. But would like to know the reasoning behind the difference in the listed specs vs. the data plate.

Thanks for the compliment! Other than the hose clamp and valve guard fabrications it was just to sort out and follow instructions. Anybody else interested in doing it themselves can expect the same results. :D Seeing these more detailed pics than what's in the instruction sheet should be a help in showing that it's not that difficult. And it appears to be the same procedure for most any setup. The more we learn, the more we know. :)
Regards,
David
 
  • Like
Reactions: 1 user

bird dogger

Well-known member
Vendor Member

Equipment
Kubota B2650 and lots of other equipment
Feb 24, 2019
1,571
1,416
113
North Dakota
Here's the last of the install. The 25 foot roll of hose protector sleeve was delivered and installed.
3rd Function Hoses.jpg

Hose Protector Sleeves.jpg

25 feet covered all four hoses completely with 6 inches to spare. :D

David
 

B737

Well-known member
Lifetime Member

Equipment
LX3310
Jun 9, 2019
2,024
2,194
113
New Jersey
did you have to take the ends off to install the protective sleeve? do you have a link to that sleeve? came out awesome. No way any dealer would have done this nice a job on your machine.
 

bird dogger

Well-known member
Vendor Member

Equipment
Kubota B2650 and lots of other equipment
Feb 24, 2019
1,571
1,416
113
North Dakota
did you have to take the ends off to install the protective sleeve? do you have a link to that sleeve? came out awesome. No way any dealer would have done this nice a job on your machine.
I did have to take one end off of the hoses as I wanted the sheath to not be so loose and baggy on the hoses. (Plus, it's cheaper. :D)

Rather than provide a link that might not work later, here's what was done.
I just googled nylon hose sheath, sleeve protector to see what would pop up.

My hoses were roughly measured and was pretty sure 25 FT would be really close to completely cover the hoses and would need something with an I.D. of 1 inch minimum.

I wound up going to Ebay and with this description: 25FT Nylon Protective Sleeve Sheath Cable Cover Welding Tig Torch Hydraulic Hose

You can also narrow the "hits" by including the diameter you'd like. I chose 1 inch ID.

Here's the specs on the abrasive nylon sheath that I purchased:
Material: Nylon Abrasive
Color: Black
Diameter: 27mm/1.06''(appr.)
Width: 4cm/1.57''(appr.)
Length: 7.5m/25ft(appr.)
Nylon Protective Sleeve.jpg

I picked a seller with a better rating that had it in stock in the USA and for $14.87 it was delivered to the mailbox. The local parts dealer didn't stock that size or I would've bought it locally.

Thanks again for the compliments! I'm pretty pleased with the way it turned out. And there was certainly nothing complicated in doing it. Hopefully others will see that now too and decide to tackle it themselves and save some money for other things!

I'd be happy to answer any questions or provide more pics, details, hose clamp details, etc.

Regards,
David
 

Cambo

New member
May 25, 2020
17
0
1
100 Mile House
I did have to take one end off of the hoses as I wanted the sheath to not be so loose and baggy on the hoses. (Plus, it's cheaper. :D)

Rather than provide a link that might not work later, here's what was done.
I just googled nylon hose sheath, sleeve protector to see what would pop up.

My hoses were roughly measured and was pretty sure 25 FT would be really close to completely cover the hoses and would need something with an I.D. of 1 inch minimum.

I wound up going to Ebay and with this description: 25FT Nylon Protective Sleeve Sheath Cable Cover Welding Tig Torch Hydraulic Hose

You can also narrow the "hits" by including the diameter you'd like. I chose 1 inch ID.

Here's the specs on the abrasive nylon sheath that I purchased:
Material: Nylon Abrasive
Color: Black
Diameter: 27mm/1.06''(appr.)
Width: 4cm/1.57''(appr.)
Length: 7.5m/25ft(appr.)
View attachment 42306

I picked a seller with a better rating that had it in stock in the USA and for $14.87 it was delivered to the mailbox. The local parts dealer didn't stock that size or I would've bought it locally.

Thanks again for the compliments! I'm pretty pleased with the way it turned out. And there was certainly nothing complicated in doing it. Hopefully others will see that now too and decide to tackle it themselves and save some money for other things!

I'd be happy to answer any questions or provide more pics, details, hose clamp details, etc.

Regards,
David
I am not 100% sure but if I understand correctly the T port is tank and the pressure on that side of the valve is much lower than the pressure ports?
 

Petey Kubota

New member

Equipment
B2601 Kubota loader back hoe
Feb 9, 2021
8
2
3
Milford PA
Now to finish installing/bolting the backhoe quick couplers in place. These pics show the following: the same hole location where the original pipe bracket (removed) was bolted to. (the new bracket mounts to the inside of the backhoe subframe.) The hose coming from the Summit valve T port gets connected to the new adapter/bracket and the original quick coupler. And finally, the hoses all made up and bracket bolted in place. Don’t forget to put those hose caps over the hose before you attach the quick couplers!! :eek:
View attachment 42136

View attachment 42137

View attachment 42138

View attachment 42139

At this point you could actually use your tractor again as you've completed your hydraulic loop circuit from the PB to the Summit valve and back to the tractor's tank through the backhoe or the 3 pt. hitch depending on your situation. If you have tools ready to go, a clean table top to work from, and the right parts laid out.....the process up to now could be done in a few hours or less. And the tractor is now back in service....just not 3rd function ready.
More to follow!

Next up: Loader bracket, front quick couplers, hoses
Hi there great job on the instructions and pictures. I am about to install my new Summit Third function valve on my B2601 with a factory backhoe and could you explain in depth how to hook up the plumbing just on the backhoe hose. What is different than the instructions without the backhoe? Maybe a drawing and I wont hold you to the art work. LOL Thank You in advance
Pete
 

bird dogger

Well-known member
Vendor Member

Equipment
Kubota B2650 and lots of other equipment
Feb 24, 2019
1,571
1,416
113
North Dakota
Hi there great job on the instructions and pictures. I am about to install my new Summit Third function valve on my B2601 with a factory backhoe and could you explain in depth how to hook up the plumbing just on the backhoe hose. What is different than the instructions without the backhoe? Maybe a drawing and I wont hold you to the art work. LOL Thank You in advance
Pete
See post #5 through #10, with the pics and the description. In a nutshell: You remove and discard the hard line between the PB port and your backhoe quick coupler. The Summit valve is now connected between these two points. You need that adapter (most likely) to adapt the summit hose's JIC fitting to your backhoe quick coupler that's mounted at the rear of your tractor. (most likely its a NPT fitting.) I chose to weld a little bracket to that adapter fitting so it could be mounted in the same spot as the hard line pipe connector and quick coupler formerly was. Your backhoe to tank return line is already done since your backhoe is installed and functioning. Hope this helps you. It becomes more apparent once you get into it.
Ask away if you have more questions!! :)

One thing that might help is to separate the kit's parts into the 3 separate areas of the install. 1. Installing the valve between the PB port and the backhoe quick coupler. 2. Installing the hoses and hookups between valve and the front of your loader. 3. Installing the relays, control handle and power hookups.

Tackle each area separately.
 
Last edited:

Petey Kubota

New member

Equipment
B2601 Kubota loader back hoe
Feb 9, 2021
8
2
3
Milford PA
See post #5 through #10, with the pics and the description. In a nutshell: You remove and discard the hard line between the PB port and your backhoe quick coupler. The Summit valve is now connected between these two points. You need that adapter (most likely) to adapt the summit hose's JIC fitting to your backhoe quick coupler that's mounted at the rear of your tractor. (most likely its a NPT fitting.) I chose to weld a little bracket to that adapter fitting so it could be mounted in the same spot as the hard line pipe connector and quick coupler formerly was. Your backhoe to tank return line is already done since your backhoe is installed and functioning. Hope this helps you. It becomes more apparent once you get into it.
Ask away if you have more questions!! :)

One thing that might help is to separate the kit's parts into the 3 separate areas of the install. 1. Installing the valve between the PB port and the backhoe quick coupler. 2. Installing the hoses and hookups between valve and the front of your loader. 3. Installing the relays, control handle and power hookups.

Tackle each area separately.
Thank You
 
  • Like
Reactions: 1 user

Petey Kubota

New member

Equipment
B2601 Kubota loader back hoe
Feb 9, 2021
8
2
3
Milford PA
Different 3rd function kits, options and components were considered before purchasing the Summit kit specific for the B2650/B3350. I was interested in Everything Attachments grapple so I started my search there. They use the WR Long valve and I was referred to Josh (at WR Long) for some answers to my questions. Unable to answer any specific questions about the B2650 system, Josh was adamant that the 3rd function valve was to be installed directly after the loader valve's power beyond port and before any backhoe or other hydraulic attachments. I understood it to be because of potential back pressures and possible seal blowout. I'm still not sure if that made sense or not. But that kit was higher priced than others and maybe not Kubota B2650 specific with the backhoe attachment.

Summit Hydraulics offers kits made for the B2650/3350, a more universal kit, and some that only include the valve, controls and a few fittings (you supply mounts, hoses, etc.). One difference between the valves is in how they can be plumbed into your tractor's hydraulics. When I spoke with Patrick and asked about my situation (with a backhoe) he said either type would work. Their B2650 kit was model specific, the others not. The B2650 kit's valve block would be a cleaner install with the hose layout. The universal kit could be plumbed a little differently with a backhoe option on the tractor. Questioned again about the difference in plumbing, Patrick said either would work for me.

Here's the install diagrams for the two different valves (found on their website):
View attachment 42206 This B2650 kit is plumbed in like this first diagram with the Valve T port going to the backhoe input and the backhoe return line feeding the 3 pt hitch and then to hydraulic (tank) reservoir.

View attachment 42207 Notice the use of the optional N Port to feed the backhoe or a different hydraulic attachment with this universal valve.

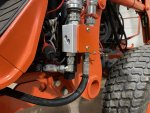
In the end, Summit's B2650 3rd Function Kit (TFK7) was ordered. Here's some specs from their website listed for that model: Valve Body Features Max Operating Pressures: (Ports) P=5080 PSI T=3050 PSI A&B=5080 PSI 3000 PSI RATED

Here's that speedbump: After the install and getting pictures ready for this thread, I noticed this picture of the valve's data plate. Do you notice what I did? Pay attention to the port max pressure ratings.
View attachment 42208

Oh CRAP! I called and spoke with Patrick again and told him of the discrepancy between their website and the data plate info. Strange, he said, that data plate must have a misprint. (I didn't find that very plausible). Asked if their valve was going to cause me trouble in my situation, Patrick assured me it was not. He said a large number of them have been installed with backhoes and none had problems. I was not to worry. What to do??? Since Summit says not to worry, I'll go with it as is and see what happens.

If you haven't spotted the discrepancy yet, compare the Max T Port pressure rating listed on their website (see above) versus the T port rating on the valve data plate. (data plate: T=1450 PSI) That's quite a difference. And much less than the B2650 max hydraulic pressure. Maybe there's such a safety factor built in that in this case it doesn't matter? But their website disagrees with their product's stated pressure rating. And nowhere on their website does it say that this kit is not to be used when a backhoe is installed.

The WR Long FAQs state to install their valve exactly the same as this Summit valve. See question #6 (the 2nd #5 :D)
https://www.wrlonginc.com/help

And even more strange, Messick's Land Pride instructions:
https://www.messicks.com/part/380-168a/b2650-b3350-third-function-valve-kit
(see install Instructions pdf) are exactly the same as Summit's except for the brand name on the instruction sheet. Even the pics in both are the same photo copied pics and almost verbatim instructions to follow.

Summit gladly emailed me pdf copies of their install instructions prior to the purchase.

I couldn't find a pdf of the WR Long instructions to see if they were identical. Chances are they could be, too.

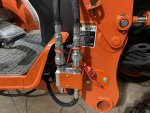
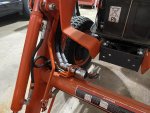
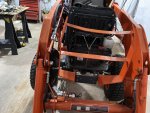
In the end, maybe all is well. The Summit kit was easy to install, complete, and even worked when installed with a backhoe attachment. They could've included a couple LARGE tie wraps to secure the hoses on the loader arm itself but I like my homemade clamp better anyway. No biggie!

All the 3rd function systems that I could find for my situation on the compact tractor apparently use the same style with the simpler plumbing. Do the D03 subplate type valves have T ports rated for full tractor hydraulic pressures? Perhaps the hydraulic gurus reading this can comment on and explain the T port discrepancy and the reason for the two different valve styles???

The grapple arrives shortly but it might be a while til things dry up enough to use it. Until then, fingers crossed. :confused:
Dave,
I wanted to thank you for your detailed instructions. My B2601 was slightly different but not far off and thanks to you it was easy to install. All works great with a little bit of heading to the Hydraulic shop to change out a defective quick connect on my plow. I am ready for the snow.

Thanks
Pete
 

bird dogger

Well-known member
Vendor Member

Equipment
Kubota B2650 and lots of other equipment
Feb 24, 2019
1,571
1,416
113
North Dakota
Dave,
I wanted to thank you for your detailed instructions. My B2601 was slightly different but not far off and thanks to you it was easy to install. All works great with a little bit of heading to the Hydraulic shop to change out a defective quick connect on my plow. I am ready for the snow.

Thanks
Pete
Hey, Pete! Great to hear your install went well, albeit with finding the defective quick connect. The best part of doing the install oneself is knowing how it's all put together and functions! Makes troubleshooting much easier in the future, too.

And...."You're more than welcome!!" Knowing it helped you makes it all worthwhile.
David
 

BillsLX2610

New member

Equipment
LX2610SU
Nov 23, 2021
3
0
1
Arkansas
Thanks for making this writeup as the instructions that came with the kit were very generic. I also have a BH77 on my 2610 and was really trying to figure out the lines until you made it so simple. The only part not plug and play was making a new mount for the line and welding that connector to it. I do agree with the lines being long in almost every case. It will be tough not to take them all off and have them custom made the correct length. Thanks again!
 

bird dogger

Well-known member
Vendor Member

Equipment
Kubota B2650 and lots of other equipment
Feb 24, 2019
1,571
1,416
113
North Dakota
Thanks for making this writeup as the instructions that came with the kit were very generic. I also have a BH77 on my 2610 and was really trying to figure out the lines until you made it so simple. The only part not plug and play was making a new mount for the line and welding that connector to it. I do agree with the lines being long in almost every case. It will be tough not to take them all off and have them custom made the correct length. Thanks again!
Bill, you're more than welcome!! Glad it helped you out a little with your install. You're not alone in finding out that the box of parts and generic instructions seem a little daunting to understand at first. Much easier to see when the install is divided up into sections and with some clear pics, isn't it? :)

Knowing that it's helped some people with doing their own install has certainly made it worthwhile!

@Matt Ellerbee did his install on his LX2610 and added some extra 90° fittings to the valve body to clean hose routing up a little bit better. You can see his install here Summit 3rd Functiion on LX2610
When my hoses need attention or replacement I'll add those 90° fittings and shorten them up to a better fitting length.

David
 
  • Like
Reactions: 1 user

BillsLX2610

New member

Equipment
LX2610SU
Nov 23, 2021
3
0
1
Arkansas
David,
Everything has been going well except for an issue where I let a line to the grapple get pinched..oops. One thing I noticed after the install and using the backhoe is it seems slower than before, almost like there has been a flow reduction. I probably have about 20hrs using the backhoe since the install and it just seems slower. Did you notice anything like this?
 

bird dogger

Well-known member
Vendor Member

Equipment
Kubota B2650 and lots of other equipment
Feb 24, 2019
1,571
1,416
113
North Dakota
David,
Everything has been going well except for an issue where I let a line to the grapple get pinched..oops. One thing I noticed after the install and using the backhoe is it seems slower than before, almost like there has been a flow reduction. I probably have about 20hrs using the backhoe since the install and it just seems slower. Did you notice anything like this?
Bill, I really don't think I encountered any flow reduction to the BH77 after installing my Summit valve. If there was, it must be so minimal that I can't tell the difference. It should be a simple hydraulic "loop" through the Summit valve back to your backhoe connections. Do you suppose your backhoe couplers are somehow limiting your flow by not engaging properly again? Hydraulics is not my strong point.

Thinking about my install more.....even with combined motions there didn't seem to be any noticeable slowing of operations that I could tell. Other than what combining motions will slow it down originally before the 3rd function install.

Sorry I can't help you more. But something seems amiss in your setup. Maybe @Matt Ellerbee will chime in? You could post your question separately in a new thread by you and somebody with more knowledge will respond.
 

BillsLX2610

New member

Equipment
LX2610SU
Nov 23, 2021
3
0
1
Arkansas
David,
That is what I was thinking, no way for this to be the case. Maybe its all in my head, I was just wondering if the adapters and fittings might have a smaller orifice and caused this, the power seems just as good as before though.
 

TheOldHokie

Well-known member
Lifetime Member

Equipment
L3901/LA525, B7200DT/B1630, G2160/RCK60, G2460/RCK60
Apr 6, 2021
6,900
3,328
113
Myersville, MD
windyridgefarm.us
David,
That is what I was thinking, no way for this to be the case. Maybe its all in my head, I was just wondering if the adapters and fittings might have a smaller orifice and caused this, the power seems just as good as before though.
This is an open center system with a fixed displacement pump. Reducing the size of the plumbing will not reduce the rate of flow unless you make it so small that you generate enough restriction to cause the pressure reliefs to open and unload to tank. It will however increase the velocity of the oil flow through the system which means more heat and turbulence is generated.

Dan
 
Last edited:

Nipmunc

New member

Equipment
Kubota B2650
Apr 9, 2022
9
8
3
Uxbridge, Ma
Dave,

I wanted to thank you for the great photos and narratives. It really made the job go smooth and really helped interpreting the instructions that came with the kit. The only thing that threw me off was the picture of the tank return. I thought that I had to change that also but I do have the backhoe attachment so I didn’t need to. The picture just threw me off. Here are some photos of my install.

Thanks
Tom
 

Attachments

  • Like
Reactions: 1 user