Guys..If you must wear regular clothes (while welding or grinding) make sure they are mostly cotton. Poly blends will burn hotter thus burn deeper into you skin.I do not like sweating either, at all but thankfully the weather up here hasn't been shorts and t shirt weather just yet, but it is getting closer by the day and I'm not too excited about it I prefer fall/winter
My skin is also flame retartedant, but not very burn resistant as I found out in the demo saw incident
On the braces the good news is they will certainly be strong enough, albeit a little bulkier and harder to work with
Kubota b7100 FEL build on a budget
- Thread starter trial and error
- Start date
And that is also a good reason to wear leather boots. Some slag lands on your tennis shoe and your foot will get a burn.Guys..If you must wear regular clothes (while welding or grinding) make sure they are mostly cotton. Poly blends will burn hotter thus burn deeper into you skin.
trial and error
Well-known member
Equipment
B7100dt manual trans. homemade FEL, 4 way hydraulic dozer blade
I read that as."if you must wear clothes"Guys..If you must wear regular clothes (while welding or grinding) make sure they are mostly cotton. Poly blends will burn hotter thus burn deeper into you skin.

 , I'm like no I'm definately wearing clothes lol in all seriousness I try to wear only cotton, the pants I was wearing in the demo saw incident where a thin canvas poly blend and they melted as much as they burned, it didnt feel great.
Also a must, I dont play around with footwear in the garage or at work, always composite toe and never sneakersAnd that is also a good reason to wear leather boots. Some slag lands on your tennis shoe and your foot will get a burn.
trial and error
Well-known member
Equipment
B7100dt manual trans. homemade FEL, 4 way hydraulic dozer blade
Happy Easter all, I'm not accomplishing anything this weekend between family time and a day in NYC yesterday (yuck). Hoping to get back on it this week. Question on hose diamter, will 1/4" be enough for the entire runs being that im using 1" rods on the cylinders? Or should I run 3/8" until the tee's. The outputs on the valve are only 1/4 and my fittings are JIC6 until the valve and quick disconnects which are 1/4" npt
North Idaho Wolfman
Moderator
Staff member
Lifetime Member
Equipment
L3450DT-GST, Woods FEL, B7100 HSD, FEL, 60" SB, 743 Bobcat with V2203, and more
Yes 1/4" is fine, it's all really dictated by your pump and it's volume output GPM, and yours is low enough to safely use 1/4" without any restrictions.
trial and error
Well-known member
Equipment
B7100dt manual trans. homemade FEL, 4 way hydraulic dozer blade
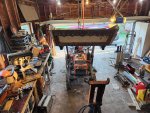
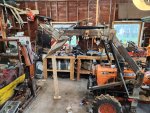
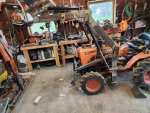
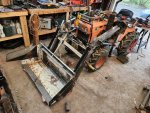
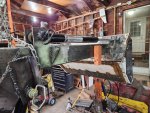
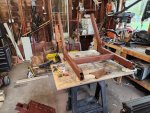
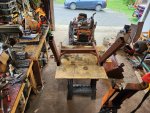
Made some progress this week, evenings after work,the result is my scrap metal "bucket" hanging from the lift arms (kinda) its only got one bracket on each side tacked on enough to raise it and lower it and get a feel for how the final product is going to work. With any luck I'll get those brackets and the other ones bombed on this weekend and get the curl cylinders figured out, the last 2 of the four cylinders should be in tomorrow. And this thing may finally take some kind of shape this weekend (maybe not a pretty one) but a shape none the less, at least resembling the final product. Hopefully in the following weeks I can disassemble prime the metal, and get my hoses figured out. The painting of the whole thing may have to wait till the fall. Projects are stacking up and I'm running out of time before summer hits full swing. Perhaps that will let me get a feel for how. Everything works, or doesn't and let me make any corrections before final paint any suggestions on final paint color I'm thinking either black or orange but my cylinders are black soo.. yes I'm getting ahead of myself
Attachments
-
 732.1 KB Views: 235
Cool. Get a side-on shot of your lift cylinder end placements, and did you measure the lift height with it how it is?
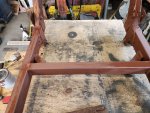
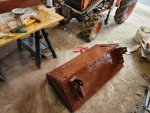
The factory bucket on my B219 is a 'round back' bucket and i have heard of people making round back buckets using different kind of tanks as material donors, so a while back i picked up an old welding gas bottle of some kind (been ventilating for years..) which turns out is only the right size to make maybe a ~36-38" bucket for a small garden tractor. More recently i picked up an electric water heater off the side of the road and a week or so back i finally got the cutoff wheel out and zipped off the shell and insulation to reveal the actual tank, and it does seem like a perfectly good donor to replicate something very close to my factory 48" b219 bucket, with the addition of a flat bottom section and some side walls.
I haven't done it yet and talk is cheap, but if you decide at some point you want to build another bucket, it's an idea.
trial and error
Well-known member
Equipment
B7100dt manual trans. homemade FEL, 4 way hydraulic dozer blade
ICool. Get a side-on shot of your lift cylinder end placements, and did you measure the lift height with it how it is?
The factory bucket on my B219 is a 'round back' bucket and i have heard of people making round back buckets using different kind of tanks as material donors, so a while back i picked up an old welding gas bottle of some kind (been ventilating for years..) which turns out is only the right size to make maybe a ~36-38" bucket for a small garden tractor. More recently i picked up an electric water heater off the side of the road and a week or so back i finally got the cutoff wheel out and zipped off the shell and insulation to reveal the actual tank, and it does seem like a perfectly good donor to replicate something very close to my factory 48" b219 bucket, with the addition of a flat bottom section and some side walls.
I haven't done it yet and talk is cheap, but if you decide at some point you want to build another bucket, it's an idea.
'll get some side shots maybe over the weekend, they are going to be tight becuase the garage is such a giant mess from this project and others. I didn't get a measurement on bucket height just yet but I think it's somewhere between 66 and 68 inches could be a few inches off from that, I'll have to check that out Saturday, w/e it is it is, thankfully most of its work will be at my house and not loading trailers but if I come up short on the height for my brother's trailer I'll just have to come up with a work around, like using ramps to get the extra lift when loading the traileelr which should be few and far between. Yes I've thought about a "better bucket and it will likely happen but not until late fall or winter it just isn't a high priority right now unless I break this one, which was made out of pure junk I had laying around including the old falling apart Curtis cab (sacrilege) that came with the tractor and that didn't fit me or through the garage door, and an old plow I had made for a lawn tractor a number of years back which was 3/16 plate. This "bucket" was originally designed for the 3ph but that plan went out the window when I started this journey, and it is not too terribly narrow are 44/45 inches so I just figured i would use what I had already made for now. The idea of using a hw tank or similar is intriguing though and thanks for that idea as I had heard of it but didn't know if they where stout enough (says the guy with this current cobbled together mess)
I have not gotten to cutting the angles off the cylinder mounts yet as that can wait and I already know what I have to do with that, I wanted to keep forward progress and deal with that kind of last.
Last edited:
trial and error
Well-known member
Equipment
B7100dt manual trans. homemade FEL, 4 way hydraulic dozer blade
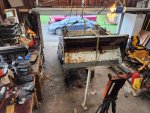
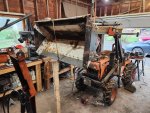
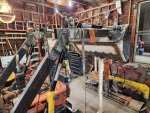
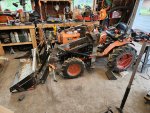
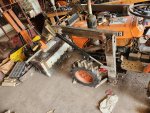
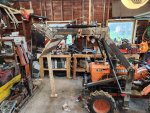
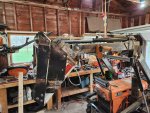
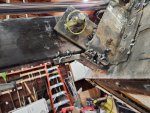
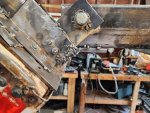
Made some major progress today got the curl cylinders "roughed in" not particularly thrilled but unless I make major changes I'm kinda stuck with what I have. I'm going to see how the current setup works and if I have to revisit it in the fall when it's time to switch the loader for the plow I'll deal with it then. Dump angle and roll back are my two disappointments. both I think will be ok and work but only time will tell. As for roll back the lip of the bucket comes off the ground about 1.5 inches when all the way down and the curl cylinders all the way retracted. if I change that the dump angle gets worse.
The dump angle isn't awfull and I have travel left on the pistons but the cylinder housings themselves come within millimeters of the lift arms when I extend it to a comfortable dump angle. Thankfully with a 3gpm pump I should be able to monitor this pretty easily. Also thankfully most if my material is loose, Stone, mulch, dirt etc snow or wet clay may be a issue but I have a dedicated plow for snow and I have mostly sandy solil which dries quickly so I'm gonna go with what I have for now and see of it works . As for pin height at full lift I'm somewhere around 66-67 inches which is a win in my book
Below are some pictures who doesn't like pictures? Even if they are in a messy disorganized garage. Did I mention I can't wait to get this project at least functional so I can clean up spme of the mess I've made over the last few months.
Attachments
-
 681 KB Views: 234
 -
 735.2 KB Views: 239
 -
 799.5 KB Views: 232
 -
 670.5 KB Views: 241
 -
 822.1 KB Views: 246
 -
 757.5 KB Views: 238
 -
 762 KB Views: 236
 -
 917.6 KB Views: 246
 -
 869.6 KB Views: 240
 -
 760.8 KB Views: 235
Last edited:
North Idaho Wolfman
Moderator
Staff member
Lifetime Member
Equipment
L3450DT-GST, Woods FEL, B7100 HSD, FEL, 60" SB, 743 Bobcat with V2203, and more
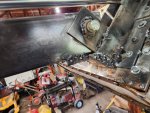
You need to put stops on the bottom of the arms so that the bucket will not roll too far, or you will bend cylinders.
Also where you have the 2x4 and clamp between the arms should have a tube welded in there.
Also where you have the 2x4 and clamp between the arms should have a tube welded in there.
trial and error
Well-known member
Equipment
B7100dt manual trans. homemade FEL, 4 way hydraulic dozer blade
U
And yes I will definitely have to work out some sort of stop for the curl cylinder, thank you for the advice as I was kind of wondering what to do with that. Yes I could probably gamble but one time not paying attention and I will end up with bent cylinders when I could have prevented it with a positive stop. If you have any ideas on placement of those stops please share
Yes the wooden 2x4 is definately temporary, I have a peice of 2x4 steel square tube for that brace. i jjst didnt want to tie the two loader arms tugether till i had 99%of the other welding done on them as its going to make that contraption quite awkward to maneuver.You need to put stops on the bottom of the arms so that the bucket will not roll too far, or you will bend cylinders.
Also where you have the 2x4 and clamp between the arms should have a tube welded in there.
And yes I will definitely have to work out some sort of stop for the curl cylinder, thank you for the advice as I was kind of wondering what to do with that. Yes I could probably gamble but one time not paying attention and I will end up with bent cylinders when I could have prevented it with a positive stop. If you have any ideas on placement of those stops please share
North Idaho Wolfman
Moderator
Staff member
Lifetime Member
Equipment
L3450DT-GST, Woods FEL, B7100 HSD, FEL, 60" SB, 743 Bobcat with V2203, and more
I'll get you some pics later today.U Yes the wooden 2x4 is definately temporary, I have a peice of 2x4 steel square tube for that brace. i jjst didnt want to tie the two loader arms tugether till i had 99%of the other welding done on them as its going to make that contraption quite awkward to maneuver.
And yes I will definitely have to work out some sort of stop for the curl cylinder, thank you for the advice as I was kind of wondering what to do with that. Yes I could probably gamble but one time not paying attention and I will end up with bent cylinders when I could have prevented it with a positive stop. If you have any ideas on placement of those stops please share
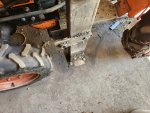
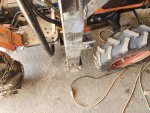
Here's what i did to repair a b219 loader that was missing its original stops.I will definitely have to work out some sort of stop for the curl cylinder, thank you for the advice as I was kind of wondering what to do with that. Yes I could probably gamble but one time not paying attention and I will end up with bent cylinders when I could have prevented it with a positive stop. If you have any ideas on placement of those stops please share
Relevant post from other thread.
trial and error
Well-known member
Equipment
B7100dt manual trans. homemade FEL, 4 way hydraulic dozer blade
Thanks Vigo very thorough thread lots of information on things I should be watching in general, like those stripped out factory holes from using factory bolts with the subframe.Here's what i did to repair a b219 loader that was missing its original stops.
Relevant post from other thread.
Amd definately gave me some idea for a stop
trial and error
Well-known member
Equipment
B7100dt manual trans. homemade FEL, 4 way hydraulic dozer blade
Well, I spent a few hours after work copying Vigos idea for stops. I should have waited to make sure of clearances before bombing them in now I'm left with a bucket that won't pivot past flat as the stops hit the bottom of the arms., I had to dismount the bucket to figure this out. Which isn't exactly easy by myself. Back to the drawing board on this one. Not sure what my work around is going to be but hopefully I can look at it with a fresh outlook tomorrow and come up with something. One step forward two back. I didn't snap any pictures of my epic fail too embarrased right now, but maybe I will tomorrow before I cut them out and try again
What i did was put the bucket as far as i ever wanted it to go before those cylinder rods hit, then to account for any flex i backed it up just a little from that, made the 'stops' touch/hit, and tacked them in place in that position. Then fully welded them in that position.
It's no big deal, it's just time and frustration, but the stuff you learn from mistakes outlasts the suffering and eventually is a 'net gain' in time it saves you down the road.")
It's no big deal, it's just time and frustration, but the stuff you learn from mistakes outlasts the suffering and eventually is a 'net gain' in time it saves you down the road.
trial and error
Well-known member
Equipment
B7100dt manual trans. homemade FEL, 4 way hydraulic dozer blade
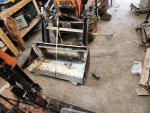
So I think I got the stops figured out. Fresh outlook this evening and I was able to come up with a crude but viable solution to yesterdays failure . I started by cutting the corner out of the very bottom of the lift arms a tiny bit at a time until my current stops would allow the bucket to roll in full motion once again. Once I determined those wheren't a total loss which was a major phew moment for me, I rolled the bucket back a hair more until I had about 1/4" inch of clearance between the cylinder housing and the lift arms and significantly more then a 1/4" on the cylinder rod itself . I didnt want to roll the bucket back too far becuase I'm already not thrilled with my dump angle at full height. But I think this will work and is a good compromise . Once I had my clearances about what I thought was acceptable I tacked a couple peices of scrap metal to the bottom of the lift arms, so that they would contact the stops I put on yesterday. And then the moment of truth......... when I gently released the ratchet strap holding the bucket from pivoting it stopped at the two stops and the aforementioned clearances on the cylinders/lift arms stayed. After all that I was ready for disappointment, there had to be something that went wrong right? Well I'm happy to report that the bucket moved in full motion from all the way rolled back to all the way dumped (hitting the stops) without any interference like I had yesterday. Now I'm pretty sure I can take this thing back apart clean up the crude cuts on the arms, grind and weld the stops permentantly on the bench (welding overhead is miserable). Then put it back together one more time and tack in the cross tube between the arms take it apart again bomb that in solid and maybe, just maybe get some primer put on.
Attachments
-
 678.4 KB Views: 205
 -
 641.5 KB Views: 204
 -
 574.5 KB Views: 214
 -
 655.8 KB Views: 214
 -
 573.3 KB Views: 207
 -
 532.1 KB Views: 199
trial and error
Well-known member
Equipment
B7100dt manual trans. homemade FEL, 4 way hydraulic dozer blade
Well got a few things done last night and today. Made sure my braces between the crossmemeber to which the towers mounted and the trans tunnel still fit and bolted into the trans tunnel. They are crude like most things on this project but they will serve their purpose. I was waiting on hoses today and was going to start priming the parts I could but the hoses I needed to locate the cross member between the arms (up front) showed up around noon so I was able to get the last major peice of steel tacked in before having to call it quits I also am nearing the end of my spool of wire on the welder so I'll have to pick some up tomorrow. I didn't take any time to snap any pictures today or last night, but maybe I'll snag some tomorrow after I weld in that cross member. After that it should just be take it apart, possibly clean some welds up and prime reassemble and fit hoses which I still have to order some of.
trial and error
Well-known member
Equipment
B7100dt manual trans. homemade FEL, 4 way hydraulic dozer blade
I got a fair mount done this afternoon. Got that cross braces welded in "solid" and even added a couple 2x2" gussets in the corners becuase I know this is a critical peice and it won't hurt anything to have some extra lateral bracing on it . I even got some primer slapped on part of the loader arms. I'm just using rustoleum rusty metal primer and a cheapo chip brush after prepping theme talks as best I can. all im trying to accomplish with the primer/paint is to A. Keep the metal from rusting away and B try to polish this turd a little bit. I did cut some of the angle iron cylinder mounts on the towers back. While I was waiting for the welder to cool down this afternoon, first time I've hit the thermal overload on it this whole project which is a little crazy becuase I've not really paid much attention to its 2 minute duty cycle  . I'm actually amazed it's still alive.
. I'm actually amazed it's still alive.Attachments
-
 810.3 KB Views: 200
 -
 783.1 KB Views: 195
 -
 626.4 KB Views: 195
 -
 694.5 KB Views: 197
 -
 737.9 KB Views: 199
 -
 883.2 KB Views: 192
 -
 998.3 KB Views: 202
Almost there. I understand you probably want to put it into use right away, but i wouldn't pick up anything fragile with it for a while. I think some of those welds are going to break loose. Since it's not in operation yet you could try some destructive testing on the things you haven't painted yet, just to get an idea. Take a chisel and a ~3lb hammer and smack some of your welds good and hard. On a good weld you'd get nothing but a ding mark. If anything pops loose, so will the brackets. Of course there is dropping the load, but a possibly more painful form of danger is even if it were to break while you were doing something totally unimportant, if it breaks on only one side it has a chance of twisting everything to a point where it would be hard to put it back straight, especially if one side snags the ground while rolling. Not to mention the slight chance of personal injury, although the loader doesn't even need to break for that, they're dangerous in general, so it's honestly sort of the bottom of my list of reasons in this case.
Is the welder just refusing to sustain an arc or are you letting off the trigger?
Is the welder just refusing to sustain an arc or are you letting off the trigger?