Farmall H restoration

Yooper

Well-known member
Lifetime Member

Equipment
3901 LA525
May 31, 2015
1,464
433
83
NE Wisconsin
Got the block back from being cooked out to get all the scale removed. Started checking the bores and I will have to hone them a bit to get them round again. But what I'm not liking is the counterbores. They vary as much as .005" on a single bore plus the sleeve projection is as high as .010".
IMG_1853.JPG

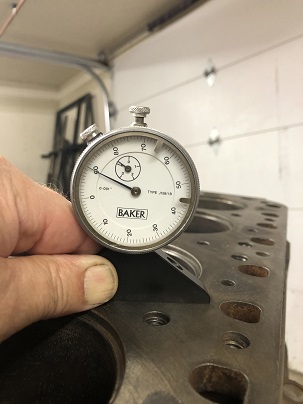
The tolerance is .000"/.005" protrusion for the liner. I could machine the liners down but they would still be riding on the high spots and being pressed down into the low spots when the head is torqued down.
IMG_1854.JPG

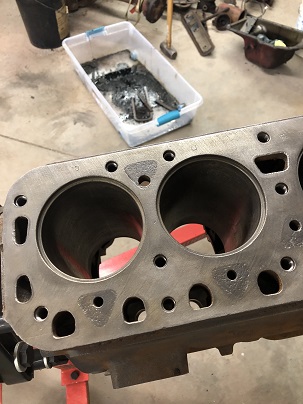
I'm getting that custom counterbore cutter feeling. Too high for my mill unless I install a riser and they are not cheap. Stay tuned...
 
  • Like
Reactions: 1 user

Yooper

Well-known member
Lifetime Member

Equipment
3901 LA525
May 31, 2015
1,464
433
83
NE Wisconsin
Honed the bushings for the wrist pins on my old Sunnen hone. Honing is something I enjoy doing for some reason. Very satisfying when you can hit your marks within a tenth!
IMG_1857.JPG

IMG_1858.JPG

Kind of neat that I'm rebuilding an antique tractor with antique tools.
IMG_1859.JPG

Roughed out the tool I'm making to fix the counterbores. That's a piece of 1045 in the lathe chuck. More to come on this in the next post.
IMG_1860.JPG
 
  • Like
Reactions: 4 users

Yooper

Well-known member
Lifetime Member

Equipment
3901 LA525
May 31, 2015
1,464
433
83
NE Wisconsin
Machined for two solid days and came up with this for truing up the counterbores.
IMG_1862.JPG

I'm using a carbide lathe tool to do the dirty work.
IMG_1861.JPG

IMG_1863.JPG

The depth of cut is set by shimming to bit and the diameter or stick out is adjusted with a set screw in the back of it.
IMG_1866.JPG
 
  • Like
  • Love
Reactions: 1 users

Yooper

Well-known member
Lifetime Member

Equipment
3901 LA525
May 31, 2015
1,464
433
83
NE Wisconsin
Have to be careful setting it in the bore so I don't damage the cutting tip of the bit. Then simply rotate and let the weight of the tool cut the base of the counterbore.
IMG_1868.JPG

Cylinder four had a definite low area. Hard to see in the image but you can kind of see where it is darker.
IMG_1867.JPG

Anyway, I couldn't be more stoked by the way it performed! After cutting with the initial depth I added a two thousandths shim and they all cleaned up quite nice. Tolerance on sleeve stick out is .000"/.005" and I hit it right in the middle at .0025"
IMG_1869.JPG
 
  • Love
  • Like
Reactions: 3 users

Runs With Scissors

Well-known member

Equipment
L2501 TLB , Grappel, Brush Hog, Box Blade, Ballast box, Forks, Tiller, PH digger
Jan 25, 2023
1,856
1,961
113
Michigan
Looking good man.

As the others pointed out, I am jealous of your shop and your skills for sure!

Very impressive.
 
  • Like
Reactions: 1 users

Yooper

Well-known member
Lifetime Member

Equipment
3901 LA525
May 31, 2015
1,464
433
83
NE Wisconsin
Looking good man.

As the others pointed out, I am jealous of your shop and your skills for sure!

Very impressive.
Thanks buddy! Kind of chuckling to myself that I spent two days building that cutter and it only took about fifteen minutes to get the counterbores cut!
 
  • Haha
Reactions: 1 user

Lil Foot

Well-known member
Lifetime Member

Equipment
1979 B7100DT Gear, Nissan Hanix N150-2 Excavator
May 19, 2011
7,287
2,240
113
Peoria, AZ
I spent two days building that cutter and it only took about fifteen minutes to get the counterbores cut!
Been there, done that! :)
 
  • Like
Reactions: 1 user

Yooper

Well-known member
Lifetime Member

Equipment
3901 LA525
May 31, 2015
1,464
433
83
NE Wisconsin
After lightly honing the block to clean up any high spots, I pressed the sleeves in. I prefer this method rather than hammering them in because if there is an issue you feel it sooner. All went in with no drama.
IMG_1872.JPG

IMG_1873.JPG

Measured the pistons and they were anything but consistent. I don't know what type of aluminum these are made out of so I'll have to inquire about clearance.
IMG_1875.JPG
 
  • Like
Reactions: 1 users

Yooper

Well-known member
Lifetime Member

Equipment
3901 LA525
May 31, 2015
1,464
433
83
NE Wisconsin
UH OH! Was getting ready to start working the head and noticed this. Cracked and repaired head. Didn't notice this at first because the head was so dirty. Maybe this repair is good but I'm sorry, its not going back in. Big sigh...
IMG_1876.JPG
 

BAP

Well-known member
Lifetime Member

Equipment
2012 Kubota 2920, 60MMM, FEL, BH65 48" Bush Hog, 60"Backblade, B2782B Snowblower
Dec 31, 2012
2,537
673
113
New Hampshire
UH OH! Was getting ready to start working the head and noticed this. Cracked and repaired head. Didn't notice this at first because the head was so dirty. Maybe this repair is good but I'm sorry, its not going back in. Big sigh...
View attachment 113012
Not uncommon at all for cracked heads in those engines. Particularly after all this time since manufactured. If you are concerned, there are plenty of used ones available to buy to replace it with. With all the work you are doing, I would be looking for a replacement to insure that you have a completely rebuilt, good engine. When you get your engine done, I have one in my H that needs a complete rebuild that I can send you so you can make use of all your machine tools you have put together to do your engine.
 
  • Like
  • Haha
Reactions: 1 users

Yooper

Well-known member
Lifetime Member

Equipment
3901 LA525
May 31, 2015
1,464
433
83
NE Wisconsin
Not uncommon at all for cracked heads in those engines. Particularly after all this time since manufactured. If you are concerned, there are plenty of used ones available to buy to replace it with. With all the work you are doing, I would be looking for a replacement to insure that you have a completely rebuilt, good engine. When you get your engine done, I have one in my H that needs a complete rebuild that I can send you so you can make use of all your machine tools you have put together to do your engine.
The search begins this morning. There is a tractor salvage yard about a half hour away. Going to give them a call. Looking for the gasoline head only. There were three different castings on these heads, gasoline, kerosene and distillate.

Would be happy to loan you the tools for your rebuild.
 

BAP

Well-known member
Lifetime Member

Equipment
2012 Kubota 2920, 60MMM, FEL, BH65 48" Bush Hog, 60"Backblade, B2782B Snowblower
Dec 31, 2012
2,537
673
113
New Hampshire
Are you putting in standard piston and sleeves? Or ones made for a Super H? The Super series piston and sleeves make more power and fit into the same bore in the engine block of a regular H. It used to be a common upgrade for farmers to use when they rebuilt their engines to put in the Super series parts to get more power out of the tractors.
 

Yooper

Well-known member
Lifetime Member

Equipment
3901 LA525
May 31, 2015
1,464
433
83
NE Wisconsin
Are you putting in standard piston and sleeves? Or ones made for a Super H? The Super series piston and sleeves make more power and fit into the same bore in the engine block of a regular H. It used to be a common upgrade for farmers to use when they rebuilt their engines to put in the Super series parts to get more power out of the tractors.
I’m installing the domed pistons that are 3-7/16” instead of 3-3/8”. Seems to be the standard for overhaul kits. The engine had the super H pistons in them so I am assuming the original owner made the upgrade. It did up the compression but the kerosene head still was the lowest compression head of the three. People milled as much as an eighth of an inch off these heads to up the compression. I was planning to do the same but now I might as well invest in the gasoline head.
 

BAP

Well-known member
Lifetime Member

Equipment
2012 Kubota 2920, 60MMM, FEL, BH65 48" Bush Hog, 60"Backblade, B2782B Snowblower
Dec 31, 2012
2,537
673
113
New Hampshire
I’m installing the domed pistons that are 3-7/16” instead of 3-3/8”. Seems to be the standard for overhaul kits. The engine had the super H pistons in them so I am assuming the original owner made the upgrade. It did up the compression but the kerosene head still was the lowest compression head of the three. People milled as much as an eighth of an inch off these heads to up the compression. I was planning to do the same but now I might as well invest in the gasoline head.
Sounds like you should have some good power there when you are all done.
 

Yooper

Well-known member
Lifetime Member

Equipment
3901 LA525
May 31, 2015
1,464
433
83
NE Wisconsin
Found a head on fleabay. Crossing my fingers that there are no cracks. It will get a thorough visual check when it gets here
 

Yooper

Well-known member
Lifetime Member

Equipment
3901 LA525
May 31, 2015
1,464
433
83
NE Wisconsin
Just an update on some progress. Crankshaft is in along with the pistons and camshaft. Checked all the bearings with plastic gauge to confirm clearances.
IMG_1885.JPG

Safety wired the main bolts in my best aircraft style attempt. Don't know if these will pass FAA specs but if this tractor gets air born, I don't think that wiring is going to be my biggest concern.
IMG_1884.JPG
 
  • Like
Reactions: 1 user

Yooper

Well-known member
Lifetime Member

Equipment
3901 LA525
May 31, 2015
1,464
433
83
NE Wisconsin
Seal contact area on the front pulley was worn pretty bad so I decided to install a sleeve.
IMG_1886.JPG

In my experience I want to make the sleeve somewhat substantial. Meaning I don't want to make it a thin wall because they tend to relax too much and in time actually loosen on the shaft. Machining this reminds me that one of these days I have to invest in a good quality boring bar. My favorite finally gave up and I hope to find an equivalent one but so far no luck. But we got through it.
IMG_1887.JPG

Made a shaft to replicate the end of the crankshaft in the lathe so I could turn down the pulley shaft, press on the sleeve and then turn that down to size and polish the surface.
IMG_1888.JPG

IMG_1889.JPG

Once it was finished I could install the front cover. I like to put the cover on loose with the pulley to center up the seal bore before I tighten down the bolts.
IMG_1890.JPG
 
  • Like
Reactions: 1 user

Yooper

Well-known member
Lifetime Member

Equipment
3901 LA525
May 31, 2015
1,464
433
83
NE Wisconsin
Rebuilding the oil pump. Started by grinding the end plate flat in the surface grinder.
IMG_1892.JPG
IMG_1893.JPG

The shaft was worn pretty bad which is common on these engines. So I ordered some 5/8" drill rod and in the mean time installed bushings in the pump housing.
IMG_1895.JPG
IMG_1898.JPG
IMG_1899.JPG

IMG_1900.JPG
IMG_1902.JPG
IMG_1903.JPG

Machined the new shaft and reinstalled the pump with a new spring and piston for the oil pressure relief.
 
  • Like
Reactions: 1 user

Runs With Scissors

Well-known member

Equipment
L2501 TLB , Grappel, Brush Hog, Box Blade, Ballast box, Forks, Tiller, PH digger
Jan 25, 2023
1,856
1,961
113
Michigan
The amount of skill and attention detail to do something like is is insane.

I love reading about it, and kudos to you sir for posting it.'

I am truly impressed.

Keep us updated please
 
  • Like
Reactions: 1 users

GreensvilleJay

Well-known member

Equipment
BX23-S,57 A-C D-14,58 A-C D-14, 57 A-C D-14,tiller,cults,Millcreek 25G spreader,
Apr 2, 2019
10,008
4,114
113
Greensville,Ontario,Canada
dang HOW do you stay FOCUSED on just one project ??
Amazing....
somehow I end up with 10-15 '1/2 done' projects here....