Hello All! Well, I've gotten a ton of help from this site, so I figured it was about time I returned the favor.
Disclaimer: I am by no means telling anyone that this is the way they should do their repair. If you choose to do this, you do so at your own risk. I am simply sharing my experience, and offering another way you MAY want to repair your issue. OK, with that out of the way...
My B7100 developed the dreaded "cam plug fell out, low oil pressure" problem. After reading several guides on it, I really didn't want to tear the tractor that far down just to get the front cover off, and figured that there must be an easier way. Some of you may consider this blasphemy and would never do it in a million years, but I have done similar procedures countless times in the past, and never had a problem. Yes, I drilled a hole in the front cover, and accessed it that way. I tapped it for a 1/4 pipe thread, and plugged it with a pipe plug. I did the same type of thing on my 2001 Z06 Corvette for an oil return line, and that was over 100K miles ago. No issues and still running strong. If this is not your thing, so be it. No problem from my end, and I would never try to convince you to try it my way. If you want to do your repair in a couple of hours instead of a day or two, please read on...
OK, first things first. When you drill holes into any sort of material, you are obviously going to get shavings. You do not want these shavings running through your engine, as they can cause serious, even catastrophic damage. You cannot avoid making shavings, but if you are careful, and methodical, you can control where they go, or more importantly, where they DON'T go. Start with a clean surface. I cleaned mine by spraying on a little engine cleaner, and wiping it off with a rag. Whenever I have to drill a hole in a part that is still on the engine(or whatever I'm working on), I ALWAYS have a helper holding a vacuum hose under, and as close as possible, to the work. I also ALWAYS coat the end of the drill bit with the heaviest grease I can find. Not differential lube, like 80W90, or 90W120, but grease, like you use on your suspension. I always use my cordless 3 speed, on low gear, and go very slowly. This helps prevent the shavings from flying all over; they stay on the bit, as does the grease. I always start with a small bit, and work my up in steps, vacuuming and wiping clean the work surface after EACH AND EVERY step. Additionally, I ALWAYS flush the inside of the work area with engine flush. The engine flush I'm talking about is the kind intended to be added to your oil to flush out all the crud that builds up in an engine if the oil isn't changed often enough. (BTW, I have never, and would never, use this stuff in this manner. It's only going to cause leaks, and break up the crud just enough to get it flowing through your engine) I also ALWAYS add fresh oil and a new filter after the job, start and run the engine for 10 minutes, then drain it, checking for any metal particles. I then add fresh oil and another new filter.
OK, so here goes. I didn't think to start taking pictures of this until I already had the hole drilled, so I'll just try to be as descriptive as possible. To locate where to drill the hole, I looked at the part of the front cover that goes over the cam gear, and noticed that it formed part of a circle, a little more than half a circle, in fact. I determined where the widest section of that part of it was. and made marks on the cover, one mark on each side. (you can see the marks in one of the pictures below. This then, marks the center of that part circle, in one direction at least. Now, I measured the diameter of that circle, and divided by two, then measured that far in from one side to find the dead center of the circle. Using a very light tap with a sharp center punch, I marked the point to start drilling. I coated the tip of the bit with a big glob of grease, had my helper hold the vacuum hose in place, and began drilling. I started with a 3/16 bit, and gradually worked my way up, about 1/8 of an inch at a time. Slow speed, lots of grease and vacuum, and move slowly up in bit sizes, stopping at a 15/32ths bit. Same with the tap, slow and easy, lots of grease and vacuum.
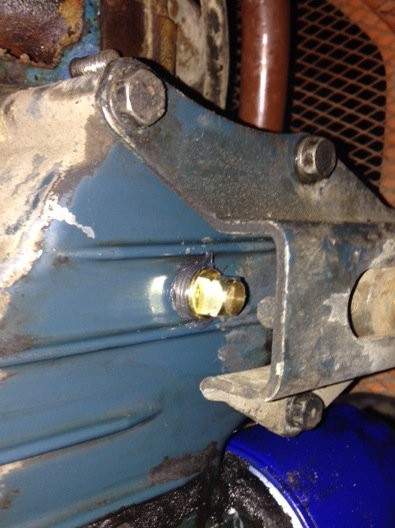
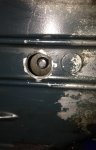
Here is where the pictures start. Here is the hole, after being tapped. I did miss the center of the cam by just a smidge, but was still able to get done what I needed.

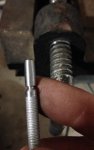
Next is the plug. I wanted to use steel, so that the expansion and contraction rates would be the same as the cam. First, I kept trying different sized drill bits, until I found one that fit very snugly into the hole in the cam. I measured it, and found it to be .191 inches. To make the plug, I used a 1/4 inch nail that I had left over from a project. From experience, I knew they were fairly brittle, and would break without bending a lot. Similar to the steel in a cam, and exactly what I needed in order to be able to snap it off, once in place in the hole in the cam. I don't have a lathe, so I cut off the head and the point, then mounted it in my drill press. I turned on the drill press, and used a 3 cornered file to score it about half way through, so it would break off where I wanted it to. I kept the file moving against the rotation of the nail, and just kept steady even pressure, making slow passes. Next, I had to turn down the diameter to fit the hole in the cam. I again turned on the drill press, and used a fine cut file, and put a little more pressure on the tip of the nail than I did at the back, so as to provide a bit of taper. I kept working it and measuring it, until I had it where I wanted it. The tip was .188, the back (by where the score mark is) was .204 inches. .016 taper over about 3/4 of an inch. That should wedge in nicely. Here is the plug, before I drove it into the cam.

I slid the plug into the hole in the cam, and pushed in on it and wiggled a bit. It only wiggled a couple of times before snugging up. This tells me I have a plug that will wedge nicely. I gave it a few firm but not hard taps with a brass hammer, until I felt it stop. Here is what it looked like before snapping off the "handle".

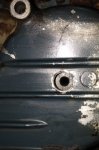
Now is the moment of truth: Did I score it deeply enough? Will it snap, or will it still move in the hole? One firm press downward, and it snapped off cleanly. Using a drift punch with about a 1/4 inch end, I gave it one tap, just to make sure I didn't feel any movement. Solid as a rock. Here is the plug, firmly seated in it's new home:

Once I had the plug seated firmly in it's place, it was time to seal the hole in the cover. I applied a little ultra black to the threads(probably overkill) of a 1/4 inch pipe plug, and threaded it in to the hole in the cover. I got the threads just a little off square with the surface of the cover when I threaded it earlier, but it still threaded in nicely, and has no leaks.
Again, I'm not saying this is the "right" way to do this repair, but I have absolutely no doubts that it will hold up to the test of time. Altogether, I would guess it took me about 2 hours, Including digging through my junk to find a suitable plug stock. It's kinda hard to say, since I didn't really keep track, and I had already taken the tractor apart some, having already started doing it the hard way first.
Ya'll let me know what you think. If I did great, then great, but I can take criticism, too. I promise you you won't hurt my feelings.
Disclaimer: I am by no means telling anyone that this is the way they should do their repair. If you choose to do this, you do so at your own risk. I am simply sharing my experience, and offering another way you MAY want to repair your issue. OK, with that out of the way...
My B7100 developed the dreaded "cam plug fell out, low oil pressure" problem. After reading several guides on it, I really didn't want to tear the tractor that far down just to get the front cover off, and figured that there must be an easier way. Some of you may consider this blasphemy and would never do it in a million years, but I have done similar procedures countless times in the past, and never had a problem. Yes, I drilled a hole in the front cover, and accessed it that way. I tapped it for a 1/4 pipe thread, and plugged it with a pipe plug. I did the same type of thing on my 2001 Z06 Corvette for an oil return line, and that was over 100K miles ago. No issues and still running strong. If this is not your thing, so be it. No problem from my end, and I would never try to convince you to try it my way. If you want to do your repair in a couple of hours instead of a day or two, please read on...
OK, first things first. When you drill holes into any sort of material, you are obviously going to get shavings. You do not want these shavings running through your engine, as they can cause serious, even catastrophic damage. You cannot avoid making shavings, but if you are careful, and methodical, you can control where they go, or more importantly, where they DON'T go. Start with a clean surface. I cleaned mine by spraying on a little engine cleaner, and wiping it off with a rag. Whenever I have to drill a hole in a part that is still on the engine(or whatever I'm working on), I ALWAYS have a helper holding a vacuum hose under, and as close as possible, to the work. I also ALWAYS coat the end of the drill bit with the heaviest grease I can find. Not differential lube, like 80W90, or 90W120, but grease, like you use on your suspension. I always use my cordless 3 speed, on low gear, and go very slowly. This helps prevent the shavings from flying all over; they stay on the bit, as does the grease. I always start with a small bit, and work my up in steps, vacuuming and wiping clean the work surface after EACH AND EVERY step. Additionally, I ALWAYS flush the inside of the work area with engine flush. The engine flush I'm talking about is the kind intended to be added to your oil to flush out all the crud that builds up in an engine if the oil isn't changed often enough. (BTW, I have never, and would never, use this stuff in this manner. It's only going to cause leaks, and break up the crud just enough to get it flowing through your engine) I also ALWAYS add fresh oil and a new filter after the job, start and run the engine for 10 minutes, then drain it, checking for any metal particles. I then add fresh oil and another new filter.
OK, so here goes. I didn't think to start taking pictures of this until I already had the hole drilled, so I'll just try to be as descriptive as possible. To locate where to drill the hole, I looked at the part of the front cover that goes over the cam gear, and noticed that it formed part of a circle, a little more than half a circle, in fact. I determined where the widest section of that part of it was. and made marks on the cover, one mark on each side. (you can see the marks in one of the pictures below. This then, marks the center of that part circle, in one direction at least. Now, I measured the diameter of that circle, and divided by two, then measured that far in from one side to find the dead center of the circle. Using a very light tap with a sharp center punch, I marked the point to start drilling. I coated the tip of the bit with a big glob of grease, had my helper hold the vacuum hose in place, and began drilling. I started with a 3/16 bit, and gradually worked my way up, about 1/8 of an inch at a time. Slow speed, lots of grease and vacuum, and move slowly up in bit sizes, stopping at a 15/32ths bit. Same with the tap, slow and easy, lots of grease and vacuum.
Here is where the pictures start. Here is the hole, after being tapped. I did miss the center of the cam by just a smidge, but was still able to get done what I needed.
Next is the plug. I wanted to use steel, so that the expansion and contraction rates would be the same as the cam. First, I kept trying different sized drill bits, until I found one that fit very snugly into the hole in the cam. I measured it, and found it to be .191 inches. To make the plug, I used a 1/4 inch nail that I had left over from a project. From experience, I knew they were fairly brittle, and would break without bending a lot. Similar to the steel in a cam, and exactly what I needed in order to be able to snap it off, once in place in the hole in the cam. I don't have a lathe, so I cut off the head and the point, then mounted it in my drill press. I turned on the drill press, and used a 3 cornered file to score it about half way through, so it would break off where I wanted it to. I kept the file moving against the rotation of the nail, and just kept steady even pressure, making slow passes. Next, I had to turn down the diameter to fit the hole in the cam. I again turned on the drill press, and used a fine cut file, and put a little more pressure on the tip of the nail than I did at the back, so as to provide a bit of taper. I kept working it and measuring it, until I had it where I wanted it. The tip was .188, the back (by where the score mark is) was .204 inches. .016 taper over about 3/4 of an inch. That should wedge in nicely. Here is the plug, before I drove it into the cam.
I slid the plug into the hole in the cam, and pushed in on it and wiggled a bit. It only wiggled a couple of times before snugging up. This tells me I have a plug that will wedge nicely. I gave it a few firm but not hard taps with a brass hammer, until I felt it stop. Here is what it looked like before snapping off the "handle".
Now is the moment of truth: Did I score it deeply enough? Will it snap, or will it still move in the hole? One firm press downward, and it snapped off cleanly. Using a drift punch with about a 1/4 inch end, I gave it one tap, just to make sure I didn't feel any movement. Solid as a rock. Here is the plug, firmly seated in it's new home:
Once I had the plug seated firmly in it's place, it was time to seal the hole in the cover. I applied a little ultra black to the threads(probably overkill) of a 1/4 inch pipe plug, and threaded it in to the hole in the cover. I got the threads just a little off square with the surface of the cover when I threaded it earlier, but it still threaded in nicely, and has no leaks.
Again, I'm not saying this is the "right" way to do this repair, but I have absolutely no doubts that it will hold up to the test of time. Altogether, I would guess it took me about 2 hours, Including digging through my junk to find a suitable plug stock. It's kinda hard to say, since I didn't really keep track, and I had already taken the tractor apart some, having already started doing it the hard way first.
Ya'll let me know what you think. If I did great, then great, but I can take criticism, too. I promise you you won't hurt my feelings.
Attachments
-
 60.4 KB Views: 1,614
 -
 51.8 KB Views: 1,684
 -
 56.1 KB Views: 1,584
 -
 78.7 KB Views: 1,593
 -
 57.3 KB Views: 1,636
Last edited: