Changing Alternaror

Dan_R_42

Member

Equipment
B7100-D, w/ Sims Cab, B219 FEL, ARPS 70 Backhoe, Oversized R4 Tires, LX2610 Cab
Dec 1, 2010
447
3
18
Taunton, MA
There's a good thread about doing a dual belt setup on a D750 by Sean barr and his install looked great. I would go find that post and read it if you haven't all ready done that.
Thanks Grumpy. I really appreciate your input and the great work you are posting here with your restoration project.

Sounds like I should have done more research before I purchased the single pulley alternator. Guess I'm back to square one now with the wrong alternator for a dual pulley setup. I was hoping there was enough room for it, placing it where the belt tension pulley is currently located without cutting into the side panel. :(
 

Grumpy560

Member

Equipment
1979 B7100D 4WD with B219 loader/ 3 G6200 HST mowers/ JD 310D 4X4 backhoe
Oct 18, 2014
178
0
16
Estill Springs TN,
Thanks Grumpy. I really appreciate your input and the great work you are posting here with your restoration project.

Sounds like I should have done more research before I purchased the single pulley alternator. Guess I'm back to square one now with the wrong alternator for a dual pulley setup. I was hoping there was enough room for it, placing it where the belt tension pulley is currently located without cutting into the side panel. :(
The alternator I have is a 45amp and came with the dual V pulley installed. I bought it off eBay for $113.00 shipped to me. I don't recall the part number but I'll look at it tomorrow and let you know.

Since you have the alternator now, why not go ahead and do a mock up just to see what you will need to do. If you are not using the tractor it wouldn't hurt to remove the hood, side panels and radiator. Doing this will make it easier to do a mock up of the alternator.

The problem with mounting the alternator above the exhaust manifold is the positive battery cable coming off the side will be too close to engine, for my liking anyway. And then there's the CCV tube right in the way but that could be resolved by modifying the valve cover thus moving that entire assembly to the rear or by moving the vent hose to the other side in its current location.

You can delete the belt tensioner pulley but the bracket needs to stay because the engine side panel bolts to it or you can leave it as is and utilize the tensioner by mounting the alternator in one position permanently.

I'm not saying that a single belt set up can't be done without cutting up the side panel. I'm sure there's a way to do it if one has the skills and patience to figure it out. The hardest part of the entire install will be making the mounting brackets.

If you decide to go the dual pulley route I'll do what I can to try and help out.
 

Dan_R_42

Member

Equipment
B7100-D, w/ Sims Cab, B219 FEL, ARPS 70 Backhoe, Oversized R4 Tires, LX2610 Cab
Dec 1, 2010
447
3
18
Taunton, MA
Grumpy, again I thank you for your input. You make some very valid points. I really appreciate you taking the time to break down my best approach.

It looks like it will be a couple weeks before I am able to tear into the B7100 due to the piles of snow & mud I'm currently dealing with. I will do a mockup as you suggest.

I would appreciate it if you could get the info on your dual pulley alternator when you have the time. I will keep that info as a plan "B" backup.
 

Grumpy560

Member

Equipment
1979 B7100D 4WD with B219 loader/ 3 G6200 HST mowers/ JD 310D 4X4 backhoe
Oct 18, 2014
178
0
16
Estill Springs TN,
Here is the one I have. If you look up M7580DT on eBay you will find 2 listings. Either one will work as they are both the same units.

Also, it might be a good idea to start your own thread on the B7100 alternator conversion. It would make it easier to keep track of what you do and we won't be cluttering up the OP's thread. Aside that there's not but a few threads out there now and it would be nice to see a few more.
 

Attachments

olthumpa

Active member
Lifetime Member

Equipment
L275
May 25, 2011
1,501
2
38
Maine
Just thought I would do a little update.
New alternator installed. Had to remove the top alternator bracket and straighten it out in a vice so it would be in the correct place for the alt to line up. Did not have to do anything to the engine mount of the lower alt tab other than drilling the mounting tab on the engine to accept a larger diameter bolt. Had to remove the exhaust manifold, oil sending unit, starter, valve cover tube and disconnect some wires. New alt wiring harness fit perfectly. Started tractor ant alt works as it should. STILL waiting on electrical parts to arrive to do some of the rewiring - should be here by 4/10 then I can finish!
 

Attachments

Grumpy560

Member

Equipment
1979 B7100D 4WD with B219 loader/ 3 G6200 HST mowers/ JD 310D 4X4 backhoe
Oct 18, 2014
178
0
16
Estill Springs TN,
Looks good and glad you got it all figured out. How close to the block is the positive post ?
 

olthumpa

Active member
Lifetime Member

Equipment
L275
May 25, 2011
1,501
2
38
Maine
Looks good and glad you got it all figured out. How close to the block is the positive post ?
With the belt tighten, about 2 3/4 inches.:) A miss = a mile. :D
On mine, the positive post has a rubber cover over it. If you do not have one I would get one. :cool:
 

Attachments

olthumpa

Active member
Lifetime Member

Equipment
L275
May 25, 2011
1,501
2
38
Maine
. . . STILL waiting on electrical parts to arrive to do some of the rewiring - should be here by 4/10 then I can finish!
Awesome!!! :D
Love it when a plan comes together! ;)
You had to go and jinks it. :mad: Just checked on the status of my parts. Yesterday everything was showing shipped with a delivery date of - on or before 4/10.

NOW :confused: one part is showing shipped with a delivery date of 4/14. The rest are showing as In Fulfillment with no delivery date showing. :eek: Is this going to turn into another clutch fiasco?

OK, where is that 21 year old bottle of Scotch - Time to put a hurt on it. :cool:
 

olthumpa

Active member
Lifetime Member

Equipment
L275
May 25, 2011
1,501
2
38
Maine
Parts still showing as In Fulfillment:eek: but they were delivered yesterday - well most plus extra.:mad:
Wrong fuse block 8 fuse vs 6 fuse = will not fit.
Grounding bar:confused: did not order.
2 gauges:cool:
2 gauge holders, = wrong size.:eek:
Water proof connectors :confused: amongst the missing
4 LED lights:cool:
2 DEUTSCH DT service connectors :mad: well you know
relay :mad:

WELL!


Time to get this done one way or another! Been sitting tooo long,
 

olthumpa

Active member
Lifetime Member

Equipment
L275
May 25, 2011
1,501
2
38
Maine
Should have updated and closed, (at least my project part of this thread), before this.

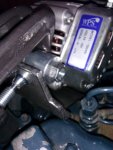
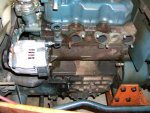
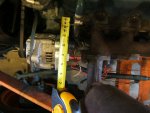
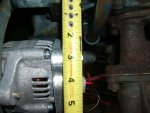
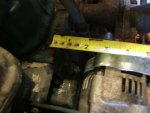
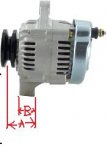
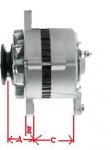
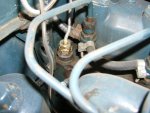
The alternator that Woldman suggested fit with minor alterations, straighten out top bracket and drill the lower mount on the engine to accept a larger bolt - alternator has a larger hole for a bolt and I did not want there to be any play in it. This aligned the alt perfectly with the crank pulley, no other mods needed. The wire pig tail is of marginal quality. If I was to do it again, and might still do it, I would make my own. That is all for the alternator part.

Rewiring:
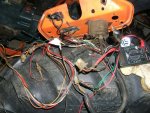
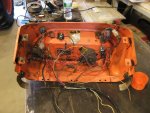
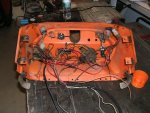
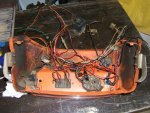
Replaced all wires that were not under the dash with new automotive wire. Used #14 wire, did not have to use a larger wire size but had allot of it laying around = no $$ out of pocket to buy more.:D 
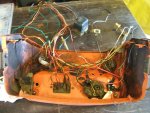
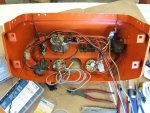
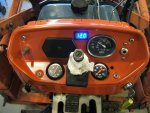
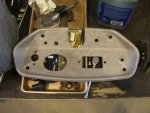
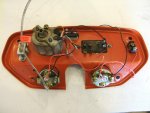
Wires under the dash were in much better shape, replaced some - left some. Eliminated the regulator, oil pressure and charging idiot lights. Added mechanical oil pressure gauge, coolant gauge and digital voltage meter. Replaced the two broken halogen lights on the ROPS with 4 LED lights. :cool: 
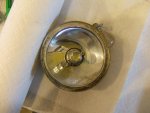
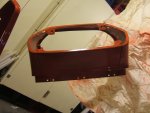
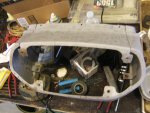
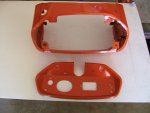
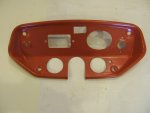
Replaced the old headlights with 2 led lights, thanks Wolfman. External gauge mounting pods were to large so I cut two holes in the dash and put them there also cut a hole for the volt meter. Sand blaster and repainted the dash. Used wire loom to cover wire that were out side the dash. Soldered most connections and put heat shrink on all connections. Ended up using original fuse block and a temporary switch for the ROPS lights. Used the grounding bar , that I did not order, under the dash to ground everything under the dash and the ROPS lights. Ran a wire from the bar back to the battery. Put in two spare wires going back to the ROPS for future use and one the front. Put heat shrink on both ends of them to prevent a possible short circuit. Used allot of wire ties. The 2 DEUTSCH DT service connectors never arrived so I left extra wire where they will eventually be put in.

Will add some pic's later.

While waiting for electrical parts I started another project on the tractor. Will start another thread for that one soon.
 
Last edited:

D2Cat

Well-known member
Lifetime Member

Equipment
L305DT, B7100HST, TG1860, TG1860D, L4240
Mar 27, 2014
13,072
4,430
113
40 miles south of Kansas City
olthumpa, what gauges did you use? What dia? What did you use for sending unit on temp gauge? Do you have any part numbers? I need some on a couple of tractors. Thanks.
 

olthumpa

Active member
Lifetime Member

Equipment
L275
May 25, 2011
1,501
2
38
Maine
olthumpa, what gauges did you use? What dia? What did you use for sending unit on temp gauge? Do you have any part numbers? I need some on a couple of tractors. Thanks.
They are not the highest quality but they work and are accurate enough - 0.5 on volts off - 3 deg off on temp - pressure ? reads 60psi at 800 rpm's with a warm engine.

Everything came in the kit except for the correct adapters. 2" black face - do not remember the size of the hole I had to cut. They came with a surface mounting bracket that I did not use.

When I ordered the gauges, these were listed as "often bought together" and "fit these gauges" - they do NOT fit and are cheep plastic.
http://www.amazon.com/Docooler®-Gau...s_auto_55?ie=UTF8&refRID=1W30X42456DNCQJ3GE43
Sunpro CP8217 StyleLine Mechanical Water/Oil Temperature Gauge - Black Dial

Price: $18.50
  • Measures from 100 to 250 degrees F (checked temp with a IR gun -with in about 3deg.)
  • 2-in black face dial with white numbers and red pointer
  • Designed for negative ground systems
  • Includes a 72-in capillary tubing with 5/8-in national pipe thread and 1/4-in, 3/8-in and 1/2-in adaptors
  • They include 72" capillary tubing with 5/8" NPT thread and 1/4", 3/8" and 1/2" adapters

(needed to make an adapter, could not find one for the love of money. I used the 20mm plug that I took out of the back right of the block and drilled a hole in it- made it to large. Took one or the adapters that came with the kit and ground it down as far as I dare without damaging the seat and another one that I had and used JB WELD to bond the three together - don't laugh skeets it worked.)

http://www.amazon.com/gp/product/B000FJQWXU/ref=oh_aui_detailpage_o00_s00?ie=UTF8&psc=1


Sunpro CP8216 StyleLine Mechanical Oil Pressure Gauge - Black Dial
Price: $18.50
  • Ranges from 0-100 PSI
  • 2-in black face dial with white numbers and red pointer
  • 12-volt internal lighting
  • Designed for negative ground systems
  • Includes 72-in nylon tubing with 1/8-in and 1/4-in national pipe thread fittings

(needed an adapter but do not remember the size - no receipt, sorry)

http://www.amazon.com/gp/product/B000FJS4PO/ref=oh_aui_detailpage_o00_s00?ie=UTF8&psc=1


Waterproof 12V Blue LED Digital Car/Auto Voltmeter Motorcycle Battery Monitor

Price: $8.59


  • Car/Auto Voltmeter
  • Power Supply: DC 3.0V - 30V
  • Range: 3.0V - 30V
(reading is off by about 0.5 volts):(

If you have any other questions, please ask them.:)
 

Attachments

olthumpa

Active member
Lifetime Member

Equipment
L275
May 25, 2011
1,501
2
38
Maine
Need help with an alternator problem.

When I go to connect the positive cable to the battery there is a little spark denoting a power drain.
If I leave the cables connected to the battery over night, the battery will be down to 2 - 3 volts in the morning even with a battery tender attached to the battery.


What I have done:
Alternator died - replaced with a new one.
Replaced all the wiring on the tractor.
Added oil pressure, collect temp and voltage gauge.
When the old alternator died it killed the battery also so I got a new one.
Tractor had been turning over very slowly so I had the starter checked and it was gone - got a new starter.

Took voltage reading before and after every test:
Left battery disconnected overnight with tender attached to see what it would be like in the morning - battery was OK.
Left battery disconnected overnight without tender - battery was OK in the morning.


Removed all fuses and waited 4 hours to check voltage - voltage was down - still had a drain on battery.
Disconnected main power supply from starter to ignition switch rendering everything from starter on dead - still had power drain.

Left power supply from starter to main switch disconnected:
Disconnected the pos+ from the alternator to the starter - still had power drain.
Disconnected the (R ignition) wire from the alternator to the starter - power drain stopped.
Reattached the pos+ from the alternator to the starter - no power drain.
Reattached the main power supply from starter to ignition switch - no power drain.
Put all the fuses back in - no power drain.
Everything reconnected except the (R ignition) wire from the alternator to the starter - no power drain.
Reattached the (R ignition) wire from the alternator to the starter - power drain was back.
I thought that it might have a bad diode so I took it to an alternator shop and had it tested - everything tested OK. To solve the problem, the man from the alternator shop told me to attach a wire to a fuse, add a momentary push button switch and connect the (R ignition) wire from the alternator to the switch. After the tractor was started, press the switch for a minute to excite the alternator field. I asked him about permanently attaching a wire after the switch to the alternator - he said that doing that would cause the alternator to constantly charge the battery damaging it. I configured it the way he told me on a temporary basis but it did not work. When the push button was released, the alternator stopped producing electricity.

Right now I am removing the pos+ cable from the battery when I am not using the tractor. This is a pain in the @ss especially after doing all the electrical work to it.
All suggestions - responses welcome. I need to get this fixed.