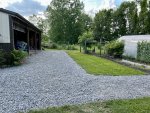
Small "stop leaving ruts" infrastructure improvement

fishpick

Active member

Equipment
BX24 & L4760HSTC
Dec 16, 2017
112
192
43
The High Taxes part of lovely NY, USA
Somewhere in my post history you will find me asking about swapping wheels and tires on my L4760HSTC as I have R1's and they just rip everything up in the yard (except they are awesome when everywhere except the lawn)... so I was considering R4's, turfs and even the fancy new R14's... but a ton of money and just not worth it because part of the issue for me is the weight of the tractor and the type of soil we have. Then you will find a post where I was considering trading my L4760HSCT for a LX3310... but after driving one, I decided that was a "massive" downgrade... so after all that - I did what I should have done years ago to fix the giant ruts the tractor leaves in the spring and fall... $550 in gravel and about 6 hours total effort...
Used both the BX24 loader and backhoe, the L4760 loader and the Landpride land plane... Love it. Wife supported the project for the path to the greenhouse.
Here's from the driveway looking towards the greenhouse after the sod and soil are dug out 4-ish inches.
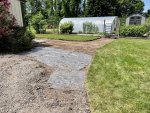
IMG_2293 Large.jpeg
Looking down along the barn leanto - that small patch of gravel there is what I put in a few years ago so I could at least get to the snow blower without getting stuck in the fall. All the new gravel is to the same depth / thickness and that thing has been rock solid no matter HOW wet the ground is - so everything else should be about the same!
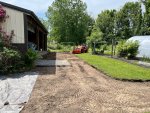
IMG_2294 Large.jpeg
Looking back towards the house from the greenhouse path - all gravel has some very thick ground cover material under it. is it the fabric fro driveways - no - but this stuff works great for our sandy soil and holding the CR1 in place and not feeding it to the earth. small precaution that works very well on all the other places we have done this.
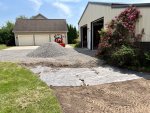
IMG_2295 Large.jpeg
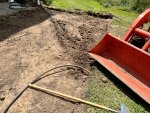
Barely buried water line used only during non-freezing months in the greenhouse - trenched it below the bottom of the grading and it's safely out of the way again.
IMG_2296 Large.jpeg
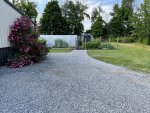
Finished from the garage looking towards greenhouse
IMG_2297 Large.jpeg
Finished looking down lean to side.
IMG_2298 Large.jpeg

I'm thrilled I didn't get rid of the L4760 - I love this thing... and with this infrastructure improvement I can get on it even more often and not rip the lawn to holy hell!
 
  • Like
  • Love
Reactions: 12 users

Ridelght

Well-known member
Lifetime Member

Equipment
2022 Kubota L4060 Polaris Rangerxp800 Ford 3400
Feb 16, 2022
434
293
63
Ohio
That is sweet !!!!
 

JimmyJazz

Well-known member

Equipment
B2601
Aug 8, 2020
1,094
643
113
Pittsburgh, Pa
You seem to know what you are doing. Nice photos. As I have aged I have come to realize that the true path forward often only presents itself in time. When I was younger everything was a call to action so to speak. There is a line in a song by Rush "If you choose not to decide, you still have made a choice" that I have come to appreciate. Patience= wisdom. I am glad you are back on track. Happy Fourth of July.
 
  • Like
Reactions: 1 user

OrangeKrush

Well-known member

Equipment
BX2680, LA344 with Piranha tooth bar, LP PF 1242, LP Rear Blade, KK 60" BB
Nov 15, 2020
1,047
514
113
Indy
Very nicely done, everything looks very well kept also! Better keep the L4760, just think how much fun this would have been without it..
 
  • Like
Reactions: 1 user

radas

Well-known member

Equipment
2022 LX2610HST, 3rd Function, Rear Remotes, BH77
Mar 21, 2022
721
831
93
Michigan
Excellent transformation. Did you dig out that 4" of dirt/sod for the drive with your FEL? Break it up with a BB first?
 

OrangeKrush

Well-known member

Equipment
BX2680, LA344 with Piranha tooth bar, LP PF 1242, LP Rear Blade, KK 60" BB
Nov 15, 2020
1,047
514
113
Indy
Excellent transformation. Did you dig out that 4" of dirt/sod for the drive with your FEL? Break it up with a BB first?
Good question, may help some of us not quite up to par with sod removal for this type of drive.
 

radas

Well-known member

Equipment
2022 LX2610HST, 3rd Function, Rear Remotes, BH77
Mar 21, 2022
721
831
93
Michigan
Good question, may help some of us not quite up to par with sod removal for this type of drive.
I am definitely a member of this camp! 😅 Read a few posts detailing glyphosate then BB and FEL after I'm assuming but this job was done very clean. Teach us your ways!
 
  • Like
Reactions: 1 user

OrangeKrush

Well-known member

Equipment
BX2680, LA344 with Piranha tooth bar, LP PF 1242, LP Rear Blade, KK 60" BB
Nov 15, 2020
1,047
514
113
Indy
I am definitely a member of this camp! 😅 Read a few posts detailing glyphosate then BB and FEL after I'm assuming but this job was done very clean. Teach us your ways!
Not to mention larger tractors help!
 
  • Like
Reactions: 1 user

fishpick

Active member

Equipment
BX24 & L4760HSTC
Dec 16, 2017
112
192
43
The High Taxes part of lovely NY, USA
About 90% of the sod removal was done with the BX24 with the small bucket getting full quickly so that gets dumped into the L4760 bucket and it takes the sod away. Couple of reasons why that approach.
#1 reason I use the BX for sod removal is - it’s weaker and lighter. Now, this is for my soil - so your mileage may vary. But thanks for the kudos on clean and sharp prep. Here’s how I do this for anything around here…

Lay out a rope to represent the edge shape you want. Do this a week ahead of time so your wife can move it 20 times and be happy.
Once final position is selected - use ground marking spray to transfer rope shape to the ground and pick up rope.
I use a cheap Black and Decker plug in “edger / trencher” to cut the sod on the outside of the painted line using the trencher setting. (It ain’t a trench but it cuts about 2” down through the sod which makes a nice seam. I also cut the sod along any edge that will be getting pulled out. So along the leanto as well. For hard to get spots or places with a stone I use on of those edger shovels to get the sod cut.
I then use a shovel to start peeling up a section of sod in a straight line that’s the width of the little BX bucket.
Now the fun part. Work the bucket lip under the exposed sod starting in the spot you pulled up by hand. Keep the bucket absolutely flat. You need to ensure it’s not angled down or it will bit too hard. And up will slide over top of the sod. Put the tractor in L and 4 wheel and go slow - constantly managing the bucket as it will try to go deeper as it gets heavier. And then it will really try to dig when your front wheels go off the grass and into the dug out area.
And you just go until the bucket is full, lift, back out and dump it in the bigger loader - repeat.
When you are going along a cut sod edge - it just lifts right up along the cut.
It’s a lot harder to do than it sounds but it’s a skill I have built up over years. But anyone can do that if they go slow and if their soil is sandy and mostly rock free.
my wife actually sat in a “drinkin chair” to watch me because she says it’s relaxing to watching it happen. Just take your time is all.
(To ward off all the jackwads that are gonna get apoplectic sputtering that a loader isnt a dozer - this is no more strain or different physics than pushing into a pile of gravel - so relax)
Another benefit of doing this kind of work with a smaller tractor is actually the fact is that you must, by the lower weight and power, do the work slower. This really helps prevent “oops” moments where you suddenly realize the loader went a foot deep and you didn’t feel it.
For this job another consideration was space. A lot of this working area didn’t fit the larger tractor being able to maneuver in all 4 compass points which is needed to shave down high spots and level the surface.
Aside from sod and soil removal duties the Grand L comes to life when it’s time to move the gravel. Couple of bucket fulls dumped then spin around and use the land plan to push it out. Rinse and repeat until you are ready for final grading.
That’s how I do it. Nothing fancy. Your mileage may vary based on soil type, rock density, skill, patience and desire to play with more implements…
 
  • Like
Reactions: 1 users

radas

Well-known member

Equipment
2022 LX2610HST, 3rd Function, Rear Remotes, BH77
Mar 21, 2022
721
831
93
Michigan
About 90% of the sod removal was done with the BX24 with the small bucket getting full quickly so that gets dumped into the L4760 bucket and it takes the sod away. Couple of reasons why that approach.
#1 reason I use the BX for sod removal is - it’s weaker and lighter. Now, this is for my soil - so your mileage may vary. But thanks for the kudos on clean and sharp prep. Here’s how I do this for anything around here…

Lay out a rope to represent the edge shape you want. Do this a week ahead of time so your wife can move it 20 times and be happy.
Once final position is selected - use ground marking spray to transfer rope shape to the ground and pick up rope.
I use a cheap Black and Decker plug in “edger / trencher” to cut the sod on the outside of the painted line using the trencher setting. (It ain’t a trench but it cuts about 2” down through the sod which makes a nice seam. I also cut the sod along any edge that will be getting pulled out. So along the leanto as well. For hard to get spots or places with a stone I use on of those edger shovels to get the sod cut.
I then use a shovel to start peeling up a section of sod in a straight line that’s the width of the little BX bucket.
Now the fun part. Work the bucket lip under the exposed sod starting in the spot you pulled up by hand. Keep the bucket absolutely flat. You need to ensure it’s not angled down or it will bit too hard. And up will slide over top of the sod. Put the tractor in L and 4 wheel and go slow - constantly managing the bucket as it will try to go deeper as it gets heavier. And then it will really try to dig when your front wheels go off the grass and into the dug out area.
And you just go until the bucket is full, lift, back out and dump it in the bigger loader - repeat.
When you are going along a cut sod edge - it just lifts right up along the cut.
It’s a lot harder to do than it sounds but it’s a skill I have built up over years. But anyone can do that if they go slow and if their soil is sandy and mostly rock free.
my wife actually sat in a “drinkin chair” to watch me because she says it’s relaxing to watching it happen. Just take your time is all.
(To ward off all the jackwads that are gonna get apoplectic sputtering that a loader isnt a dozer - this is no more strain or different physics than pushing into a pile of gravel - so relax)
Another benefit of doing this kind of work with a smaller tractor is actually the fact is that you must, by the lower weight and power, do the work slower. This really helps prevent “oops” moments where you suddenly realize the loader went a foot deep and you didn’t feel it.
For this job another consideration was space. A lot of this working area didn’t fit the larger tractor being able to maneuver in all 4 compass points which is needed to shave down high spots and level the surface.
Aside from sod and soil removal duties the Grand L comes to life when it’s time to move the gravel. Couple of bucket fulls dumped then spin around and use the land plan to push it out. Rinse and repeat until you are ready for final grading.
That’s how I do it. Nothing fancy. Your mileage may vary based on soil type, rock density, skill, patience and desire to play with more implements…
Thanks for sharing your method! I'm surprised the little BX did most of the work haha.

This sod removal method should work for me too as I have about a few inches of topsoil and then sand. For cutting the dirt, you just tilt the bucket to drive it into the ground and inch or two, flatten it out, and push forward in 4wd until the bucket is full? Or did you break up the soil after tearing the sod out with anything?
 

D2Cat

Well-known member
Lifetime Member

Equipment
L305DT, B7100HST, TG1860, TG1860D, L4240
Mar 27, 2014
12,899
4,266
113
40 miles south of Kansas City
About 90% of the sod removal was done with the BX24 with the small bucket getting full quickly so that gets dumped into the L4760 bucket and it takes the sod away. Couple of reasons why that approach.
#1 reason I use the BX for sod removal is - it’s weaker and lighter. Now, this is for my soil - so your mileage may vary. But thanks for the kudos on clean and sharp prep. Here’s how I do this for anything around here…

Lay out a rope to represent the edge shape you want. Do this a week ahead of time so your wife can move it 20 times and be happy.
Once final position is selected - use ground marking spray to transfer rope shape to the ground and pick up rope.
I use a cheap Black and Decker plug in “edger / trencher” to cut the sod on the outside of the painted line using the trencher setting. (It ain’t a trench but it cuts about 2” down through the sod which makes a nice seam. I also cut the sod along any edge that will be getting pulled out. So along the leanto as well. For hard to get spots or places with a stone I use on of those edger shovels to get the sod cut.
I then use a shovel to start peeling up a section of sod in a straight line that’s the width of the little BX bucket.
Now the fun part. Work the bucket lip under the exposed sod starting in the spot you pulled up by hand. Keep the bucket absolutely flat. You need to ensure it’s not angled down or it will bit too hard. And up will slide over top of the sod. Put the tractor in L and 4 wheel and go slow - constantly managing the bucket as it will try to go deeper as it gets heavier. And then it will really try to dig when your front wheels go off the grass and into the dug out area.
And you just go until the bucket is full, lift, back out and dump it in the bigger loader - repeat.
When you are going along a cut sod edge - it just lifts right up along the cut.
It’s a lot harder to do than it sounds but it’s a skill I have built up over years. But anyone can do that if they go slow and if their soil is sandy and mostly rock free.
my wife actually sat in a “drinkin chair” to watch me because she says it’s relaxing to watching it happen. Just take your time is all.
(To ward off all the jackwads that are gonna get apoplectic sputtering that a loader isnt a dozer - this is no more strain or different physics than pushing into a pile of gravel - so relax)
Another benefit of doing this kind of work with a smaller tractor is actually the fact is that you must, by the lower weight and power, do the work slower. This really helps prevent “oops” moments where you suddenly realize the loader went a foot deep and you didn’t feel it.
For this job another consideration was space. A lot of this working area didn’t fit the larger tractor being able to maneuver in all 4 compass points which is needed to shave down high spots and level the surface.
Aside from sod and soil removal duties the Grand L comes to life when it’s time to move the gravel. Couple of bucket fulls dumped then spin around and use the land plan to push it out. Rinse and repeat until you are ready for final grading.
That’s how I do it. Nothing fancy. Your mileage may vary based on soil type, rock density, skill, patience and desire to play with more implements…
Your project looks nice and it makes your area more functional.

The most important part of your procedure is: "Lay out a rope to represent the edge shape you want. Do this a week ahead of time so your wife can move it 20 times and be happy." !!! All other operations, if done improperly, can easily be corrected---this one not so.
 
  • Like
  • Haha
Reactions: 3 users

OrangeKrush

Well-known member

Equipment
BX2680, LA344 with Piranha tooth bar, LP PF 1242, LP Rear Blade, KK 60" BB
Nov 15, 2020
1,047
514
113
Indy
Yes thanks for sharing fishpick! Do you have any type of cutting edge mounted on the BX? Makes perfect sense using something smaller and less powerful.. especially for us with less experience.
 
  • Like
Reactions: 1 user

fishpick

Active member

Equipment
BX24 & L4760HSTC
Dec 16, 2017
112
192
43
The High Taxes part of lovely NY, USA
Thanks for sharing your method! I'm surprised the little BX did most of the work haha.

This sod removal method should work for me too as I have about a few inches of topsoil and then sand. For cutting the dirt, you just tilt the bucket to drive it into the ground and inch or two, flatten it out, and push forward in 4wd until the bucket is full? Or did you break up the soil after tearing the sod out with anything?
I just use the bucket to scape forward until full, adjusting depth of cut as I go. Usually taking 1/2 to 1” in a pass. If you try to get more aggressive you risk adding too much material to the bucket too fast and you dive deep and then have a hole to fill.
Im not a fan of using a tiller or box to break up the soil because you almost inevitably go too deep and end up back filling. Which is fine… but then it will settle and you will need to add more gravel later when that happens.

Yes thanks for sharing fishpick! Do you have any type of cutting edge mounted on the BX? Makes perfect sense using something smaller and less powerful.. especially for us with less experience.
nope. Just the edge the bucket came with… a bunch duller than when new ;)
 
  • Like
Reactions: 1 users

radas

Well-known member

Equipment
2022 LX2610HST, 3rd Function, Rear Remotes, BH77
Mar 21, 2022
721
831
93
Michigan
I just use the bucket to scape forward until full, adjusting depth of cut as I go. Usually taking 1/2 to 1” in a pass. If you try to get more aggressive you risk adding too much material to the bucket too fast and you dive deep and then have a hole to fill.
Im not a fan of using a tiller or box to break up the soil because you almost inevitably go too deep and end up back filling. Which is fine… but then it will settle and you will need to add more gravel later when that happens.


nope. Just the edge the bucket came with… a bunch duller than when new ;)
Much appreciated! I look forward to doing similar projects with my LX in the future.
 
  • Like
Reactions: 1 users