Quick question - the dreaded delivery valve holder leak - Bosch K-type injector pump

JohnDB

Active member

Equipment
M4500DT
Jun 9, 2018
376
63
28
NZ
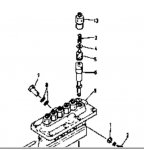
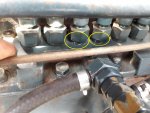
No. 4 holder is weeping (has been for months if not years - previous owner mentioned it), and I suspect no. 3 is just starting to as well - see photo. From the numerous threads on the subject I've decided to fix it myself (it's been wonderful reading the contributions of people on this forum and elsewhere over the years. You guys are awsome).

There seem to be only 2 options to fix the leak: (a) get the injector lines off and crack open each delivery valve holder and then re-torque or (b) pull all the lines off, pull all the holders and replace all the gaskets.

My questions are:
1. How successful is (a) above, usually. Should I bypass it and go straight to (b)? The attraction of (a) is less disturbance, but if it doesn't work I've got to do (b) which is more distubance of the fuel system because I've had to pull the lines of twice. I'm paranoid about dirt getting into the system (have been ever since seeing a video by Cummins about the damage dirt does).

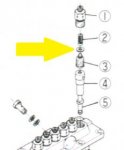
2. On this pump, what is the "Gasket, deliv. valve" made of? Part number 15221-51240. The options seem to be copper ring, or rubber O-ring? Can someone confirm the material please?

Thanks in advance for your advice.

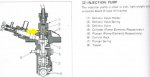
Sorry about the parts diagrams being so small - not sure how to fix it.
 

Attachments

Last edited:

thepumpguysc

Member
Aug 8, 2018
267
1
16
Sunny South Carolina
Just RE-TORQUE them.. they aren't very tight when they're new for some reason??
Remove the lines, u better have an appropriate sized wrench handy for the holder, cuz it'll probably turn too..
RE-TORQUE the holder to 30-35 FT LBS.. & retighten the lines.. The lines themselves don't have to be SUPER tight or you'll overcome the torque u put on the holder..
Chances are 80% or better, it'll fix the weep.. Good luck..
OH>> & DONT JUST TIGHTEN THEM>>TORQUE THEM..
 

JohnDB

Active member

Equipment
M4500DT
Jun 9, 2018
376
63
28
NZ
Thanks, I need to suss out a socket that will fit the holders. Do you know what the gasket material is?
 

D2Cat

Well-known member
Lifetime Member

Equipment
L305DT, B7100HST, TG1860, TG1860D, L4240
Mar 27, 2014
13,023
4,394
113
40 miles south of Kansas City
Look at part #1, the delivery valve holder. There is an o-ring under the lip on it. That is what you need to replace to stop the fuel leak if torquing the nut doesn't stop it. If you remove the holder don't fiddle with anything under there. it's a spring and a check valve that has to be in the correct orientation!
 

North Idaho Wolfman

Moderator
Staff member
Lifetime Member

Equipment
L3450DT-GST, Woods FEL, B7100 HSD, FEL, 60" SB, 743 Bobcat with V2203, and more
Jun 9, 2013
28,726
5,134
113
Sandpoint, ID
Sorry on that model pump there is no O-ring on the delivery holder (One picture you posted is generic and does show O-ring).
Yes you can try just torquing them down, And I would recommend that too, but in my experience not very successful with that style of seal.

Now in regards to you being wary of working on it due to dirt/debri contamination, you're very smart to be with this style of pump.
The thing to note, there is nothing to stop dirt/moisture/debri from getting under and around the threads of the delivery valve and so when you remove the delivery valve all of that can fall directly into the pump section.
I almost always recommend that you remove the entire pump to do this type of reseal, but that has it's issues too.

Now in the real world here is a safe way to do it: :)
Use brake parts cleaner to wash off any loose material, remove all the injector lines so they are out of the way, loosen each delivery valve holder about a turn, then using the straw on the brake parts cleaner spray under the delivery valve gap washing out any material in there, I also use an air gun to blast everything away.
Then one at a time pull the delivery valve holder, remove the spring, then using small needle nose remove the seal, replace all parts and torque down the delivery valve holder to 28.9 to 32.5 ft lbs.
repeate till all done.
With the throttle set to high, crank in intervals as to not overheat the starter, and burp the injection pump, then install injector lines and bleed them same way and then tighten, start, run, enjoy. :D

The seal in question on this pump is a semi soft Copper seal/ Gasket.
Seal:
OLD P/N 15221-51240
NEW P/N 70000-65197

Still available in the states, if it turns out you need them and can't get them locally give a shout, and I'll help.


Attachments

Last edited:

JohnDB

Active member

Equipment
M4500DT
Jun 9, 2018
376
63
28
NZ
Thanks people, this is exactly the sort of info. I was looking for. I'll try the tightening route, then if that doesn't work will replace the copper gasket. Good point about potential for dirt to fall in when removing the holder, I guess same could apply to paint flakes - looks like that whole area was painted at the same time, so there must be paint in the gap where the holder meets the pump body.

If tightening doesn't work and I go to step (b), after I clean around the delivery valve holder first like NIW says, should I then put a smear of grease around the base of the holder, then unscrew the holder, the idea being that the grease will stop any paint flakes that get dislodged falling into the pump? (Then clean the grease off before doing the next steps.)
 

North Idaho Wolfman

Moderator
Staff member
Lifetime Member

Equipment
L3450DT-GST, Woods FEL, B7100 HSD, FEL, 60" SB, 743 Bobcat with V2203, and more
Jun 9, 2013
28,726
5,134
113
Sandpoint, ID
should I then put a smear of grease around the base of the holder, then unscrew the holder, the idea being that the grease will stop any paint flakes that get dislodged falling into the pump? (Then clean the grease off before doing the next steps.)
I wouldn't, (makes it really tough to work on) just clean it good before you start, loosen all of the holders a little, then clean again, that will remove any paint and debri.
One other trick is to have a syringe full of diesel and flood each of the pumps cavities right before you reinstall the holders, this will flush out anything that fell in. ;)
 

JohnDB

Active member

Equipment
M4500DT
Jun 9, 2018
376
63
28
NZ
I'll get in touch with you Wolfman if I run into problems with the gasket. I see why the grease isn't a good idea, I didn't read your cleaning suggestion first time carefully enough - yes extra flushing required.

Thepumpguysc I'll try tightening the holders, not loosening them, to start with. Usually I've got time on my side so it's worth taking it one step at a time. Yes I could get burned, but overall at this stage of my life I feel like it's been worth it :) Warnings are heeded - I'll take extra care.

Thanks guys, will post an update, probably take me a week for stage one, need to get me a thin wall socket.
 

JohnDB

Active member

Equipment
M4500DT
Jun 9, 2018
376
63
28
NZ
Finally got this done. Funny thing - torqued the leaking delivery valve holders - the leak stopped on one, but got a lot worse on the other. And on one that hadn't been leaking, started leaking (just experimenting...).

Got new copper washers ("Gasket, deliv valve 15221-51240” approx 0.48mm thick 11.64mm OD 9.10mm ID. The injection pump service shop also said I'd need rubber O rings - I almost turned them down because the parts manuals didn't show any rubber O rings but I took them anyway (14.98 or 15mm ID x 2.38 or 2.4 mm thick). Turned out that the delivery valve holders did have O rings under the head. Fitted it all up, trying the keep the parts and surroundings surgically clean. SUCCESS! No sign of leaks :D

The old O rings had developed a compression set, and every one of the copper gaskets had signs of erosion, but only on the lower face, like tiny crevices radiating out from the ID.

So, job done, my thanks to Wolfman, D2Cat, the pumpguySC for your help :)
 

JohnDB

Active member

Equipment
M4500DT
Jun 9, 2018
376
63
28
NZ
A quick follow-up for those that are curious - finally got a USB-connected microscope going. The 11mm diameter copper gaskets that I referred to in my last post above look like this:

DV holder gaskets one side (Custom).png


Left gasket is showing the upper (DV holder) side, the right gasket shows the face that's against the lapped topside of the delivery valve body. No wonder it leaked. Damage around the inside edge may be due to cavitation erosion (?), which has allowed the diesel to exit and make its way up past the O ring to the top of the pump.

For comparison here's a new gasket on top of some old ones:
DV holder new gasket (Custom).png

Again, many thanks to members who contributed.
 

makowa

New member

Equipment
Kubota b2150hst
Nov 25, 2020
2
0
1
poland
A quick follow-up for those that are curious - finally got a USB-connected microscope going. The 11mm diameter copper gaskets that I referred to in my last post above look like this:

View attachment 44115

Left gasket is showing the upper (DV holder) side, the right gasket shows the face that's against the lapped topside of the delivery valve body. No wonder it leaked. Damage around the inside edge may be due to cavitation erosion (?), which has allowed the diesel to exit and make its way up past the O ring to the top of the pump.

For comparison here's a new gasket on top of some old ones:
View attachment 44117
Again, many thanks to members who contributed.
hi, really good job with
A quick follow-up for those that are curious - finally got a USB-connected microscope going. The 11mm diameter copper gaskets that I referred to in my last post above look like this:

View attachment 44115

Left gasket is showing the upper (DV holder) side, the right gasket shows the face that's against the lapped topside of the delivery valve body. No wonder it leaked. Damage around the inside edge may be due to cavitation erosion (?), which has allowed the diesel to exit and make its way up past the O ring to the top of the pump.

For comparison here's a new gasket on top of some old ones:
View attachment 44117
Again, many thanks to members who contributed.
hi,
congrats with job well done. I have the same problem with my b2150hst and I wonder if I can do it by my self too. I'm worried tho about what d2cat said about valve and spring orientation, that it need to be exact. how it was in your case? how I can make sure to not make it wrong (keep the correct orientation, is it any way obvious)?
again congratulations for your success and thank you for your detailed description
Chris
 

JohnDB

Active member

Equipment
M4500DT
Jun 9, 2018
376
63
28
NZ
... I'm worried tho about what d2cat said about valve and spring orientation, that it need to be exact. how it was in your case? how I can make sure to not make it wrong (keep the correct orientation, is it any way obvious)?
...
Chris
Hi Chris - the correct valve and spring orientation that the spring (2) should be above the valve (3) as shown in the image with the yellow arrow, not the other way around and it's pretty obvious when you remove the delivery valve holder.

I know you didn't ask about it, but the big deal is, as others have said, make sure everything is scrupulously clean - above, below and around the pump, ensure that the outsides of the fuel lines are clean (I don't have access to a steam cleaner, so I spray on kerosene and wash it off with sprayed water, followed up with drying the top of the pump and surrounds with compressed air before removing fuel lines and delivery valve holders, so that no dust or dirt gets anywhere near the internals of pump. Do it in a dust-free, grit free, well-lit place, have clean hands, clean gloves, clean tools, and clean lint-free rags :) Take your time. Prep is essential. That's what I try to achieve anyway. Hope this helps.
 
  • Like
Reactions: 1 user

makowa

New member

Equipment
Kubota b2150hst
Nov 25, 2020
2
0
1
poland
Hi Chris - the correct valve and spring orientation that the spring (2) should be above the valve (3) as shown in the image with the yellow arrow, not the other way around and it's pretty obvious when you remove the delivery valve holder.

I know you didn't ask about it, but the big deal is, as others have said, make sure everything is scrupulously clean - above, below and around the pump, ensure that the outsides of the fuel lines are clean (I don't have access to a steam cleaner, so I spray on kerosene and wash it off with sprayed water, followed up with drying the top of the pump and surrounds with compressed air before removing fuel lines and delivery valve holders, so that no dust or dirt gets anywhere near the internals of pump. Do it in a dust-free, grit free, well-lit place, have clean hands, clean gloves, clean tools, and clean lint-free rags :) Take your time. Prep is essential. That's what I try to achieve anyway. Hope this helps.
Thank you JohnDB very much for all your advise, I'll make sure is as clean as it should be.
Chris