Kubota b7100 FEL build on a budget

trial and error

Well-known member

Equipment
B7100dt manual trans. homemade FEL, 4 way hydraulic dozer blade
Feb 16, 2023
392
369
63
NY
Yes, I know build and budget shouldn't really be in the same headline but my funds are pretty limited and im tired of not having a FEL on the ol gear drive b7100 which is already tapped for hydraulics and already has a (very) similar subframe to the b219 loader to which a full hydraulic plow is already mounted. Besides anything has got to be better then a wheelbarrow and shovel with a 400' gravel drive to maintain etc

This is going to be an test of my fabricobblication skills and more a of a test of if can I come out at the end with something functional after spending a fair amount of time and $. What else would you expect from someone with the title of "trial and error"

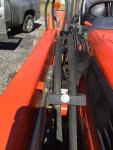
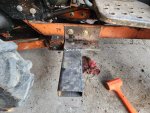
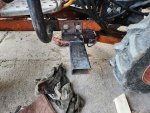
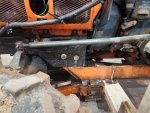
others have already commented that the "hard part of my plan is already done for me" in that I already have 80-90% of the subframe I need. and that with some simple modifications it will work for my build. I've mocked up what I can using wood (no good pictures of that sorry) for the loader arms etc and have moved on to starting the metal fabrication process. I only have a gasless mig 125 which I modified with a bridge rectifier to get a more stable arc, a drill press, 2 angle grinders, a metal chop saw and a fairly unlimited hand tool assortment. A plasma cutter, mill, lathe, 220 volt welder and on and on would be super awesome to have, however that would be my entire budget and then some without even starting the fab process I'm fairly confident in my skills and although prettty primitive I think I can come out on the other side of this with a fairly functional full hydro boom and curl FEL. Another bonus is I've already got a 2 stick 2 spool valve with float for the plow so while a joystick controller would be super, for now I'm going to stick with what I've already got until I know this project is worth any extra funds not absolutely nessacary.

Build materials are 2x4"×1/8" rectangle tube for most major components, 2x2"x1/8" square tube for tower bracing etc and 2×4"×3/16 rectangle tube for the peice that runs under the tractor for the tower mounts. 3/16 plate for braces at joints and cylinder mounts etc. Some kind of bushings (haven't gotten that far in my planning yet). Cylinders are cross tube 1" shaft x18" for boom and 1" shaft 16" for curl (rugged made. For the win on those) I'm not looking to lift the world so they should be fine based on some quick hydro calculators online. Couple small shaft cylinders and limited counterweight it should keep me from breaking the only tractor I have.

Below are couple pictures of my progress so far

I'm open to suggestions/ comments but this is a bare bones build lol so don't mind the hideous welds and non OSHA aproved methods along the way
 

Attachments

Last edited:
  • Like
Reactions: 1 users

GreensvilleJay

Well-known member

Equipment
BX23-S,57 A-C D-14,58 A-C D-14, 57 A-C D-14,tiller,cults,Millcreek 25G spreader,
Apr 2, 2019
9,676
3,926
113
Greensville,Ontario,Canada
Holes, in the frame ,along the center line, don't really affect the strength,especially when they''re 'filled in' with bolts.

BTW, when you run 240 to your garage, pull the cable through 4" conductor pipe,with a 'spare' 1/4" rope. That way you can 'fish' more cables through(TV, internet, phone, fibre, etc. ) afterwards....
 
  • Like
Reactions: 2 users

trial and error

Well-known member

Equipment
B7100dt manual trans. homemade FEL, 4 way hydraulic dozer blade
Feb 16, 2023
392
369
63
NY
Holes, in the frame ,along the center line, don't really affect the strength,especially when they''re 'filled in' with bolts.

BTW, when you run 240 to your garage, pull the cable through 4" conductor pipe,with a 'spare' 1/4" rope. That way you can 'fish' more cables through(TV, internet, phone, fibre, etc. ) afterwards....
Greensvillejay

Absolutely brilliant advice on the "4" conduit advice"
And the first, part about the "holes in the frame rail" was really the part I was most concerned about so far. As I was drilling them this afternoon I was thinking "well, no going back now" lol glad you put my mind at ease.
 

North Idaho Wolfman

Moderator
Staff member
Lifetime Member

Equipment
L3450DT-GST, Woods FEL, B7100 HSD, FEL, 60" SB, 743 Bobcat with V2203, and more
Jun 9, 2013
28,289
4,853
113
Sandpoint, ID
How did 4" conduit come into this???
4" conduit is STUPID expensive!
And you can not legally pull Low volt in with High volt!
Run 2, 2" pipes! ;)
 
  • Like
Reactions: 2 users

trial and error

Well-known member

Equipment
B7100dt manual trans. homemade FEL, 4 way hydraulic dozer blade
Feb 16, 2023
392
369
63
NY
How did 4" conduit come into this???
4" conduit is STUPID expensive!
And you can not legally pull Low volt in with High volt!
Run 2, 2" pipes! ;)
NI wolf, thanks for that tidbit. I wouldn't have known. But none of that is in my plans anytime soon. I've got way too much going on to think about running 220 to the garage. At least for the foreseeable future
 

fried1765

Well-known member

Equipment
Kubota L48 TLB, Ford 1920 FEL, Ford 8N, SCAG Liberty Z, Gravely Pro.
Nov 14, 2019
6,313
4,003
113
Eastham, Ma
Holes, in the frame ,along the center line, don't really affect the strength,especially when they''re 'filled in' with bolts.

BTW, when you run 240 to your garage, pull the cable through 4" conductor pipe,with a 'spare' 1/4" rope. That way you can 'fish' more cables through(TV, internet, phone, fibre, etc. ) afterwards....
I have used the spare (poly) rope trick in large conduit numerous times.
I would certainly do the rope, but for internet/fibre etc. I would use a separate conduit spaced away from the electric conduit.
Electricity, and electronic signals, in the same conduit would seem to not be a particularly good idea.
 
  • Like
Reactions: 1 user

Runs With Scissors

Well-known member

Equipment
L2501 TLB , Grappel, Brush Hog, Box Blade, Ballast box, Forks, Tiller, PH digger
Jan 25, 2023
1,722
1,825
113
Michigan
Since you are kind of limited 'welding wise'; I am wondering if multiple passes would help to strengthen the welds a little.

Or possibly pre-heating if you have a torch?
 
  • Like
Reactions: 1 user

Yooper

Well-known member
Lifetime Member

Equipment
3901 LA525
May 31, 2015
1,456
429
83
NE Wisconsin
Your choice of material is good. I’ve seen a lot of people build some impressive stuff with no more equipment than you have. It just takes longer and patience is the key.

I have never welded with your type of machine or process so I can’t help you with welding advice other than grind the surface clean before you weld. I would get some scrap and practice welding a bit before trying to join up the critical parts on the loader. And there won’t be too many forgiving parts on this project. Having a weld break while using the loader will at the very least wipe out the cylinders and maybe cause an injury.

Do you know someone that could help you set up the welder and give you some guidance before you get into the meat of this project?
 
  • Like
Reactions: 1 users

PoTreeBoy

Well-known member
Lifetime Member

Equipment
L35 Ford 3930
Mar 24, 2020
2,344
1,180
113
WestTn/NoMs
If your budget can handle it, I think you'd be surprised how much hotter an inverter welder would be than the transformer machine. I bought a Yeswelder and burnt stuff my old Craftsman flux box wouldn't, all at 110v.
 
  • Like
Reactions: 1 users

Vigo

Well-known member

Equipment
B6100, B8200
Jan 9, 2022
595
339
63
San Antonio Texas
^ I am a big fan of my Yeswelder 205DS! BUT.. i have not run it on 120 much. :)

I agree the welding might need work.

MIG in general is a bit funny because you can't really control your heat and your filler metal rates separately. You can, but only within a range.. there is no way to add heat to a part with the welder without also piling up material on it. My 205ds can do tig but i havent even tried yet.. once i got enough power to melt 1/4", my desire to move away from flux core mig lessened substantially. :ROFLMAO:

Up until a year ago the only welder i had was the old $89 (now $129?) flux-core machine from Harbor Freight. It is non-rectified AC which makes flux core welding look like shit and spatter everywhere no matter what. I never did put a rectifier on mine but glad you did! Flux core also prefers a certain polarity so check that as well! My coworker just did same mod to his. What i DID do to mine was install a contactor because on my machine from 2009 the lead was ALWAYS hot whether you were pulling the trigger or not! So I at least fixed that...

Anyway, i did weld some stuff up to 3/16 successfully with it. I could not do 1/4" even with preheat, although i was using propane/mapp and not an acetylene torch. I could make stuff look ok on 1/4 but it would break when subjected to 'tractor use' so looks can be deceiving.

In general preheat is a good idea, especially where the weld is going to start. Underpowered mig on thick metal sucks because you have to pile bird shit on your starting location for a good while before you get enough heat into the metal to have a functional puddle and actually start 'travelling' with the gun. So heating up that spot as much as possible allows you have a much cleaner start that won't require as much grinding afterwards, and once the puddle is going you can usually keep it going with the welder just fine. You just have to weave back and forth slightly so you travel slower, instead of actually moving the gun in a straight line across the joint.

Im not a real welder, this was just my self-taught experience with a shitty flux machine.

All the materials list sounds pretty good. In fact, my B219 diagonal braces down to front end aren't even 2x2 square, they are pipe with flattened ends.
 
  • Like
Reactions: 1 user

PoTreeBoy

Well-known member
Lifetime Member

Equipment
L35 Ford 3930
Mar 24, 2020
2,344
1,180
113
WestTn/NoMs
^ I am a big fan of my Yeswelder 205DS! BUT.. i have not run it on 120 much. :)

I agree the welding might need work.

MIG in general is a bit funny because you can't really control your heat and your filler metal rates separately. You can, but only within a range.. there is no way to add heat to a part with the welder without also piling up material on it. My 205ds can do tig but i havent even tried yet.. once i got enough power to melt 1/4", my desire to move away from flux core mig lessened substantially. :ROFLMAO:

Up until a year ago the only welder i had was the old $89 (now $129?) flux-core machine from Harbor Freight. It is non-rectified AC which makes flux core welding look like shit and spatter everywhere no matter what. I never did put a rectifier on mine but glad you did! Flux core also prefers a certain polarity so check that as well! My coworker just did same mod to his. What i DID do to mine was install a contactor because on my machine from 2009 the lead was ALWAYS hot whether you were pulling the trigger or not! So I at least fixed that...

Anyway, i did weld some stuff up to 3/16 successfully with it. I could not do 1/4" even with preheat, although i was using propane/mapp and not an acetylene torch. I could make stuff look ok on 1/4 but it would break when subjected to 'tractor use' so looks can be deceiving.

In general preheat is a good idea, especially where the weld is going to start. Underpowered mig on thick metal sucks because you have to pile bird shit on your starting location for a good while before you get enough heat into the metal to have a functional puddle and actually start 'travelling' with the gun. So heating up that spot as much as possible allows you have a much cleaner start that won't require as much grinding afterwards, and once the puddle is going you can usually keep it going with the welder just fine. You just have to weave back and forth slightly so you travel slower, instead of actually moving the gun in a straight line across the joint.

Im not a real welder, this was just my self-taught experience with a shitty flux machine.

All the materials list sounds pretty good. In fact, my B219 diagonal braces down to front end aren't even 2x2 square, they are pipe with flattened ends.
I'm a beginner. One variable that I tend to overlook with flux core is the wire stick-out distance from the tip. Longer stick-out gives a little more heat since the wire and flux are preheated when they get to the arc.
 
  • Like
Reactions: 1 user

trial and error

Well-known member

Equipment
B7100dt manual trans. homemade FEL, 4 way hydraulic dozer blade
Feb 16, 2023
392
369
63
NY
^ I am a big fan of my Yeswelder 205DS! BUT.. i have not run it on 120 much. :)

I agree the welding might need work.

MIG in general is a bit funny because you can't really control your heat and your filler metal rates separately. You can, but only within a range.. there is no way to add heat to a part with the welder without also piling up material on it. My 205ds can do tig but i havent even tried yet.. once i got enough power to melt 1/4", my desire to move away from flux core mig lessened substantially. :ROFLMAO:

Up until a year ago the only welder i had was the old $89 (now $129?) flux-core machine from Harbor Freight. It is non-rectified AC which makes flux core welding look like shit and spatter everywhere no matter what. I never did put a rectifier on mine but glad you did! Flux core also prefers a certain polarity so check that as well! My coworker just did same mod to his. What i DID do to mine was install a contactor because on my machine from 2009 the lead was ALWAYS hot whether you were pulling the trigger or not! So I at least fixed that...

Anyway, i did weld some stuff up to 3/16 successfully with it. I could not do 1/4" even with preheat, although i was using propane/mapp and not an acetylene torch. I could make stuff look ok on 1/4 but it would break when subjected to 'tractor use' so looks can be deceiving.

In general preheat is a good idea, especially where the weld is going to start. Underpowered mig on thick metal sucks because you have to pile bird shit on your starting location for a good while before you get enough heat into the metal to have a functional puddle and actually start 'travelling' with the gun. So heating up that spot as much as possible allows you have a much cleaner start that won't require as much grinding afterwards, and once the puddle is going you can usually keep it going with the welder just fine. You just have to weave back and forth slightly so you travel slower, instead of actually moving the gun in a straight line across the joint.

Im not a real welder, this was just my self-taught experience with a shitty flux machine.

All the materials list sounds pretty good. In fact, my B219 diagonal braces down to front end aren't even 2x2 square, they are pipe with flattened ends.
I did fix the polarity issue by connecting the "electrode" to the negative side of rectifier. And looks can be very deceiving on welds that are under powered. Where my angle attaches to the rectangle tube I did grind down the welds on the inside ( couldn't get it to slide up to the subframe with all the birds nest of weld) and I did find good penetration, I was actually half impressed. I am quickly learning patience with the equipment I have. I'll definately have to "clean up" my visible welds. Me and the grinder are going to have lots of quality time. I also discovered that there are two ratings of wire one that is rated for multiple passes and one that is not, unfortunately the 2lb spool I currently have is the single pass type, but it shouldn't take long to get through that. The preheat idea is a good one and I'll have to fiddle with that no oxy/acey though just mapp so 3/16 is def gonna be my limit on thickness. The yeswelder you suggested is currently 400$ and is on my list for the coming year.
 
Last edited:
  • Like
Reactions: 1 user

trial and error

Well-known member

Equipment
B7100dt manual trans. homemade FEL, 4 way hydraulic dozer blade
Feb 16, 2023
392
369
63
NY
Your choice of material is good. I’ve seen a lot of people build some impressive stuff with no more equipment than you have. It just takes longer and patience is the key.

I have never welded with your type of machine or process so I can’t help you with welding advice other than grind the surface clean before you weld. I would get some scrap and practice welding a bit before trying to join up the critical parts on the loader. And there won’t be too many forgiving parts on this project. Having a weld break while using the loader will at the very least wipe out the cylinders and maybe cause an injury.

Do you know someone that could help you set up the welder and give you some guidance before you get into the meat of this project?
Definately cleaning my surfaces to nearly mirror finishes and that is helping
 

trial and error

Well-known member

Equipment
B7100dt manual trans. homemade FEL, 4 way hydraulic dozer blade
Feb 16, 2023
392
369
63
NY
I'm a beginner. One variable that I tend to overlook with flux core is the wire stick-out distance from the tip. Longer stick-out gives a little more heat since the wire and flux are preheated when they get to the arc.
I've always heard 3/4-1" on "stick out" an d I'm doing my best to concentrate the heat and move slowly, I know I need to grind my welds down to make sure it's not just glue gunned together, the parts I did grind on the inside of the angle iron did showed good penetration though. The above pics where taken in a rush Sunday evening when I promised the Mrs I would be in hours earlier
 

North Idaho Wolfman

Moderator
Staff member
Lifetime Member

Equipment
L3450DT-GST, Woods FEL, B7100 HSD, FEL, 60" SB, 743 Bobcat with V2203, and more
Jun 9, 2013
28,289
4,853
113
Sandpoint, ID
I've always heard 3/4-1" on "stick out" an d I'm doing my best to concentrate the heat and move slowly, I know I need to grind my welds down to make sure it's not just glue gunned together, the parts I did grind on the inside of the angle iron did showed good penetration though. The above pics where taken in a rush Sunday evening when I promised the Mrs I would be in hours earlier
What size wire are you running?
 

trial and error

Well-known member

Equipment
B7100dt manual trans. homemade FEL, 4 way hydraulic dozer blade
Feb 16, 2023
392
369
63
NY
Too much stick out for that size wire. I use 3/8-1/2 stick out on .045 flux core with gas.
Thanks for the tip , I find of I go much shorter I end up welding my tip to the steel , any advice on that?
 

Yooper

Well-known member
Lifetime Member

Equipment
3901 LA525
May 31, 2015
1,456
429
83
NE Wisconsin
Thanks for the tip , I find of I go much shorter I end up welding my tip to the steel , any advice on that?
Try increasing your voltage/amperage in small increments along with your wire speed until you get that steady ‘frying bacon’ sound. The manufacturer‘s give you a starting point and you have to tweak it from there. Even two identical machines will land on slightly different settings from each other. Its all a dance between voltage, wire speed and operator speed. Experiment and learn and you will get better!
 
  • Like
Reactions: 1 users