Homemade Loader Build. Under $1380

Lblevins

Member

Equipment
Kubota L2200, John Deere 1050, Kubota L3301 with woods bh80x
Sep 1, 2017
48
1
6
Ada, ok, USA
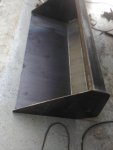
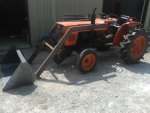
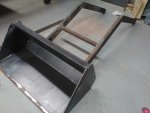
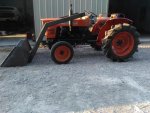
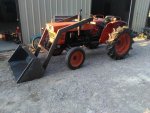
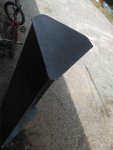
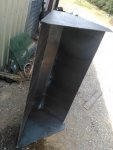
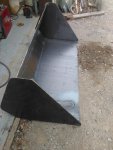
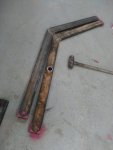
Well I have decided to start on my Loader build for my Kubota L2200. I am sad I could do the tapered loader arms like a nice oem style but this will have to suffice for now. I will not be doing anything crazy with it other that dirt rock and sod so it's all built out of 3/16" and will be more than capable of anything I will put it threw. This is just the beginning so before any negative comments please know there is a lot more to this at I have time to work on it. I made my templates for my side plates to go on arms for hydraulic cylinders to mount just haven't had time to cut them out yet. So far im in it for roughly 3.5hrs not counting the drive to get materials or measurements I have taken etc. Here are a few pics of it tacked together. Bucket will have 2" strap on side plates at front and two 1x3" rect tubes on rear going across where my vertical plates for arm and hydraulic mounts will go and a 1x3" rect tube going across top edge of bucket also. I am waiting on a buddy to bring me a cutting blade or I will end up building one. It will have 1" pins everywhere with grease certs. I will be using 2x24" cylinders from Magister Hydraulics, They have a 32" pin to pin and extend to 57" for some decent height. Wolfman told me which control valve to run so hydraulics will go from pump to loader to 3 point. I would have loved to have bought a tractor with a loader but I have 5 daughters and do my best to build everything myself and if I don't know something I ask and learn.
 

Attachments

Lblevins

Member

Equipment
Kubota L2200, John Deere 1050, Kubota L3301 with woods bh80x
Sep 1, 2017
48
1
6
Ada, ok, USA
My total price for all parts invested is only $1380 and then some labor on my part. lol
 

RCW

Well-known member
Lifetime Member

Equipment
BX2360, FEL, MMM, BX2750D snowblower. 1953 Minneapolis Moline ZAU
Apr 28, 2013
8,399
4,053
113
Chenango County, NY
Now why would you do it THAT way?!?!:eek:

Just poking fun!

Looks good to me so far, and looking forward to your progress; please post pictures along the way.

We have some very talented fabricators here, and I'm sure not one of them.!.!.!..:p

Best wishes on your build!
 
Last edited:

Yooper

Well-known member
Lifetime Member

Equipment
3901 LA525
May 31, 2015
1,463
433
83
NE Wisconsin
Looks like you are off to a good start. The only advice I can offer now is don't keep track of your time. Just enjoy the journey and keep us posted.
 

Lblevins

Member

Equipment
Kubota L2200, John Deere 1050, Kubota L3301 with woods bh80x
Sep 1, 2017
48
1
6
Ada, ok, USA
Let me know when you are ready to make a backhoe...:)
That will be as soon as this is done. I have already drawn up everything to make it next minus the hydraulic stabilizer legs to balance it while in use. But it will probably be a self contained unit with a 2cyl kubota engine I am getting from a buddy of mine with a belt driven pump and drive axle.
 

bucktail

Well-known member

Equipment
L1500DT, 6' king kutter back blade, boom, dirt scoop ford disk JD212
Jun 13, 2016
1,234
181
63
MN
Are you going to gusset the arms at the angle?
 

Lblevins

Member

Equipment
Kubota L2200, John Deere 1050, Kubota L3301 with woods bh80x
Sep 1, 2017
48
1
6
Ada, ok, USA
Got the top rect. tube on bucket.. Buddy told me there was no way my little Lincoln pro 140 would be able to flux weld this stuff but it's been doing good. Will probably do my side straps on front edge and cutting blade tonight or tomorrow as one of my daughters b-day is today.
 

Attachments

Lblevins

Member

Equipment
Kubota L2200, John Deere 1050, Kubota L3301 with woods bh80x
Sep 1, 2017
48
1
6
Ada, ok, USA
Pic is before I cut 8 inches off the arms down by the bucket to bring the bucket closer. It's not much but a little progress. I am going to have to retap the holes on the tractor where the mounts will be everywhere due to the fact the threads are old and don't hold to torque. Finished making my hydraulic arm mounts for center of loader arms just need to cut them out now. Still have to make bracket for uprights to arms and bucket to arms with all my braces on bucket and loader to tractor. All the big stuff is getting close to done though.

Also I purchased some 4"led headlights and rear spot lights for it today. I am planning to rewire the tractor and put a nice fuse panel and bosch gauge set sometime soon.
 

Attachments

torch

Well-known member

Equipment
B7100HSD, B2789, B2550, B4672, 48" cultivator, homemade FEL and Cab
Jun 10, 2016
2,595
838
113
Muskoka, Ont.
When I built my loader, one design "rule of thumb" I came across was that the bucket on the ground should be approximately 1 front tire diameter in front of the tractor. EG: if the front tire is 20" in diameter, then the back of the bucket should be approximately 20" in front of the tractor.

The front tires act like a fulcrum with the weight in the bucket on one side of the see-saw and the weight of the tractor on the other side. Putting the bucket further out puts a great deal of stress on the front axle and effectively reduces the load capacity. Keeping the weight close to the tractor keeps more of the weight on the rear wheels.

Of course, if the bucket is too close to the tractor you will dump your load on the tractor hood instead of the truck/trailer/spoil pile.

My build thread is here, if you are still looking for ideas.
 

Lblevins

Member

Equipment
Kubota L2200, John Deere 1050, Kubota L3301 with woods bh80x
Sep 1, 2017
48
1
6
Ada, ok, USA
When I built my loader, one design "rule of thumb" I came across was that the bucket on the ground should be approximately 1 front tire diameter in front of the tractor. EG: if the front tire is 20" in diameter, then the back of the bucket should be approximately 20" in front of the tractor.

The front tires act like a fulcrum with the weight in the bucket on one side of the see-saw and the weight of the tractor on the other side. Putting the bucket further out puts a great deal of stress on the front axle and effectively reduces the load capacity. Keeping the weight close to the tractor keeps more of the weight on the rear wheels.

Of course, if the bucket is too close to the tractor you will dump your load on the tractor hood instead of the truck/trailer/spoil pile.

My build thread is here, if you are still looking for ideas.
Thanks for the advice i will check out your build. I am not very knowledgeable on this so positive advice is welcome. I had a buddy come over and told me I needed to move bucket closer so we measured and that was the extra I have no cut out of the lower arm length. I was only 6" off but like you said it doesn't take much to screw it up.
 

Attachments

torch

Well-known member

Equipment
B7100HSD, B2789, B2550, B4672, 48" cultivator, homemade FEL and Cab
Jun 10, 2016
2,595
838
113
Muskoka, Ont.
  • Like
Reactions: 1 user

Lblevins

Member

Equipment
Kubota L2200, John Deere 1050, Kubota L3301 with woods bh80x
Sep 1, 2017
48
1
6
Ada, ok, USA
I debated on teeth but since im not going to do any hard dirt work just moving stuff around etc I dont think it would be a good idea for me. Going to build my vertical arms to mount today and am waiting on my buddy to bring me a piece of 4'x4' 1/4" for arm mounts, bucket mounts, cylinder mounts and my tractor mount under and on the sides since they will see the most twisting. Going to run two straps to rear and two to nose for support arms off mount to tractor.
 

Yooper

Well-known member
Lifetime Member

Equipment
3901 LA525
May 31, 2015
1,463
433
83
NE Wisconsin
Looking good, bud! What are you using to cut the sheet metal? I would like to suggest that you make your loader a ssqa for future attachments.
 

Lblevins

Member

Equipment
Kubota L2200, John Deere 1050, Kubota L3301 with woods bh80x
Sep 1, 2017
48
1
6
Ada, ok, USA
Looking good, bud! What are you using to cut the sheet metal? I would like to suggest that you make your loader a ssqa for future attachments.
I thought about making it where I could do other attachments but decided against it. I have been very diligent with thin cut off wheels on a 4.5" dewalt grinder. Measuring and marking with a sharp metal point. I have a lot of experience with metal work, just nothing really structural or this thick. I am going to cut 8 inches off the top horizontal arms also to make it sit nice and level. I cut it a little long to give myself some room for adjustments as this is my first real go around by myself on this and didn't want to be short and have to start over.