Front loader for a B7200

Paul Allwood

Active member
Premium Member

Equipment
Kubota B7200HSTD, RC60-72H MMM, homemade FEL
Jul 8, 2025
233
202
43
Baranduda, Victoria, Australia
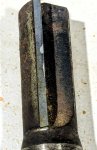
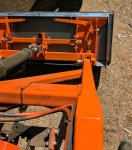
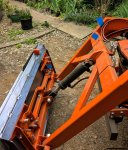
I tried grinding a bevel on a piece of 100 x 10 mm mild steel that I'll weld on to the bucket for a cutting edge, but wasn't happy with how uneven it came out. Don't think it would have bothered the dirt but not sure if the tooth bar would have sat on snuggly, and I'd rather start with it straight.

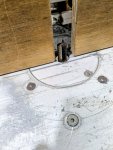
The router table worked ok to clean up my dodgy grinding.


Attachments

Runs With Scissors

Well-known member

Equipment
L2501 TLB , Grappel, Brush Hog, Box Blade, Ballast box, Forks, Tiller, PH digger
Jan 25, 2023
3,261
4,105
113
Michigan
Thanks. When you say it came down to a point, are you referring to the orange cutting edge ? Is this the one you beveled by eye ? If so, nice job. Is it mild steel or something else ?
No I was referring to the black part. Thats the part I beveled by “eye”.

The orange part is the "factory bucket"

In regard to your diagram, I am referring to your “Y” measurement. That is zero inchs/mm tall on my toothbar.

Mine comes to a point there.

I suppose I was thinking that I wanted the tooth bar to have as little “resistance” as possible.

Yes, it was made of mild steel.

It was actually a “kit” that I found on Amazon, except for the teeth.

The “kit” was 3 pieces of metal consiting of 2 metal pieces for the sides, one long piece for the “bar”, and 4 nuts and bolts.

I mainly bought the “kit” becasue it was “stupid cheap” at the time……something on the order of 75 USD. I could not source the metal nearly that cheap, so I bought it.

The teeth were sourced from “The Big A” as well, but were not part of the “kit”.


EDIT: I just watched your video, and “kudos to your sir” 👏

That setup made “short work” of that job. It took me literally “hours” to bevel mine by hand, and I am quite sure yours is much more “even” than mine.

Was that some sort of “carbide” router bit?
 
Last edited:
  • Like
Reactions: 1 user

Paul Allwood

Active member
Premium Member

Equipment
Kubota B7200HSTD, RC60-72H MMM, homemade FEL
Jul 8, 2025
233
202
43
Baranduda, Victoria, Australia
Thanks. Bringing the bolt on tooth bar to a point makes sense to minimise resistance. The bit that I'm making here will be the bucket edge. If it wears too much I'll attack it with some hard facing rods.

I ground mine first but I wasn't happy with how uneven it ended up so I had a go at it with the router. Much happier with it now. I used a standard 1/2" carbide tipped router bit, same as I use for timber (just not this one), with the router slowed down a little.

I did the same thing a few years ago when I made a pan brake. Unfortunately I don't have a mill.
 
Last edited:

torch

Well-known member

Equipment
B7100HSD, B2789, B2550, B4672, 48" cultivator, homemade FEL and Cab
Jun 10, 2016
2,805
1,041
113
Muskoka, Ont.
The carbide used for milling wood is a different grade than the carbide used for milling steel. Wood bits are typically C2 to C4 (softer, tougher and less likely to chip in an interrupted cut) whereas steel milling bits are usually C6 or higher (harder, more brittle, holds edge longer in an uninterrupted cut but chips easily ).

Harder grades of wood bits do OK in softer metals such as aluminium but I'm betting that bit is pretty dull now. And I wouldn't try that trick to mill AR5 or similar wear-resistant steel.

You could mount a carbide endmill in the router, but bear in mind that metal cutting requires much lower rpm than wood. For mild steel and a 1/2" carbide endmill you might want the router down at the 1,000 rpm level.
 
  • Like
Reactions: 1 user

Paul Allwood

Active member
Premium Member

Equipment
Kubota B7200HSTD, RC60-72H MMM, homemade FEL
Jul 8, 2025
233
202
43
Baranduda, Victoria, Australia
The carbide used for milling wood is a different grade than the carbide used for milling steel. Wood bits are typically C2 to C4 (softer, tougher and less likely to chip in an interrupted cut) whereas steel milling bits are usually C6 or higher (harder, more brittle, holds edge longer in an uninterrupted cut but chips easily ).

Harder grades of wood bits do OK in softer metals such as aluminium but I'm betting that bit is pretty dull now. And I wouldn't try that trick to mill AR5 or similar wear-resistant steel.

You could mount a carbide endmill in the router, but bear in mind that metal cutting requires much lower rpm than wood. For mild steel and a 1/2" carbide endmill you might want the router down at the 1,000 rpm level.
You're right about the chipping. There's a couple of small chips out of one cutting edge (looks worse in the photo than in real life), and both edges are a bit dull but not terrible. I've had this bit for about 35 years and it's had a lot of use, mostly on wood, but hasn't been used for any finish cutting for quite a while.

I didn't realise there were different grades of carbide for wood and steel. Might look for a carbide end mill if I have any more steel to run through the router. Thanks for the tip.
 

Attachments

Paul Allwood

Active member
Premium Member

Equipment
Kubota B7200HSTD, RC60-72H MMM, homemade FEL
Jul 8, 2025
233
202
43
Baranduda, Victoria, Australia
Yea your geometry is off.
Your not getting enough roll back or enough roll over.
This could be caused by bracket location or simply by not enough stroke on the dump cylinder.
I can tell you your too close on the roll pivot point and the roll cylinder attachment point.

Interesting choice using one cylinder, you'll lose a lot of roll back / breakout strength doing that.
You're right, and I'm now regretting my decision to go with a single curl/dump cylinder. I've just test fitted the bucket made from 3 mm steel, so not overly heavy, and found that with the arms raised about half way and the bucket dumped fully, the position of the pivots plus the extra weight of the bucket means the cylinder can't curl it back. Part of the problem appears to be play in the pivot points that allow them to pull over so that they're almost in line.

I'll obviously have to modify it as it doesn't work as it is. Thinking I'll change it to a more conventional 2 cylinders for curl and dump and pay better attention to placement of the pivot points and making them with less play.

I kicked it and came inside for a coffee - I'll get some pics when I get back out to it.

Pretty sure someone was doing something like this when they invented the grinder.

I watched a few good YouTube videos by VinyB where he designed and built a backhoe - his favourite saying was "you're only one grinder away from success".
 

North Idaho Wolfman

Moderator
Staff member
Lifetime Member

Equipment
L3450DT-GST, Woods FEL, B7100 HSD, FEL, 60" SB, 743 Bobcat with V2203, and more
Jun 9, 2013
34,109
9,297
113
Sandpoint, ID
You're right, and I'm now regretting my decision to go with a single curl/dump cylinder. I've just test fitted the bucket made from 3 mm steel, so not overly heavy, and found that with the arms raised about half way and the bucket dumped fully, the position of the pivots plus the extra weight of the bucket means the cylinder can't curl it back. Part of the problem appears to be play in the pivot points that allow them to pull over so that they're almost in line.

I'll obviously have to modify it as it doesn't work as it is. Thinking I'll change it to a more conventional 2 cylinders for curl and dump and pay better attention to placement of the pivot points and making them with less play.

I kicked it and came inside for a coffee - I'll get some pics when I get back out to it.

Pretty sure someone was doing something like this when they invented the grinder.

I watched a few good YouTube videos by VinyB where he designed and built a backhoe - his favourite saying was "you're only one grinder away from success".
Sorry to hear that.

Can I offer a suggestion that might really help you out all the way around?

I didn't like the bucket dump geometry, but I also am not a fan of the lift geometry either.
It's too flat.
If you get longer cylinders for the lift and swap the 2 cylinders from lift to dump you will be much better off all the way around.

1762231652539.png
 
  • Like
Reactions: 1 user

North Idaho Wolfman

Moderator
Staff member
Lifetime Member

Equipment
L3450DT-GST, Woods FEL, B7100 HSD, FEL, 60" SB, 743 Bobcat with V2203, and more
Jun 9, 2013
34,109
9,297
113
Sandpoint, ID
You're right about the chipping. There's a couple of small chips out of one cutting edge (looks worse in the photo than in real life), and both edges are a bit dull but not terrible. I've had this bit for about 35 years and it's had a lot of use, mostly on wood, but hasn't been used for any finish cutting for quite a while.

I didn't realise there were different grades of carbide for wood and steel. Might look for a carbide end mill if I have any more steel to run through the router. Thanks for the tip.

I tried to use one of my routers for something similar.
It was aluminum, well when chips fell down and got sucked into the motor it was game over! 🤬
 
  • Sad
Reactions: 1 user

Paul Allwood

Active member
Premium Member

Equipment
Kubota B7200HSTD, RC60-72H MMM, homemade FEL
Jul 8, 2025
233
202
43
Baranduda, Victoria, Australia
Sorry to hear that.

Can I offer a suggestion that might really help you out all the way around?

I didn't like the bucket dump geometry, but I also am not a fan of the lift geometry either.
It's too flat.
If you get longer cylinders for the lift and swap the 2 cylinders from lift to dump you will be much better off all the way around.

View attachment 165116
Thanks. Food for thought. Maybe I'll listen to you better this time ?
 

Paul Allwood

Active member
Premium Member

Equipment
Kubota B7200HSTD, RC60-72H MMM, homemade FEL
Jul 8, 2025
233
202
43
Baranduda, Victoria, Australia
Here's a video that shows the problem pretty well. The bucket curls back ok until it just goes over the point of no return where the pivot points end up either in line or just on the wrong side of each other. The amount of play in the psingle pivot at the bottom of the curl/dump cylinder is also pretty clear. Once it gets to this point of travel it doesn't need to be out by much to cause a problem.


I'll scratch my chin a bit more and post some pics of what I think I might change.

At least the bucket looks a bit like a bucket, so some forwards progress.
 

Attachments

  • Like
Reactions: 1 user

Paul Allwood

Active member
Premium Member

Equipment
Kubota B7200HSTD, RC60-72H MMM, homemade FEL
Jul 8, 2025
233
202
43
Baranduda, Victoria, Australia
Starting to look at where I might be able to mount 2 longer travel curl/dump cylinders. Haven't really settled on anything yet but here are the options in looking at.

The first pic shows some options for approximate mounting areas for the top and bottom of the cylinders with bits of blue tape.

The second is looking straight down one of the arms - I've managed to get the arms pretty well straight in line with the SSQA locking bits so mounting the top end on the arm will be difficult.

Some more chin scratching still needed to settle on locations, cylinder stroke and modifications required.
 

Attachments

  • Like
Reactions: 1 user

mdhughes

Well-known member
Lifetime Member

Equipment
L3901DT
Dec 10, 2014
1,364
1,136
113
Ste Geneveive county, MO
Are you thinking of an internal stop in the cylinder or something else ?
Something on the loader arms that stop the SSQA. The LA525 has a piece of metal on the loader arm and on the SSQA that keeps it from dumping too far.

I can take a picture of what I'm talking about tomorrow if you would like.
 
  • Like
Reactions: 1 users

Paul Allwood

Active member
Premium Member

Equipment
Kubota B7200HSTD, RC60-72H MMM, homemade FEL
Jul 8, 2025
233
202
43
Baranduda, Victoria, Australia
Something on the loader arms that stop the SSQA. The LA525 has a piece of metal on the loader arm and on the SSQA that keeps it from dumping too far.

I can take a picture of what I'm talking about tomorrow if you would like.
Thanks - all suggestions, and photos, gratefully received.
 
  • Like
Reactions: 1 user