B6100 w/ Loader+Backhoe

Vigo

Well-known member

Equipment
B6100, B8200
Jan 9, 2022
595
339
63
San Antonio Texas
So i have a B6100 w/ b219 FEL that I dearly love. A buddy of mine who used to own a small skid steer and somewhat regrets getting rid of it had been looking for some kind of small and maneuverable loader for use around his property. He had borrowed my b6100 for a week or two and enjoyed it, and swung at a couple of older BXs with loaders that didn't work out. One day I came across a local listing for a couple of interesting kubotas, one a larger 4wd L w/ fel, and a B6100 w/ fel AND backhoe for $5k.

Now, from my time on tractor forums i've noticed that small loader machines are nowhere near as rare in other parts of the country as they are here. It mostly seems that the prevalence of such machines tracks closely with the existence of snow, followed by 'arable land', of which South Texas has very little! Down here, small loader machines of any variety are rare and expensive. So 5k for a B6100 with loader and backhoe seemed reasonable even if the pictures in the listing looked.. pretty rough. The guy said it ran and was usable. I recommended my friend at least go look at it..

Well, he bought it and I told him to just drop it off with me since the backhoe wasn't on it and it wasn't 'medically recommended' for my buddy to attempt that reassembly due to some joint issues. When I first saw it in person, i was amazed.. at how beat it was! "I bought it in the dark", he says. :ROFLMAO: But I also knew I might have been a bit too much of an enabler by finding the thing in the first place and encouraging him to go look at it since it was a rare shot at this kind of machine in this area.. and I felt a little responsible for the mess that was now before us.

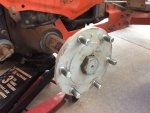
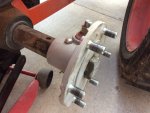
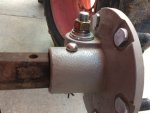
So, i've been doing a mostly mechanical rehab with a little bit of cosmetic rehab along the way. I've been working on it in my free time since February, and I would say i'm 70-80% done. I'm going to post everything i've done along the way.

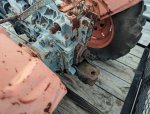
I have tons and tons of pics of along the way, but surprisingly (or maybe not if you'd seen what it looked like..) I have almost no pictures of its 'before' state.. but i might have saved the original pics from the ad on my work computer, and my buddy might have some too. For now.. this is a sneak peak as to its original condition:

FA47329B-262A-4AA2-BA51-A18DF49069DA.jpeg


Lots more to follow..
 
  • Like
Reactions: 1 user

Vigo

Well-known member

Equipment
B6100, B8200
Jan 9, 2022
595
339
63
San Antonio Texas
So one of the first things I did was replace the battery. These tractors, at least from the several i've seen, are apparently supposed to have a group 51 battery in them. That's unfortunate because that's a small car battery that costs just as much as a big car battery, and most of the battery sellers don't even offer their cheapest/value line of battery in a group 51, so it's just kind of an expensive battery to be cranking a 600cc engine with.

On my 6100 im running group U1 batteries, which is the most common riding mower size and basically the cheapest 'engine cranking' battery you can get in ANY size. I actually mounted another one on my loader frame because i came into another one for free, so my 6100 runs TWO U1 batteries, but anyway..

This 6100 came with a larger car battery in it. A group 51 is basically the narrowest car battery there is and anything wider will rub on the hood and cause the hood not to align properly. Well this one was WAY bigger and the hood wouldn't even close when you dropped it unless you guided it into place, and even when it was closed it rubbed on the throttle linkage badly!
74042DB1-5C1E-4B89-9D34-F66069A90DD3.jpeg

Here's how bad that hood fitment was. As for the total lack of an air cleaner, the brake pedals AND throttle pedal being flopped all the way down as if they're no longer hooked to anything.. yeah, we'll get to all that. :poop:
B8B8E06A-A777-4882-A903-825998CF3043.jpeg

Or how about the fact that if the bulkhead/firewall between the battery and the engine wasn't MISSING, the huge battery would probably interfere with it? Oh and the cracked fan, missing fan shroud, missing side panel... all to be addressed.

So i deal with a LOT of batteries and and pretty strongly believe that you'll get a better result treating a cheaper battery better, than getting a more expensive battery and treating it poorly. So, im usually looking for the cheapest option, or something close to it. Having already tried the U1 batteries I wanted to see if one of the 'powersport' batteries that wasn't just as expensive as a car battery would do well in the 6100, so i decided to try a '16CLB' battery because it was the heaviest battery that wasn't right up there in price with all the $100+ car batteries. With lead-acid batteries, the technology is ancient, nothing is new (except EFBs), and there are no surprises really.. whichever one weighs the most for the least dollars is usually the best value because it has the most lead in it! This one wasn't the least dollars (thats the U1s and several really small motorcycle/atv batteries) but it was only $59 at Walmart.

5a995290-6a54-4ba3-b06f-112631f19d85.1f9664fad0e38a7098a6a317dd06bc91.jpeg

It's rated at 240cca, about the same as the cheaper U1, but it's smaller and seems to actually perform slightly better (by ear). I've run some pretty long glow plug and cranking on it and it has never seemed like it was going to peter out before i got what i needed. It's only been a couple months, time will tell, but so far so good.

The tractor had a replacement parts store positive battery cable for a car on it. Since this battery doesn't have car-style terminals, I went ahead and crimped a more correct lug onto the end of it. The starter end i just cleaned and reinstalled.
01876377-8DF2-4913-98D3-EEA1596E5B0A.jpeg

CF7C8B10-3F27-4AB0-8E78-B694C62A978B.jpeg

The negative cable I swapped out for something appropriate I already had. I have a 5gal bucket full of 'large cables' from parting out cars, redoing the wiring on golf carts, etc, so i was able to just find something suitable and swap it on, and keep the car-style cable for another project. And now the hood closed properly. (y)
 
Last edited:
  • Like
Reactions: 1 user

Vigo

Well-known member

Equipment
B6100, B8200
Jan 9, 2022
595
339
63
San Antonio Texas
So the radiator was nearly new, and the radiator hoses as well. Probably a bad sign, all things considered. These came with an all-metal radiator that barely even sees pressure and my other 3 near-identical tractors appear to still be on their originals. Whether the old one was impaled on something or just split open due to freezing tap water, we'll never know. I drained 100% tap water out of it, and saw some freeze-related damage elsewhere on the tractor as well, but who knows..

Anyway, since it was new I wanted to make the best of it, like making sure it wasn't going to rub open on something, or overheat and blow up the engine anyway because of some other stupid issue like the missing fan shroud.

So one of the 'selling points' I made to my friend about buying a matching tractor to my 6100 was that I had a 7100 'parts tractor' that was part of the package deal i got my 6100 in (also several implements, etc). Good thing too because it turned out this 6100 was missing a fair number of parts, and some things were misassembled or missing that i was able to quickly figure out the correct version of by looking at the other tractor.

One of those things was the radiator mounts.
9B64944D-8A1A-4780-94AB-45344CA43C0E.jpeg

Here's one on the 'good' tractor (at least, the one im fixing..) with a too-long bolt having an oversized nut stuck under it as a spacer but not poking out the top so maybe not being too-long enough to have to use that much spacer..?

90A86A98-F02C-403A-853C-9A77FBF5C69B.jpeg

And here's the original/correct setup on the parts tractor showing a much less-crushed bushing, and a bolt that protrudes through the nut and uses a pin/clip as a safety mechanism.
48267633-5989-4478-8BB7-282805B85FB1.jpeg

Here are the bushings that came out, one clearly having been overtightened.
A1263A9B-B914-4649-9425-8C83E6520617.jpeg

So off to my drawer of swaybar endlink and shock bushings left over from car repairs gone by, and..
D80627FE-F0BA-4DDA-96B4-B3197606CC3D.jpeg

Here's what i came up with.
B24BC6BF-A3CC-44DE-85F1-6BE2C46B4AEB.jpeg

There's the mismatched bolts and 'washers' that came out, and the stuff i found to replace them.
3F9450FF-7D95-487D-89BF-814139952D9A.jpeg

Which i drilled holes in for safety pins.
FCBBD75E-E259-4C63-B05A-E6385911BCEB.jpeg

I also replaced this broken fan with the fan from my parts tractor. I've seen similar damage cause noticeable vibration on cars. Nobody ever believed me that their vibration was a cracked fan, but i don't know why it's such a difficult concept. Anyway, fixed that, AND installed the fan shroud from the parts tractor as well.
 
  • Like
Reactions: 1 users

Vigo

Well-known member

Equipment
B6100, B8200
Jan 9, 2022
595
339
63
San Antonio Texas
So about those brake pedals flopping down as if they weren't connected to anything.. yeah they weren't. Both brake rods had been broken, and one of them had been 'repaired'. It was repaired so well, it's hard to fathom why it broke again. :rolleyes:
The bad:
B53EF0A8-46D9-418A-A960-10A526FF38F2.jpeg

The worse!
1C7EE070-6E51-472C-9C18-2E3CC9124317.jpeg

Ok, on to the actual brakes. After I removed the beat-to-heck fenders and pulled the backing plates, I found one of them soaked in oil from a leaking seal behind the drum. That brake lever still moved, i suppose because it was lubricated.. frequently, constantly? Certainly enough!
EFE72D13-FD7A-4DB3-BF9A-5E9A42E457EB.jpeg

The other side, in spite of being hooked to a broken rod, seemed to be dragging at times. Once pulled it was clear why, with one of the return springs having broken.
34EE6F76-7A09-4373-96B0-F148536D612B.jpeg

That brake lever was seized. So, back to the parts tractor.. a non-broken return spring, some non-oil-saturated brake shoes, some non-broken brake rods.. but that still left a leaky seal and seized brake lever. I ordered the seal from Messick's. After removing the snapring holding the drum it slide right off, thankfully not seized, probably also due to frequent lubrication.
5E363369-534A-4A60-9FBE-8F7735FF5BCB.jpeg

To remove the seal, which was recessed way down in the fairly small 'brake pocket' and not really able to be hit from the sides at all, I resorted to an old trick that's a bit risky.. drill through the seal metal, thread a wood/sheetmetal screw into it, and pull up on that with something, in this case a small prybar. It's risky because it's very easy to drill further than you intend to when it breaks through the seal metal, and depending on what's behind it and how close, it's easy to cause damage to more important parts on the other side. With a lot of care (or a depth stopper on the drill bit if you're smarter than me!!) it can be done. The new seal hammered in beautifully with a very large 1/2" drive deep socket, probably a 34 or 36mm.
After that, it was on to the backing plates and their levers, one of which was seized and the other i think was not seized but did not move cleanly.
9EB95F44-A087-46D2-820D-A10C3DFBA66F.jpeg

At the bottom you can see the seized shaft which is supposed to 'spread' the brake shoes as it rotates. It's retained by a small snap ring. After removing the snap ring, i decided to take the lazy and risky approach, skip heat and lube, and just see how hard i could push on it in the press before it seriously distorted the backing plate and i regretted being lazy.
EDF25E44-9447-4D5F-82C3-FFEF702A19DB.jpeg
DA000E80-00B5-49D8-AF4C-DB1AB307A482.jpeg

Turns out it popped loose before the plate was ruined! I pushed it out and proceeded to wire wheel the surfaces before reassembling with the antiseize pictured there as lubricant.
84233514-88F8-4118-AE34-B91250E58B2B.jpeg

Technically there are o-rings on that lever shaft, but i didn't even bother to replace them. It's pretty clear that the o-rings alone are not what this mechanism needs to stay functional. What it clearly needed was to ever, ever be taken apart and cleaned/lubricated AT ALL.. Now that it's clean and lubed it will probably stay functional for a couple decades even without the o-rings. I have some large o-ring assortments and im sure I had replacements, but the o-rings just seemed like such a poor bandaid on the design that it seemed totally pointless to even spend the 2 minutes to match them up. If this thing had no o-rings but DID have a grease fitting, it would be a better design. Anyway, these things probably never seize up if the brakes are actually used and only seize when the tractors are left to sit for years. Hopefully this one won't have that particular problem for a good while now. Maybe my buddy will ford a river of solvent some day and make me wish i had the o-rings back in.. Anti-seize is also slightly abrasive which means if its moving under any force it's constantly 'sanding' itself of any accumulated bits of rust trying to seize it back up.

Anyway, after it was all back together, time to adjust the brakes! Luckily for me, the tractor had an FEL and nothing on the back (backhoe was still off) which means it had very light rear tires, and I have a gravel driveway so.. very easy to adjust brakes by just keeping the pedals joined together with the small locking plate between them, and see which rear wheel locks up first. After 2 or 3 times hopping off to adjust the turnbuckles on the brake rods, the brakes were back in sync. Now, if it was a 2wd tractor with a loader and no rear implement, even perfectly good brakes would still be crappy brakes since the back tires have so little weight on them to generate traction. However, this is a 4wd tractor so going from 2 braked wheels to 4 braked wheels is as simple as pushing the 4wd lever. And I did eventually put the 700lb backhoe back on it, so now it's all fixed up for brakes. (y)
 
Last edited:
  • Like
Reactions: 4 users

GreensvilleJay

Well-known member

Equipment
BX23-S,57 A-C D-14,58 A-C D-14, 57 A-C D-14,tiller,cults,Millcreek 25G spreader,
Apr 2, 2019
9,675
3,925
113
Greensville,Ontario,Canada
gee, looks like you're having waaaay tooooo much FUN !!!!

it'll be interesting to see the progress of the 'weekend project' !
 
  • Like
Reactions: 1 user

Lencho

Active member
Lifetime Member

Equipment
B7100hst
Jan 21, 2017
407
85
28
NM
It is great to see your progress and I appreciate your excellent photos. Interesting case study in parts compatibility between the B6100 and B7100 as well.
 
  • Like
Reactions: 1 user

Vigo

Well-known member

Equipment
B6100, B8200
Jan 9, 2022
595
339
63
San Antonio Texas
Obviously the B6100 had been run out of diesel a time or two, judging by the condition of the air bleed screw on the injection pump. Apparently, none of those times was a 12mm wrench to be had, because it looks like it was attacked repeatedly with slip joint pliers, or hell maybe a leatherman! Anywho, the 7100 had one a lot less beat up, so i dressed up the slightly damaged (as opposed to majorly damaged) flats on my bench grinder, matched up a new copper sealing washer out of my assortment, and fixed it to the 6100.
023ADCE2-628F-4B07-815B-ED84DC1964BC.jpeg
0E777162-15AC-42B9-A4A9-B6E137CAA896.jpeg

959577DA-D1DA-403B-8F05-578CDCA6A834.jpeg
7FD16EA6-CE4C-47B5-8FA2-FAFB6C768152.jpeg
 

Vigo

Well-known member

Equipment
B6100, B8200
Jan 9, 2022
595
339
63
San Antonio Texas
The fuel filter on the 6100 looked pretty disgusting. When i bought my B8200, the owner had included a new fuel filter (and air filter which also ended up on this 6100) so i went ahead and used that. I actually thought the filter bowl was made of glass, but when i sprayed brake cleaner into it to rinse it out, it instantly went from clear to cloudy, and didn't fully recover. :cautious: Anywho, even with the cloudy plastic it's sure a lot better to look at without all that gunk in there.
66736392-6A96-499F-9088-0A47025AE16F.jpeg
ACF604B0-D6A8-4705-A2AD-2C9EC3C4FD2E.jpeg

0BE3B821-782C-4702-A406-F65B398B7C2B.jpeg

Keep in mind every picture in this thread was taken AFTER i took all the body panels off the tractor and pressure washed the heck out of it. (y)
 
Last edited:
  • Like
Reactions: 1 user

Vigo

Well-known member

Equipment
B6100, B8200
Jan 9, 2022
595
339
63
San Antonio Texas
So this thing has 5 pedals on it:
  • Clutch
  • Left Brake
  • Right Brake
  • Throttle
  • Diff Lock
Initially the ONLY one that worked was the clutch! But i still adjusted it.. and replaced the cotter pins and other mismatched clips on most of the pedals' clevis pins with small hairpins for ease of future service. I also cleaned the pedal rocker shaft area and greased both sides of the pedal shaft. You can tell a grease fitting hasn't been used in a while when you have to scrape hardened gunk off of it before you can try it..

I already went over the brakes. The throttle pedal linkage I haven't repaired yet. The diff lock pedal was simply seized. It wasn't the pedal or linkage, but the actual shaft in the rear end housing which was stuck.
diff lock.jpeg

Knowing it would be a can of worms if i couldn't get it freed up from the outside, I went ahead and did some 'exploratory hammer strikes' starting lightly and alternating from left to right, progressively harder until i did get it moving. I worked on it for a while and got it to move completely freely, and verified that it does work and the spring return does disengage it normally. I assume the shaft is splash lubed internally, but since it's above the fluid level it will dry out and rust if noone drives the tractor for a long time. So, dodged a bullet on that one! Another thing that failed only from sitting still for too long..
 
Last edited:
  • Like
Reactions: 1 users

Lil Foot

Well-known member
Lifetime Member

Equipment
1979 B7100DT Gear, Nissan Hanix N150-2 Excavator
May 19, 2011
7,259
2,203
113
Peoria, AZ
Interesting thread & good work, keep it coming!
 
  • Like
Reactions: 1 users

Vigo

Well-known member

Equipment
B6100, B8200
Jan 9, 2022
595
339
63
San Antonio Texas
Aside from the horribly beat up hood and fenders, one of the things really adding to the sense of neglect coming off this thing was the front wheels and tires. Someone had put some 5.3-12 trailer tires and wheels on it. Not only that, they were 'dusted' in orange paint in the most half-assed way, right over some warning stickers, with plenty of the original bright white showing through. The trailer wheels were made to use conical lug nuts, but the original flat nuts were tightened down on top, tearing up the seats on the wheels.. but only the lug nuts that weren't missing, on the studs that weren't damaged or missing. :poop:

But even if it had proper lug nuts on a full set of studs, it would still be skinny trailer tires on the front end of a 4wd, making it about a two and a half wheel drive at best. And it turns out the tractor didn't like the diameter mismatch compared to the original 4wd tire sizes as the 4wd system frequently felt bound up. Jeez. Got to fix all this. The tire/wheel problem was easy as the parts tractor actually had a real good set of 6-12 r1s on original kubota front wheels.

0F89975E-BFD5-46D3-BD6E-B54DBB17761B.jpeg
Look at that sweet paint job right over the warning sticker, and that flat washer driven into the cone seat until it took on its own cone shape and got stuck. (y)


4D372436-F613-44F3-8A2E-953688A35B90.jpeg

On one side one stud hole was empty with rusty threads, and another stud had backed out when i tried to remove the nicely-rounded lug nut. I ran a tap through the holes to clean them up after determining the diameter and thread pitch, 12x12.5.
475D6671-16A4-4BAC-9F66-C9AFB72F819D.jpeg
5D696D76-21C7-4F23-BFC2-442B78130291.jpeg

9C67C28F-B83B-4EF8-81EA-C033B04D63B4.jpeg
9F9B8165-924D-47EC-B873-75B7BEF8220B.jpeg

Then I decided to recover the stud that had backed out with a seized beat up lug nut on it. First i cut slots into opposite sides of it with an angle grinder, being careful not to break through and cut the threads on the stud. Then i put it in a nut splitter and split the nut off of it.
93426901-A369-45CF-8F68-9AB83F87F17A.jpeg
E3E93F2F-55B0-4FE8-A4BD-394A9AE6BB55.jpeg

192F1EF1-9C4A-4204-8EB8-8FA8A9472530.jpeg
88A294F3-EB88-4AA9-A084-98D37270FACE.jpeg

Old nut split off, and threads in decent shape. Ran a die over those threads to clean them up.
The thread sealer there i guess isn't technically thread sealer but i'm using it that way. It's intended to retain thin metal sleeves that are pressed over damaged shaft seal surfaces such as crank front and rear main seals. I read that it was the strongest form of 'loc-tite' and that if you needed something to come back off you had to heat it to 400-500f first.. well i don't want this stud to back out again! But if i do, it's got good torch access..

Hitting the pic limit, so continued in next post..
 
Last edited:
  • Like
Reactions: 1 user

Vigo

Well-known member

Equipment
B6100, B8200
Jan 9, 2022
595
339
63
San Antonio Texas
So the tractor was missing one lug stud entirely. Rather than try to pull one off my parts tractor, i decided to make one simply by threading a same-size bolt into the hole, cutting the head off, and dressing up the cut end a little bit.
DE3D63FF-5354-48C8-9030-B7B5858462B9.jpeg
39B4D0C0-525B-45C5-89F7-964079C3CFCE.jpeg

One of the things I've learned doing this type of thing, is you really need to leave the die on the bolt before you cut it rather than trying to get it started on the cut end later. Sort of like making sure you put the line fitting on a brake line before you flare it, or the heat shrink on a wire before you splice it.. Yeah we've been there. :sneaky: Anwyay, I put a tack weld on the stud to the hub flange before cutting the bolt head off and running the die up and down, but i did buzz the tack down most of the way with a cutoff wheel to prevent it from distorting the wheel when bolted down over it.
13ACEEE3-4136-4B80-8124-F94F0F8EB400.jpeg

Turns out I cut the stud a little too long, but at this point of this process i said 'good enough, $#@*-it' and moved on. Next was to scrounge up a full set of lug nuts. It would have been easier if they were regular tapered lug nuts as i have a drawer full of those (which means they're all in one place!) but since the correct Kubota wheels i swapped on needed regular nuts I had to dig through some less-organized parts of my expansive used hardware collection.
07532897-C099-47B6-88EC-6D121BF24943.jpeg
image_15148.jpg

There we go. These nuts and bolts are somewhat organized in the sense that they are all-metric, mostly-zinc-plated hardware i got from parting out a Mitsubishi Diamante parts car i had. I decided Mitsubishi used really nice hardware on that car, so when i parted it out i literally went around with a cordless impact zipping out every nut and bolt that wouldn't stop the shell from rolling. When digging through an unorganized pile like this i just dump it on the ground, and use a magnetic pick up tool from Harbor Freight to pick it back up into its jar/bucket when i'm done. Another upside of doing this is since dirt can't be picked up with a magnet, it tends to leave whatever dust has accumulated in that pile on the ground to be swept or blown out. So this 'collection' is kept separate from my other buckets and buckets and... buckets of bolts and nuts. I go back to this pile over and over for this tractor.. in fact i left this pile dumped out in the middle of my shop for like a month of working on this tractor here and there.

The other side had all its studs, just crusty and rusty and with one of the studs looking like someone hit the threads impressively square on with a hammer. I just ran a die over these to clean and straighten them, and added a dab of anti-seize afterwards.
3C49BD10-24DA-49CB-9D5B-7F4CD10B8357.jpeg
6109721A-CDCD-412A-95D6-CB8A065E17CA.jpeg
 
Last edited:
  • Like
Reactions: 1 users

Vigo

Well-known member

Equipment
B6100, B8200
Jan 9, 2022
595
339
63
San Antonio Texas
Ok, on to the rear wheels/hubs. Even though i technically did more work to the rear hubs, it felt like it went by faster. The rear hubs on these things are.. something that looks like it was never intended to last 40 years, but here we are and they are all screwed up. :ROFLMAO:

So these hubs can be set at multiple positions on the rear axle shafts, and they're even reversible, plus the wheels are reversible, so you can pick all kinds of width options for the rear end. I set mine about as wide as they'll go (technically it's the 2nd widest setting) because the FEL makes tipping sideways (and every other direction) a lot easier. So the adjustability is cool. But.. how you get it, is not that cool. The hubs are 'set' to the axle with a pin or through-bolt (probably originally was just a pin) that goes through the hub and a hole in the axle shaft, and by tightening a bolt on the hub which 'clamps' the hub tightly to the axle to prevent it rocking back and forth and putting wear on the hub, the axle, the cross pin, etc.

But guess what happens. The pinch bolt either works loose or never was tight enough to begin with, the hub rocks around on the axle, the movement puts enough wear on the hub and axle that the pinch bolt no longer has the travel to clamp the thing tight anymore, and sometimes the motion fatigues the cross pin until it pops and falls out and the wheel tries to walk right off the axle shaft. Does it sound like i'm familiar with this problem already? :rolleyes:
27FFC5D5-2C1C-4466-B5C7-67B9832A2990.jpeg

Here's a pic showing the cross bolt on one of the tractor's hubs, clearly an excellent fit. Unfortunately the pinch bolt is on the far side in this pic, but it's visible in this next pic that google found somewhere else on this forum:
rear hub.jpg

I didn't read the thread that came from but the yellow arrows are showing where the hub is split to allow the large bolt on the left to 'pinch' the hub onto the hex axle shaft.

So first step is get the hubs off the axles and clean all the accumulated rust powder from both sets of surfaces grinding against each other. Once clean i coat the axle shaft where the hub rides in a thin film of anti-seize (although just about any grease would do the job too). Before reinstalling the hubs I remove the clamp/pinch bolt and chase the threads in there with a tap and wire wheel the bolt threads on the bench grinder.
5EB95E04-020C-4D7F-9AF8-D46E28F736C2.jpeg

Just look at that.. you can see the raised lip where the metal of the hub's ID is getting hammered outward from all the rocking back and forth, the and cross-pin hole is 'wallered all to s%$t'.
So due to the wear on the surfaces from these things being loose for the majority of these tractors' lives (from what i can tell from the few of these tractors ive been around), you can't tighten the pinch bolt enough to actually pinch the hub onto the axle shaft any longer. But, that's only because the spring under the bolt (visible 2 pics up) that basically serves as a lock washer goes into coil bind (squeezes until all the parts of the spring touch) before the bolt tightens down enough to actually clamp onto the axle. So, i remove those springs and tighten the things some more as a way to string along this crap design a little longer without replacing them. I know it's a crap design because Kubota admits it's a crap design, or at least they implicitly admitted it because they changed to a different design on newer tractors. Anyway, i digress.. I clean it, take out the spring, and tighten the everloving crap out of it.

Did anyone notice in the first pic that not all the wheel studs match? This tractor had one hub with 3 mismatched wheel studs of a totally different thread diameter, so i swapped that for a 'normal' one off my parts tractor. That also means the tractor didn't have a full set of matching rear lug nuts, so I went to my lug nut drawer (yup..) and found 12 appropriate 14x1.5 thread lug nuts, and put it all back toghether.
6BD27848-8362-4A69-8E8F-6A03FABAF17C.jpeg
D52A61B5-5671-4C5A-A2F6-1C7307AC5993.jpeg
 
Last edited:

Lencho

Active member
Lifetime Member

Equipment
B7100hst
Jan 21, 2017
407
85
28
NM
Ok, on to the rear wheels/hubs. Even though i technically did more work to the rear hubs, it felt like it went by faster. The rear hubs on these things are.. something that looks like it was never intended to last 40 years, but here we are and they are all screwed up. :ROFLMAO:

So these hubs can be set at multiple positions on the rear axle shafts, and they're even reversible, plus the wheels are reversible, so you can pick all kinds of width options for the rear end. I set mine about as wide as they'll go (technically it's the 2nd widest setting) because the FEL makes tipping sideways (and every other direction) a lot easier. So the adjustability is cool. But.. how you get it, is not that cool. The hubs are 'set' to the axle with a pin or through-bolt (probably originally was just a pin) that goes through the hub and a hole in the axle shaft, and by tightening a bolt on the hub which 'clamps' the hub tightly to the axle to prevent it rocking back and forth and putting wear on the hub, the axle, the cross pin, etc.

But guess what happens. The pinch bolt either works loose or never was tight enough to begin with, the hub rocks around on the axle, the movement puts enough wear on the hub and axle that the pinch bolt no longer has the travel to clamp the thing tight anymore, and sometimes the motion fatigues the cross pin until it pops and falls out and the wheel tries to walk right off the axle shaft. Does it sound like i'm familiar with this problem already? :rolleyes:
View attachment 80034
Here's a pic showing the cross bolt on one of the tractor's hubs, clearly an excellent fit. Unfortunately the pinch bolt is on the far side in this pic, but it's visible in this next pic that google found somewhere else on this forum:
View attachment 80035
I didn't read the thread that came from but the yellow arrows are showing where the hub is split to allow the large bolt on the left to 'pinch' the hub onto the hex axle shaft.

So first step is get the hubs off the axles and clean all the accumulated rust powder from both sets of surfaces grinding against each other. Once clean i coat the axle shaft where the hub rides in a thin film of anti-seize (although just about any grease would do the job too). Before reinstalling the hubs I remove the clamp/pinch bolt and chase the threads in there with a tap and wire wheel the bolt threads on the bench grinder.
View attachment 80036
Just look at that.. you can see the raised lip where the metal of the hub's ID is getting hammered outward from all the rocking back and forth, the and cross-pin hole is 'wallered all to s%$t'.
So due to the wear on the surfaces from these things being loose for the majority of these tractors' lives (from what i can tell from the few of these tractors ive been around), you can't tighten the pinch bolt enough to actually pinch the hub onto the axle shaft any longer. But, that's only because the spring under the bolt (visible 2 pics up) that basically serves as a lock washer goes into coil bind (squeezes until all the parts of the spring touch) before the bolt tightens down enough to actually clamp onto the axle. So, i remove those springs and tighten the things some more as a way to string along this crap design a little longer without replacing them. I know it's a crap design because Kubota admits it's a crap design, or at least they implicitly admitted it because they changed to a different design on newer tractors. Anyway, i digress.. I clean it, take out the spring, and tighten the everloving crap out of it.

Did anyone notice in the first pic that not all the wheel studs match? This tractor had one hub with 3 mismatched wheel studs of a totally different thread diameter, so i swapped that for a 'normal' one off my parts tractor. That also means the tractor didn't have a full set of matching rear lug nuts, so I went to my lug nut drawer (yup..) and found 12 appropriate 14x1.5 thread lug nuts, and put it all back toghether.
View attachment 80040 View attachment 80041
Hi Vigo, you have found one of the weak points on these tractors. There a multiple threads on this repair or replacement with the new style.
 

Attachments

  • Like
Reactions: 1 user

Vigo

Well-known member

Equipment
B6100, B8200
Jan 9, 2022
595
339
63
San Antonio Texas
I have one of those newer style on my parts tractor, but decided to keep that one for myself since I will probably need it at some point! The old-style ones on my B6100 and this one are still 'serviceable'.. If you remove the spring and crank the everloving piss out of it, or perhaps fabricate some shims. If I ever get to the point of shims I will probably just swap on that newer one, or buy new ones. I saw another style with two large set screws when i was looking around before writing that post. I don't know which style I would prefer yet.
 

Lencho

Active member
Lifetime Member

Equipment
B7100hst
Jan 21, 2017
407
85
28
NM
I have one of those newer style on my parts tractor, but decided to keep that one for myself since I will probably need it at some point! The old-style ones on my B6100 and this one are still 'serviceable'.. If you remove the spring and crank the everloving piss out of it, or perhaps fabricate some shims. If I ever get to the point of shims I will probably just swap on that newer one, or buy new ones. I saw another style with two large set screws when i was looking around before writing that post. I don't know which style I would prefer yet.
Either way as long as you get the play out of the system. When the axle and wheel are rocking on each other the metal wears and the hubs are cheaper and easier to replace than the axles. Don’t wait to fix this issue. Keep posting your rehab. 😊
 
  • Like
Reactions: 1 users

Vigo

Well-known member

Equipment
B6100, B8200
Jan 9, 2022
595
339
63
San Antonio Texas
I was on a long break from the internet being super busy moving and trying to get settled. It took almost a month to get internet out here because there is only one provider and you know what a lack of competition does for work ethic.. I'm back and will resume this thread (catching up to where the project currently is) and soon will resume working on the tractor. I've really got to get this thing back to the owner so HE can finally use it!

The hood that came on the tractor was absolutely hideous. The hood on my parts tractor was pretty good.
4AF99F6F-844F-4074-B38F-BD991C278E09.jpeg

I put the hood on the 6100 and noticed it didn't seat correctly against the cowl/dashboard. The parts tractor is a b7100, but they sure looked identical to me. After some staring and eventually some measuring, I figured out that the 7100 has a slightly taller hood, taller firewall between the engine and the battery/fuel tank area, and a taller mounting pad on the steering column for the dash panel.

I had actually already installed the firewall at that point, because the 6100 was missing it entirely. Before installing the firewall I decided to try and weld up a small crack in it since i had just gotten a new welder and enjoyed the challenge of 'thin sheetmetal'.
A570BA2E-DABD-4D59-8B8A-864085A22482.jpeg

There was definitely a big learning curve on that ~1.5" weld :sneaky:. You can see on the left hand side i was making a little bit of a mess and then having to fix it by 'growing' the work area. I'm sure anyone who has blown holes in thin metal knows that dance and how you can end up with a half inch wide weld on something that was originally a tenth of an inch across. B/y the time i got to that right side I had figured out how to put tiny tacks/dabs on the metal without melting holes in it. The wire is .035" so those weld dabs are probably ~.120" across. So that was a fun diversion performing an unnecessary 'repair'.

So the hood and the firewall were both 7100, leaving only the gap between the hood and dash. The dash panel itself is actually the same, but the pad it bolts down to on the steering column is mounted higher up on the column. You can probably swap only the column part of the steering assembly without changing the entire 'gearbox', but I decided to swap the entire gearbox assembly because the 6100 also had a bent pitman arm that was rubbing on something (how!? 😦😡).
AA6C3733-D9FD-4892-B9DD-4313656E9852.jpeg

You can see the marks being left by the rubbing of the damaged pitman arm. So instead of swapping the steering columns AND pitman arms between the tractors, i decided to swap the whole gearbox assembly between them.
77AEAD38-932E-4131-AD7D-3DBF7A847741.jpeg

Of course, if you want to swap the gearbox/column and NOT the dash panels themselves, that means you have to remove the steering wheel so you can lift the dashboard over the top of the column and put it aside. I've already heard stories of broken and horribly cludged back together steering wheels on these things. I've heard of people ripping the wheel off the splined hub which remained on the shaft! Well, being a longtime auto tech i've had plenty of fights with 'press-fit assemblies which are now good and stuck' and despite not being able to come up with a 'proper' tool, I STILL WON, both times, with no new damage. :) You can't 'just pull' on things like this. You'd look at that tool and think i was destined for failure, but sometimes experience pays..

F894276D-3F01-42D1-A7BE-BCE807482FA0.jpeg

Here's a steering gearbox assembly freed from the tractor.
901AA442-D37F-41B6-9897-CF588A20FA14.jpeg

1C25DB9E-1610-4D50-8F4D-A1D11B29C977.jpeg

Here's the height difference in the dashboard mounting pads. I went ahead and changed out the fluids while i was at it, which took several ounces of fluid. :LOL:

47AC9891-D55D-435B-91D6-779302E4DF98.jpeg

If anyone has felt the steering wheel being loose radially (side to side, front to back etc), you can see here the rubber bushing which is all that locates the shaft inside that tube. It's also all that keeps water from accumulating inside that tube. The 6100s was gone, the 7100s was intact. You can also see the anti-seize i put on the splines in case that steering wheel ever needs to come off again, and the nicer (but still used!) zinc plated hardware im swapping in anytime i have to remove crusty bolts. You can also see the polyurethane suspension bushings im pinching in between all the rod end assemblies as 'dust boots' since all the originals were trashed (red thing on the pitman arm).

So now the tractor has a nicer hood, a firewall between engine and battery/tank, new fluid in the steering box, steering wheel doesn't wobble around, and an unbent pitman arm that doesn't rub. And a 'dust boot'.
 
Last edited:

Vigo

Well-known member

Equipment
B6100, B8200
Jan 9, 2022
595
339
63
San Antonio Texas
This tractor is going to be wearing a backhoe for the rest of its life, at least with the current owner, so I removed/disabled some of the 3pt stuff to prevent accidental snags/injuries/damage to the machine.

First thing i did was actually swap pressure lines between this 6100 and my own 6100. This one had the fitting block on the pressure line to add external hydraulic circuits, and mine did not. Since this tractor will not use its 3pt with the backhoe attached, the existing 'diverter valve' under the seat which allows you to direct the 3pt fluid to an external attachment, is the only 'pressure tap' point that would ever be needed since this tractor will not use its 3pt lift AND an external attachment. One less point for leaks, too.

The fluid looked terrible so i decided to drain and change it. There is a drain plug on the left side of the tractor, but i decided to pull the suction line fitting on the right side since that is where the fluid strainer filter is, and i figured it would need cleaning.

F87897EC-2581-4457-AF90-5CD2258E8B2F.jpeg

2B75F648-6EFE-4EC4-8B4D-757E06791946.jpeg

So yeah, that needed doing! You can also see the bolts attaching the rear of the loader subframe to the axle housing. Most of those were either missing or stripped or loose, but in this pic i had already scrounged some temporary replacements. I ended up ordering thread inserts and matching set of bolts for that location. So since this fluid looked so bad, i decided to put some fluid in it, run the tractor for a while, and then drain and fill it again. I think the main source of water intrusion on these things is a torn shifter boot.

So there's the fluid system for the 3pt cleaned up. I also removed the 3pt rockshaft arms. For backhoe use these would just be one more thing to bang your legs on, or somehow get a hose from the pto pump hooked under and then rip it off by accidentally raising the 3pt, or snag and crack your leg the same way etc.. they just seemed like a pointless source of miserable mistakes for backhoe use. I wire-wheeled all the splines on the rockshaft, put some grease on the ends, and then put some heat shrink over them to keep them ready for reuse if that were ever to happen.
5F8DDB24-9A87-4C09-B3B5-B9F22BEAF66A.jpeg

I also locked the 3pt control lever in place. It didn't look easy to remove it, but i worried if i left it loose it would be too easy to accidentally pop it into the 'up' position, and with no feedback rod from the rockshafts to pop it back to neutral, it would just sit there holding the relief valve open putting a bunch of heat into the fluid until the operator noticed the noise (which could be drowned out by regular engine noise at full throttle). So i locked it up.
4B0E6ABB-5A90-47E6-86B8-247A39ED2FAE.jpeg

The hole on the 3pt lever for the feedback rod was empty and available, so i planned to bolt a small link between there and one of the bolts of the valve housing. Gray bar shown in pic directly above the two holes. The bar itself is.. one of those bars you use at the end of chain link fencing which i forget the name of.. :ROFLMAO:
095EB43E-A4D5-4CCD-9671-C04CF361455E.jpeg

I put it in the press and made the bends. A vise and hammer could have done, also.
948AF330-B5CB-473F-ACE0-02C5B8B00F2B.jpeg

Getting the shape close took a couple trips.
D3DF43B0-C40C-4178-A076-DB1BC72EDE2D.jpeg

4AC68C9F-A0E1-4FC4-BC1B-6B84F259AE21.jpeg

So now the handle is locked in neutral. The flat bar is probably 3/16 and surprisingly stiff, and the handle is maybe ~1/2" and pretty dang strong as well, so it doesn't seem like it will be damaged from accidentally leaning on it or anything like that. If one wanted to use the 3pt pressure port to drive something external, you could just take the bar off that 12mm bolt in front, loosen the 10mm on the handle end and flip the lock over towards the back so it wouldn't snag on anything, and the handle would be functional again. I doubt anything will ever be hooked to that external port, though.
 
Last edited:
  • Like
Reactions: 1 user

Vigo

Well-known member

Equipment
B6100, B8200
Jan 9, 2022
595
339
63
San Antonio Texas
Well, it's been a crazy 8 months since i left this thread in limbo. I did continue working on the tractor in fits and starts and accumulated a lot of pictures and story, but didn't keep up with posting it. The tractor actually got done enough to 'go home', so now i have no reason to leave this hanging..

So, to resume: Let's look at how bad the the B219 FEL was!

Starting with the subframe, there should be 3 bolts holding each side of the subframe to the side of the engine block.
old1.jpeg

Yep, 3 bolts there.. and really, 5 out of 8 aint THAT bad either.. I teach community college and 5 out of 8 would be about 62%, ALMOST passing.. I tell those people "you can still turn it around". But i guess that would be if the bolts were of proper dimensions, with proper washers, in undamaged holes, at proper torque. Any bets?
old3.jpeg

Yeah.. no. Lots of clues in that pic. What about the other side?
old4.jpeg

Hey, 3 for 3 on subframe bolts, and 6 out of 8 total! Maybe if they did another whole tractor they'd work their way up to 'no missing bolts', but there's still the rest of the problems.. One wonders at what point someone would figure out that split lock washers don't glide smoothly over gaping chasms when tightening. Or at what point of tightening that rearmost subframe bolt, would one notice that the washer has 'stuck' on the edge of the hole and spinning the bolt is now making the washer.. not even round anymore?! In fact, why does it look like that bolt is screwed in at a different angle than the rest?! I'll tell you why, because idiots.
old6.jpeg

Hey, at least the bolt was bent! The alternatives were WORSE! Sucks to wallow out a hole in some fairly thick plate (kind of impressive), and maybe if any of the other 5 bolts in this front section were even tight, that wouldn't have been able to happen. But i guess you can't tighten em if you already stripped em. :mad: Luckily these holes were so deep i was able to make them serviceable just by using longer bolts to engage deeper thread which no previous owner had managed to screw up, so i did not have to use any thread inserts here. Just a bunch of better hardware and some time with a tap. Wish i had enough to make it all match but oh well, no empty holes and every bolt actually threading in and accomplishing something.
old6a.jpeg


Moving on to the 'middle' subframe brackets. These are small, fairly thin plates that bolt to the side of the tractor near the pedals.
old7.jpeg
old8.jpeg

Well.. would bolt, if there were bolts in them. But the holes weren't screwed up, if i recall correctly. Seems like previous owners destroyed everything they touched so i assume this means the loader NEVER had bolts here during its entire time on this particular machine.
 

tsp159

Member

Equipment
B7100D
Feb 8, 2023
86
43
18
Fort Bend Texas
Oof! That tractor started pretty rough! I'm of the same mindset, and I hate seeing mostly complete equipment neglected and fixed with hack repairs.

The lack of stains and discoloration on the subframe/trans tunnel seems to confirm your assessment that the belly brace wasn't even bolted in! :ROFLMAO:

You wouldn't happen to have some of that removed 3-point hardware/stuff available would you? I've got an equally rough B7100D "parts" tractor that I got in a deal when I bought a B1630 loader for my B7100HST. It seems to be complete enough to justify trying to make it a whole tractor again, but pretty much the entire 3-point setup is missing or junk. All that's left is a seized control valve broken at the handle and the rockshaft splines.

It used to wear a trencher off the back, so it's got a creeper gearbox (probably broken as well!). I think I can pull the creeper shifter assembly off if I had an original B7100D shifter to swap in, but there's very little documentation on these gearboxes and I'm not ready to do that just yet.
 

Attachments

  • Like
Reactions: 1 user