B2782 Snowblower with brand new fan, shear plate etc. breaking pins and pto drivelines

ronlackey

New member
Jan 6, 2017
11
1
3
Eden UT USA
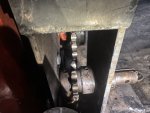
This summer, I had the dealer put a new fan and a new shear plate on as I was breaking the fan shear pins constantly. The hole for the pin had hollowed out and needed replacement. We got a big storm this week and within 15 minutes I noticed I was breaking the fan shear pins too often again. Then I had a catastrophic break when the pto driveline came off......the roll pin and set screw was gone, which is an easy fix, but something else is causing the unit to bind. I disassembled what I could and got the main shaft. Through the circle....90% of the time it turns easily, but then it goes through a rough spot. I don't know if it's the chain, the bearing, a bent shaft or what. The noise is not coming from the worm box....it's coming from the back by tis shaft, I think. Trying to get some advice from some smart folks before I start ordering parts. I have attached a video. Thoughts?
I tried to attach the video directly here, but it would not let me, so here is the link to the you tube upload: https://youtube.com/shorts/7JXh6owxKIQ?feature=share
THANK YOU ALL!
 
Last edited:

Trimley

Well-known member
Lifetime Member

Equipment
BX23SLSB-R-1 plus additions
Jul 25, 2023
951
654
93
PNW-WA
I don't know much about snow blowers, and I don't have one.

To me, there are stripped teeth on the gears inside. When it skips, see if you can rotate the paddle or the screw that pushes the snow to the paddle. It acts as if the paddle gear is missing teeth or they're rounded off.

Let someone else help you.
 
Last edited:

nbryan

Well-known member

Equipment
B2650 BH77 LA534 54" ssqa Forks B2782B BB1560 Woods M5-4 MaxxHaul 50039
Jan 3, 2019
1,168
710
113
Hadashville, Manitoba, Canada
I'm pretty sure i know what that rough spot is caused by, as i have the same blower and have corrected that issue with mine, and others issues.

The large sprocket on the fan and auger gearbox input shaft is not perfectly round and if there's not enough slack in the chain ALL AROUND its travel that noise is created as the chain tightens against the sprockets from the out-of-round.

The 1/16" chain slack has to be kept as the minimum slack, not maximum, and the rest of the rotation the chain will be more than 1/16" slack for sure. But the grinding is over-tightness, at least it was for me.

As for the input shaft spline and set screws on the small sprocket, they need to be checked for tightness regularly and re-tightened as they work their way loose even after a solid torque-down. 2500rpm and the vibrations involved are pushing this assembly design to the limits!

I check these by grasping the input u-joint yoke from below, and through the small opening between the chain cover and reduction box cover somehow hold the small sprocket motionless (I use a small hardwood stick) while twisting back and forth on the ujoint will show as noticeable play. The small gear and input joint should be tight! If any play, off comes the chain cover and tighten the set screws, the shaft screw AND the spline key set screw.

The next time they loosen again, on me I've gotten some thread-lok compound to throw at them.

I had the entire input assembly slip completely off the carrier bushing and sit hanging on the pto-shaft support chain at full rpm while blowing, thought I'd blown another blower shear pin, but no!

The pto u-joint has a pass-through torquing bolt through the input shaft and it had vanished. So the whole shaft was no longet set screwed anywhere and it drifted backward (under load!) until falling right off. Without that little support chain that pto shaft would have destroyed something badly flying off the shaft at 2500rpm.

Use that little support chain!
 
  • Like
Reactions: 1 users

ronlackey

New member
Jan 6, 2017
11
1
3
Eden UT USA
I'm pretty sure i know what that rough spot is caused by, as i have the same blower and have corrected that issue with mine, and others issues.

The large sprocket on the fan and auger gearbox input shaft is not perfectly round and if there's not enough slack in the chain ALL AROUND its travel that noise is created as the chain tightens against the sprockets from the out-of-round.

The 1/16" chain slack has to be kept as the minimum slack, not maximum, and the rest of the rotation the chain will be more than 1/16" slack for sure. But the grinding is over-tightness, at least it was for me.

As for the input shaft spline and set screws on the small sprocket, they need to be checked for tightness regularly and re-tightened as they work their way loose even after a solid torque-down. 2500rpm and the vibrations involved are pushing this assembly design to the limits!

I check these by grasping the input u-joint yoke from below, and through the small opening between the chain cover and reduction box cover somehow hold the small sprocket motionless (I use a small hardwood stick) while twisting back and forth on the ujoint will show as noticeable play. The small gear and input joint should be tight! If any play, off comes the chain cover and tighten the set screws, the shaft screw AND the spline key set screw.

The next time they loosen again, on me I've gotten some thread-lok compound to throw at them.

I had the entire input assembly slip completely off the carrier bushing and sit hanging on the pto-shaft support chain at full rpm while blowing, thought I'd blown another blower shear pin, but no!

The pto u-joint has a pass-through torquing bolt through the input shaft and it had vanished. So the whole shaft was no longet set screwed anywhere and it drifted backward (under load!) until falling right off. Without that little support chain that pto shaft would have destroyed something badly flying off the shaft at 2500rpm.

Use that little support chain!
Will try all these things. THANK YOU!
 
  • Like
Reactions: 1 user

Orange1forme

Active member

Equipment
B2650 HSDC, filled tires, wheel spacers, B2728B , LA534A FEL, 3rd valve kit
Dec 1, 2018
394
56
28
Wa
You could remove all the shear bolts and turn the shaft and see if the noise is there.
Add in a shear bolt at a time until the noise returns.
 

BAP

Well-known member
Lifetime Member

Equipment
2012 Kubota 2920, 60MMM, FEL, BH65 48" Bush Hog, 60"Backblade, B2782B Snowblower
Dec 31, 2012
2,534
672
113
New Hampshire
If your chain is getting tighter at 1 spot In it’s rotation, then most likely you have a bent shaft, not an out of round sprocket.
 

GreensvilleJay

Well-known member

Equipment
BX23-S,57 A-C D-14,58 A-C D-14, 57 A-C D-14,tiller,cults,Millcreek 25G spreader,
Apr 2, 2019
9,989
4,102
113
Greensville,Ontario,Canada
One 'trick' a machinest showed me was to add a second set screw in the sprocket set screw hole. This 'lock screws' the first. Similar to 'lock nutting', unlikely the 1st screw will ever get loose.
It'll play a 'mind game' on you when you ever HAVE to remove the sprocket as you'l remove the one you see and NOT the 'real' one......BTDT
 

ronlackey

New member
Jan 6, 2017
11
1
3
Eden UT USA
OK, when I remove the chain both sprockets turn smoothly. I did notice that the sprockets are not perfectly lined up. should they be? they are like 1/4" off.......thoughts?
 

Attachments

ken erickson

Well-known member

Equipment
B7100 hst, 2650 front mount snowblower, L2501 hst qa loader
Nov 21, 2010
1,007
1,568
113
Waupaca Wisconsin
As close to each other as they are, yes! They should be adjusted to be inline. The fact they are out of alignment and your chain perhaps being a bit too tight explains your video. It would not take much for one or both sprockets to run not concentric with the shaft to get that binding and noise.
 

nbryan

Well-known member

Equipment
B2650 BH77 LA534 54" ssqa Forks B2782B BB1560 Woods M5-4 MaxxHaul 50039
Jan 3, 2019
1,168
710
113
Hadashville, Manitoba, Canada
One 'trick' a machinest showed me was to add a second set screw in the sprocket set screw hole. This 'lock screws' the first. Similar to 'lock nutting', unlikely the 1st screw will ever get loose.
It'll play a 'mind game' on you when you ever HAVE to remove the sprocket as you'l remove the one you see and NOT the 'real' one......BTDT
These B2782B blowers do have 2. A direct-to-shaft set screw, and the shaft spline set screw. It's at 90 degrees from the spline. They both back out, and the twisting play vibration that causes gets everything loosening.
I now check my small sprocket-to-input shaft play every time the blower goes out.
Like I said, if they loosen again after the last major torque I gave them, they're getting threadlock put on them.
 

GreensvilleJay

Well-known member

Equipment
BX23-S,57 A-C D-14,58 A-C D-14, 57 A-C D-14,tiller,cults,Millcreek 25G spreader,
Apr 2, 2019
9,989
4,102
113
Greensville,Ontario,Canada
OK you have two in DIFFERENT holes...NOT the same....
I meant you ADD another set screw on top of the 'original' one.
 
  • Like
Reactions: 1 user

GreensvilleJay

Well-known member

Equipment
BX23-S,57 A-C D-14,58 A-C D-14, 57 A-C D-14,tiller,cults,Millcreek 25G spreader,
Apr 2, 2019
9,989
4,102
113
Greensville,Ontario,Canada
Not my idea but dang remember that from 1/2 a century ago..... same guy said it was a 'cheap, easy cheat' to help balance sprockets.
 
  • Like
Reactions: 1 user

DustyRusty

Well-known member

Equipment
2020 BX23S, BX2822 Snowblower, Curtis Deluxe Cab,
Nov 8, 2015
5,248
3,877
113
North East CT
The sprockets must be in alignment. I suggest that you use a straight edge along the faces of both sprockets to verify that they are in alignment. Then spin the sprocket 90 degrees, and check again. I have never seen a sprocket that wasn't drilled exactly in the center and if one of yours is, then it needs to be replaced. You can purchase sprockets at a bearing supply house, and you don't have to go to Kubota for them. Next, remove the master link from the chain, and stretch the chain out straight. It should la;y flat on a flat surface on both the edge and the face. If it doesn't then your chain is defective. You can buy a new chain from Kubota that is a sealed chain, or you could buy a box of #50 chain and make them up for a lot less money. Just count the number of links on the old chain and duplicate it on the new chain. Since this is going to be the only thing that the chain is going to be used for, make up a bunch as spares. Also, purchase a bunch of master links for when you are going to need them.
You didn't say how many hours the blower had on it, so the sprockets might also be worn. A worn sprocket will have a point at the end of the tooth instead of being rounded on a new sprocket.
If your old fan wasn't worn out, the shear bolt hole could have been welded shut and then redrilled. Also, make sure that the bolts that you are using are the correct grade bolts as specified by Kubota. Not all dealers stock the OEM bolts and sell lesser quality bolts. Lubricate the chain with chain and bar oil.
 
  • Like
Reactions: 1 user