Any help or suggestions for body work

jfnewell1965

New member

Equipment
B6200D
Aug 19, 2014
71
0
0
Katy, TX
www.jfnewell.com
Hi,

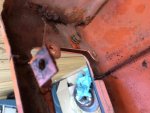
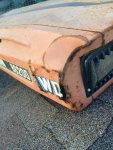
I have a B6200D I am working on. The tractor is mechanically good, but sheet metal challenged. I am down to fixing the hood, and I am not sure how to progress.

The main goal is to have a sound stable tractor. It does not have win points in a beauty contest, but looking nice never hurts.

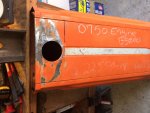
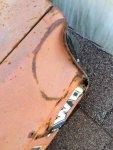
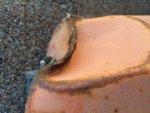
I have attached some pictures of the bad dent, and was wondering if anyone had suggestions for how to progress.

I have attached pictures for refference.

There is rust on the sides where the hinges mounts, but that does not bug me, what I am worried about is how to work out the big crease.

For repairing I have a spot welder, and a Millermatic 175. I am as good as any on the spot welder, but remain somewhat challenged on the MIG.

Any ideas, suggestions, etc would be appreciated.

Thanks,
Jim
 

Attachments

bearskinner

Active member

Equipment
BX25D, snowblower, PHD, Grapple, Snow blade, land Plane
Sep 1, 2014
925
238
43
N. Idaho
bring it over, Ill show ya how to fix it. yeah a little far, I know. You may want to get a small cheap cut off wheel, and split the seam at the peak of the crunch, so you can work the metal out, than use the mig and weld the seam back together. Don't beat on the metal without a sandbag, or wood or metal dolly behind it, or you could end up with lots of warpage. Try and keep it so you only need 1/8-1/4" of filler. half the battle is trying to fix it, it just takes a little time. most people wouldn't attempt it.
 

bearskinner

Active member

Equipment
BX25D, snowblower, PHD, Grapple, Snow blade, land Plane
Sep 1, 2014
925
238
43
N. Idaho
and as long as your going thru the motions, get a piece of metal and create a patch panel for the rust, as long as your welding on it. don't try to weld in a continuous line, just a spot every inch, and move, keep it cool till all the spots connect
 

North Idaho Wolfman

Moderator
Staff member
Lifetime Member

Equipment
L3450DT-GST, Woods FEL, B7100 HSD, FEL, 60" SB, 743 Bobcat with V2203, and more
Jun 9, 2013
28,722
5,130
113
Sandpoint, ID
I would use a rose bud and heat it up and beat it out! ;)
 

Tooljunkie

Well-known member
Lifetime Member

Equipment
L1501,home built carry all, mini plow blade.
May 13, 2014
4,150
27
48
59
Lac Du Bonnet, Manitoba,Canada
Mostly, take your time.
This metal is heavier than auto body metal, takes a little more force to move.
Imagine how the dent started,try to move it back in reverse of how it got there.
Having welding equipment is going to make it a lot easier.

Cutting piece off is about the easiest. Just take enough to get rid of damage.
Want to make a new piece? Cover opposite side in duct tape the size of the part you want to put in. Couple layers. Mark your bend lines Then carefully peel tape off and cut it so it will lay flat.
Apply to new piece of flat stock and trace out and transfer any marks. Cut panel out and bend opposite of good panel. Pull panel together and tack it where tape was notched to lay flat. Pre fit panel and adjust as necessary. Finish welding , grind welds and fill.

I have done this on complex pieces and they turned out really nice. Especially mirror images.

Bending, or body lines can be done with a slightly dull chisel and hammer from backside. And a good block of wood. I use a tree stump. Curved lines can even be done this way.
Filling-24 grit or paintbuster disc to give sheet metal tooth for filler to hold onto.
Mix filler in small amounts as working time is short-couple golf ball size glob.
I like the light body filler as it sands easier. Scuff between layers of filler. As filler gets harder it gets easier to finish with fine paper. For pinholes in filler i cut them out a little with a knife and scuff before next layer of filler. Assortment of paper grits 24,40,80,120,180 and finish at 240 or 320. If you sand in straight line using a block of hard foam,go 90 degrees only-to make an x or cross-hatch pattern. Will make a nicer end result.

Remember-dont rush( unless welding went bad and you or shop is on fire)
 

bearskinner

Active member

Equipment
BX25D, snowblower, PHD, Grapple, Snow blade, land Plane
Sep 1, 2014
925
238
43
N. Idaho
Its been a couple weeks, how did the body work turn out?
 

jfnewell1965

New member

Equipment
B6200D
Aug 19, 2014
71
0
0
Katy, TX
www.jfnewell.com
Hi,

Well, I took the easy way out. I called a place in Wisconsin. They had a B5200 in the right serial # range, so the part number was the same.

They sold me a hood with no rust, no front damage, and slight (by the gas tank cap) damage in the back for $110 + Shipping. Shipping was $50, so I got the whole thing for $160.

I really just have to bend the back flat, transfer my parts, and repaint.

The problem with what I had, was that when I stripped all the parts off, things started to come unglued. The brackets that held the headlights and hinges were rusted in half (see picture), spot welds were rusted; pretty much anywhere the metal was doubled was rusted beyond repair.

I have a spot welder, a MIG welder, various tools to bend drill etc.....but when it came right down to it, I got lucky, found the part cheap(ish), and saved myself a whole bunch of time.

I will post pictures of what I bought, and how it turned out, once I get it in the shop and worked on.

Thanks,
Jim
 

Attachments

CaveCreekRay

Well-known member
Lifetime Member

Equipment
L3800 HST, KingKutter box scraper, KingKutter 66" rake, County Pride Subsoiler
Jul 11, 2014
2,631
93
48
Cave Creek, AZ
Whatever works the easiest!

I had my hands full doing a remodel so I took mine to a body shop. It wasn't cheap but it ended up being half of what a new hood runs from Kubota. Today, nobody can tell.

Ray
 

ShaunRH

New member
Lifetime Member

Equipment
L3200
May 14, 2014
1,414
6
0
Atascadero, CA
Oh, I hear you on this. The tins on my D-17 mock me every time I look at them...

I want to paint them but do I really want to paint them with the dents too! Ugh.
 

jfnewell1965

New member

Equipment
B6200D
Aug 19, 2014
71
0
0
Katy, TX
www.jfnewell.com
OK.....

The first two pictures are what I started with.

The second two pictures are where I am at.

I guess I need to know how perfect/straight the body work needs to be before I start using filler.

I think I am approaching the end of my skill set for body work, and fear that any more banging is going to start stretching the metal.

Any ideas on how good it needs to be before I use filler?

Any advice/direction is appreciated.

Thanks,
Jim
 

Attachments

Tooljunkie

Well-known member
Lifetime Member

Equipment
L1501,home built carry all, mini plow blade.
May 13, 2014
4,150
27
48
59
Lac Du Bonnet, Manitoba,Canada
Nice. Point to mention is filler doesent do edges very well,but you got it pretty straight. Clean,grind and fill. The longer the sanding block(within reason) the easier to finish. Use guide coats of primer and when block sanding it will indicate high and low spots.