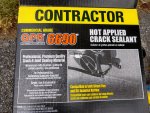
Most of our driveway is in good shape, but it developed about a half dozen cracks over the last year or two. The original 1990 gravel driveway was blacktopped around '94 and then topped in 2009. The 2009 fix is holding up better than the original blacktop. In an effort to get a few more years out of it before the next re-do I spent the day filling cracks. Lowes has something called QPR 6690 crack sealant at $70 for 5 gallons that I used. Although the measurement is gallons, what you get is two plastic-wrapped cubes in the box. After the cubes are removed from the box, they morph into whatever space they have.
Some users posted that they chopped pieces off to melt down. That wasn't an option today because it was way too soft to chop. The material reminded me of the Ram-nek joint sealant we used on manholes. To get usable chunks, slicing/scoring pieces repeatedly - A LOT - with a razor knife it seemed to work best for cutting 3-4" wide pieces.
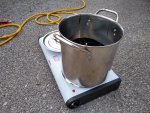
Equipment was simple. Found a brand new 2-burner electric countertop "stove" on FM for $20 and visited a local re-uzit shop for a $5 pot and 50 cent dipper. I melted the plastic wrap right along with the sealer as others have done. Cut pieces tend to attach themselves very securely to whatever they are placed on. It would have been handy to have some plastic wrap to temporarily park pieces on.
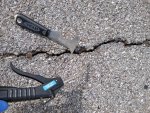
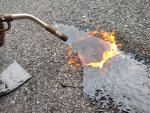
Melting on the 120V burner was surprisingly quick. The pot sure got slopped up but the mini range only ended up with two little black dots. First step was dragging the air compressor out to blow the cracks clean while scraping them out. The they were pre-heated a bit withe a MAPP gas torch. Some of the larger cracks had to be topped off. due to the sealer flowing deep. Then to smooth them out I hit them with the torch. Most cracks were simple pour 'em and go. The trickiest one was a wide one on a hill. Took a little finesse. The sealer wanted to flow over the downhill side of the crack and not flush off with the uphill side. I tossed some sand on the patches near the house.
The cracks required about 3/4 of the 5 gallon box. It took till almost 10:00 in the morning to get set up and started. When it wrapped up around 6:30 this evening my ol' body was really glad.
Some users posted that they chopped pieces off to melt down. That wasn't an option today because it was way too soft to chop. The material reminded me of the Ram-nek joint sealant we used on manholes. To get usable chunks, slicing/scoring pieces repeatedly - A LOT - with a razor knife it seemed to work best for cutting 3-4" wide pieces.
Equipment was simple. Found a brand new 2-burner electric countertop "stove" on FM for $20 and visited a local re-uzit shop for a $5 pot and 50 cent dipper. I melted the plastic wrap right along with the sealer as others have done. Cut pieces tend to attach themselves very securely to whatever they are placed on. It would have been handy to have some plastic wrap to temporarily park pieces on.
Melting on the 120V burner was surprisingly quick. The pot sure got slopped up but the mini range only ended up with two little black dots. First step was dragging the air compressor out to blow the cracks clean while scraping them out. The they were pre-heated a bit withe a MAPP gas torch. Some of the larger cracks had to be topped off. due to the sealer flowing deep. Then to smooth them out I hit them with the torch. Most cracks were simple pour 'em and go. The trickiest one was a wide one on a hill. Took a little finesse. The sealer wanted to flow over the downhill side of the crack and not flush off with the uphill side. I tossed some sand on the patches near the house.
The cracks required about 3/4 of the 5 gallon box. It took till almost 10:00 in the morning to get set up and started. When it wrapped up around 6:30 this evening my ol' body was really glad.
Attachments
-
 714.4 KB Views: 50
 -
 961.3 KB Views: 51
 -
 1.4 MB Views: 51
 -
 1 MB Views: 50


 do it to me. I offer something to consider going forward. Soil where I live is clay that expands when wet then shrinks when dry. During extended dry periods soil cracks exactly like your pavement. Building foundations shift and pavement cracks same as yours(or worse). The most effective preventive measure is sloping grade to prevent rainwater ponding near foundation and driveway then irrigating at first sign of ground cracking. Irrigating drive more than 50 feet from yard isn't practical but sloping to drainage ditch usually is.