Injector Pump questions for D950DT in my B1750

Bumjelly

New member

Equipment
Kubota B1750
Jul 23, 2015
4
0
0
Angier, NC
Hey Y'all,
New to this website and I'm very impressed with the knowledge and helpfulness of those posting advice and help for those of us not as up to speed regarding Kubota Tractors. I've been lurking and gathering information for a few weeks and I now think I have enough to get started with my new project.
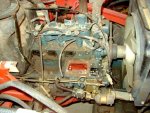
I have inherited a Kubota B1750 tractor with the engine in a state of partial dis-assembly and need some assistance and guidance. Any and all help and advice is welcome, so lay it on me.
To start off with I'm mostly looking for assistance with the Injector pump. It "don't not, ain't not, got none." :eek:
I was told that it was determined that the internal parts were too rusted and pitted to be be rebuilt with an expectation of a long service life. A rebuilt replacement pump was to be installed but that never happened. So now I have a great little tractor without an injection pump.

Any knowledgeable, hands on experience type of advice regarding the correct injector pump, shims, timing, etc., and installation of same and the correct installation of the governor springs is certainly welcome. Hoping to find a replacement pump asap to get the tractor back in running condition.
I'm unsure of the correct Kubota part # for the correct injector pump for my engine. Lots of Kubota 3 cyl. engines and pumps out there.
I have determined, correctly so I hope, that the pump for the D950-TD is is either; #15381-5101-0 or #15531-51012
Anybody know for sure?

The prices I have seen for a new pump are wicked scary! Rebuilts, around the internet and Ebay, for $450 + seems a bit out of my price range right this minute. However, I do want to obtain a known, good pump or a rebuilt that's been done correctly, bench tested for pressure, etc.

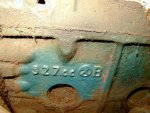
The engine is a D950DT, pretty sure. Got that from online research regarding the the "927660B" casting # on block, at the intake side, rear, location.
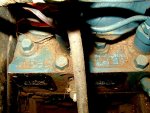
"K5C 0411 with an 8 above the 11" - Casting # on the Head, intake side.
"9N" - Casting # on intake side of block, at rear, under rear intake port.

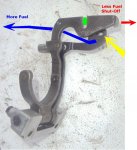
I'm a bit confused as to the exact way to get the 2 springs back into the correct orientation between the Comp Lever and the Fork Lever.
I finally found the 2 unattached springs for the governor assembly.
The diagram shows them connecting to each other and the ends of the small spring connecting to the Comp lever and the bigger spring to the Fork Lever. What is the point of that? Won't the smaller, weaker spring will always "give" before pulling the bigger spring?

In looking at the Kubota diagrams regarding the governor assemblies;
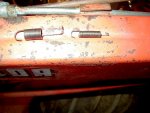
There are 2 governor springs (#2 and #3) between the #4 Comp Lever and the #13 Fork Lever.
The # 2 spring has a curved "hook" at one end and a "straight hook" with ends bent at 90 degrees at the other end. See pic.
Which end goes where?
How is it possible to get the big spring attached to the small spring and then hooked to the comp lever without loosing / dropping them before placement of the Comp lever plate?
My fingers aren't that small! There has to be a trick to it...???
Looking forward to my new project.
RP in NC
 

Attachments

rentthis

Well-known member
Lifetime Member
May 30, 2012
1,010
25
48
summerville,sc
The first thing to do is to find a workshop manual. They are available, in most cases. online. The wsm will give you proper orientation for the springs and tell you how to put them in place. It says to bend a wire, I used a coat hanger, to hook the and pull them into place. I found a pair of needle nosed pliers helpful too. Be prepared to use your monthly allotment of profanity. I have had luck finding the wsm @ manualvault.com. They have a $9.95 download of really good manuals. Others here know of other sites where they are free. The numbers you pictures are casting numbers and probably won't tell you what you need. Look on the top of the valve cover. Kubota puts a sticker there that gives the engine number. Hopefully it's still there. If not, someone here will know the number. If you plan to try the old pump, just use the current shims and the timing should be right. Shimming a new pump is way above my pay grade. Good luck and have fun.
 

Daren Todd

Well-known member
Lifetime Member

Equipment
Massey Ferguson 1825E, Kubota Z121S, Box blade, Rotary Cutter
May 18, 2014
10,903
8,572
113
Vilonia, Arkansas
I tackled the governor springs in my l1501 last year. Has the z751a engine in it. I ran into the same issue trying to get the springs back into place. Big fingers, and a thumb that doesn't work very well. Easiest way to install them is with a set of needle nose pliers that have a 22° off set in them. Made it really easy to get around the corners and hook the springs into place ;)

I think the link that rentthis was talking about is www.kubota.servicemanualvault.com


On mine, the shorter fatter spring hooked to the timing cover(crankcase cover depending on your region) and the rod for the governor, and the other spring hooked to the throttle arm and governor.
 
Last edited:

North Idaho Wolfman

Moderator
Staff member
Lifetime Member

Equipment
L3450DT-GST, Woods FEL, B7100 HSD, FEL, 60" SB, 743 Bobcat with V2203, and more
Jun 9, 2013
33,931
9,144
113
Sandpoint, ID
I will third the "Get the WSM", as it will give you the exact procedure for setting the timing with shims, and all the other info you need. ;)

You can still ask for clarity on issues it just helps when you have pictures and instructions right in front of you! :)
 

Bumjelly

New member

Equipment
Kubota B1750
Jul 23, 2015
4
0
0
Angier, NC
Many thanks to all for the speedy replies, information and tips, much appreciated! :) The link to the Manual Vault website, that will come in real handy! I'll definitely make getting the WSM my first priority.
For now though, the FREE drawings and information from the kubotabooks.com website is a good way for me to get familier with my new project.
There are 8 .pdf files there for downloading, including a 6.7 mb / 79 page official Kubota Ltd. file for the D950 engine with all of the Kubota part numbers for everything. No procedural descriptions and all that, but pretty sweet non the less!

http://www.kubotabooks.com/AutoIndex/index.php?dir=Engines/&AutoIndex=bce432a75c8e1dd5b82d718fd6aec733

Getting those springs into place will definitly be a booger to do. The advice of the needle nose offset pliers is a real good idea. Of course, a removable plate at the side of the block in front of the pump would make the job a snap, requiring minimal profanity but it would obviously add to the manufacturing cost. Just fyi: My friend's Mitsubishi 3 cyl. diesel generator has that plate on the side of the block to facilitate a very easy removal of the pump. :cool:

:confused: I still do not grasp the concept of a light duty spring hooked to a stronger spring to make the connection between point A and point B in the governor assembly. There has to be an engineering reason for that otherwise I think there would only be 1 spring...
And why is the one end of the big spring, see pic, not the usual 1/2 circle bend? Why the right angle bends?
It's not that important but the engineer in me wants to know. ;)

For right now, after getting the workshop manual, the procurement of a good rebuilt injection pump is the first priority. From the Kubota diagram's part list the pump I need is part # 15381-5101-0
Any known reliable vendors to recommend?

As I said earlier, the $450+ price tag for a rebuilt / tested and 1 year warranted unit off of Ebay from Grainfarmer.com is a little out of my price range right now, but as granny used to say "Quality is long remembered after the cost is forgotten."
I'd rather just cry once and be done with it!

Regarding the model number of the engine: I was on another site today, TractorByNet.com, and my answer was posted there by a knowledgeable Kubota mechanic. Many thanks to him!
The engine model # and the serial # for the 3 cyl. Kubota engines is stamped into the block flange just outboard of the hole where the injection pump drops into and bolts up to. He also posted that all of the B1750's came with the D950 engine.
All I had to do was wire brush a thin layer of paint away and there it was: D950 - 631573
That will make everything a lot easier as time goes on.
Got to love the power of posting!!!

Big thanks again fellas, I'll be back, I'm sure!
RP in NC
 

motmow

New member

Equipment
L2350DT, JD 1070, L245
Jun 13, 2015
81
0
0
Chesapeake, VA
I just got an injector pump for my L2350 from Oregon Fuel Injection. They shipped it fast and I have had no issues. The governor springs on the L2350 were not too bad. I paid 399.00 with a 50.00 core charge. I thought it was a pretty good deal. I had a JD 1070 injection pump rebuilt here locally and it cost me $1400.00!!!!!
 
Last edited:

North Idaho Wolfman

Moderator
Staff member
Lifetime Member

Equipment
L3450DT-GST, Woods FEL, B7100 HSD, FEL, 60" SB, 743 Bobcat with V2203, and more
Jun 9, 2013
33,931
9,144
113
Sandpoint, ID
The governor springs do not hook to each other, they go inside each other, the one with the hook end engages faster than the longer spring.
They give the governor a 2 stage effect. ;)
 
Last edited:

Bumjelly

New member

Equipment
Kubota B1750
Jul 23, 2015
4
0
0
Angier, NC
Thanks Wolfman!
That makes a lot more sense to me now. Another good reason to get the workshop manual.
When I found the 2 springs in the "parts can" they WERE kind of "intertwined" with each other. I "ASSumed" they had gotten squished / pushed together over time moving around in the parts can one way or another.
When I found the 2 springs amongst a bunch of nuts,bolts, tubes, glow plugs, etc., of course I separated them, thinking ever so logically, that no one puts a spring within a spring.
However, in my own defense, I must plead ignorance to the purpose of the 2 springs seeing as how I didn't know what they were for at the time.

Time for the proper "old saying;"
"Life is a hard teacher. She gives the test first and only then, the lesson."

@ motmow - Thanks for the input regarding Oregon Fuel Injection! :)
I'll be checking out any and all possibilities for getting a good pump for the Kubota.

Gotta check out the "Manual Vault" website and get that manual first.

Thanks again all,
RP in NC
 

Bumjelly

New member

Equipment
Kubota B1750
Jul 23, 2015
4
0
0
Angier, NC
OK, back again. Another search of the "Interwebs' has unearthed an interesting website where this guy, "Crazy Jerry," has installed a Kubota D850 diesel engine in a weird car called the "Centurion."
He entered it in the "Green Grand Prix" at Watkin's Glen and actually won and also has a current low side fuel economy of 124 miles per gallon.

Anyway, knowing that the D750, D850 and the D950 share the same basic block, I thought there might be something of interest here regarding the injection pump governor springs situation of mine.

On Jerry's website, scrolling about about 1/2 way down the page, he has some pics and descriptions regarding the governor assembly. The pics show the governor assembly out of the block and has a lot of interesting info regarding exactly how everything works,
http://ecomodder.com/forum/showthread.php/urba-centurion-update-kubota-diesel-100-mpg-mixed-23497-33.html
I'll include just a bit of the info he provided regarding the attached pic of the gov assembly with the colored areas.

Here's what Crazy Jerry has to say:
"Look at the lime green circle. This is where the Injector Pump's rack dowel pin slides down into. Once you know that, it becomes a bit more clear that as the "arm" holding the green dowel pin moves forward, the fuel rack will increase the pump's output and the engine will rev. If the arm moves rearward, the fuel rack will cut back the fuel delivered to the injectors and the engine will slow down (or stop if it goes rearward far enough)."

"When you push down on the accelerator pedal, you are really only pulling on that arm via a spring. As the engine begins to rev near its rpm limit, the centrifugal force of the fuel pump's camshaft weights act on the same arm to push it rearward, thus limiting the fuel rack's travel - this way you don't over-rev the engine and blow it to smithereens."

"Notice the yellow arrow in the above pic and see that it's pointing to a slot. That slot is essentially a "tolerance" area between the two arms. If the pulling of the accelerator spring closely matches the pushing force of the fuel pump camshaft weights, then the dowel pin from the closer arm is allowed to "free float" just a little bit (both forward and rearward) in that slot. In certain cases, likely due to both heat and vibration, the accelerator spring can resonate and then you get a bouncing back and forth action between "its pull", and the "camshaft weight's push". When this happens (in this case under a light load in any gear) the fuel rack will move fore-and-aft just enough to give you a rodeo ride (bucking action.) This normally would never happen if this engine was in the stock equipment is was designed for since there would normally be a constant load on it (Ex: A Genset, Tractor, Bobcat, etc..)"
* * * * * * * * * * * * * * * * * * * * * * * * *
Searching for "governor springs" this morning I found a thread from 2013 regarding the 2 springs so I'll include it here in case it helps anyone else.

"The only reason I can think of to do spring in a spring like that is if they were experiencing some sort or spring resonance that was making the governor hunt. Just a guess.
Anyway I think it's a safe assumption they go in the same slot since they're inside on another, otherwise the springs would catch on each other.
They both should attach to a single eyelet (a slot actually ) on the rear of the governor arm.
If you remove the stop lever plate on the side of the engine below the injection pump it'll be the arm closest to you.
The bigger spring (governor spring) attaches to the governor lever and the smaller spring (start spring) goes in a drilled stud in the gear cover. "
Just keep an old wadded up T-shirt handy and leave the air cleaner off the first time you start it in case you need to smother it.

Enjoy...
RP in NC
 

Attachments

ASTER

Member
May 30, 2017
115
4
18
ROSEDALE LA
OK, back again. Another search of the "Interwebs' has unearthed an interesting website where this guy, "Crazy Jerry," has installed a Kubota D850 diesel engine in a weird car called the "Centurion."
He entered it in the "Green Grand Prix" at Watkin's Glen and actually won and also has a current low side fuel economy of 124 miles per gallon.

Anyway, knowing that the D750, D850 and the D950 share the same basic block, I thought there might be something of interest here regarding the injection pump governor springs situation of mine.

On Jerry's website, scrolling about about 1/2 way down the page, he has some pics and descriptions regarding the governor assembly. The pics show the governor assembly out of the block and has a lot of interesting info regarding exactly how everything works,
http://ecomodder.com/forum/showthread.php/urba-centurion-update-kubota-diesel-100-mpg-mixed-23497-33.html
I'll include just a bit of the info he provided regarding the attached pic of the gov assembly with the colored areas.

Here's what Crazy Jerry has to say:
"Look at the lime green circle. This is where the Injector Pump's rack dowel pin slides down into. Once you know that, it becomes a bit more clear that as the "arm" holding the green dowel pin moves forward, the fuel rack will increase the pump's output and the engine will rev. If the arm moves rearward, the fuel rack will cut back the fuel delivered to the injectors and the engine will slow down (or stop if it goes rearward far enough)."

"When you push down on the accelerator pedal, you are really only pulling on that arm via a spring. As the engine begins to rev near its rpm limit, the centrifugal force of the fuel pump's camshaft weights act on the same arm to push it rearward, thus limiting the fuel rack's travel - this way you don't over-rev the engine and blow it to smithereens."

"Notice the yellow arrow in the above pic and see that it's pointing to a slot. That slot is essentially a "tolerance" area between the two arms. If the pulling of the accelerator spring closely matches the pushing force of the fuel pump camshaft weights, then the dowel pin from the closer arm is allowed to "free float" just a little bit (both forward and rearward) in that slot. In certain cases, likely due to both heat and vibration, the accelerator spring can resonate and then you get a bouncing back and forth action between "its pull", and the "camshaft weight's push". When this happens (in this case under a light load in any gear) the fuel rack will move fore-and-aft just enough to give you a rodeo ride (bucking action.) This normally would never happen if this engine was in the stock equipment is was designed for since there would normally be a constant load on it (Ex: A Genset, Tractor, Bobcat, etc..)"
* * * * * * * * * * * * * * * * * * * * * * * * *
Searching for "governor springs" this morning I found a thread from 2013 regarding the 2 springs so I'll include it here in case it helps anyone else.

"The only reason I can think of to do spring in a spring like that is if they were experiencing some sort or spring resonance that was making the governor hunt. Just a guess.
Anyway I think it's a safe assumption they go in the same slot since they're inside on another, otherwise the springs would catch on each other.
They both should attach to a single eyelet (a slot actually ) on the rear of the governor arm.
If you remove the stop lever plate on the side of the engine below the injection pump it'll be the arm closest to you.
The bigger spring (governor spring) attaches to the governor lever and the smaller spring (start spring) goes in a drilled stud in the gear cover. "
Just keep an old wadded up T-shirt handy and leave the air cleaner off the first time you start it in case you need to smother it.

Enjoy...
RP in NC


i wonder if the springs the go into each other ??


They both should attach to a single eyelet (a slot actually ) on the rear of the governor arm.
If you remove the stop lever plate on the side of the engine below the injection pump it'll be the arm closest to you.
The bigger spring (governor spring) attaches to the governor lever and the smaller spring (start spring) goes in a drilled stud in the gear cover. "
Just keep an old wadded up T-shirt handy and leave the air cleaner off the first time you start it in case you need to smother it.

Enjoy...
RP in NC