Does anyone have a clue about the mystery rear hydraulic connectors on my ZB-1600?

b0ned0me

New member
Apr 16, 2013
12
0
0
Sweden
Because I have no clue... Hence my first set of embarrassing noob questions.

This is Little Miss Sunshine, a 1983-vintage four wheel drive who has allegedly done some multiple of 573 hours before joining us on our 12 acres in Sweden a year ago.

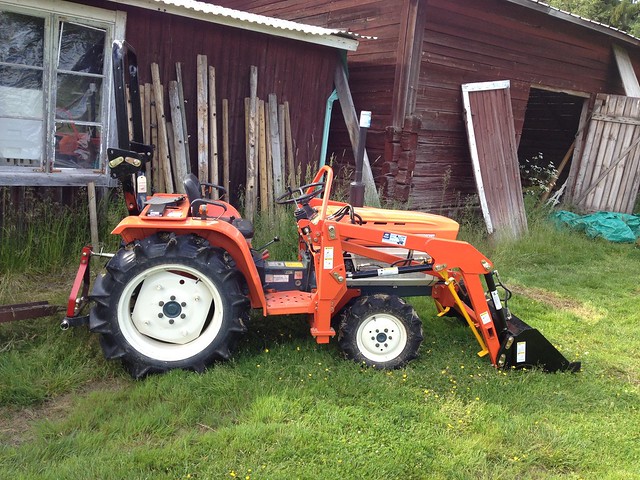
Looks like the paintwork is either original (I fondly imagine a genuine 573 hours of gentle work loving cared for by one elderly Japanese farmer), or else she has been through the Vietnamese refurb factory and then stood about in the monsoon for a short while. Either way, she seems to be in reasonable condition and and is a proper little workhorse. This is just as well because as you can see from the state of the buildings in the background, there is lots of work to be done....

However, now that we have done lots of snow-moving and some bush-hogging and some dragging of things about and some lifting, I have ambitions to move beyond just using the three-point and the loader. The thought is to acquire a small trailer or a rear scoop, in order to transport gravel, earth, firewood etc. more efficiently than using the front bucket. Something with hydraulic tipping would be awfully convenient but I know nothing about hydraulics other than it's a way of avoiding manual labour by using pumps and oil. I like the sound of avoiding spadework, sooo...

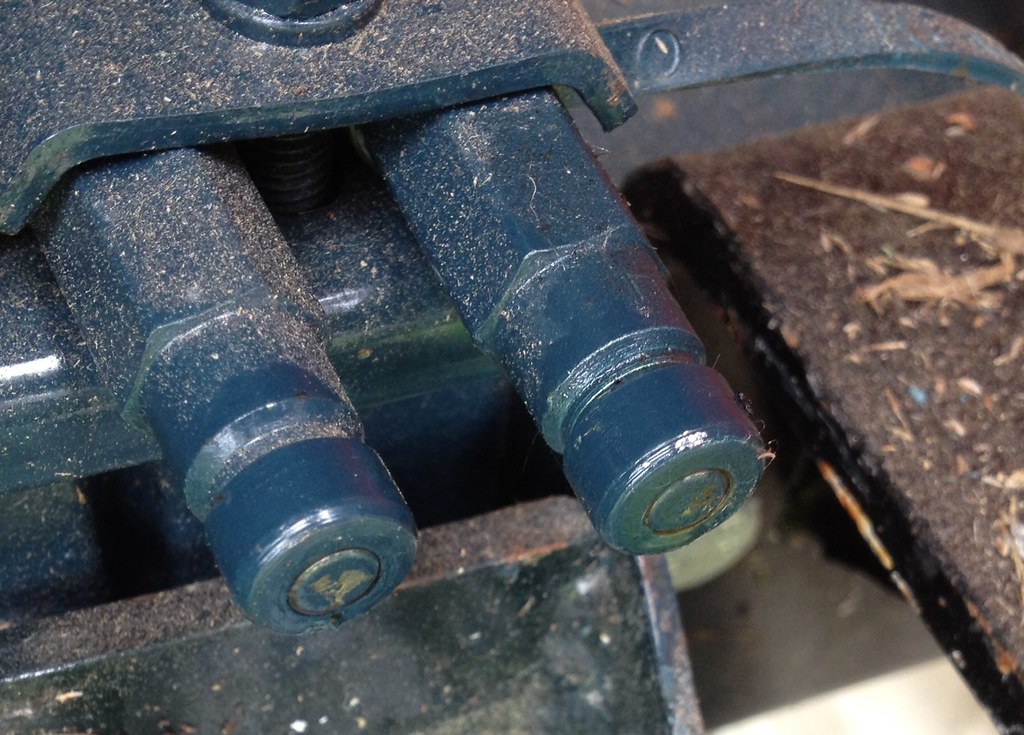
First: What are these two hydraulic outlets/inlets/beasties lurking under the right lift arm, and what can I use them for in the way of making my life easier by buying new toys errrr I mean labour saving implements?

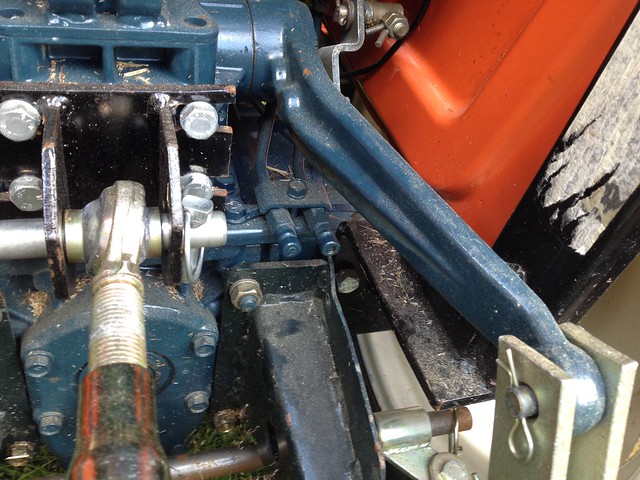
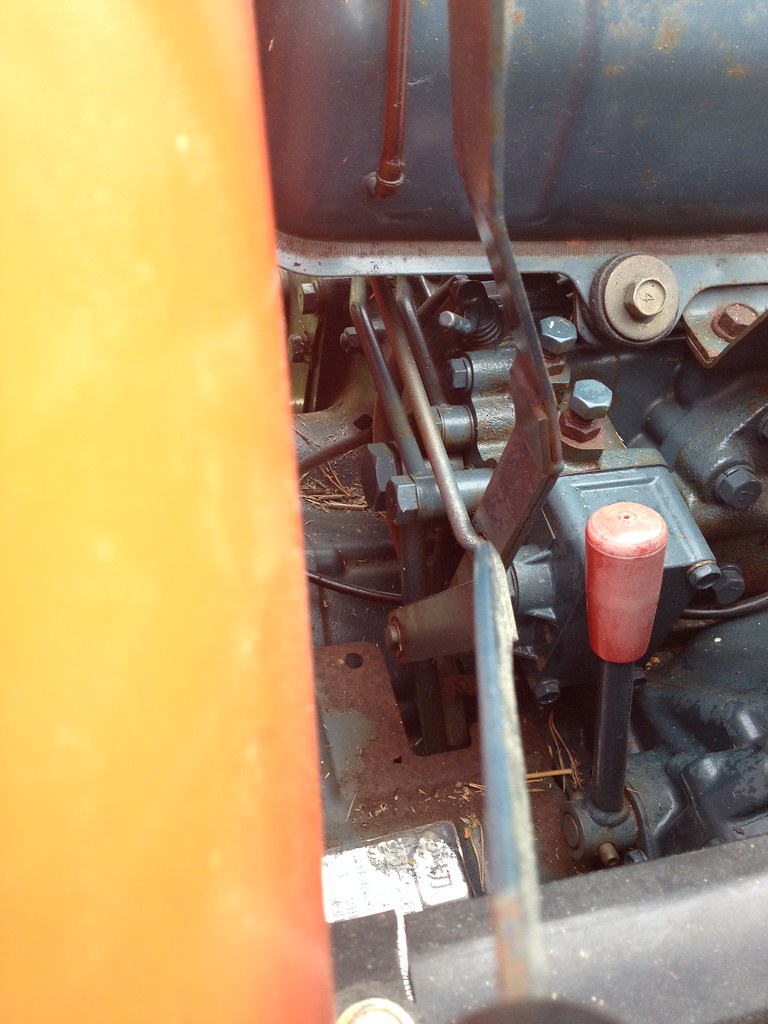
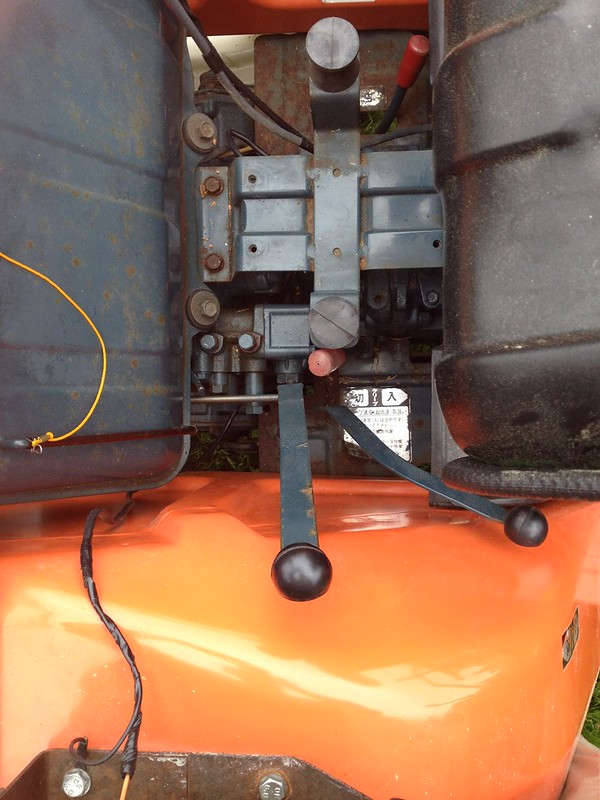
They seem factory-fitted and there is a second lever to the right of the 3-point control lever. This second lever does nothing at the moment, and looks like it might be related to them.

Might these be useable for e.g. a hydraulic tipping trailer? Are they both likely to be 'push'-only, or one 'push' and the other 'return', or are they somehow magically able to both push and return as required? How does one go about hooking up e.g. a tipping trailer so as not to blow up the system by trying to tip it downwards, if you know what I mean?

2: If these are useable, what connector might they be? They look very different to the ones on my neighbour's 50hp Valmet.
According to my vernier, the external diameter is pretty much exactly 1/2 inch (12.35mm, 0.486"). I poked the face of the right one to see if it would move in, and it did, releasing a drop of oil. Internal diameter of the opening is pretty much exactly 1/4 inch (6.175mm, 0.243"). My tentative identification is that they are ISO 16028 HT Series Flushface 1/2", male a.k.a nipple. Does that sound plausible or do grey market Kubotas use some exotic Japanese coupling I need to research? Are there any other distinguishing marks or dimensions to look for?

3: Assuming these are useable for tipping, and I can positively identify them, would I then just order something like these http://www.safewayhyd.com/coupler-adapters.htm to convert the whatever-they-ares to fit whatever connectors are on a hypothetical tipping trailer, tipping gravel scoop, hydraulically adjustable top link :cool: or back blade or whatever?

So - as you can tell, my ignorance of this topic is almost complete. I know how to drive the front loader and make the 3-point go up and down, and I have successfully managed to attach and remove implements, and that's what I know about hydraulics. Where do I go from here if I want to leave my ATV-owning friends pining for the awesomeness of a compact tractor with built-in hydraulics, without making lots of expensive mistakes along the way?
 

Diydave

New member

Equipment
L2202 tractor, L185f tractor
Oct 31, 2013
1,635
7
0
Gambrills, MD USA
Got a close up picture of the 2 connectors? If it were mine, I would get some pipe fittings, and hook a gauge into each line, in turn, then pull and push the lever. this will tell you which line is hot, when you pull or push the lever. You can do it with one gauge, as if one is hot the other is not, by process of elimination.:D
 

North Idaho Wolfman

Moderator
Staff member
Lifetime Member

Equipment
L3450DT-GST, Woods FEL, B7100 HSD, FEL, 60" SB, 743 Bobcat with V2203, and more
Jun 9, 2013
28,286
4,853
113
Sandpoint, ID
I think we have talked about those before, and If I remember right, there doesn't seam to be a source for the other ends of those lines.

I would be easy to convert those over to standard 1/4" flat face connectors, Just remember the lines on those are probably BSPT threads, so get conversion adapters.
 

b0ned0me

New member
Apr 16, 2013
12
0
0
Sweden
Got a close up picture of the 2 connectors? If it were mine, I would get some pipe fittings, and hook a gauge into each line, in turn, then pull and push the lever. this will tell you which line is hot, when you pull or push the lever. You can do it with one gauge, as if one is hot the other is not, by process of elimination.:D
A close-up is no problem. At least, a closer-up. Note small paint scrapes on faces of couplers caused by repeated poking with a leatherman. Click here if you want the BIIG picture.

Pipe fittings? Gauges? This is all unexplored territory, to put it mildly. Would it be necessary to unscrew these couplings to connect the gauge or could one somehow cheat by getting a length of hose with a female one of these whatever-they-are couplers on one end and the gauge on the other? I had many childhood experiences of taking things apart and now I rarely try it unless the make-it-work magic has already escaped.

The hex/nut part at the base of the coupling seems to be 9/16 of an inch, 14.2mm. Length from tip of coupler to hex part looks like 11/16" or 18mm approx.
I think we have talked about those before, and If I remember right, there doesn't seam to be a source for the other ends of those lines.
The pipes from these connectors run through into a hunk of metal under the seat that is in very close proximity to the lever that controls the 3-point. If I press in the face of either connector it releases a little dribble of clean clear oil and stays very slightly depressed. When the tractor starts up the faces of the connectors come out flush with the end of the connector again. I think they are connected to something, I just have no idea if it is a useful 'something'.
Hopefully you can see on this photo the two lines which are running below and just to ether side of the rod (link?) from the upright 3-point control arm and joining into the mystery block. The lower lever along the bottom of the photo is the 'it does nothing' lever I mentioned earlier. This lever feels like it has an 'up on' and a 'down on' with a spring-loaded return to 'center' when released. The user manual I have is pieced together from the most relevant parts of manuals for similar-but-different tractor and refers to a "attachment lowering control lever" and a "Hydraulic lift control lever". The workshop manual refers to an "auxiliary Control Valve (Option)" and mentions that this second thingy is installed on 4WD tractors only. Maybe they made 2WD models with the connectors and lines but without plumbing them in? :confused:


I would be easy to convert those over to standard 1/4" flat face connectors, Just remember the lines on those are probably BSPT threads, so get conversion adapters.
What's the difference between the current ones and a 'standard' 1/4 flatface? It looks like ISO 7241-1 series A or B (Parker 6600/60) are more common here, but they are a little point on the face, not flat...

More pictures of the general arrangement, including funky label I think relates to the red-topped lever for the crawler gear.
 

Diydave

New member

Equipment
L2202 tractor, L185f tractor
Oct 31, 2013
1,635
7
0
Gambrills, MD USA
You will still prolly need to hook up a gauge to them, regardless of whether they are single or double acting. Now that I see the lever setup, most likely that the second lever controls them. I'd still test them with a gauge, and you might have to have the first lever all the way up, in the constant pumping position, to get the second one to function. This is where an operator's manual would come in handy...:D
 

b0ned0me

New member
Apr 16, 2013
12
0
0
Sweden
Where's the little "waaaaah" smilie with the tears? This is clearly going to get more complicated than I hoped. Especially since I am an idiot and I think based on the dimensions these are 1/4 ISO 16028 not 1/2 inch, it's the inside diameter not the outside that counts, apparently

1 - Fitting things on the connectors. Does anyone have a better 'diagnosis' than that these things are male 1/4 inch 16028 / snap-tite 74 / Parker FEM / skid-steer or whatever they are called? If not, then I will have to lay my hands on something intended to fit that - step 2

2 - Pressure testing. There doesn't seem to be anything like a meter intended to mount straight on a skid-steer coupling so I will presumably have to make my own (more waaaaaah!) or pay someone to do it (waaaah!) unless there is some special term I should be using to search with? Presumably the requirement is:
  1. one female coupler to fit as step 1
  2. a length of suitable hose (with a terminator or fitting on each end?
  3. a suitable gauge

From what I can tell, ham-handed DIY on hydralic hoses is definitely not recommended so presumably it is best to get them made up already?
 
Last edited:

b0ned0me

New member
Apr 16, 2013
12
0
0
Sweden
Presumably the requirement is:
  1. one female coupler to fit as step 1
  2. a length of suitable hose (with a terminator or fitting on each end?
  3. a suitable gauge

From what I can tell, ham-handed DIY on hydralic hoses is definitely not recommended so presumably it is best to get them made up already?
And would this fit the requirements?

coupler
hose
gauge
adapter to fit coupler to hose


Or would I be better with something like this test kit and the coupler? Would the "Check Coupling 1/4" BSP" allow connection between the 16x2 metric nut and the back of the female coupler?:confused:
 

D2Cat

Well-known member
Lifetime Member

Equipment
L305DT, B7100HST, TG1860, TG1860D, L4240
Mar 27, 2014
12,901
4,266
113
40 miles south of Kansas City

ShaunBlake

New member
Lifetime Member

Equipment
B6100D; B219; Piranha bar; Hodge stabilizers; Filled Ag rears; R322T w/48" deck
Dec 21, 2014
899
1
0
81
Sugar Hill -- next door to Buford, GA
And would this fit the requirements?

coupler

gauge
That connector price is a bit painful. The gauge is affordable, and is threaded the same as the connector. I suggest putting the connector directly on the gauge for the purpose of learning about those lines. Then plumb the gauge into your loader control block for a permanent installation.
 

b0ned0me

New member
Apr 16, 2013
12
0
0
Sweden
If you can come up with a pressure gauge that reads up to 3000 PSI, then connect the gauge directly to the female quick connect. Then you can plug the quick connect to the tractor fitting and read the pressure. No hose needed.
The gauge is affordable, and is threaded the same as the connector. I suggest putting the connector directly on the gauge for the purpose of learning about those lines.
:eek:
I'm not really an idiot, but I play one on the internet. Thanks for de-complicating things. I'll order those two and keep my fingers crossed.
 

D2Cat

Well-known member
Lifetime Member

Equipment
L305DT, B7100HST, TG1860, TG1860D, L4240
Mar 27, 2014
12,901
4,266
113
40 miles south of Kansas City
b0ned0me, sorry to have offended you. Only trying to clarify what is actually needed. Might help someone else who reads the thread trying to solve a similar problem.

Welcome to the board, just turn the sensitivity level down.:D
 

b0ned0me

New member
Apr 16, 2013
12
0
0
Sweden
b0ned0me, sorry to have offended you. Only trying to clarify what is actually needed. Might help someone else who reads the thread trying to solve a similar problem.

Welcome to the board, just turn the sensitivity level down.:D
Sorry, communication failure there, that was me attempting to thank you guys for stopping me from over-complicating things. I'm forever telling people that the more parts they put into something the more likely it is to go wrong, and now look at me. 100% more parts than required!

Just to make things even better, I just went to look at when I could expect these things to turn up, and found I hadn't actually finalised the checkout, so they were still sitting in the basket awaiting payment :eek:
And when I hit the 'checkout' button, it tells me checkout is busted and I will have to pay for them later. :mad:

My first venture into the world of hydraulics is off to a great start, I tell ya...
 

b0ned0me

New member
Apr 16, 2013
12
0
0
Sweden
b0ned0me said:
And when I hit the 'checkout' button, it tells me checkout is busted and I will have to pay for them later. :mad:

My first venture into the world of hydraulics is off to a great start, I tell ya...
Update: so flowfitonline turn out to be super-efficient, I got my shipping confirmation within half an hour of ebay letting me complete the checkout, and I got the parts a few days later. :cool:

Only for the connector to be significantly too big. :eek: So whatever these connectors are is clearly not a 1/4 flatface. On the other hand, the gauge+ connector makes a nice paperweight / thing to fiddle with during conference calls.

Some googling suggests that there is such a thing as a 1/8 flatface, but very few people seem to make them, and they are nigh-on impossible to locate retail. It also seems to me that a 1/8 would be too small? Anyway, unless someone knows of a cheap source they are too expensive to be practical.

The hydraulic line running to the connector seems to be 5/16 or 8mm, it's hard to get to in order to measure accurately. I think the next step is to take off the existing connector and try to figure out a way of connecting up a gauge (ideally the one I just bought!) to see if the lines are 'live'. If they are, then attempt to bubba on a more conventional connector. So I guess I will be spending some time getting oily and measuring threads...
 
Last edited:

Daren Todd

Well-known member
Lifetime Member

Equipment
Massey Ferguson 1825E, Kubota Z121S, Box blade, Rotary Cutter
May 18, 2014
8,961
4,329
113
Vilonia, Arkansas
Do you have a local source for hydraulic fittings and hoses? If so, they should be able to help you out to get some fittings and nipples that work. You would just need to take them in and have them match them up :)
 

North Idaho Wolfman

Moderator
Staff member
Lifetime Member

Equipment
L3450DT-GST, Woods FEL, B7100 HSD, FEL, 60" SB, 743 Bobcat with V2203, and more
Jun 9, 2013
28,286
4,853
113
Sandpoint, ID
The threads on the fittings will probably be BSPT (British Standard Pipe Taper), they measure out the same as NPT but have a different taper.
The flat face couplers should be NPT (National Pipe Thread).

How you can tell, is try and fit a NPT on a BSTP fitting or vice vesa and they will only thread on easily for the first thread or so then they will get too tight too quickly.
 

b0ned0me

New member
Apr 16, 2013
12
0
0
Sweden
So I finally found time in amongst barn demolition, ditch excavation and getting rained on to take off one of the connectors. There was some old latex-like white goop in the threads which I think was some sort of sealant. Should I be using something special to re-tighten with?

Anyhow, I did manage to get the connector off and back on again without wrecking anything obvious, and the thread the coupler was connected with appears to be 1/8BSP or thereabouts, which was sort of expected. I now need to figure out whether to just take a gamble on ordering some hoses or adapters or whatever, or play it safe first by ordering the cheapest thing I can find that is definitely 1/8BSPT and seeing if it fits cleanly...
 

North Idaho Wolfman

Moderator
Staff member
Lifetime Member

Equipment
L3450DT-GST, Woods FEL, B7100 HSD, FEL, 60" SB, 743 Bobcat with V2203, and more
Jun 9, 2013
28,286
4,853
113
Sandpoint, ID
My suggestion would be get a set of 1/8"BST to 1/4" NPT adapters and then you will be able to use a standard 1/4" flat face connector. ;)
 

b0ned0me

New member
Apr 16, 2013
12
0
0
Sweden
So in case anyone is still interested in the ongoing saga of My First Fiddling With Hydraulics....

Some more bits arrived in the post, and a 1/8" to 1/4" bushing finally let me attach my gauge to the left-hand pipe. Result is that:
  • when the aux lever is pushed forward, gauge immediately hits ~50Bar aka 725psi
  • Releasing the lever sees the pressure drop to a little above zero almost immediately - not sure if this is by design, or because the bushing/gauge was leaking a tiny bit, or because of an issue in the spool somewhere
  • pulling the aux lever back drops the pressure to 0
so that looks promising. Presumably a trailer-tip would work as-is, and maybe something more sophisticated if I could sort out the pressure drop?

Now the next 'mare. The right-hand pipe is still an unknown because the diddly little connector is immovable, presumably due to a mix of rust and the old white thread sealant goop.
With a deep socket over the connector and a t-handle, paint was flaking off the pipe because it was twisting along its length. Trying two spanners squeezed against each other got me a nothing but an incipient rupture. I guess the next thing to try is heat. Any recommendations?

Cold wet rag round the pipe and heat onto the connector, or other way round? How much heat is safe to try? Boiling water, heat gun, blowtorch?
How flammable is hyd fluid anyway? :eek:

If I can't get this thing loose, what is the standard procedure for 'desperate measures'? Cut the hose, tap it with a thread and put a new fitting on the end?

My suggestion would be get a set of 1/8"BST to 1/4" NPT adapters and then you will be able to use a standard 1/4" flat face connector. ;)
Roughly what I will be doing, with the minor difference that here in Sweden BSP is more "standard" than NPT, what with the pesky imperialists being just across the north sea :D
These flowfit people do free shipping within the EU, minimum order of £10, and are really efficient about fulfilling my repeated orders for different random bits...
 

b0ned0me

New member
Apr 16, 2013
12
0
0
Sweden
Aaaaaand - success! Finally!

Lots of cursing, swearing and elbow grease failed to release the second fitting. I zapped it several times over the course of a day with some "Rust loosener with freeze shock effect" I had in the barn, and which did - absolutely nothing but take the last of the paint off it and soften the thread goop.
I had a brain storm and deployed a Makita 18V impact screwdriver with a rusty old 1/2" socket adapter I found in the pokey-hole and the deep socket. The first few attempts just had it writhing about like an epileptic ferret and moved nothing. Finally I decided that since the next step was blowtorches and possibly saws, and the socket was so far undamaged, I might as well go nuts. I buzzed it non-stop for about half a minute, at which point the fitting finally came off.:D

Fitting the gauge gave me the expected results: +50bar with the lever pulled back, dropping to a hundred PSI or so with the lever released and to nothing when the lever is pulled forward. And a little dribble of hydraulic oil from the 1/8 to 1/4 adapter.

Two further questions if anyone is still reading:
  1. Will a leak of a spoonful or so of oil cause the pressure drop from 725psi to ~100 in a second or so? Or is it more likely that the circuit is some sort of "instantanous" type not meant to hold pressure, or perhaps that there is a leak in the spool valve?
  2. Is it normal for the leaking oil to have tiny bubbles in, almost as if it was slightly carbonated? Or does this indicate some sort of problem I need to address?