What was that saying?….”measure 398 times, cut once…..dumbass”

Runs With Scissors

Well-known member

Equipment
L2501 TLB , Grappel, Brush Hog, Box Blade, Ballast box, Forks, Tiller, PH digger
Jan 25, 2023
3,198
3,994
113
Michigan
Well there I am working on the my Chi-Com mill, back story posted below.

https://www.orangetractortalks.com/...little-help-from-the-electronics-gurus.77082/

I am moving along quite well with the X and Y axis.

Pretty simple and straight forward job. Make a couple of simple bracket, drilll, tap and install.

I decide to put the X axis on the stern, where it will be out of the way.

IMG_4606.JPG


I decide to put the Y axis on the starboard side, for no real particular reason, other than the table is already sitting in an “advantageous spot” so I won’t have to move anything.
IMG_4604.JPG


As my granddaughter would say……………….“Easy peezy, lemon squezzy”


Now I have to work on the Z axis.

Long story short, I can’t see an “obvious place” to mount the “magnetic tape” (Oh yea, and I decided to give this style of DRO instead of the traditional “glass scales” a whirl….it’s basically a $150 dollar gamble).

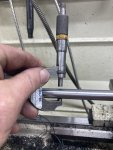
So after some head scratching I remember that, many, many moons ago, I removed the “Z axis measuring thing” .

And I be damned if when I opened the built in cabinet, there it was.

That threaded rod used to go in the area there the DRO display is currently, was used some sort of “Z axis stopper”, but now I figure if I “cock it” to the side a little (as pictured) I could “Jerry rig” (or is it Jury rig?) something up.


IMG_4473.JPG


It's off to the “drawing board”…………...

Well the smoke starts pouring out of my ears, and I come up with a “plan"

I am going to make a piece nearly identical to the current “threaded rod” EXCEPT

Instead of “threads”, I am going to mill a flat spot and use that to “glue” the magnetic tape to, then make a custom bracket to hold the sensor head.

So the very first thing I have to do is measure how long i need to make it.

So I run the quill down and lock it in place.

Its about 5.5 inchs.

Then I let it back up, and repeat…….again about 5.5 ish inches (remember this;))


So now I take a few measurements and measure the thread pitch of the nut that holds it on.

PERFECT……It’s a standard 5/8-18, so I can use the original “thin nut”…..saving me a bit of time/effort
IMG_4477.JPG


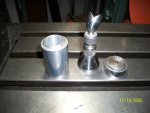
Off to the scrap pile.

I find this ‘remnant” that looks perfect.


So I chuck it up, and use my new NOGA indicator holder to check the run out

Whoooo, Hooooooo………..The UPS fairy just dropped it off 2 days ago and I am dying to use it!!!!!!!

From what I gather it is the “latest and greatest” becasue it has both a “bottom adjuster” and a “top adjuster”

IMG_4430.JPG


IMG_4428.JPG


IMG_4427.JPG


So I chuck up the piece, check it for run out and start to turn it down to size.

I finally get it to "pretty close" to the final dimensions.

Now I just gotta turn the threaded part…

So I get it all set up with the “fish tail” check and “double checK” that I have the machine set properly.

I get ready to do my “scratch pass”……

I flip the handle and

BAM………CRASH!!!!!!!!!!!!….BOOM!!!!!!!!!!!!!!!

I basically shit my pants………………I jam the “emergency stop” button so hard that I hurt my palm.


Mother____her…….!!!!!!! Gosh Damn it all to hell………Sum bitch……..'………..

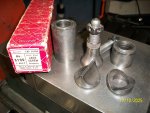
I can’t recall with total clarity, but I crashed that dirty rotten mo——————er smack dab into my new chuck and

here is the end result.

IMG_4545.JPG


and here is the tool holder…..


.
IMG_4546.JPG


Feeling like a “total dumbass”, very pissed off, and needing to change my britches, I ask myself WTF just happened………….I shut the lights off, and pour a "cold one"………….DAMN IT………….
 
Last edited:
  • Wow
Reactions: 1 users

Hugo Habicht

Well-known member
Lifetime Member

Equipment
G1900
Jun 24, 2024
865
1,200
93
Ireland
"Pour a cold one" is the right thing to do. Those things just happen, does not matter how careful you are (will not post a picture of my milling vice here, too embarassing :giggle: )

And be honest, the damage could have been worse and the important bit is that you did not get hurt. Chucks and tool holders can be replaced.

Risk of hammering into the chuck when cutting threads is reduced when placing the cutter upside down and running the lathe in reverse. This way the cutter is moving away from the chuck.

In case it may help you, here are two pictures how I mounted the Z-Axis glass scale out of harms way on my milling machine which seems to be very similar to yours:

IMG_20251018_125458.jpg


IMG_20251018_125806.jpg
 
Last edited:
  • Like
Reactions: 1 user

Runs With Scissors

Well-known member

Equipment
L2501 TLB , Grappel, Brush Hog, Box Blade, Ballast box, Forks, Tiller, PH digger
Jan 25, 2023
3,198
3,994
113
Michigan
So the following week I decide to “give it another shot"

This time, I decide it’s best to “write down” my plan before I get started.

So trying to avoid any pitfalls, I draw out everything FIRST, and TRIPLE check my measurements.

After several iterations, I come up with this.

IMG_4567.JPG


I also decide that I am going to use my “good steel”, but its pretty long…...

In the past I would have “cut off” a smaller piece and used it, but I decide to try and use the “whole piece” in the lathe.

IMG_4551.JPG


I am worried about the rear portion of that bar “slapping around”

So I use the “dogs"(screws with brass tips?) in the rear part of the lathe to try and limit/eliminate “rear run out”
IMG_4557.JPG


IMG_4587.JPG

I start off at 70rpm to “ test it” and slowy increase the speed to a “turnable speed"


I get it turned down and set up for my “threading operation”…….again

IMG_4600.JPG


BUT……and there is always a “BUT"


My “inner Joe Pie” is screaming out at me.

and just like .Gov says……………… “If all else fails……. throw more money at it."

So in the past few days, I ordered an “Aloris threading tool” and so it’s going to make its “debut"


I set it up for “Joe Pie, reverse threading"

IMG_4598.JPG


After triple/quadruple checking everything, its time for the “scratch pass"


IMG_4602.JPG


Perfect……So I start the “Joe Pie reverse threading” and it works great.

(although I think I need to use cutting fluid and maybe a faster speed to reduce “tear out’, cause my threads are kind of “rough”). But for this project, it’s “good nuff”.

The UPS fairy has been very busy…….I also got a new “up-side-down” parting off tool.

So I set up for “reverse parting” using my Joe Pie inspired “homemade height gauge measurement” tool.
IMG_4599.JPG


and it “parts off” like “butter"


IMG_4603.JPG
 

Attachments

Shawn T. W

Well-known member

Equipment
'05 L5030 HSTC - '21 MF GC 1725 MB - '18 JD Z960M Z-Trak
Dec 9, 2024
354
628
93
SW Missouri Ozarks
I find experience is the best teacher ... Nobody even got hurt ... Other than a sore palm ...
 
  • Like
Reactions: 1 user

Runs With Scissors

Well-known member

Equipment
L2501 TLB , Grappel, Brush Hog, Box Blade, Ballast box, Forks, Tiller, PH digger
Jan 25, 2023
3,198
3,994
113
Michigan
Now I use my new “collet blocks and collets set” ( I told you, the UPS fairy has been working overtime:))

to set up for making the “bolt head"


IMG_4613.JPG


After turning it 5 more times, I get a “fairly nice” bolt head.


IMG_4619.JPG


But now I have to mill the “flat part”…...

This has me “very perplexed”…...

I start off thinking that I should clamp the round part in the mill vise, but after several attempts, I abandon those ideas.

I struggle to come up with a solution, but this eventually pops into my head, and it seems pretty stable/reasonable.

I eventually settle on using my “new collets” and a “homemade stand” and some shims (aka a bed frame bracket…lol), under the bolt head to clamp it and hold it still.

Something like this (But I forgot to take a pic of the actual set up)….

EDIT: (actually upon further review, the 2nd pic down from this one shows my set up with the "bed frame" bracket as a shim….lol))


IMG_4611.JPG


Then I mill the "flat"

IMG_4629.JPG


IMG_4632.JPG


Now I'm as “proud as punch”, so it’s off to “blacken it” to make it look “professional"

A few minutes in the “black oxide” solution…..


IMG_4638.JPG


IMG_4640.JPG


Now for ”final install"
IMG_4643.JPG


BUT WAIT!

Whats this?
IMG_4644.JPG


When I bring the quill down, I’m about an inch short….AGGGGGHHHHHHHHHHHH

How could this be???????


WTF happened…….

I mean this is beyond BS……..I measured that damn thing 4,396 f’ing times…..This can't be…...

Well, its true…..as pissed off as I am, I think that when I measured it, the quill was “stopping” because it was just barely hitting the vise on a corner.

Then when I “moved everything” for the milling procedure the vice was no longer there to act as a stop, and now……well…..

I am contemplating just swallowing my pride ane welding an “extension” on.
IMG_4645.JPG


The “up-side” to re-doing it, is that I was not “super, super happy” with the threads, so maybe a “Third Swing” at those, is not necessarily a “bad thing”.

(Glass "half empty or half full" sort of thing I guess)

Or just weld on the extension, grind it flat and say "F___ it”

(But I know that everytime I look at it, it will mock me)


The End…..maybe ;)
 
Last edited:
  • Like
Reactions: 1 users

Lil Foot

Well-known member
Lifetime Member

Equipment
1979 B7100DT Gear, Nissan Hanix N150-2 Excavator
May 19, 2011
7,899
3,164
113
Peoria, AZ
Every machinist has done it (or something similar) wether they will admit it or not.
But thankfully, pride, nerves, and underwear where the only casualties.
(Although that first crunch on a new piece of gear always seems to hurt worse :eek:)
If it gets you comfortable with reverse single pointing, it's becomes a positive experience.

Side note:
Differences in control panels. mine is older.

100_0536.JPG 100_0537.JPG
 
  • Like
Reactions: 1 users

lynnmor

Well-known member

Equipment
B2601-1
May 3, 2021
1,643
1,418
113
Red Lion
When I think of the thousands of times I have used a down stop, there is no way I would eliminate it. In addition to using it to control depth of cut it also acts as a positive control of the spindle position so you have more than the clamp holding the spindle in place, this is very important when doing heavy cuts. I learned this the first week of my apprenticeship over 60 years ago. I would go back to the drawing board and make a new plan.
 

Lil Foot

Well-known member
Lifetime Member

Equipment
1979 B7100DT Gear, Nissan Hanix N150-2 Excavator
May 19, 2011
7,899
3,164
113
Peoria, AZ
If you decide to go with an extension rather than make a new part from scratch, I would probably drill/tap/turn/thread the extension & original part, (use a set screw, threaded rod?) red loctite them together, and take a break for a day before finishing.
 
  • Like
Reactions: 1 users

Runs With Scissors

Well-known member

Equipment
L2501 TLB , Grappel, Brush Hog, Box Blade, Ballast box, Forks, Tiller, PH digger
Jan 25, 2023
3,198
3,994
113
Michigan
When I think of the thousands of times I have used a down stop, there is no way I would eliminate it. In addition to using it to control depth of cut it also acts as a positive control of the spindle position so you have more than the clamp holding the spindle in place, this is very important when doing heavy cuts. I learned this the first week of my apprenticeship over 60 years ago. I would go back to the drawing board and make a new plan.
Interesting sir.

I had not thought the “down stopper” would be of any real value. (I did keep it……as I do most things…LOL)

I thought it was more of a “Chi-Com Gimmick” than anything else.

You have me “re-evaluating” my position.

?????Hmmmm????
 
  • Like
Reactions: 1 user

Runs With Scissors

Well-known member

Equipment
L2501 TLB , Grappel, Brush Hog, Box Blade, Ballast box, Forks, Tiller, PH digger
Jan 25, 2023
3,198
3,994
113
Michigan
For supporting that outboard end, hunt up some machinist's jacks.
More UPS action....
OK, you hooked me…….Bastard….LOL JK. ;) (y)

I see they make them in a few sizes and configurations.


How many, and what sizes/configurations do you suggest?
 
  • Haha
Reactions: 1 user

torch

Well-known member

Equipment
B7100HSD, B2789, B2550, B4672, 48" cultivator, homemade FEL and Cab
Jun 10, 2016
2,784
1,004
113
Muskoka, Ont.
The S190 shown is 20 pitch threads -- nice and strong. The SF190 is 40 pitch threads -- matches the threading of your micrometer. The S191 has a smaller base diameter and can squeeze into a smaller space.

Step away from the bed frame, put the UPS driver on alert, mortgage the house and buy 2 of each.

Or go the cheap route: https://www.grizzly.com/products/grizzly-machinist-jack-set-4-pc./t28740

OR ...

Fire up your lathe, put those new-found threading skills to work and make some.
 

Runs With Scissors

Well-known member

Equipment
L2501 TLB , Grappel, Brush Hog, Box Blade, Ballast box, Forks, Tiller, PH digger
Jan 25, 2023
3,198
3,994
113
Michigan
Fire up your lathe, put those new-found threading skills to work and make some.
I like the idea of making my own, however, like most people here, it sometimes/mostly comes down to “time”.

My list of 238,732 “things to do” is constantly updating, and constantly “competing" with my wallet. :)
 
  • Like
Reactions: 1 user

lynnmor

Well-known member

Equipment
B2601-1
May 3, 2021
1,643
1,418
113
Red Lion
OK, you hooked me…….Bastard….LOL JK. ;) (y)

I see they make them in a few sizes and configurations.


How many, and what sizes/configurations do you suggest?
I have a number of different size, expensive brand jacks. I could count on one hand the number of times I used them since 1985. It all depends on the type of work you might get, for fixing tractors they might be more useful.
 

torch

Well-known member

Equipment
B7100HSD, B2789, B2550, B4672, 48" cultivator, homemade FEL and Cab
Jun 10, 2016
2,784
1,004
113
Muskoka, Ont.
I like the idea of making my own, however, like most people here, it sometimes/mostly comes down to “time”.

My list of 238,732 “things to do” is constantly updating, and constantly “competing" with my wallet. :)
Yup. As you are finding out, the cost of a lathe or mill is only a part of the cost. Tooling and metrology can double the investment. But having the ability to machine metal means you can make your own. A production shop might buy the tooling because they can make more money with their time. A hobbyist may not be able to afford all the tooling, but can trade time for money.

Besides, making your own tooling is good practice.
 
  • Like
Reactions: 1 user

torch

Well-known member

Equipment
B7100HSD, B2789, B2550, B4672, 48" cultivator, homemade FEL and Cab
Jun 10, 2016
2,784
1,004
113
Muskoka, Ont.
How many, and what sizes/configurations do you suggest?
I was so busy being a smart-ass, I forgot to answer your question:

I have two of the S191 sets. I've never used the v-base or the wedge base. I do upon occasion find a need for both sets at once when trying to support an irregularly shaped item and I have very rarely needed the point screw. I have had occasion to "borrow" one or two of the extensions from one set and stack them with the other. I also have two of the cheap Chinese cast-base jacks (as in the Grizzly set) although I don't think I've ever needed more than 3 jacks at a time.

Finally, with reference to this pic:


Rather than shimming up a single block with a piece of random metal and then engaging the strap clamp heel with the block's teeth, I would suggest setting the step block on the table and using a second, inverted, step block. Set the overall height 'just' above the height of the work and set the strap clamp on top of the inverted block.

The way you have it, the steps are not evenly engaged. All the force is concentrated on one step -- possibly on the edge of that one step. Setting up like you did really isn't secure unless the work height happens to leave the strap at 90° to the block.

Also, try to get your stud as close as possible to the work piece for maximum holding power without having to really crank down on the stud (potentially damaging the tee slot in the table).
 
  • Like
Reactions: 2 users

Lil Foot

Well-known member
Lifetime Member

Equipment
1979 B7100DT Gear, Nissan Hanix N150-2 Excavator
May 19, 2011
7,899
3,164
113
Peoria, AZ
I have two of the S190s, and the other shown is a shop-made one of similar size.
I find them to be perfect size; if you need them taller, just throw a chunk of stock or step blocks under them.
Or, if you're a purist, making extension blocks of any height is easy.
(note aluminum extension in my 2nd pic)
Stay away from cheapies, they tend to have coarse threads with sloppy fits, making adjustment difficult. (ask me how I know)
The finer the pitch, the easier the adjustment.
The ball joint and different shaped anvils are pretty handy for varied setups.
Put an indicator on the part if you need precision, makes it easier to see if it is supported or deflected upward.

I had a beautiful pair of tiny ones, 1" tall, 10-32 thread, case hardened finish, if I remember correctly, but I never used them in 25+ years of owning them, so I sold them to a collector for $75.
 
Last edited:

Lil Foot

Well-known member
Lifetime Member

Equipment
1979 B7100DT Gear, Nissan Hanix N150-2 Excavator
May 19, 2011
7,899
3,164
113
Peoria, AZ
I just had a flashback; the production machine shop where I started had a pair of jacks very similar in design to the Starrett 190s I posted above, but huge- I think they were 3" in diameter and about 18" tall.
Never saw them used.
Probably left over from our manager's first job- he worked for some place that made railroad wheels.
 

Runs With Scissors

Well-known member

Equipment
L2501 TLB , Grappel, Brush Hog, Box Blade, Ballast box, Forks, Tiller, PH digger
Jan 25, 2023
3,198
3,994
113
Michigan
I was so busy being a smart-ass, I forgot to answer your question:

I have two of the S191 sets. I've never used the v-base or the wedge base. I do upon occasion find a need for both sets at once when trying to support an irregularly shaped item and I have very rarely needed the point screw. I have had occasion to "borrow" one or two of the extensions from one set and stack them with the other. I also have two of the cheap Chinese cast-base jacks (as in the Grizzly set) although I don't think I've ever needed more than 3 jacks at a time.

Finally, with reference to this pic:


Rather than shimming up a single block with a piece of random metal and then engaging the strap clamp heel with the block's teeth, I would suggest setting the step block on the table and using a second, inverted, step block. Set the overall height 'just' above the height of the work and set the strap clamp on top of the inverted block.

The way you have it, the steps are not evenly engaged. All the force is concentrated on one step -- possibly on the edge of that one step. Setting up like you did really isn't secure unless the work height happens to leave the strap at 90° to the block.

Also, try to get your stud as close as possible to the work piece for maximum holding power without having to really crank down on the stud (potentially damaging the tee slot in the table).
So is the way I have it considered “wrong”?

If so, I had no idea. I would have “bet the farm” that I had it right.

As a matter of fact, I thought that it should be angled MORE, so that the "angled flat tip” was flat on the part.

Thanks for the “heads up” (y) ……..I will have to reevaluate my clamping techniques.