I installed the bar perhaps a little differently. In my pictures you can see that the "hooks" on the top side of the bar are pushed up further against the original bucket edge than you show. The hooks don't really fit my bucket edge taper well so there are 4 options not involving welding that I can think of: mount as you show, drill and tap every hook from the top for a set screw to bear down on the bucket lip, put a spacer bar between the bucket lip and the bottom of the hooks, or do what I did.
In my mount, the objective was to take away any rotation or slippage at the two bolts that go through the sides of the bucket. I clamped the bar flat against the bottom of the bucket edge with the hooks as far up against the bucket edge as it would go. I then drilled through the bucket edge and the bar in three places with a letter drill that was just one size bigger than a standard 3/8-16 tap drill (you really don't technically need 75% thread to make it work and a slightly bigger hole makes it easier to tap). While still clamped together, I took a 1/2" transfer punch (the biggest I had), put some arbor spacers on it to make it 3/4" diameter, and punched center marks for the two holes in the sides of the bucket. I then removed the bar and tapped it 3/8-16 and drilled the holes in the bucket lip out to just over 3/8". I used a center drill with a pilot point and twist drills to get to the hole sizes I needed for the 3 holes. The side bolt holes were center drilled and then step drilled to the bolt size from each side of the bucket wall.
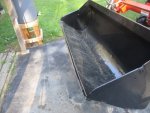
Install is finished but haven't used yet so don't know if it works.
Tips:
1. I was afraid before I started that the bucket edge and/or the tooth bar would be hardened and make my solution impossible. I did not check the hardness, but I figured my hole location would be far enough away from welds to minimize the risk from the welding process so all I had to worry about was the steel itself. It turned out that if it is heat treated, it is not hard enough to damage high speed steel cutters or taps.
2. I did have a little bit of trouble getting the center drill to cut well in starting the holes. I think this might have just been due to a little bit of work-hardening of the steel when I punched the center marks or maybe the drill was a tad dull. I eliminated that problem by taking a Dremel tool with a ball end carbide dental burr (a real one, not an imitation - and by the way, the "diamond" ones you can find almost anywhere I have found are not worth beans mostly because I suspect the bond matrix is worthless). I used the dental drill to auger out a small hole down far enough to give the pilot on the center drill a head start, used cutting oil and everything went fine from there on.
3. I tapped the bar because I did not want a nut or a screw head on the bottom of the bar and I wanted the top of the tooth bar up against the bottom of the bucket edge. My grade 8 socket button head cap screws are just long enough to come out almost perfectly flush with the bottom of the tooth bar. Of course there is the risk that if the head gets worn down enough or damaged in use, you might not be able to remove the screw because the Allen key won't work. A Torx or regular hex or regular head height socket head cap screw might solve that if you are worried about it. Or you might be able to fill the hex cavity with something that you can get out with a pick or something. On the threads of the 3 button heads and the two sidewall bolts, I put anti-seize compound so I could get them back off if I want to without worrying too much about them corroding and turning it into a torch project.
4. The bars that mount to the side walls had a little bit of clearance (i.e. they were closer together than the inside dimension of my bucket). You can fill the space with washer(s), but if you do that, you may have to go buy longer bolts. If you just crank down on the bolts, the arms will flex enough to touch the inside wall of the bucket without adding washer(s), so I just went that route. This puts a little side torque on the welds at the tooth bar, and that means there will be a combination of stresses at the weld when you are working but it's probably a fairly long term fatigue problem perhaps not worth worrying about.
5. I'm sure you know by now - wear gloves while handling - these things are surprisingly sharp and that combined with a weight that is not exactly insignificant have the potential to ruin your day.
View attachment 105090
View attachment 105091
View attachment 105092
 141.5 KB Views: 243
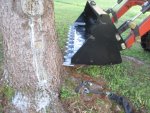 184.9 KB Views: 244
 192.8 KB Views: 243
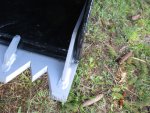 190.4 KB Views: 237
 175.2 KB Views: 253
 213.3 KB Views: 254
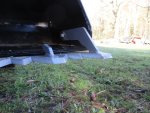 173.5 KB Views: 256
 162.7 KB Views: 245
