I have had my B2320HSD for a little under a year and this is essentially the 3rd customization (not including adding the LA304 FEL). This is my 3rd tractor, but my 1st Kubota and I am very much enjoying it (I previously had two grey market Yanmars which were both good tractors that were sold to help fund my Kubota).
Now, on to the subject of this post: Another option for a Front End Loader (FEL) Bucket Level Indicator...
I saw multiple posts around the internet for DIY FEL Bucket Level Indicators while looking for ideas for one to install on my Kubota B2320 w/LA304 FEL. I set off to town to get the 'parts' after I had decided on a variation of several different 'designs'. My initial design was going to be the typical steel rod, but that changed while I was shopping/configuring and I came up with an indicator that consists of very inexpensive parts and was a fairly quick & simple install. I decided to go with a fiberglass rod as it would be more forgiving than a steel rod, if bumped (and I liked that the orange rod was a close match to the Kubota Orange). Stainless steel hardware was used to ensure a clean and maintenance free installation.
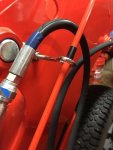
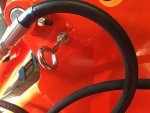
- An eye bolt was used for the rod 'guide' as the LA304 FEL already had a couple of factory holes near the bucket cylinder pins on the loader arms. A 3" eye bolt was chosen to ensure that there was enough clearance between the rod and the bucket cylinder hoses.
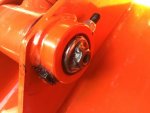
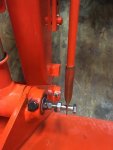
- Rather than drill & tap the cylinder pin at the bucket, a 1/4-20 nut was tack-welded (on 3 of 6 nut 'flats') to the center of the cylinder pin to create a mounting point for the rod 'pin'.
- A 1/4-20 x 1 1/2" bolt was used as the rod pin. A nut was 'bottomed' at the end of the threads, limiting the travel of the rod end to the bolt shoulder between the bolt head and nut. A second nut was used as a lock/jam nut against the welded nut to lock the pin in place.
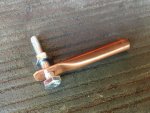
- A piece of 3/8 copper tubing was used for the rod end as the fiberglass rod slipped snugly inside. 3/4" of the tubing was flattened to form a 'tab' and drilled with a 1/4" hole for the rod pin. The original plan was to use a 3/8" x 3/4" long steel spacer and tack-weld a 1/4 flat washer to one end to use as the rod sleeve/end. Another variation would be to make or modify a clevis end to slide onto the rod. Both are still options if the copper rod end doesn稚 hold up.
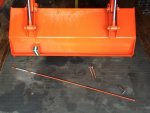
- Rod was trimmed to 2" above the eye bolt guide with the bucket in the fully-dumped position and the protective cap reinstalled.
- Electrical tape was used to mark the 'bucket level' location on the rod at the eye bolt guide.
Parts list (prices/total before sales tax):
48" Reflective Fiberglass Marker Rod; $1.99 @ Home Depot (HD); found with other driveway markers/mailboxes
1/4-20 x 1 1/2" Stainless Steel (SS) Bolt (Rod 'Pin'; $0.42 @ HD
1/4-20 SS Nuts, 3 ea; $0.26 ea @ HD
1/4-20 Std Nut (to weld onto the bucket cylinder pin & become the mount for the level indicator rod pin); no cost (had on hand)
1/4-20 x 3" SS Eye Bolt (Rod Guide) (comes with one SS nut); $1.49 @ Tractor Supply Co. (TSC)
1/4 SS Flat Washers, pack (only needed 2 ea for the eye bolt); $0.99 @ TSC
3/8" Copper Tubing, 3" length (to fabricate rod end); no cost (had on hand)
Total cost: $5.67
I appreciate the ideas that I have gleaned from in the past and hope that this idea may benefit others.
Now, on to the subject of this post: Another option for a Front End Loader (FEL) Bucket Level Indicator...
I saw multiple posts around the internet for DIY FEL Bucket Level Indicators while looking for ideas for one to install on my Kubota B2320 w/LA304 FEL. I set off to town to get the 'parts' after I had decided on a variation of several different 'designs'. My initial design was going to be the typical steel rod, but that changed while I was shopping/configuring and I came up with an indicator that consists of very inexpensive parts and was a fairly quick & simple install. I decided to go with a fiberglass rod as it would be more forgiving than a steel rod, if bumped (and I liked that the orange rod was a close match to the Kubota Orange). Stainless steel hardware was used to ensure a clean and maintenance free installation.
- An eye bolt was used for the rod 'guide' as the LA304 FEL already had a couple of factory holes near the bucket cylinder pins on the loader arms. A 3" eye bolt was chosen to ensure that there was enough clearance between the rod and the bucket cylinder hoses.
- Rather than drill & tap the cylinder pin at the bucket, a 1/4-20 nut was tack-welded (on 3 of 6 nut 'flats') to the center of the cylinder pin to create a mounting point for the rod 'pin'.
- A 1/4-20 x 1 1/2" bolt was used as the rod pin. A nut was 'bottomed' at the end of the threads, limiting the travel of the rod end to the bolt shoulder between the bolt head and nut. A second nut was used as a lock/jam nut against the welded nut to lock the pin in place.
- A piece of 3/8 copper tubing was used for the rod end as the fiberglass rod slipped snugly inside. 3/4" of the tubing was flattened to form a 'tab' and drilled with a 1/4" hole for the rod pin. The original plan was to use a 3/8" x 3/4" long steel spacer and tack-weld a 1/4 flat washer to one end to use as the rod sleeve/end. Another variation would be to make or modify a clevis end to slide onto the rod. Both are still options if the copper rod end doesn稚 hold up.
- Rod was trimmed to 2" above the eye bolt guide with the bucket in the fully-dumped position and the protective cap reinstalled.
- Electrical tape was used to mark the 'bucket level' location on the rod at the eye bolt guide.
Parts list (prices/total before sales tax):
48" Reflective Fiberglass Marker Rod; $1.99 @ Home Depot (HD); found with other driveway markers/mailboxes
1/4-20 x 1 1/2" Stainless Steel (SS) Bolt (Rod 'Pin'; $0.42 @ HD
1/4-20 SS Nuts, 3 ea; $0.26 ea @ HD
1/4-20 Std Nut (to weld onto the bucket cylinder pin & become the mount for the level indicator rod pin); no cost (had on hand)
1/4-20 x 3" SS Eye Bolt (Rod Guide) (comes with one SS nut); $1.49 @ Tractor Supply Co. (TSC)
1/4 SS Flat Washers, pack (only needed 2 ea for the eye bolt); $0.99 @ TSC
3/8" Copper Tubing, 3" length (to fabricate rod end); no cost (had on hand)
Total cost: $5.67
I appreciate the ideas that I have gleaned from in the past and hope that this idea may benefit others.
Attachments
-
 87.7 KB Views: 6,391
 -
 98.2 KB Views: 5,187
 -
 60.4 KB Views: 4,995
 -
 75.5 KB Views: 5,224
 -
 43.6 KB Views: 7,202