Drifthopper
Member
Equipment
2000 L3710 HST w/ Woods 1012 FEL. LandPride FDR2572, 60" Brush Hog: Need 60" BB
My tractor is 70 miles away at our camp, so I just want to make sure I bring the right tools.
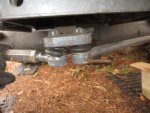
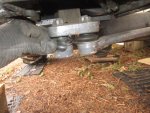
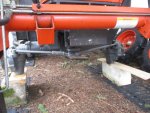
See pictures.
I got my new replacement rubber grease boots for the front steering ball joints, I plan on working on my tractor this weekend up at our camp, and as simple as I think this is, I just want to be sure.
So.... Take the cotter pin out, loosen the nut, drop the ball joint out of the steel steering plate, take old torn grease boot off, put on new grease boot, reinstall ball joint, tighten nut, re-insert cotter pin.
Simple Job..right.
Please let me know if I am missing something.
I don't want to get up to camp and not have the correct tools to finish the task.
Attachments
-
 129.7 KB Views: 347
 -
 175.8 KB Views: 379
 -
 165.9 KB Views: 360
