newbe initial review of yeswelder mig-205ds using 110v flux core (picture rich)

dan_m

Active member

Equipment
BX2380
Jul 9, 2020
197
92
28
Georgia
As requested - this is my initial review of the yeswelder mig-205ds (green) using 110v power using flux core wire (yeswelder E71TGS.030-inch flux core wire).

Background - very new self teaching welder, the only other welder I've used is a harbor freight 90a flux core (probably dozen years old). Take this review for what it is, the thoughts of a newbe who knows little to nothing about welding - your mileage my vary.

I had 2 left over scraps of 1/4" steel plate that I used for a project and previously used for test welder settings (HF welder has min/max setting and dial for wire feed so I used these to get settings dialed in for my welding style and were all spattered up). The test was the weld these two pieces together (butt weld) on both top and bottom then use my chop saw to cut through the middle of the weld to see how it looked. I used 110V and max thickness / voltage setting. Due to limitation of the welder, the wire setting was 0.035 (only option available for flux core). Keep in mind, 1/4" thickness is larger than the max thickness setting for 110V. Also note even though the top/bottom of the pieces look rough (spatter) the butt joint where I welded was nice clean, shiny metal.

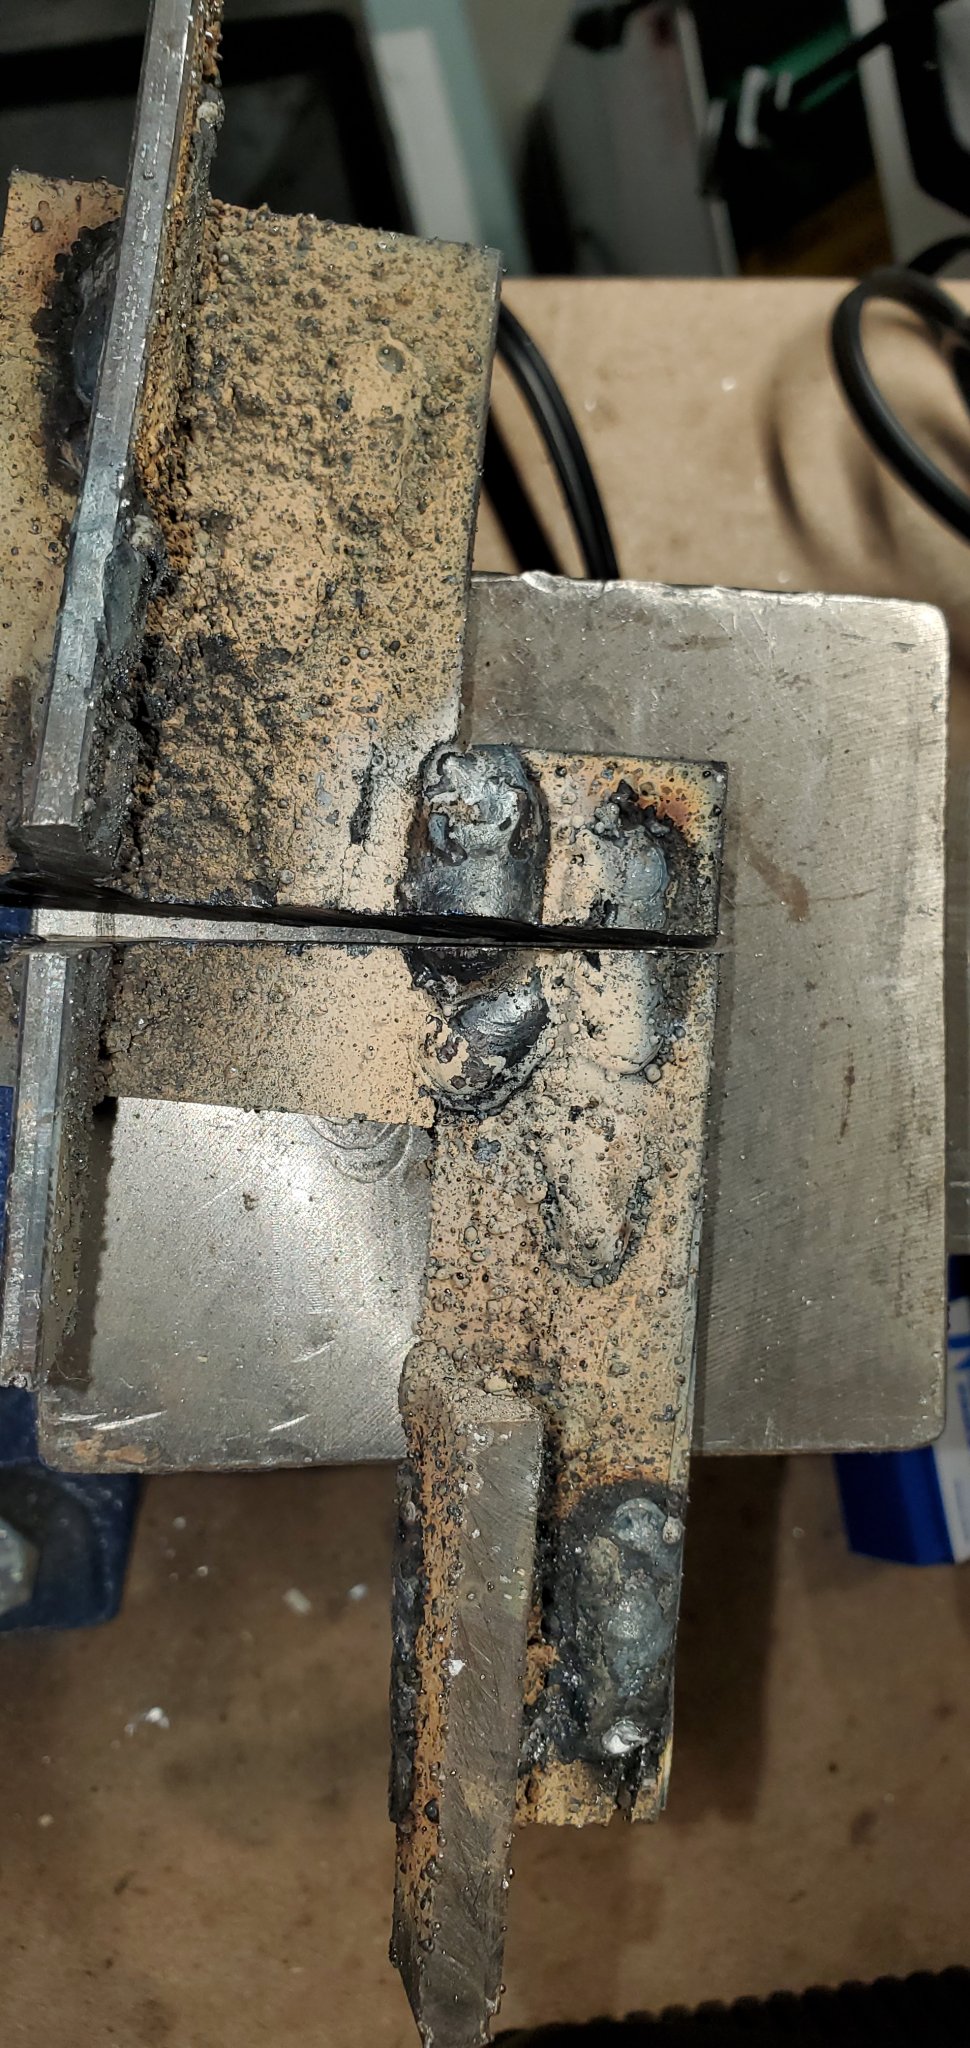
These first 2 pictures are the 2 pieces I welded together and cut though, showing both sides of the butt weld - note one side has a better looking weld than the other and notice the spatter from the HF welder all over. the first picture has the worse weld of the two sides while the 2nd picture has the better looking weld.

side1.jpg


side2.jpg


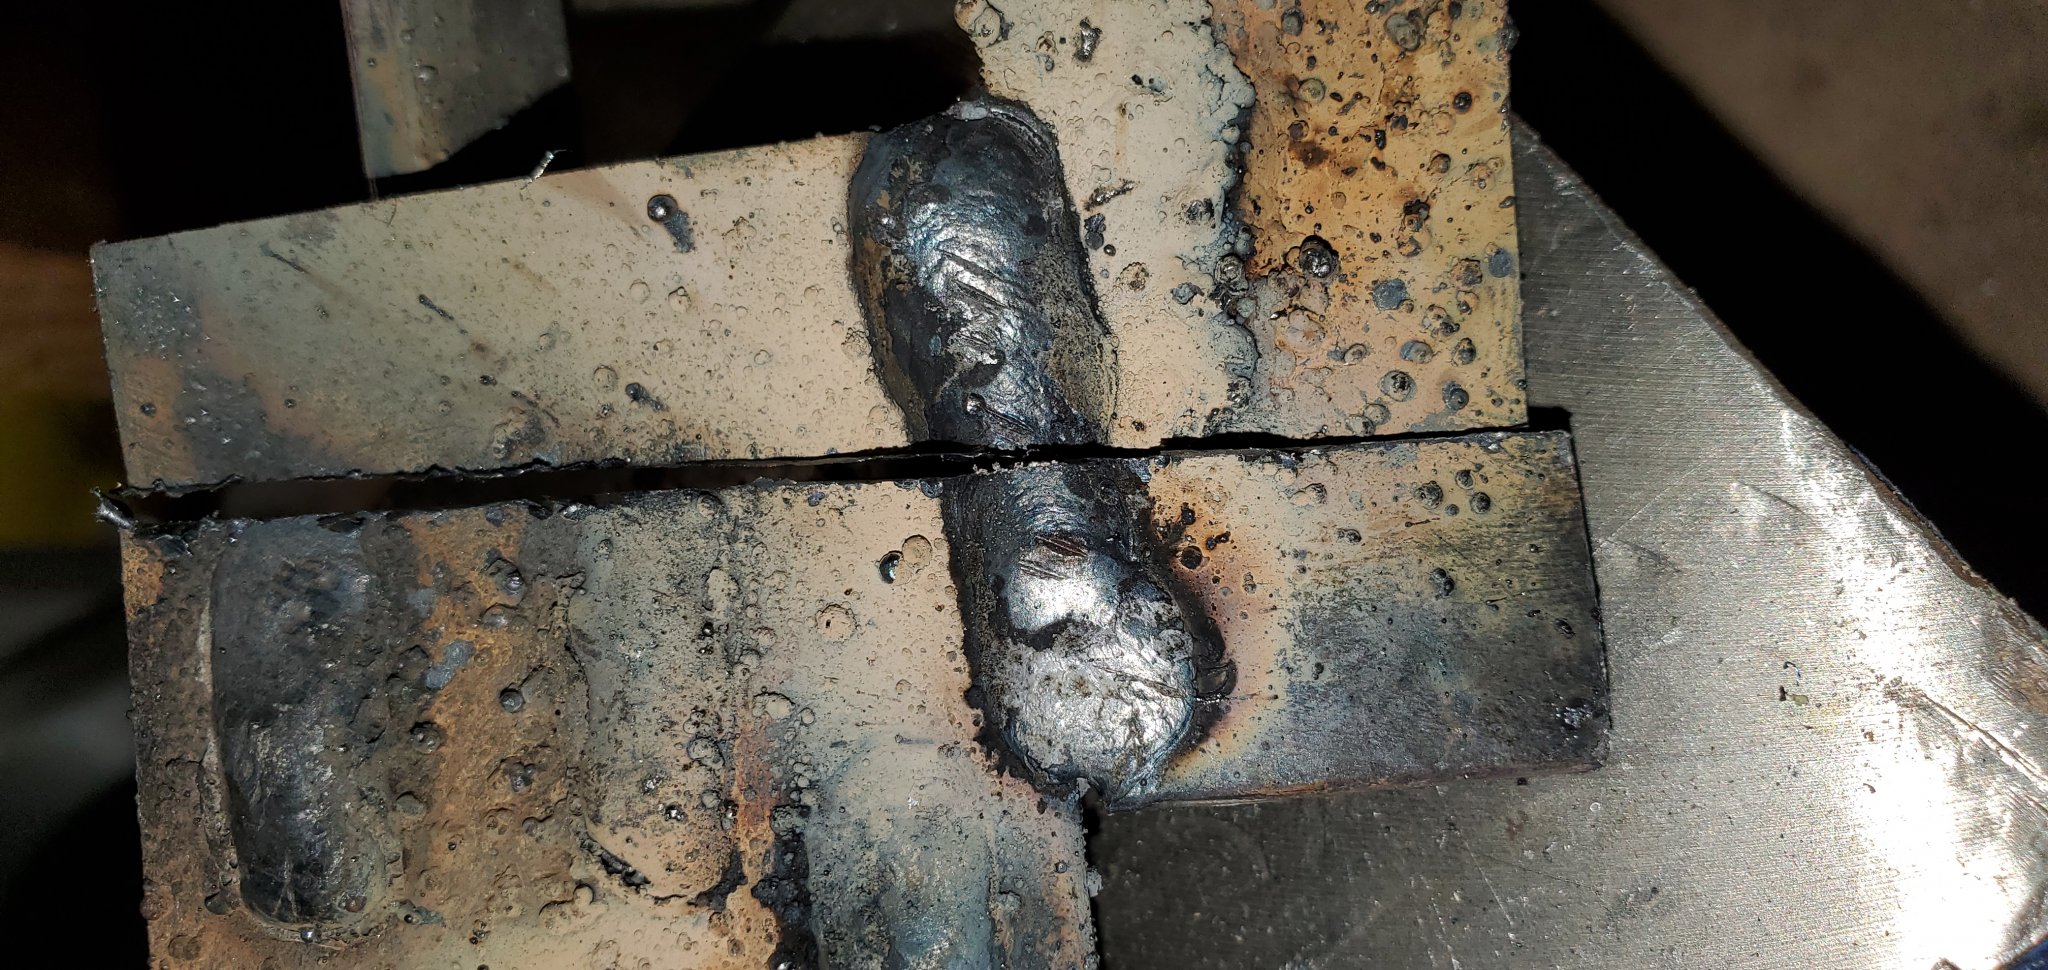
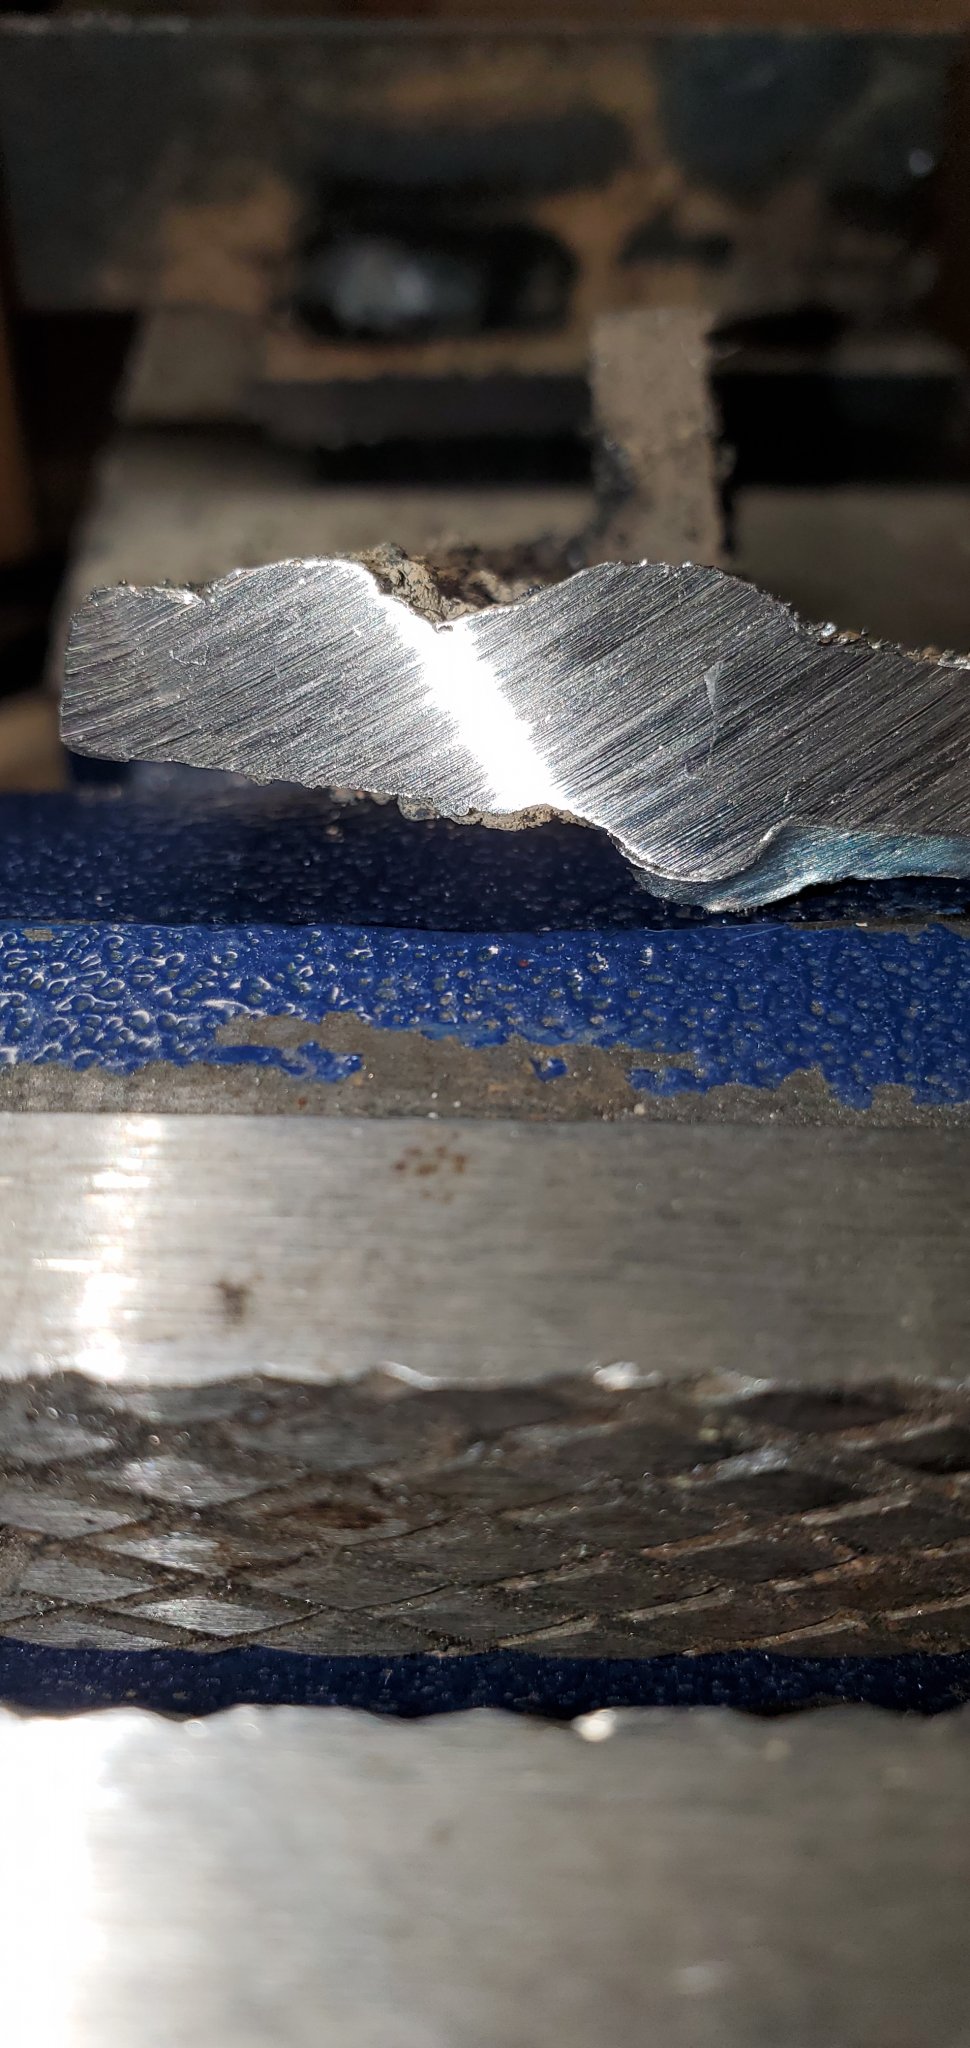
these next 2 pictures show the inside of both sides of the welds that I cut though using the chop saw. Note there is a little "crack" in the middle where the 2 pieces didn't fuse together completely. Otherwise, it looks like decent penetration and fusion of the two pieces.

middle1.jpg


middle2.jpg


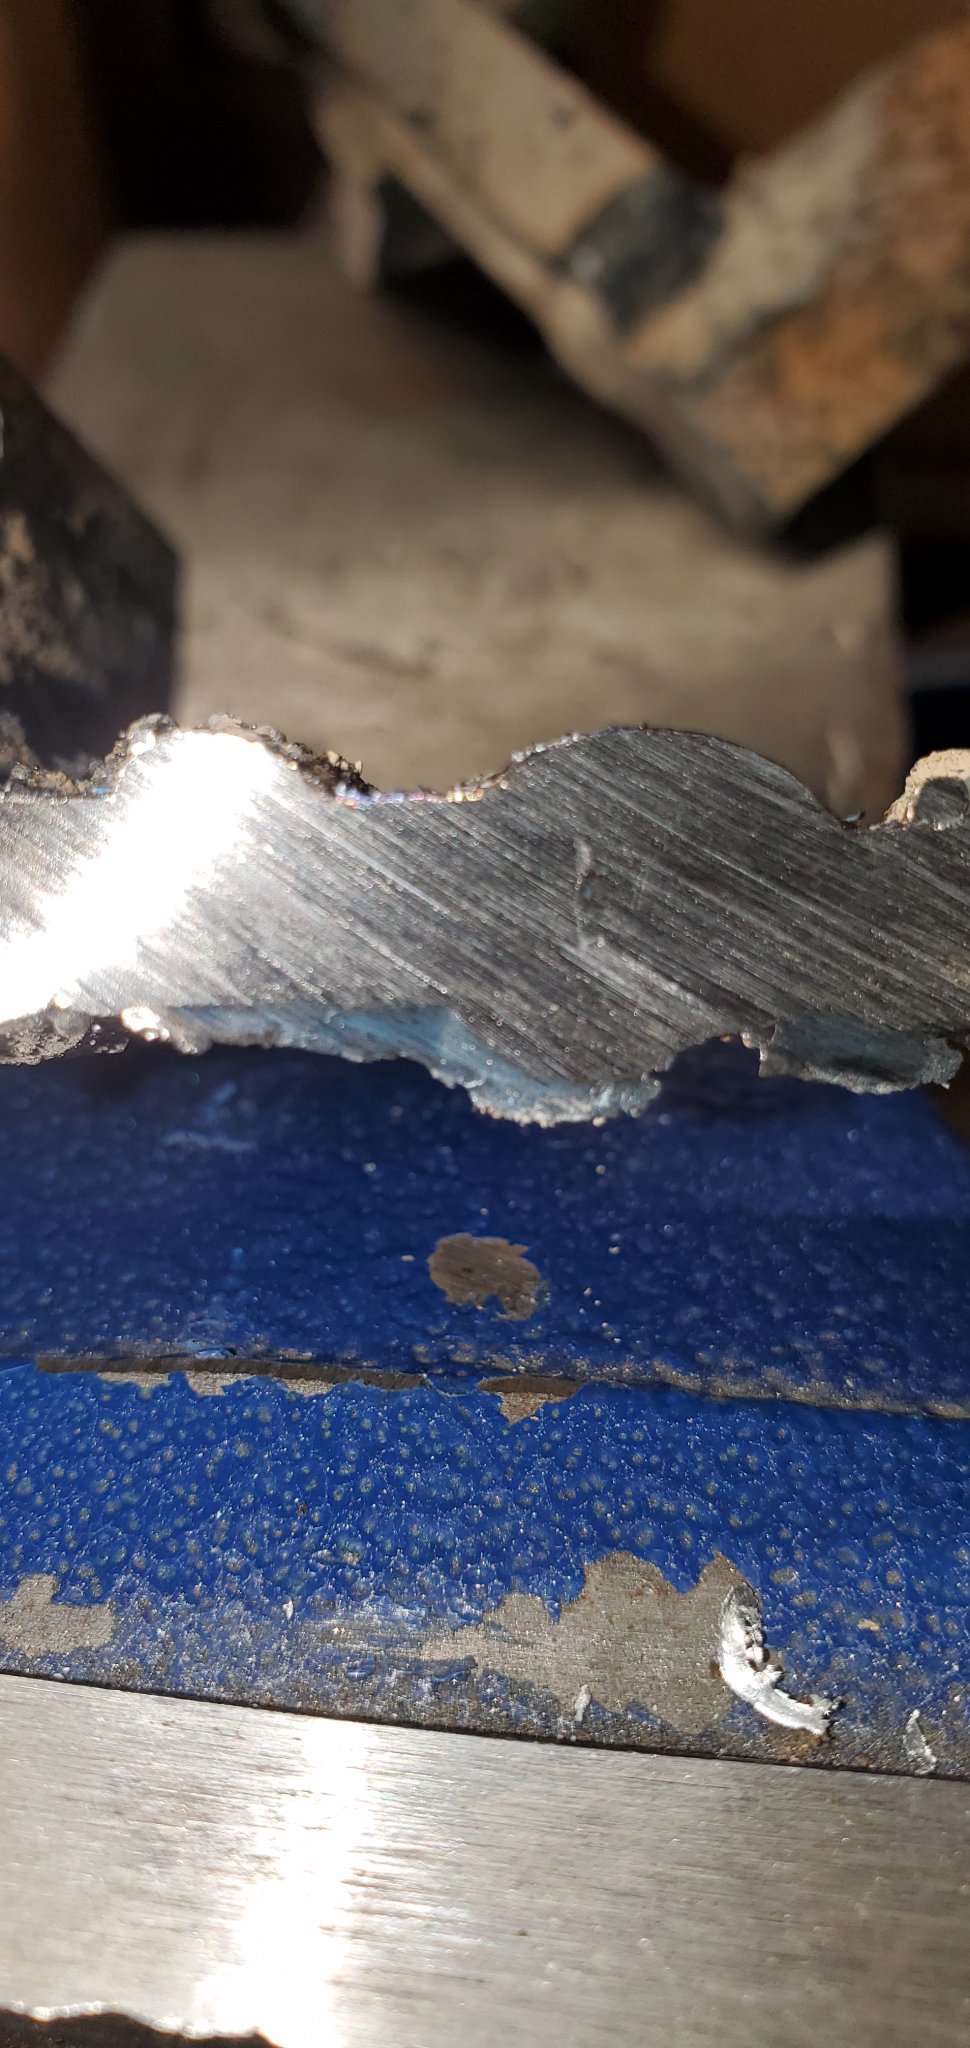
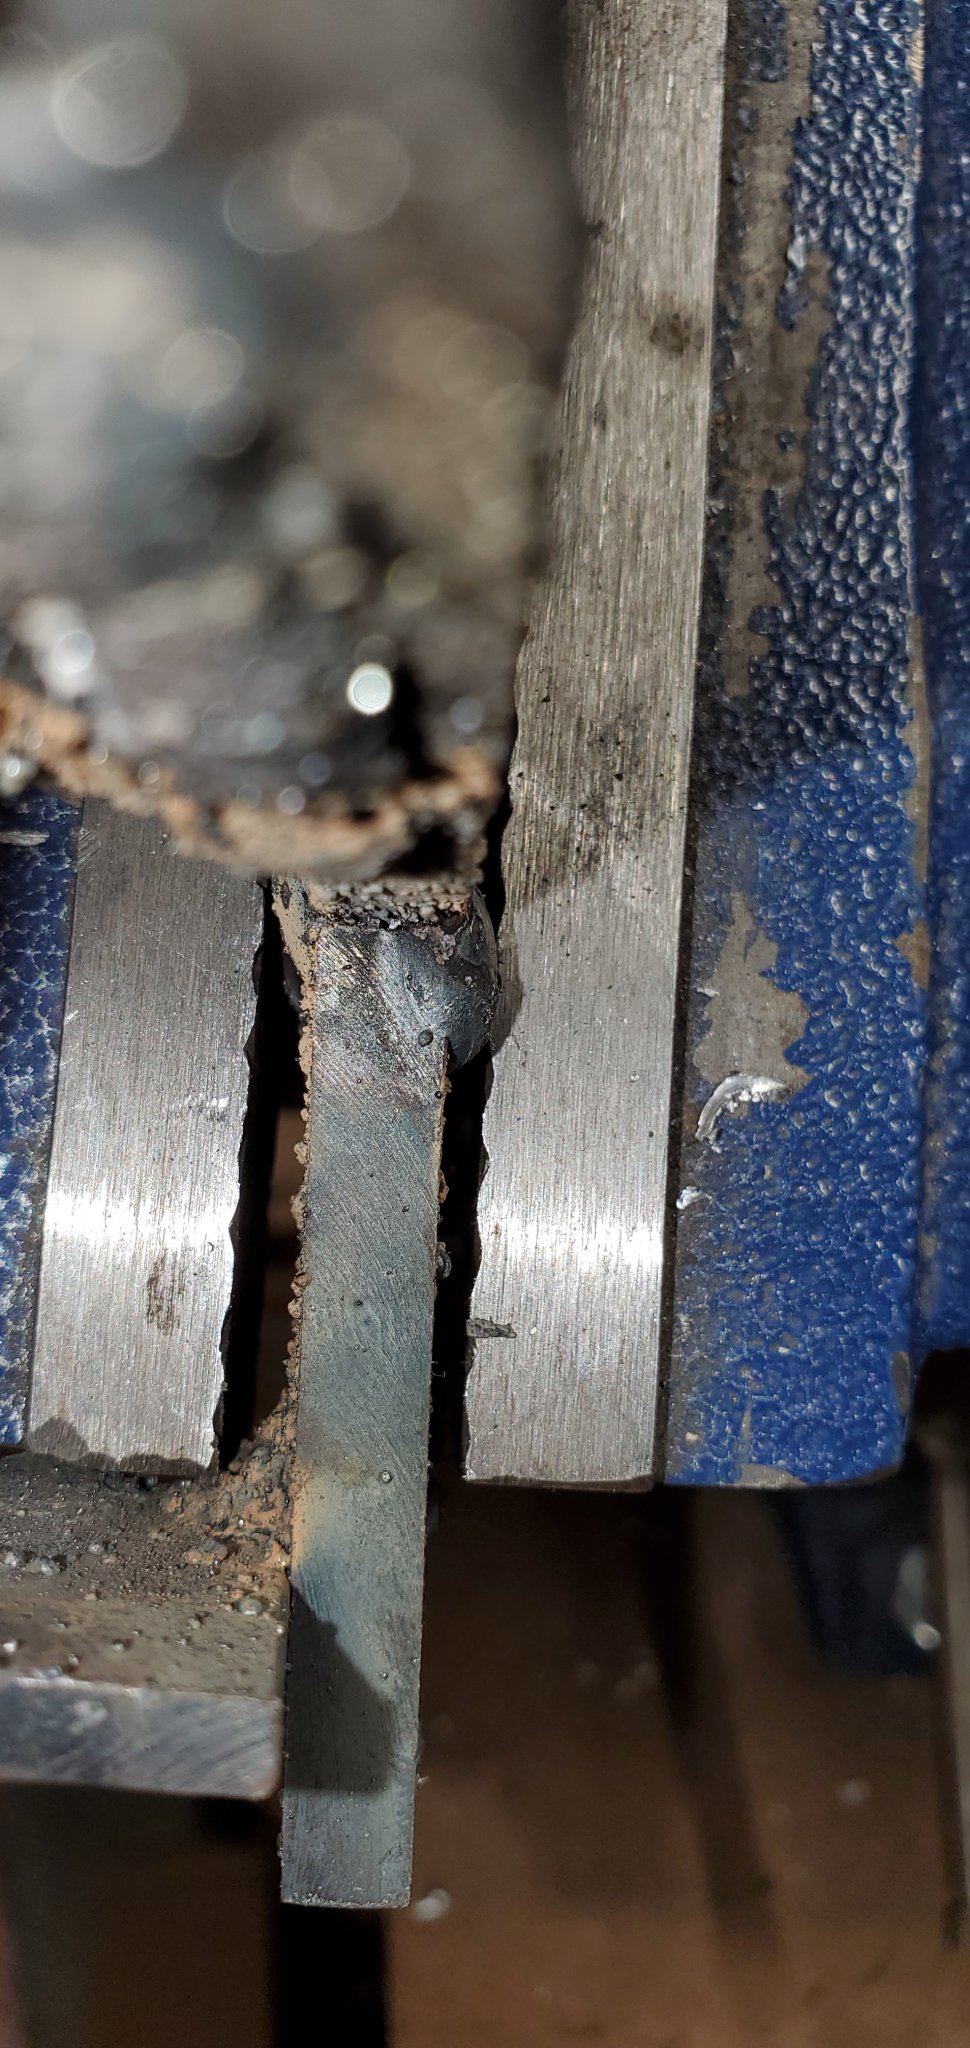
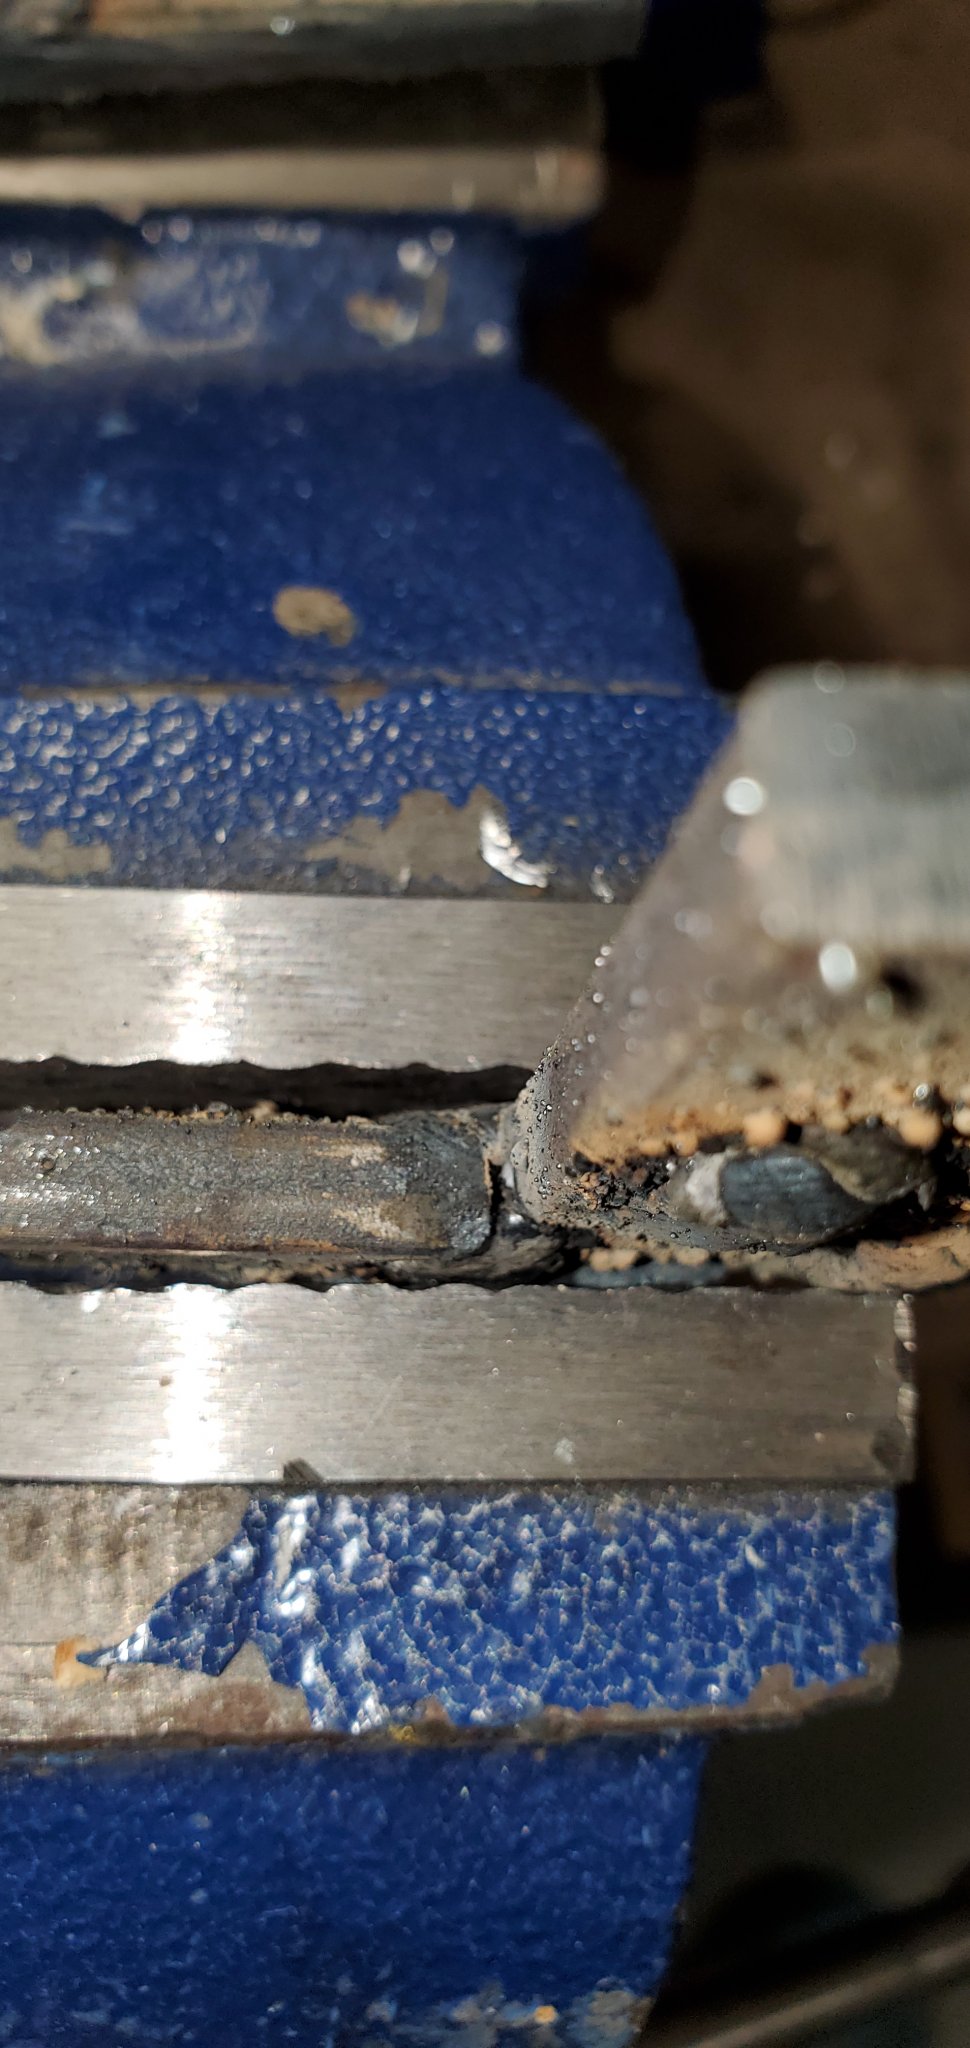
The next 2 pictures are of ends of the butt weld (start and stop of the weld) .
The first picture shows where I had better bead and the weld penetrated/fused better.
start.jpg


This picture shows the other end of the bead (finish) where I didn't get the bead close enough to the end of the pieces to complete the butt weld. You can see some penetration, though not as much as the above picture. Had I gotten the welder closer to end of the pieces, I think It would have had better penetration and look more like the above picture. This is just due to my lack of experience I think.

finish.jpg


Final thoughts :
This welder is exponentially better than the old HF welder.

I'm highly impressed with the weld quality given my very limited knowledge and experience (haven't even ran a complete 2lb spool of wire yet).

I'm not sure if it was all due to welder or the quality of the wire (or both), but the slag chipped away pretty much completely using the yeswelder/yewelder wire - no wire brush nor sanding involved in the above pictures. And there was little to no spatter with this setup as compared to the HF welder.

240V Should have no issue with fully penetrating/fusing 1/4" plate which is most likely the max thickness I'll be doing.

I'm eager to try gas welding with this setup as the flux core capability nice.

Yes, the Fan is loud as others have pointed out in their reviews.

Yes the metal is a little flimsy and the door came bent a little from the factory and most likely due to them packing some of the components inside the welder - but doesn't affect it opening/closing.

I took the gas tip off and welded without it, it allows for better visibility of the tip. There is no flux core tip like some welders have.

No plans soon, but I'll try stick welding with this machine one day.

Dan
 
  • Like
Reactions: 2 users

Yooper

Well-known member
Lifetime Member

Equipment
3901 LA525
May 31, 2015
1,456
429
83
NE Wisconsin
I would get it hooked up to the higher voltage and get the .035 flux wire. Your welds are ‘cold’ due to the lack of amperage. Spend the money and get it hooked up to gas with hard wire and start practicing with that. Much more forgiving and much more versatile. And always remember that a 4-1/2” grinder is a welder’s best friend. Grind the metal clean and try welding that. I guarantee you will see the difference. Good luck and keep us posted.
 
  • Like
Reactions: 1 user

dan_m

Active member

Equipment
BX2380
Jul 9, 2020
197
92
28
Georgia
I would get it hooked up to the higher voltage and get the .035 flux wire. Your welds are ‘cold’ due to the lack of amperage. Spend the money and get it hooked up to gas with hard wire and start practicing with that. Much more forgiving and much more versatile. And always remember that a 4-1/2” grinder is a welder’s best friend. Grind the metal clean and try welding that. I guarantee you will see the difference. Good luck and keep us posted.
I already ordered some 0.035. I thought i ordered that but clicked wrong and got 0.030. It'll come in handy for some smaller projects I want to do/try.

I will get gas after I get the 240V installed. No immediate plans for that, but will come in time. For now, my work is outside so gas is a no go anyway.

I am a better grinder than I am a welder. :) I have 2 grinders and a dremel for the tight spots.

What makes you think the weld is cold? Trying to educate myself to become better.

I know i'm using smaller wire and larger metal than I should - it was all the scrap I had. It wasn't cleaned fully but the area where I welded was. picture 1 is a bad weld - all on me. picture 2 is a better looking weld - need more experience going end-to-end from start and finish the weld as illustrated with picture 5 and 6 (especially 6 - didn't fully weld the lenth of the pieces).
Pictures 3 and 4 show the middle of the weld and looks really good. I understand the center crack isn't good but I'm exceeding the capabilities of 110V with 0.030 wire on 1/4" plate and i expected some lack of penetration / fusion but was curious on the max capabilites of the welder using what I had on hand - 0.030 wire on 110v with the thickest scrap I had, 1/4".


I think with this setup, I'll able to do 3/16". I don't plan on welding anything over that until I go 240V.

Dan
 

PoTreeBoy

Well-known member
Lifetime Member

Equipment
L35 Ford 3930
Mar 24, 2020
2,344
1,180
113
WestTn/NoMs
Thanks for the report. Looks like the Yeswelder has higher output than my old Craftsman 110v flux welder.

One possible reason for the 'crack' in the middle - when welding from both sides a double v-groove is usually used. One side is welded, then the groove in the other side is ground out to remove slag to prevent it leaving inclusions in the second weld.

When welding at the limit of your machine, preheat. You probably noticed some difference as you approached the end of the weld. This is due to heat building up as you welded. Preheat, even with a propane torch, can help when you're at your machine's limit.

Your HF rig may be outputting AC. Some genius decided that by leaving out the diodes and capacitors, they could build cheaper welders. FCAW was never intended to be AC. So you get even more spatter than with DC.
 

dan_m

Active member

Equipment
BX2380
Jul 9, 2020
197
92
28
Georgia
Thanks for the report. Looks like the Yeswelder has higher output than my old Craftsman 110v flux welder.

One possible reason for the 'crack' in the middle - when welding from both sides a double v-groove is usually used. One side is welded, then the groove in the other side is ground out to remove slag to prevent it leaving inclusions in the second weld.

When welding at the limit of your machine, preheat. You probably noticed some difference as you approached the end of the weld. This is due to heat building up as you welded. Preheat, even with a propane torch, can help when you're at your machine's limit.

Your HF rig may be outputting AC. Some genius decided that by leaving out the diodes and capacitors, they could build cheaper welders. FCAW was never intended to be AC. So you get even more spatter than with DC.
Good points about the groove and pre-heating (I like the bernzomatic TS800 over the TS4000 for flame control). When I built the tie down points for my tractor, I did bevel the edge on the vertical pieces and did multiple passes. I wasn't concerned with making this a solid/perfect weld, just doing a quick (not thorough) test of the capabilities and comparing it to my current cheap welder using the materials I had on hand. In another post, I was asked to provide a review so thought this was a good way to show the capabilities, and limits, of the yeswelder the quick, easy and lazy way.

There are things that can make this an even better budget welder - grinding/groove/bevel the joints, pre-heat metals, correct wire size for thickness of metal, switching to 240v to up the amps, switching to gas.

The HF welder is AC, there are many videos on youtube to convert it to dc. I may try that - because why not? If it works, it can become my dedicated flux welder and the yeswelder can be a dedicated gas/240v welder.

Next up, practicing on thinner metal, as that'll be the majority of my welding.

Thanks to all for feedback.

Dan
 
  • Like
Reactions: 1 users

Yooper

Well-known member
Lifetime Member

Equipment
3901 LA525
May 31, 2015
1,456
429
83
NE Wisconsin
The crack across the weld bead in picture #2 pretty much confirms the cold weld. What you want to see is ‘feathering’ along the edge of the weld where the bead meets the base metal. Your weld speed looks very good. I think if you dropped down to .035 flux you will see the difference. Keep practicing!
 

dan_m

Active member

Equipment
BX2380
Jul 9, 2020
197
92
28
Georgia
The crack across the weld bead in picture #2 pretty much confirms the cold weld. What you want to see is ‘feathering’ along the edge of the weld where the bead meets the base metal. Your weld speed looks very good. I think if you dropped down to .035 flux you will see the difference. Keep practicing!
Not sure I follow completely.

Pictures 1 and 2 are both taken after I cut across the bead to take a look at the inside (penetration/fusion). I should have taken pictures of the beads before cutting, but didn't think about it until after the fact - so I laid the already cut pieces close together to get a picture of the bead.

Pictures 3 and 4 show the inside of the bead on both pieces after cutting across the bead. The crack in both pictures is the joint between the 2 pieces and I suspected that would happen that since I was using 110v with 0.030 wire and exceeding the recommended thickness and didn't groove/bevel before welding.

Pictures 5 and 6 shows the start/end of the welds to show the penetration/fusion from that view point.

I'm enjoying learning and do need much more practice!

Thanks for the encouragement!

Dan
 

PoTreeBoy

Well-known member
Lifetime Member

Equipment
L35 Ford 3930
Mar 24, 2020
2,344
1,180
113
WestTn/NoMs
I'm about to order a Mig-205. Do you know of any differences between the green and blue ones? Have you had any regrets?
 

dan_m

Active member

Equipment
BX2380
Jul 9, 2020
197
92
28
Georgia
I'm about to order a Mig-205. Do you know of any differences between the green and blue ones? Have you had any regrets?
I searched around and never found any differences listed between the blue and green. Based on youtube videos, it seems the older videos were blue and newer ones were green - not sure if that due to any design/tech changes or just a color change for some business reasons. Mine is green.

I've only used the fluxcore side of things and it works much better than my old ac HF flux welder - as expected.
As a new welder, the auto settings are a huge help - i'd struggle setting wirespeed/amps without it.

I have no complaints from the little I've used it.

Thanks

Dan
 
Last edited:
  • Like
Reactions: 1 user

Vigo

Well-known member

Equipment
B6100, B8200
Jan 9, 2022
595
339
63
San Antonio Texas
I'm not sure if it was all due to welder or the quality of the wire (or both), but the slag chipped away pretty much completely using the yeswelder/yewelder wire - no wire brush nor sanding involved in the above pictures. And there was little to no spatter with this setup as compared to the HF welder.
From what i know (similar welding experience to you..) i think it is all down to having DC and correct polarity on the flux core vs the AC on the old HF machine. It is night and day between the two..

I did a small amount of amateur car racing (autocross mostly) and one of the things 'they say' in that world is if you can drive a slow car fast you can drive a fast car faster.. or something like that.

Basically, if you can learn to work around crappy machinery and produce decent results, once you get good equipment you produce much better results than someone for whom that same car/welder/etc was their first rodeo. I think i benefitted from the struggle of using the old HF 90a. 😂

Glad to hear you're happy with it! Still love mine!
 
  • Haha
  • Like
Reactions: 1 users

PoTreeBoy

Well-known member
Lifetime Member

Equipment
L35 Ford 3930
Mar 24, 2020
2,344
1,180
113
WestTn/NoMs
I received the Yeswelder MIG-205DS Monday. I ordered it from weld_mart on eBay, and it shipped from Florida. I got the blue case and it arrived undamaged except minor warping in the door.

Besides the MIG torch, electrode holder and ground clamp, it includes extra 0.8 and 0.9 tips and both smooth and serrated 0.8/0.9 drive rolls and a Welder Setting Chart.
Welder Setting Chart.jpg

Welder Setting Chart sm.jpg

It can accept 4" or 8" spools, but not like the pictures in the chart. The 4" requires a wrench or pliers, but after the 8" adapter is mounted, 8" spools can be changed without any tools.

I haven't used it yet, just been exploring. I was impressed by the drive mechanism, it looks pretty rugged. One thing I discovered was that the mechanism uses a tiny woodruff key which fits loosely in the shaft. I may try to stake it so it doesn't fall out when changing rolls.

I may actually try it out this afternoon.
 
  • Like
Reactions: 1 user

PoTreeBoy

Well-known member
Lifetime Member

Equipment
L35 Ford 3930
Mar 24, 2020
2,344
1,180
113
WestTn/NoMs
Oh yeah. It comes with a MIG nozzle. But I plan to use flux and stick. I was pleasantly surprised to find the tips and nozzles from my old Craftsman fit it. Harbor Freight has changed to slip-on nozzles, but you can buy a screw-on flux nozzle at Lowe's for about $4.

Screenshot_20220825-091042-175.png
 
  • Like
Reactions: 1 users

dan_m

Active member

Equipment
BX2380
Jul 9, 2020
197
92
28
Georgia
I received the Yeswelder MIG-205DS Monday. I ordered it from weld_mart on eBay, and it shipped from Florida. I got the blue case and it arrived undamaged except minor warping in the door.

Besides the MIG torch, electrode holder and ground clamp, it includes extra 0.8 and 0.9 tips and both smooth and serrated 0.8/0.9 drive rolls and a Welder Setting Chart.


It can accept 4" or 8" spools, but not like the pictures in the chart. The 4" requires a wrench or pliers, but after the 8" adapter is mounted, 8" spools can be changed without any tools.

I haven't used it yet, just been exploring. I was impressed by the drive mechanism, it looks pretty rugged. One thing I discovered was that the mechanism uses a tiny woodruff key which fits loosely in the shaft. I may try to stake it so it doesn't fall out when changing rolls.

I may actually try it out this afternoon.
I ordered mine from amazon and I didn't get a chart. That's what I like about the yeswelder, the auto settings are pretty good. I'm not experienced/knowledgeable enough to know any better, but they work for me.

I believe the small warping in the door is due to them shipping some of the components inside the unit.

I was able to install the 2lb spool without any tools. for 0.030 wire, adjust tension to lower setting (3.5 if memory serves me correct).

Enjoy!

Dan
 

dan_m

Active member

Equipment
BX2380
Jul 9, 2020
197
92
28
Georgia
Oh yeah. It comes with a MIG nozzle. But I plan to use flux and stick. I was pleasantly surprised to find the tips and nozzles from my old Craftsman fit it. Harbor Freight has changed to slip-on nozzles, but you can buy a screw-on flux nozzle at Lowe's for about $4.

View attachment 85994
Nice to know. I just removed the nozzle and have been welding without one. Tips are replaceable anyway, right? ;)

Dan
 
  • Like
Reactions: 1 user

PoTreeBoy

Well-known member
Lifetime Member

Equipment
L35 Ford 3930
Mar 24, 2020
2,344
1,180
113
WestTn/NoMs
I ordered mine from amazon and I didn't get a chart. That's what I like about the yeswelder, the auto settings are pretty good. I'm not experienced/knowledgeable enough to know any better, but they work for me.

I believe the small warping in the door is due to them shipping some of the components inside the unit.

I was able to install the 2lb spool without any tools. for 0.030 wire, adjust tension to lower setting (3.5 if memory serves me correct).

Enjoy!

Dan
I'm definitely a rookie.

I think they've made 'adjustments' over time. Seems I read somewhere they used slip-on nozzles, so I was pleasantly surprised. Yes, the tips are replaceable. They match the wire size.

Sounds like my spool rig is a little different. Maybe I'll use my budding 3D printer skills to make a knob/wrench.
 

PoTreeBoy

Well-known member
Lifetime Member

Equipment
L35 Ford 3930
Mar 24, 2020
2,344
1,180
113
WestTn/NoMs
Gotcha. There's always a gotcha (when dealing with cheap Chinese stuff), right? I got all my welding junk out today to play. After fooling around with some flux wire, I thought I'd try some stick. Pulled the rod holder out of the bag and the connector was too small for the welder. Did any of you guys run into this?
IMG_20220826_170741928.jpg

Left is what's on the stinger, right is the ground and the sockets.

I ran down to Airgas to get a connector. But their plug looked like this:
IMG_20220826_173555926.jpg

Yeswelder claims to be 'Dinse-type', but it's not Dinse. The pin is the same diameter, but it's shorter and the peg on the side is about half as long. The Dinse standard is 19mm and the Yeswelder is about 12. If I had cut it off that much, I would have cut through whatever holds the peg to the pin. (There's a small hole through the pin on the back side of the picture, with possibly a riveted end.) Fortunately, the socket is about 16mm deep, so I was able to cut the pin just past the peg. I also had to file the peg round a little, to get the square peg in the round slot. That got it working, and I sent a message to weld-mart to send a cable or connector.

For my brief test, I loaded some INE 0.035 flux wire and plugged into 110v. My coupon was about 1/8" thick. I set up the machine and promptly burnt through. I never had that happen with my old Craftsman! After backing it down, it made a pretty decent bead. As others have said, it seems to run hot. I think it'll do on 110 about any FC I need.

After getting the stick hooked up, I tried some 1/16" 6013 I had lying around. It produced a nice beard. I tried some 3/32 6011, and I think that exceeded its capacity on 110. It was hard to strike and maintain an arc.

Overall, for an amateur like me, I think it'll do everything I'm likely to need. Just need practice and get used to the controls. Hopefully, I can find a local class to get some pointers.
 

Attachments

PoTreeBoy

Well-known member
Lifetime Member

Equipment
L35 Ford 3930
Mar 24, 2020
2,344
1,180
113
WestTn/NoMs
Yeswelder replied that they're shipping a replacement stinger Monday, so I'm pleased with them.

Some of these come with a wingnut on the spool tension, but I just got a nylok nut. So I drew up an overlay to put wings on it and printed it down at the library. The first try was too tight, so I scaled it up 1% and got a snug fit. I was curious how threads would print and, since I'll probably never use gas, decided to make a plug to keep spiders and dirt daubers out of the gas port. It fit first try. I'm finding the library's printer is very accurate on outside surfaces, but prints slightly undersize on inside surfaces.

IMG_20220828_122346039.jpg
 
  • Like
Reactions: 1 user