Help with 3-point hitch repair

Roll

New member

Equipment
B7300
Dec 14, 2016
98
0
0
Central Ohio
Re: Interim report on 3-point hydraulic refresh

Got it Dave, O-ring on top side, retainer ring on bottom side of slot.

All the parts I bought are Kubota including the O-rings, bolts, snap rings, even clips.

Thanks, Roll
 

Roll

New member

Equipment
B7300
Dec 14, 2016
98
0
0
Central Ohio
Re: Interim report on 3-point hydraulic refresh

Just curious....If the 3 pt drops completely overnight....what problems does this cause? I guess I don’t see an issue.
Ah well...

It's the defect in my DNA. It's just not right. It's needs to be repaired and I am retired (have the time).

There is a limit however, I won't spend the extra money for a new casting or even a new control valve but I will invest the time to replace the O-ring and see if that improves the situation.

Roll
 

Dave_eng

Well-known member
Lifetime Member

Equipment
M7040, Nuffield 465
Oct 6, 2012
5,145
941
113
Williamstown Ontario Canada
Re: Interim report on 3-point hydraulic refresh

Got it Dave, O-ring on top side, retainer ring on bottom side of slot.

All the parts I bought are Kubota including the O-rings, bolts, snap rings, even clips.

Thanks, Roll
Roll
The reason for the nylon ring is to prevent the O ring from being forced between the piston and the cylinder wall.

Since the 3 pt is a single acting device, i.e. pressure only in up direction, only one ring is used.

On a FEL , which utilizes double acting cylinders, there will be a ring on either side of the O ring.

Dave
 

Roll

New member

Equipment
B7300
Dec 14, 2016
98
0
0
Central Ohio
Re: Interim report on 3-point hydraulic refresh

This has to make you (anyone reading but especially Dave) smile.

I went fishing in the bottom of my differential case and caught a fish! LOL

The pictures tell it all. The pic of the end of the magnet is right after pulling this collection out, no staging, that's exactly what I saw when I turned the magnet over and looked at it with my reading glasses on.

Also for Dave... On the napkin, the broken clip is round side up, the replacement is flat side up. You can easily see the difference a fact that I would have never noticed before.

You can also see how it deformed before breaking off. I guess I'm lucky it didn't cause more damage and that I was lucky enough to bring up all three pieces.

If interested; I pulled this up out of the area in the top right quadrant (see pic) of the differential with about 2 inches of oil remaining in the case.
 

Attachments

Dave_eng

Well-known member
Lifetime Member

Equipment
M7040, Nuffield 465
Oct 6, 2012
5,145
941
113
Williamstown Ontario Canada
Re: Interim report on 3-point hydraulic refresh

This has to make you (anyone reading but especially Dave) smile.

I went fishing in the bottom of my differential case and caught a fish! LOL

The pictures tell it all. The pic of the end of the magnet is right after pulling this collection out, no staging, that's exactly what I saw when I turned the magnet over and looked at it with my reading glasses on.

Also for Dave... On the napkin, the broken clip is round side up, the replacement is flat side up. You can easily see the difference a fact that I would have never noticed before.

You can also see how it deformed before breaking off. I guess I'm lucky it didn't cause more damage and that I was lucky enough to bring up all three pieces.

If interested; I pulled this up out of the area in the top right quadrant (see pic) of the differential with about 2 inches of oil remaining in the case.
Roll
Thank you for your kind words of appreciation.

Of course with your new found knowledge we will be expecting you to jump in and help others by enlightening them. :)

Clearly the two "ears" of the old clip were under a lot of stress.

Dave
 

wdlanning

Member
Lifetime Member

Equipment
L3750, L4310, B20, Genie Boom
Nov 7, 2016
221
11
18
philadelphia pa
Re: Interim report on 3-point hydraulic refresh

Hey Roll and all,
I have been working on my 3pt valve (See my post for details). The lift arms always go to the up position and stay there. Is there suppose to be any resistance on the lift arms when I move them with the engine off? There is absolutely no resistance up or down and I heard a small clang when moving upward. Is it possible for the cylinder to be disconnected somehow that prevents the arms going down when the engine is running? I thought that since you had yours apart that you could help me.
 

Roll

New member

Equipment
B7300
Dec 14, 2016
98
0
0
Central Ohio
Re: Interim report on 3-point hydraulic refresh

Hey Roll and all,
I have been working on my 3pt valve (See my post for details). The lift arms always go to the up position and stay there. Is there suppose to be any resistance on the lift arms when I move them with the engine off? There is absolutely no resistance up or down and I heard a small clang when moving upward. Is it possible for the cylinder to be disconnected somehow that prevents the arms going down when the engine is running? I thought that since you had yours apart that you could help me.
Sorry, beyond my ability. All I can tell you is that if the arms are going up the piston must be down in the cylinder. It is normally pushed down by hydraulic pressure. The bang you hear may be the piston arm hitting a safety plate that rides on the back wall of the differential for that purpose, (as far as I can tell). See pic of plate in open differential. On the bottom inside edge of the case you'll see a steel plate. Keeps the arm from hitting the case is my guess.

Roll
 

Attachments

Roll

New member

Equipment
B7300
Dec 14, 2016
98
0
0
Central Ohio
Re: Interim report on 3-point hydraulic refresh

In the picture below you can see the narrow groove cut in the facing edge of the lower case. I expect this is to let a small amount of gasket material to fill that groove and help seal the valve assembly casting with the differential case.

I have tried to clean out that groove as best I can. It's no easy task unless they make a special tool for the job. I used a medical tweaser with a small pointed end and lots of bending over with elbow grease.

As for putting it back together: Run a small bead over the groove and mate the two pieces, then torque it down. That about right? I'm using Permatex Ultra Grey.

The product label does not say if this hardens or stays pliable. Also the directions say to set the pieces together and hand tighten the bolts, then wait for 24 hours before torqueing it down. Is that how everyone does it? Seems odd to me.

Roll
 

Attachments

Last edited:

North Idaho Wolfman

Moderator
Staff member
Lifetime Member

Equipment
L3450DT-GST, Woods FEL, B7100 HSD, FEL, 60" SB, 743 Bobcat with V2203, and more
Jun 9, 2013
29,038
5,356
113
Sandpoint, ID
Re: Interim report on 3-point hydraulic refresh

As for putting it back together: Run a small bead over the groove and mate the two pieces, then torque it down. That about right? I'm using Permatex Ultra Grey.

The product label does not say if this hardens or stays pliable. Also the directions say to set the pieces together and hand tighten the bolts, then wait for 24 hours before torqueing it down. Is that how everyone does it? Seems odd to me.

Roll
Yep that's right, it's a semi solid material, you will get the best performance and sealing out if it if you wait some time to torque down on the gasket surfaces.
 

Dave_eng

Well-known member
Lifetime Member

Equipment
M7040, Nuffield 465
Oct 6, 2012
5,145
941
113
Williamstown Ontario Canada
Re: Interim report on 3-point hydraulic refresh

Hey Roll and all,
I have been working on my 3pt valve (See my post for details). The lift arms always go to the up position and stay there. Is there suppose to be any resistance on the lift arms when I move them with the engine off? There is absolutely no resistance up or down and I heard a small clang when moving upward. Is it possible for the cylinder to be disconnected somehow that prevents the arms going down when the engine is running? I thought that since you had yours apart that you could help me.
A word of caution based upon my experience on moving lift arms manually.


In this old tractor's design, a simple cotter pin secured the piston of the 3 pt to the push rod. Over time the cotter pin would wear out and now there was no connection between the piston and push rod.

When I lifted the arms manually, the push rod dropped out of position. The next time I tried to raise the 3 pt, there was a loud crack and the push rod pushed a large piece of the rear casting off the tractor completely.

Now on any tractor, I never lift the arms although many new designs are more fool proof, one day you will come across one that is not.

It is a sickening sound.

Dave
 

Roll

New member

Equipment
B7300
Dec 14, 2016
98
0
0
Central Ohio
Re: Interim report on 3-point hydraulic refresh

Replacing the valve/piston assembly went fairly well until I realized the bonehead move I had made...

Laid out the 1/4 in bead of Permatex over the groove on the differential side. I had already cleaned the head assembly side, so we were ready to go.

With my wife's assistance I held the assembly over the differential while she struggled to get the lever back on the fulcrum rod. She got it, and I let the whole thing down slowly onto the top of the differential. installed the new bolts I had purchased to hand tight only. As I pushed back from the tractor it dawned on me what my mistake had been. I left the paper towel in the differential. The one in the photo above that I had set in there to catch debris that might fall into the case. Talk about bonehead moves.

Pulled the bolts, lifted the head assembly about 3 inches and Cindy gently pulled the paper towel out. I set the head assembly back down on the differential case and reinstalled the bolts. I just wasn't up to pulling if off again, cleaning everything up and redoing all that Permatex.

Am I kidding myself that it will seal and not leak? I was careful not to slide the mating surfaces around and Cindy didn't touch either side. It did look like most of the Permatex had already been squeezed out. That didn't strike me as strange since the head at 42+ pounds would likely squeeze the material out regardless of it being torqued down.

Thoughts/recommendations? Other than I am a bonehead, I already know that.

Roll
 

Attachments

100 td

Active member

Equipment
B21TLB (B21, TL421 & BT751) Toyota SDK4 T116 Bobcat
Aug 29, 2015
1,776
8
38
ɹǝpunuʍop
Re: Interim report on 3-point hydraulic refresh

I wouldn't worry, see how you go. Personally, if I were installing it on my tractor, I would wire buff the groove out, clean surfaces with acetone, apply minimal sealant and install and torque down. The operation listed in the manual works by leaving a thin film of sealant to be squashed down under torque load. In a workshop, generally the mechanics don't have time to let the sealant go off, they just do it up. You'll have a high chance of success, but make sure you follow up and check it, you may have to do it again, depending on air pockets created when replacing etc. YMMV
 

Dave_eng

Well-known member
Lifetime Member

Equipment
M7040, Nuffield 465
Oct 6, 2012
5,145
941
113
Williamstown Ontario Canada
Re: Interim report on 3-point hydraulic refresh

Replacing the valve/piston assembly went fairly well until I realized the bonehead move I had made...

Laid out the 1/4 in bead of Permatex over the groove on the differential side. I had already cleaned the head assembly side, so we were ready to go.

With my wife's assistance I held the assembly over the differential while she struggled to get the lever back on the fulcrum rod. She got it, and I let the whole thing down slowly onto the top of the differential. installed the new bolts I had purchased to hand tight only. As I pushed back from the tractor it dawned on me what my mistake had been. I left the paper towel in the differential. The one in the photo above that I had set in there to catch debris that might fall into the case. Talk about bonehead moves.

Pulled the bolts, lifted the head assembly about 3 inches and Cindy gently pulled the paper towel out. I set the head assembly back down on the differential case and reinstalled the bolts. I just wasn't up to pulling if off again, cleaning everything up and redoing all that Permatex.

Am I kidding myself that it will seal and not leak? I was careful not to slide the mating surfaces around and Cindy didn't touch either side. It did look like most of the Permatex had already been squeezed out. That didn't strike me as strange since the head at 42+ pounds would likely squeeze the material out regardless of it being torqued down.

Thoughts/recommendations? Other than I am a bonehead, I already know that.

Roll
Roll

The big advantage with this location is, as I understand it, to be above the fluid level in the transmission. The seal is only dealing with splash and spray.

I would have rolled the dice the same way too.

Dave
 

Roll

New member

Equipment
B7300
Dec 14, 2016
98
0
0
Central Ohio
Re: Interim report on 3-point hydraulic refresh

Thanks Dave and TD, going out now to torque it down and start working on the linkage. Will start it up and work the air out before I put the seat and it's hardware back in so I can see if there are leaks.

Roll
 

Roll

New member

Equipment
B7300
Dec 14, 2016
98
0
0
Central Ohio
Re: Interim report on 3-point hydraulic refresh

Here you are. The acid test. No leaks, no alarming noises, just a smooth ride up and down. I'll have to wait overnight to see if it still drops.

I don't know how to set up a video so I'll just give you this link.

https://youtu.be/ZZkSjvPtFqQ

It's just the one video, anything following can be disregarded.

Roll
 

Roll

New member

Equipment
B7300
Dec 14, 2016
98
0
0
Central Ohio
Final report, refresh of Hydraulic 3-point

All back together, works fine. After 6 days leaving the arms in the fully raised position, they dropped 3/4 of an inch, maybe slightly more.

I can live with that. Before the repair they would drop to full down overnight.

Good deal. Now on to the baseplate install on the 2018 Wrangler.

Roll

Mod EDIT: Merged all threads on same subject
 
Last edited by a moderator:

Muggman

Member
Jun 11, 2022
93
17
8
SC
Interim report on 3-point hydraulic refresh

If anyone is considering doing this on a B7300 or similar Kubota, a couple of things to note.

After twenty years the bolts that hold the hydraulic controller assembly to the base became corroded, I was lucky they didn't snap off. I am using new replacement bolts when I reassemble.

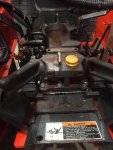
The linkage is a pain to get loose and out of the way. Same with the delivery pipe, I used a 1X2 length of board to hold it back out of the way.

I needed a two foot breaker bar to loosen the top link bracket bolts.

The most difficult connection was the Fulcrum shaft and its controls. I ended up pulling the controller assembly off so that I could slide the control lever off the shaft. Awkward but it worked.

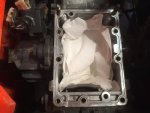
I was told the casting weighed 60 pounds, not true, I weighed it on the bathroom scale, it weighs 42.8 pounds. That’s still heavy. I used a piece of nylon rope tied to all four corners to lift it off the housing and carry it over to the work table.

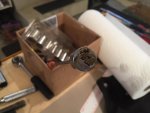
Planned to remove one arm to slide the shaft out of the housing with the other arm but realized quickly I was not going to be able to pull the arm off the spline. I gently knocked out the retaining pin on the (interior) hydraulic arm and then lifted the rod out. Finally, the piston came right out with a brief pop of air in the controller forward hole. Watch out, it comes fast, be ready to catch it with something soft. Mine nearly fell to the concrete floor.

Pictures attached if you are interested.

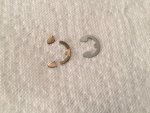
Question for the knowledgeable techs... looking at the piston pic, you can see marks (grooves) at the top of the pistons side wall and near the bottom. I see the same type of marks in the cylinder, no pic. I also see in the pic some nicks in the o ring. With the o-ring and retainer located near the middle of the piston I wonder if it rocks/pivots in the center and so, the top and bottom edges of the piston brush against the cylinder walls as it goes up and down?

Is a new o-ring and retainer ring going to make a difference? I don't see myself replacing the entire casting and I'm not too anxious to attempt to hone the cylinder. Thoughts/suggestions?

Thanks all, Roll
How did you get that plastic knob off the stem