First try at repairing a cylinder need a little help

mvwood

Member

Equipment
B21(sold) B26
Apr 7, 2011
59
0
6
Wallkill NY
My left hand stabilizer would weep down slowly over a few days and it just anoyes me. So while the tractor is out of commission while I attempt to replace a leaking oil seal on the front axel I decided what the heck lets pull more things apart. I got the cap off ,boy that thing was a bugger, I ended up having to use a pipe wrench with a 4foot leverage bar while it was still connected to the backhoe.
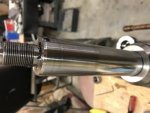
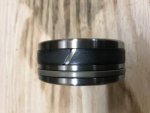
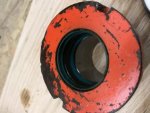
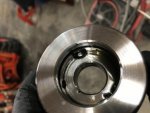
I slid the gland off and got the piston out and cleaned them up. When I pulled the piston off I found the culprit. The small o ring on the inside of the piston was torn up, 1st and last pictures. The o rings are an easy replacement. My question is the smaller (ring) that sits next to the black ring on the piston,second pic, is that part of the seal kit? And if so how do I remove it? The second question is the seal that sits on the inside of the gland, turquoise in color with a metal center third picture,how do I remove that? Do I tap at it from the opposite side and push it out. I am going to pick up a seal kit tomorrow. Any advise would be greatly appreciated
Just a note I do have a WSM but it seems they are more geared towards those with more experience
 

Attachments

Last edited:

G.rid

Member

Equipment
L48 tlb, ssqa forks, manual thumb for hoe
Aug 19, 2016
207
17
18
Oxford, NS, Canada
A quick answer, if it's a complete kit, all orings, seals, and wear bands should be included.

The ring on the Piston with the angle slit is the wear band. It will open enough to pull off the end of the Piston. They're fairly tough so unless you really pull on it, it will snap back. The seal next to it, carfully pry it out with a small flat screwdriver. It's not a big deal if you nick the seal, you're going to replace it anyway. Becarful not to scratch or nick the groove in the piston.

The first ring in the gland, outer most, is a scraper/wiper. Pay attention the direction of it before you pull it out. It will pull out with a small screwdriver also.

The main seal in the gland is the hardest to remove and replace. At work I've made a few tools to pry them out. They look like a flat screwdriver but with a 45' bend about 1/2" from the tip. I made them out of 5/32" welding rods so theyre not too hard, agian you don't want to to scratch the grooves. You will need a second tool, as you get part of it out, grab it with the second tool. It's easier to grab it from the cylinder side of the seal, thats the open side of it. If the new one is too ridgid to snap in to the groove, soak it for a few minutes in hot water.

The first cylinder is always the hardest. After you've done 2 or 3 they're a piece of cake!

Not to burst your bubble but don't be surprised if the stabilizer doesn't stop leaking down. The oring in the piston wouldn't let much bypass, the piston is tight up against the shoulder of the rod. If there are no external leaks than it's most likely the valve.

Sorry to run on, easier to do than type! Good luck.
 

mvwood

Member

Equipment
B21(sold) B26
Apr 7, 2011
59
0
6
Wallkill NY
Ok G rid thanks for the info. Maybe I’ll make up a couple of those pry bars like you mentioned. They almost sound like drum brake adjustment tools. When you say that the leak down could be the valve is that something that may be repaireable? And if so is that a shade tree mechanic job or is that better left to the professionals?
 

D2Cat

Well-known member
Lifetime Member

Equipment
L305DT, B7100HST, TG1860, TG1860D, L4240
Mar 27, 2014
13,082
4,439
113
40 miles south of Kansas City
Here"s a tool used to insert the seal inside the gland. As you click on the link it gives additional pictures of how it works. There are several different size available. You may be able to fabricate one up, borrow one or rent one. They work nice.

https://www.ebay.com/i/152627598679?chn=ps

Often times you can get a seal kit at a hydraulic repair shop at much less cost than other places. If you go to a hyd. shop to purchase the components, they may gladly insert the inner seal.,
 

Kennyd4110

Well-known member
Vendor Member
Sep 7, 2013
1,178
344
83
Westminster, MD
www.boltonhooks.com
Here"s a tool used to insert the seal inside the gland. As you click on the link it gives additional pictures of how it works. There are several different size available. You may be able to fabricate one up, borrow one or rent one. They work nice.

https://www.ebay.com/i/152627598679?chn=ps

Often times you can get a seal kit at a hydraulic repair shop at much less cost than other places. If you go to a hyd. shop to purchase the components, they may gladly insert the inner seal.,
I have just boiled the seals to soften them up, then fold it into a kidney shape and insert. No need for a special tool, especially for the hobbyist doing one/two cylinders a year.
 

G.rid

Member

Equipment
L48 tlb, ssqa forks, manual thumb for hoe
Aug 19, 2016
207
17
18
Oxford, NS, Canada
Ok G rid thanks for the info. Maybe I’ll make up a couple of those pry bars like you mentioned. They almost sound like drum brake adjustment tools. When you say that the leak down could be the valve is that something that may be repaireable? And if so is that a shade tree mechanic job or is that better left to the professionals?
That's a good way to describe them, just a lot smaller to suit the size of the gland. As far as the valve body, it's only hard the first time. It's usually a few orings and plastic backer rings. The most important thing with them is cleanliness. The spools are a very close fit to the bore. If there is any rust or scratches use 600 emery or finer, but sparingly.

Thanks D2cat, I've never seen a tool like that before. That would definitely help on the smaller seals when I can't get my big fingers in the gland. Have you found a similar tool to take them out that easy?

I agree with D2cat, if you have a hydraulic shop near by, they with definitely be cheaper than oem. You'll need to take all the seals and orings with you so they can match them up. If they're a reasonable shop, take the gland in as is and they would probably switch them out at no charge.
 

L35

Well-known member

Equipment
L35/TL720/BT900/York rake/Valby chipper
Jun 13, 2010
434
259
63
CT
I saw kubota has special tools available to get that fibrous ring onto the piston and get it back to size after you stretch it out by installing it. I used a worm drive clamp in the past and it seemed to work ok. Just another tip.
 

mvwood

Member

Equipment
B21(sold) B26
Apr 7, 2011
59
0
6
Wallkill NY
Thought I would put a close to this thread. I got the new seal kit in the mail last week and got it all put back together. I didn't need any special tools. I was able to get the two larger seals in place buy squeezing them in the center to create a figure 8 so to say and then put one end into the groove while bending the other side inward to get it to fall into the other side of the groove. the other o rings were pretty straight forward I just noted which one went where as I took the old ones out. So its been about 5 days since I got it back together and back onto the backhoe and I'm happy to report that I have zero weep down now. So it seems as if that busted inner o ring may have been the culprit. My advise to anyone who is hesitant to try doing this for themselves is to GO FOR IT!!! You'll feel great that you did it yourself and also that you saved yourself some$$$$ to put towards a new attachment:cool:
 

Lencho

Active member
Lifetime Member

Equipment
B7100hst
Jan 21, 2017
410
87
28
NM
Thanks for the update, photos, discussion, and inspiration! I have a few of these in my future. :)