Resolved the problem with my bucket constantly creeping up. Looking at the parts diagram for the upgraded detent 75536-65400 it states a remark of 59221. However, I couldn't find how to interpret this number into English. I suspect it mentions where to place the included washer which acts like a shim probably for certain models only. In my case, I needed this washer (shim) as my bucket would not rest at a neutral position and would constantly creep up making for a dangerous condition. When I original installed the detent upgrade kit I excluded this washer as I didn't know where it went nor did my old detent use a washer. However, after taking it apart and comparing the large spring distances between new and old it became clear where the washer needed to be placed such that the spring would hold the spool in the neutral position. I'm going to document my steps for detent removal and install for this kit for my LA352 FEL Husco control valve 3-position. I must have done this a dozen times now.
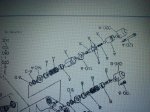
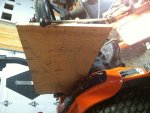
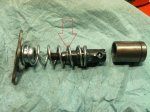
1. Review the assembly diagram of the control valve so you understand the components involved. Nothing in your old assembly is reused but its a good idea to keep them and compare to the new kit. This was a godsend for me. I also reused my old kit for analysis of my problem. See image_A.
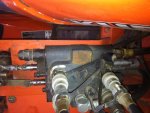
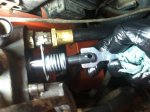
2. Remove the control valve body cover so the valve body is visible. See image_B.
3. I used a dollar store disposable oven pan and magnetic tool pan to catch any detent items upon removal\install. I could bend the oven pan to fit the awkward space. I like using an oven pan because if anything falls during breakdown\install it makes a noise indicating something as fallen. See image_C.
4. Using hex wrench, remove the dust caps on the up/down spool, exposing the detent assembly.
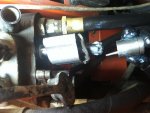
5. Using a nail set, place the nail set into the very end of the cup and center it and push on the large ball bearing about 3/8" in so it goes past the 4 smaller bearings releasing the cup. If your assembly is all rusted, the bearings might be frozen so use vise grips and just rip it off. Its OK to twist and turn this end cup. Although you may need to use needle nose vise grips on the adjusting rod by the control lever to prevent the spool from twisting as well. I think its OK if this twists a little as mind did, just better safe than sorry. BONUS: Magnetize the nail set for better control. See image_D.
6. With the cup off, remove the 5 ball bearings in the black detent rod.
7. Use a piece of wood to push your control lever forward such that the spool is fully extended towards your FEL. Using a bungie or rope can slide down the lever and be annoying. I found plywood to be the best and is nice and solid. From this point on you keep the spool forward until you assemble the dust caps. See image_E.
8. You now need to remove the black detent rod but its best to first relieve some pressure on the spring to make the rod removal easier. This can be hit or miss. I used a socket to compress the spring towards the valve just enough to take some pressure off. If you chose to keep the pressure on you may crack the detent. This happened to me on a new assembly during my analysis. See image_F & image_G.
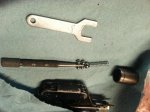
9. Here's a valuable tip: You now need a tool to remove (and later install) the black detent rod. Its difficult finding a good tool for a snug fit. A screwdriver is too thin and not wide enough to get a good bite. I once used a thick wisher with vise grips in a pinch. It also shouldn't be too long as your going to thread this rod while compressing a spring. In my case I had a some cheap metal stamped tools that come with Ikea. See image D. My hording finally paid off and justifies hording more junk tools. In retrospect,
I would have probably been better off buying a dollar store chisel and cut the sharp end off. If your really stuck and don't think you'll ever use the black detent rod, you can insert the nail set into the holes where the ball bearings were and loosen in that manner but this will distort the holes making it unstable should you need to reuse this although you could reuse it will just be a bit sloppy. The rod turns counter-clockwise to loosen like a regular thread. See image_H.
10. Once the detent rod is off, you should just be looking at just the shiny valve spool. You can remove the plastic seal retainer (white). The kit comes with a new black seal but I just left my original on there.
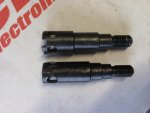
11. Here's a valuable tip: Using your new detent rod, find where it engages the threads on the spool and mark this location on the detent rod. This will make assembly so much easier to get those threads started. See image_F.
12. Insert the new white seal retainer on the spool so the tapered end is facing the valve body.
13. Insert the dust cover metal gasket with the flush side facing the valve. Consider using some tape to hold these 2 pieces in place up against the valve body as for the next part things usually go flying off.
14. Assemble the large spring components as you'll need them in this order for assembly. See image_J.
15. Insert the silver colored spring retainer over the end of the spool so its like wearing a top hat. See image_J.
16. Insert the large spring. See image_J.
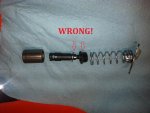
17. VERY IMPORTANT: Insert the black spring retainer onto the new black detent rod to the lip is positioned away from the threads, then insert the washer on top of the black spring retainer such that it is facing towards the threads. This will place the washer toward the spring side. This is very important as another way to assemble (incorrectly) is by placing the washer on the detent side of the black spring retainer. This is wrong! The washer must be inside the spring so when the large spring is under compression, the shiny spring retainer will come in contact with the washer. See image_J & image_K.
18. With all of these components assembled and ready for install, finally insert the black detent rod with your mark in the correct position so you can begin threading this entire assembly onto the spool. See image_F.
19. The large spring assembly needs to be compressed while also threading on the black detent rod. This is tricky. I have compressed by hand and have used a socket to help compress. I have used the tool to start the threads and I have also simply used a rag with my thumb on the end to get them started. I think of all the times I've done this it seems using a rag at the end with my thumb was easiest to compress and start the threads. This part is tricky and its also the part where the spring will go flying. There's a hydraulic hose in the way that makes this difficult. You're best to use a bungie to move this out of the way as space is a premium for this task. The actual detent balls and springs should NOT be assembled at this time. Your task is to just get the black detent rod threaded while compressing the large spring and don't forget the metal gasket for the cover, this is easy to forget and you'll need to revisit this step again. This is the worse step in the entire process. See image_F.
20. Once threaded by hand you can then tighten it up using the tool mentioned in the previous step. Whatever you use don't insert anything into the ball bearing holes as the metal will distort. Also don't use vise grips. Use the notches at the end of the detent rod only. I didn't tighten this very tight at all, just hand tight. There is some kind of loctite substance on the threads from the factory that seem to hold it enough from loosening but also allows disassembly. I doubt this part is under so much stress and vibration that it backs out. If it does I'll revisit then as I had to do this job several times so I want to keep it hand tight. If your brave or concerned about having it tight, good luck.
21. You can now assemble the detent balls and springs. I used marine wheel bearing grease as this had a very nice consistency and it cleans up well if you drop things, unlike regular wheel bearing grease. I'm in cold weather so using anti-seize is not preferred as that stuff stiffens up when cold. I would have used white lithium grease but didn't have any. I also chose to NOT drill a drain hole or oil hole in my cover. My original detent kit lasted 14 years
and 400 hours and that was factory lube, so I suspect with this lube it will last longer.
22. Insert the center spring and 5 ball bearings coated in grease to hold them in place and act as a lubricant.
23. Slide the first dust cover on over the compressed larger spring, along with its steel gasket. These 2 items need to be in position prior to inserting the end cup. However, if you forget its easy enough to remove a nice new end cup, unlike the old rusted one.
24. Position the nail set through the end cup, make sure the ridge line on the exterior of that cup is facing towards the FEL and not the control valve.
25. Position the cup just close to the 4 bearings and then compress that larger bearing past the smaller ones. Once you see them bulge and then slightly recess go ahead and slide the end cup on and then release the larger bearing so the end cup now stays assembled with the small bearings holding it. The cup doesn't need to be inserted all the way, just enough so the small ball bearings are inside and the cup. You can remove the nail set and just use your hand to push the cup on so its not wobbly.
26. Now I shoot grease into the top dust cap (larger spring) and into the end of the cup, etc to coat it up. I also put some grease into the end cover.
27. Now assemble, start tractor and slowly test the operation.
28. If the control lever travel is very short, like 1/2" of movement and the bucket doesn't operate correctly this is very likely an indication that you placed the washer (shim) wrong or your end cap is upside down (external ridge line needs to be away from the valve body). If you are having other problems, remove the detent kit entirely and with the tractor running slowly operate the spool and measure the distances to get an idea of where your neutral position is. In my case it was about 1/8" - 1/4" of travel. Armed with this info I was able to figure out the washer was a shim. But if there were other problems with my valve I could have used another washer to shim it further. This type of analysis got me out of this bind and I thank Wolfman for that tidbit.
 101.9 KB Views: 262
 102.4 KB Views: 264