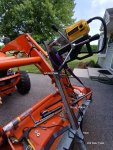
A couple weeks ago I wired a switch and extended wiring to a trailer plug to the outside of the cab. Earlier this week I fabbed up a couple tabs and visirted the local hardware store for a couple bushings and longer bolts. Today it's been wrapped up except for wiring between the plug just outside the cab to the linear actuator. It was tested with jumpers, but other duties called so it'll be done done next week.
First thing was drilling the two tabs that go on the post of the QA mechanism. The tractor helped with this. It was parked with the bucket dumped enough to make the back about horizontal. That gave access to everything and was a handy work surface. A scrap piece of galvanized 2x2 tube slipped down through the receiver hitch that's welded into my slotted chain grabber. Then a scrap piece of flatbar from an old mower deck was clamped to the 2x2 tube. Then the "added plate" was clamped to the flatbar to give the mag drill a place to fasten to. That plate is for drilling stuff that doesn't have sufficient steel for the base of the mag drill to grab. It's a good bit larger than the magnet footprint with a "target hole" that can be roughly located over the proposed hole in trhe material below. It came in handy a few times. After drilling holes in the flatbar, the two needed pieces were cut fromm it.
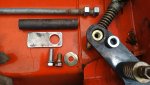
The collars from the hardware store had an OD very close to the holes in the QA handles and an ID that wasn't too sloppy for the bolt. The thickness was just enough to provide a tight bolt-up of the QA mechanism and allow enough clearance for the tab to rotate on it. Another stroke of luck was one of the annular cutters from the mag drill kit was perfect for the OD of the collars.
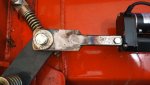
Second picture shows the parts for the "driver's side". The 1/2" SCH 40 steel pipe was a pretty decent fit for the one end of the linear actuator. It was drilled and bolted through the actuator's piston. One of the nuts was welded to the end of the pipe so the allthread could be threaded in or out in case there's a need to make any adjustments. The other nut and end of the allthread were welded to the tab that goes on the QA mechanism. The new bolts were cut down to allow for the additional length needed for the collar.
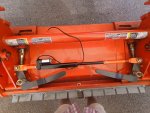
Next photo shows the "passenger's side". That end linear actuator had a square boss that was very close to the inside dimensions of some oddball light gauge square tube saved from some other project. A teensy bit of effort with a big single cut file made it fit nicely and it was bolted to the square end of the actuator. Then the other end of the square tube was simply welded to the tab.
Last picture is after a quick rattle can job on the newly fabbed parts. Greased her up and did the old in 'n out a few times using the spray rig's extension cord before dropping the loader and mowing. Wifey and Sweet Pea had me on a tight schedule in order to make it to the restaurant before it closed") The final wiring will have to wait till next week. Not very much. Just a cord fastened to the loader arm to keep it out of harm's way and a plug on the end toward the cab.
The final wiring will have to wait till next week. Not very much. Just a cord fastened to the loader arm to keep it out of harm's way and a plug on the end toward the cab.
First thing was drilling the two tabs that go on the post of the QA mechanism. The tractor helped with this. It was parked with the bucket dumped enough to make the back about horizontal. That gave access to everything and was a handy work surface. A scrap piece of galvanized 2x2 tube slipped down through the receiver hitch that's welded into my slotted chain grabber. Then a scrap piece of flatbar from an old mower deck was clamped to the 2x2 tube. Then the "added plate" was clamped to the flatbar to give the mag drill a place to fasten to. That plate is for drilling stuff that doesn't have sufficient steel for the base of the mag drill to grab. It's a good bit larger than the magnet footprint with a "target hole" that can be roughly located over the proposed hole in trhe material below. It came in handy a few times. After drilling holes in the flatbar, the two needed pieces were cut fromm it.
The collars from the hardware store had an OD very close to the holes in the QA handles and an ID that wasn't too sloppy for the bolt. The thickness was just enough to provide a tight bolt-up of the QA mechanism and allow enough clearance for the tab to rotate on it. Another stroke of luck was one of the annular cutters from the mag drill kit was perfect for the OD of the collars.
Second picture shows the parts for the "driver's side". The 1/2" SCH 40 steel pipe was a pretty decent fit for the one end of the linear actuator. It was drilled and bolted through the actuator's piston. One of the nuts was welded to the end of the pipe so the allthread could be threaded in or out in case there's a need to make any adjustments. The other nut and end of the allthread were welded to the tab that goes on the QA mechanism. The new bolts were cut down to allow for the additional length needed for the collar.
Next photo shows the "passenger's side". That end linear actuator had a square boss that was very close to the inside dimensions of some oddball light gauge square tube saved from some other project. A teensy bit of effort with a big single cut file made it fit nicely and it was bolted to the square end of the actuator. Then the other end of the square tube was simply welded to the tab.
Last picture is after a quick rattle can job on the newly fabbed parts. Greased her up and did the old in 'n out a few times using the spray rig's extension cord before dropping the loader and mowing. Wifey and Sweet Pea had me on a tight schedule in order to make it to the restaurant before it closed
The final wiring will have to wait till next week. Not very much. Just a cord fastened to the loader arm to keep it out of harm's way and a plug on the end toward the cab.Attachments
-
 691.9 KB Views: 233
 -
 764.1 KB Views: 236
 -
 608.6 KB Views: 239
 -
 605.8 KB Views: 238
