Hello All
I just completed the purchase/assembly process of my chipper. So here are my thoughts.
The reasons I went with woodland are,
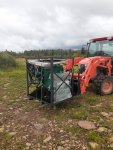
they are the only ones to offer a trailer hitch
they are the only ones to have the safety bar below the chute, so it is easy to hit in an emergency.
It is the most compact when folded up.
They seem to have a good reputation.
it comes with a saw mount as standard equipment.
and of course price.
The sales lady at woodlands was excellent to deal with. The chipper arrived seven days after I ordered it, including a three day weekend, you can't ask for better than that. The delivery driver was also excellent to deal with.
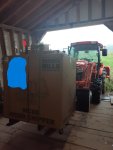
It arrived in good condition, and for the most part was easy to assemble. All the hardware was well packaged in separate bags for the step you were doing, or in that particular piece. All of the various pieces were very well wrapped, with no damage to the paint. With the chipper mounted to my quick hitch I did not have to shorten the pto shaft.
Woodland does not offer knife to anvil clearance gauges, so I made some. 1/8 x 2 x 24 inch flat bar for one. 1/16 x 2 x 15 inch, with a piece of 22 gauge ( 1/32 inch) 2x 7 inch tin epoxied to it, for the second gauge.
The pto engages nicely at low idle ( 53pto hp).
The pump is a 10ml/rotation unit, witch makes 1.42 us gals per minute at 540rpm. But for what ever reason they are using a 0-16 gal flow control valve, so 0-4 out of 10 for the control lever is the useful range of the flow control valve, as stated in the operators manual. I found the feed wheel does not move until #2 and does not increase beyond #4 ish.
I have not chipped anything yet, as that is still a week or two away.
BUT
One of the crate hold down bolts was missing and the other three were loose, it was still held tight by the straps.
The hold down hole for the top cover was slightly misaligned, so the bolt threads were deformed when I removed the bolt. I retaped the threaded hole, enlarged the hole in the cover slightly and replaced the bolt. No big deal if you have the tooling and hardware, but a disaster if you don't. I have seen two u-tube videos with people having this same issue.
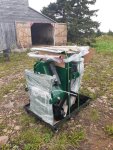
If you assemble the inlet chute per the instructions you will have a 3/8 to 1/2 inch ledge for the wood to get over to enter the body of the chipper. You need to slightly snug all the bolts with the bottom panel raised up above the inlet floor, then tap the panel down to flush or slightly above the floor. Then tighten all the bolts.
The clips to hold the bottom of the chute in place when lowered, were not adjusted at all, they had a 1/4 in gap. Easily tightened with a 10mm socket ( if you can find one, haha), but still, it should not be out that much.
The pivot points for the front cover were very loose, and also had to be tighten.
Most other bolts/nuts were tight. I did gain a bit on 3 of the eight bolts that hold the knives in place with a torque wrench set to 45ftlbs, ( the max torque).
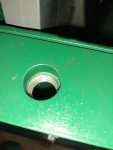
Spec for knife clearance is 1/16 to 1/8th inch. I made gauges and found the gaps to be 3/32 to 1/8. I adjusted the anvil plate to 1/16 to 3/32, depending on the knife. The outer knifes for what ever reason are 1/32 farther way than the inner knifes.
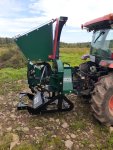
Woodland's promotional pictures show the ball (which comes with it), installed in a plate. Mine is mounted directly to the cross tube. To me this is a better method.
As of now I would definitely purchase it again.
I just completed the purchase/assembly process of my chipper. So here are my thoughts.
The reasons I went with woodland are,
they are the only ones to offer a trailer hitch
they are the only ones to have the safety bar below the chute, so it is easy to hit in an emergency.
It is the most compact when folded up.
They seem to have a good reputation.
it comes with a saw mount as standard equipment.
and of course price.
The sales lady at woodlands was excellent to deal with. The chipper arrived seven days after I ordered it, including a three day weekend, you can't ask for better than that. The delivery driver was also excellent to deal with.
It arrived in good condition, and for the most part was easy to assemble. All the hardware was well packaged in separate bags for the step you were doing, or in that particular piece. All of the various pieces were very well wrapped, with no damage to the paint. With the chipper mounted to my quick hitch I did not have to shorten the pto shaft.
Woodland does not offer knife to anvil clearance gauges, so I made some. 1/8 x 2 x 24 inch flat bar for one. 1/16 x 2 x 15 inch, with a piece of 22 gauge ( 1/32 inch) 2x 7 inch tin epoxied to it, for the second gauge.
The pto engages nicely at low idle ( 53pto hp).
The pump is a 10ml/rotation unit, witch makes 1.42 us gals per minute at 540rpm. But for what ever reason they are using a 0-16 gal flow control valve, so 0-4 out of 10 for the control lever is the useful range of the flow control valve, as stated in the operators manual. I found the feed wheel does not move until #2 and does not increase beyond #4 ish.
I have not chipped anything yet, as that is still a week or two away.
BUT
One of the crate hold down bolts was missing and the other three were loose, it was still held tight by the straps.
The hold down hole for the top cover was slightly misaligned, so the bolt threads were deformed when I removed the bolt. I retaped the threaded hole, enlarged the hole in the cover slightly and replaced the bolt. No big deal if you have the tooling and hardware, but a disaster if you don't. I have seen two u-tube videos with people having this same issue.
If you assemble the inlet chute per the instructions you will have a 3/8 to 1/2 inch ledge for the wood to get over to enter the body of the chipper. You need to slightly snug all the bolts with the bottom panel raised up above the inlet floor, then tap the panel down to flush or slightly above the floor. Then tighten all the bolts.
The clips to hold the bottom of the chute in place when lowered, were not adjusted at all, they had a 1/4 in gap. Easily tightened with a 10mm socket ( if you can find one, haha), but still, it should not be out that much.
The pivot points for the front cover were very loose, and also had to be tighten.
Most other bolts/nuts were tight. I did gain a bit on 3 of the eight bolts that hold the knives in place with a torque wrench set to 45ftlbs, ( the max torque).
Spec for knife clearance is 1/16 to 1/8th inch. I made gauges and found the gaps to be 3/32 to 1/8. I adjusted the anvil plate to 1/16 to 3/32, depending on the knife. The outer knifes for what ever reason are 1/32 farther way than the inner knifes.
Woodland's promotional pictures show the ball (which comes with it), installed in a plate. Mine is mounted directly to the cross tube. To me this is a better method.
As of now I would definitely purchase it again.
Attachments
-
 349.2 KB Views: 223
 -
 733.8 KB Views: 200
 -
 1 MB Views: 210
 -
 369.6 KB Views: 217
 -
 785.3 KB Views: 207
Last edited:
