This is not an installation guide, but I wanted to share my experience installing the Summit Hydraulics Rear Hydraulic Valve Kit with Front Third Function for Kubota B2320, B2620, B2301 & B2601 Series Tractors, SKU FR3-K4 on my 2014 Kubota B2320HSD in the hope that it will save some time and trouble for the next guy who attempts it.
Why the Summit Kit
My goal was to add hydraulic top-and-tilt. I don’t have any need for a third-function. Yet.
I looked at Kubota’s OEM three-spool rear remotes through my dealer, which are apparently still available for the B2320. He didn't have a lot of information about the OEM kit, but he did get me a copy of the PDF installation instructions. It showed that the OEM rear remotes include mechanical hydraulic valves that attach to a bracket fastened to the right side of the ROPS. The installation didn’t look very OEM to me, more like Kubota went with a semi-universal kit for a number of models rather than making one specific to my B2320. The price I was given for a three-spool setup, minus installation, was $2200.
I also looked at Land Pride’s new top-and-tilt kit for the B2320. This kit also attaches to the right side of the ROPS and uses mechanical valves. The dealer quoted me a price of $2300 for a three-spool kit, which did include the hydraulic top- and side-links, but not the fittings and hoses to attach to my power beyond circuit to make everything work. To me, the Land Pride kit also looks like the controls would be in the way.
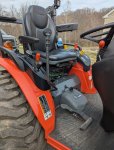
Next, I looked at the Summit Hydraulics kit. It was available for ~$1100 with three spools (you can get up to four), one of which would be for the included third-function kit. Unlike the Kubota and Land Pride kits, it is electric-over-hydraulic. I would still have a fairly large valve manifold hanging on my ROPS, but the switch box and control stick switch of the Summit kit looked like they would be more handy and less in the way.
Overall, with the lower price, the less-intrusive controls, and the added bonus of the third-function valve, I decided to go with the Summit Hydraulics kit.
Video Help
Although he’s working with an earlier, universal kit, not the one I had, you might find this step-by-step installation video of a 4-spool install on a B2601 helpful. There’s also an introduction video of the Summit Hydraulics kits.
Instructions and Missing Parts
Unlike with MJA in the first video, my Summit kit came with instructions. When I placed my order, Summit also provided a link to download a PDF version of the instructions. The instructions were very helpful, but there was an error in them that led me a bit astray.
According to page 7, step 5 of the instructions, it said to install two 1/2" JIC Male x #10 SAE/ORB Male fittings into the manifold, but on page 9, step 1, it says you need 3/8” JIC Male x #10 SAE/ORB Male fittings, and indeed, the hoses use 3/8” female JIC fittings. The kit was missing the two, 1/2" JIC Male x #10 SAE/ORB male adapters that the instructions mistakenly called for, and didn’t have the correct 3/8” JIC Male x #10 SAE/ORB Male fittings, either.
Before I realized the error in the instructions, I contacted Summit, and they immediately sent me the 1/2” JIC Male x #10 SAE/ORB fittings. Only when I received them a few days later did I realize they wouldn’t fit. I should mention that Summit responded within an hour to me emailing them about this, and I got a shipping notice for the (wrong) missing fittings the same day.
Once I realized my mistake, I contacted Summit again, and they sent me the correct fittings.
The other issue I had was with the bolts Summit supplied to fasten the bracket for the valve manifold to the ROPS. They provided grade 8, 3/8-16 x 3 1/2" shoulder hex bolts.
Apparently, some of the tractors the Summit kit is supposed to fit have 3” thick ROPS, but others, like mine, have 2” thick ROPS so the provided bolts were an inch too long. The available threads on the 3 1/2" shoulder hex bolts weren't enough to make do, so I bought some 3/8-16 x 2 ½” grade 8, zinc-plated hex bolts from a local auto parts store that did the trick.
I didn't find the parts list in the instructions to be particularly helpful. The drawings were too small, and the table listing the parts didn't include a description, just a part number, so instead of going through all the parts to make sure I had everything and it all fit before starting the installation, I just went through the instructions in the order they were written.
Things I Didn't Have to Do
Contrary to the instructions and the video above, I didn't have to remove the right-rear wheel of my tractor or the seat frame to reach the tank and pressure fittings. On my B2320, they are both accessible from the rear of the tractor, just below the seat frame. I could also reach the pressure connection from between the seat frame and the fender on the right side of the tractor. I was even able to get a socket on the banjo bolt for the tank fitting to torque it to the 40 lb-ft recommended by the Kubota workshop manual.
Electrical Connections
If you don't already have work lights installed, the B2320 has two, unused bullet connectors secured with blue tape under the right fender near the tail light. Those two connectors provide switched power and ground on a 20 A circuit for work lights. I don't have work lights, so I used those connectors to get a source of switched power for the Summit kit.
If I Were to Do It Again
I did this in the winter so it wouldn’t matter much, but I could have saved some downtime for the tractor and had a smoother time of it if I had done things in a different order than the instructions suggest.
First, I would find a large-enough space to lay out all the parts, test-fitting everything, to make sure all the parts required are included and fit together as they should.
Once you're certain you have all the parts, instead of following the order of installation in the instructions, I recommend the following:
When you know how far the hoses and electrical harnesses will reach, and how to best route the lines, it's much easier to decide on which side of the ROPS you want to install the valve manifold.
When you know which side of the ROPS the valve manifold will be on, you know which way the manifold will be oriented on the tractor, and which port to use for each fitting.
If you do the manifold fittings first, as the instructions suggest, you will end up having to re-do the fittings if you change your mind about the valve manifold placement.
The instructions recommend putting the valve manifold on the same side as the power beyond connections on the tractor, which in my case would have been the right side.
I chose to put the manifold on the left side of the ROPS to use up the extra hose and wiring harness and to keep the manifold out of my way when looking over my right shoulder while using my box blade, for example. The controls are on the right side of the tractor, so it made more sense.
Whichever side of the ROPS you decide to use, there is plenty of hose and wiring harness to do it.
Why the Summit Kit
My goal was to add hydraulic top-and-tilt. I don’t have any need for a third-function. Yet.
I looked at Kubota’s OEM three-spool rear remotes through my dealer, which are apparently still available for the B2320. He didn't have a lot of information about the OEM kit, but he did get me a copy of the PDF installation instructions. It showed that the OEM rear remotes include mechanical hydraulic valves that attach to a bracket fastened to the right side of the ROPS. The installation didn’t look very OEM to me, more like Kubota went with a semi-universal kit for a number of models rather than making one specific to my B2320. The price I was given for a three-spool setup, minus installation, was $2200.
I also looked at Land Pride’s new top-and-tilt kit for the B2320. This kit also attaches to the right side of the ROPS and uses mechanical valves. The dealer quoted me a price of $2300 for a three-spool kit, which did include the hydraulic top- and side-links, but not the fittings and hoses to attach to my power beyond circuit to make everything work. To me, the Land Pride kit also looks like the controls would be in the way.
Next, I looked at the Summit Hydraulics kit. It was available for ~$1100 with three spools (you can get up to four), one of which would be for the included third-function kit. Unlike the Kubota and Land Pride kits, it is electric-over-hydraulic. I would still have a fairly large valve manifold hanging on my ROPS, but the switch box and control stick switch of the Summit kit looked like they would be more handy and less in the way.
Overall, with the lower price, the less-intrusive controls, and the added bonus of the third-function valve, I decided to go with the Summit Hydraulics kit.
Video Help
Although he’s working with an earlier, universal kit, not the one I had, you might find this step-by-step installation video of a 4-spool install on a B2601 helpful. There’s also an introduction video of the Summit Hydraulics kits.
Instructions and Missing Parts
Unlike with MJA in the first video, my Summit kit came with instructions. When I placed my order, Summit also provided a link to download a PDF version of the instructions. The instructions were very helpful, but there was an error in them that led me a bit astray.
According to page 7, step 5 of the instructions, it said to install two 1/2" JIC Male x #10 SAE/ORB Male fittings into the manifold, but on page 9, step 1, it says you need 3/8” JIC Male x #10 SAE/ORB Male fittings, and indeed, the hoses use 3/8” female JIC fittings. The kit was missing the two, 1/2" JIC Male x #10 SAE/ORB male adapters that the instructions mistakenly called for, and didn’t have the correct 3/8” JIC Male x #10 SAE/ORB Male fittings, either.
Before I realized the error in the instructions, I contacted Summit, and they immediately sent me the 1/2” JIC Male x #10 SAE/ORB fittings. Only when I received them a few days later did I realize they wouldn’t fit. I should mention that Summit responded within an hour to me emailing them about this, and I got a shipping notice for the (wrong) missing fittings the same day.
Once I realized my mistake, I contacted Summit again, and they sent me the correct fittings.
The other issue I had was with the bolts Summit supplied to fasten the bracket for the valve manifold to the ROPS. They provided grade 8, 3/8-16 x 3 1/2" shoulder hex bolts.
Apparently, some of the tractors the Summit kit is supposed to fit have 3” thick ROPS, but others, like mine, have 2” thick ROPS so the provided bolts were an inch too long. The available threads on the 3 1/2" shoulder hex bolts weren't enough to make do, so I bought some 3/8-16 x 2 ½” grade 8, zinc-plated hex bolts from a local auto parts store that did the trick.
I didn't find the parts list in the instructions to be particularly helpful. The drawings were too small, and the table listing the parts didn't include a description, just a part number, so instead of going through all the parts to make sure I had everything and it all fit before starting the installation, I just went through the instructions in the order they were written.
Things I Didn't Have to Do
Contrary to the instructions and the video above, I didn't have to remove the right-rear wheel of my tractor or the seat frame to reach the tank and pressure fittings. On my B2320, they are both accessible from the rear of the tractor, just below the seat frame. I could also reach the pressure connection from between the seat frame and the fender on the right side of the tractor. I was even able to get a socket on the banjo bolt for the tank fitting to torque it to the 40 lb-ft recommended by the Kubota workshop manual.
Electrical Connections
If you don't already have work lights installed, the B2320 has two, unused bullet connectors secured with blue tape under the right fender near the tail light. Those two connectors provide switched power and ground on a 20 A circuit for work lights. I don't have work lights, so I used those connectors to get a source of switched power for the Summit kit.
If I Were to Do It Again
I did this in the winter so it wouldn’t matter much, but I could have saved some downtime for the tractor and had a smoother time of it if I had done things in a different order than the instructions suggest.
First, I would find a large-enough space to lay out all the parts, test-fitting everything, to make sure all the parts required are included and fit together as they should.
Once you're certain you have all the parts, instead of following the order of installation in the instructions, I recommend the following:
- Install the third-function mid-mount bracket (the bracket that mounts behind the front-end loader, where the hoses join to go forward to the front of the loader), the third-function cross-beam coupler mount (the bracket that holds the third-function connectors on the cross-bar of the front-end loader), and the hoses for the third-function circuit, routing them to the back of the tractor.
- Remove the power beyond tube (Kubota calls it the “three points hitch delivery pipe”) and install the hydraulic hoses for both the pressure and tank ends.
- Install the switchbox and the joystick switch.
When you know how far the hoses and electrical harnesses will reach, and how to best route the lines, it's much easier to decide on which side of the ROPS you want to install the valve manifold.
When you know which side of the ROPS the valve manifold will be on, you know which way the manifold will be oriented on the tractor, and which port to use for each fitting.
If you do the manifold fittings first, as the instructions suggest, you will end up having to re-do the fittings if you change your mind about the valve manifold placement.
The instructions recommend putting the valve manifold on the same side as the power beyond connections on the tractor, which in my case would have been the right side.
I chose to put the manifold on the left side of the ROPS to use up the extra hose and wiring harness and to keep the manifold out of my way when looking over my right shoulder while using my box blade, for example. The controls are on the right side of the tractor, so it made more sense.
Whichever side of the ROPS you decide to use, there is plenty of hose and wiring harness to do it.