L2650 Steering cylinder removal?

Ribeye

New member

Equipment
L2650
Jun 7, 2025
6
0
1
Texas
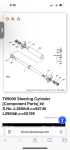
I was going to take this leaky steering cylinder off of my L2650 and bring it to the dealership to have them replace all of the seals. But now I’m at a loss as to how on earth I go about getting it out?

I do have a copy of the WSM, but it provides no detail other than remove one of the flanges. I assume it then can slide out of this godforsaken little carrier that it’s in?

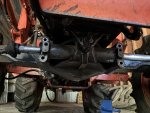
Any recommendations on the best way to remove the flange? I have tried wacking it with a dead blow, but I don’t seem to making one bit of progress.

I would appreciate any advice!
 

Attachments

Russell King

Well-known member
Lifetime Member

Equipment
L185F, Modern Ag Competitor 4’ shredder, Rhino tiller, rear dirt scoop
Jun 17, 2012
6,267
1,941
113
Austin, Texas
@Ribeye

You can see illustrated parts lists at Messicks and Kubota (link below)

It looks like there are two pins that hold it in place so you have to get those out of the tractor or the cylinder. The parts list says you need 2 so I assume that it is on both sides of the tractor. There is a threaded hole on each side that you might be able to use to pull it off the pins. I don’t know how the manual says to get it off if the manual even says how! Is there much room for it to move towards the front end of the tractor?

IMG_0408.jpeg
 
  • Like
Reactions: 1 user

Ribeye

New member

Equipment
L2650
Jun 7, 2025
6
0
1
Texas
@Ribeye

You can see illustrated parts lists at Messicks and Kubota (link below)

It looks like there are two pins that hold it in place so you have to get those out of the tractor or the cylinder. The parts list says you need 2 so I assume that it is on both sides of the tractor. There is a threaded hole on each side that you might be able to use to pull it off the pins. I don’t know how the manual says to get it off if the manual even says how! Is there much room for it to move towards the front end of the tractor?

View attachment 157541
I am betting you are on to something there. That would make a lot of sense too. I will try it out this afternoon and see what happens! Thank you kindly.
 

Ribeye

New member

Equipment
L2650
Jun 7, 2025
6
0
1
Texas
@Ribeye

You can see illustrated parts lists at Messicks and Kubota (link below)

It looks like there are two pins that hold it in place so you have to get those out of the tractor or the cylinder. The parts list says you need 2 so I assume that it is on both sides of the tractor. There is a threaded hole on each side that you might be able to use to pull it off the pins. I don’t know how the manual says to get it off if the manual even says how! Is there much room for it to move towards the front end of the tractor?

View attachment 157541
I got it. It wasn’t so darn complicated when I was pointed in the right direction! So strange the WSM did not elaborate on this because the pins are 100% hidden.

There is in fact just enough room in that carrier for you to get a pry bar behind it and dislodge it from the pins. I did one side first, popped off a flange on one side (fairly easily), and then unthreaded the linkages on both sides and slid it out.

Thanks again so much for doing the extra digging I had not! You saved me a whole lot of extra frustration.
 

Russell King

Well-known member
Lifetime Member

Equipment
L185F, Modern Ag Competitor 4’ shredder, Rhino tiller, rear dirt scoop
Jun 17, 2012
6,267
1,941
113
Austin, Texas
Glad that I was able to help.

I recall several secret things on my old Datsun 280 that were similar. Find the secret and they basically fall apart! Same with my wife’s German car, but the secrets are better disguised!

But if you don’t know the secrets it is frustracting and can become costly!
 

SouthernSky

New member

Equipment
L3200 & L2650, 5' Modern cutter, 5' boxblade, LP FDR1672 mower
Sep 15, 2017
24
0
1
Deville, LA
I got it. It wasn’t so darn complicated when I was pointed in the right direction! So strange the WSM did not elaborate on this because the pins are 100% hidden.

There is in fact just enough room in that carrier for you to get a pry bar behind it and dislodge it from the pins. I did one side first, popped off a flange on one side (fairly easily), and then unthreaded the linkages on both sides and slid it out.

Thanks again so much for doing the extra digging I had not! You saved me a whole lot of extra frustration.
I'm doing the exact same thing on my L2650 so good timing! Now that I know there are pins there I can go back to finishing the job.
Did you physically need to remove the pins? Or was there enough room to clear once you popped the flange?

Also, what did you do about the special tool needed to reassemble or did you have the dealer do that? It does not seem to be available anywhere. I bought all the seals from Messicks.
 

SouthernSky

New member

Equipment
L3200 & L2650, 5' Modern cutter, 5' boxblade, LP FDR1672 mower
Sep 15, 2017
24
0
1
Deville, LA
I'm doing the exact same thing on my L2650 so good timing! Now that I know there are pins there I can go back to finishing the job.
Did you physically need to remove the pins? Or was there enough room to clear once you popped the flange?

Also, what did you do about the special tool needed to reassemble or did you have the dealer do that? It does not seem to be available anywhere. I bought all the seals from Messicks.
And you're right -- The WSM sucks on this procedure.
 

Ribeye

New member

Equipment
L2650
Jun 7, 2025
6
0
1
Texas
I'm doing the exact same thing on my L2650 so good timing! Now that I know there are pins there I can go back to finishing the job.
Did you physically need to remove the pins? Or was there enough room to clear once you popped the flange?

Also, what did you do about the special tool needed to reassemble or did you have the dealer do that? It does not seem to be available anywhere. I bought all the seals from Messicks.
No sir, the pins stay put on the axle and you just pry the cylinder forward to get it off. It will have just enough room to clear once you remove one of the flanges.

Unfortunately my Kubota dealer seems to like to drag their feet on these things. I went in for a different reason about a week after dropping it off and saw it had not moved since I left it with them… sigh.

Regarding the special tool - I will have to figure that bit out because it will obviously have to have the flange removed to mount it back onto the pins - so the dealership won’t be able to help me there either way. Though, I saw on another forum somewhere that you’ll likely be able to do without. I think the special tool is mostly used to help line the flange back up when you are mounting it back on. I assume it has to do with the valves and such being in the right place for the hydraulic system. I’ll give it a go and see what happens.

Did you purchase some sort of a kit/package for the seals. If so, could you share the link please? I thought dropping it off at the dealer would be easier, but now I am thinking I will just pick it up if they don’t have it done by the middle of next week. I’ve got work to do!
 

SouthernSky

New member

Equipment
L3200 & L2650, 5' Modern cutter, 5' boxblade, LP FDR1672 mower
Sep 15, 2017
24
0
1
Deville, LA
No sir, the pins stay put on the axle and you just pry the cylinder forward to get it off. It will have just enough room to clear once you remove one of the flanges.
Gonna give it a try and see if I can get it out. Once you were clear of the pin did the flange slide off?

I bought the seals individually. I wish they did have a kit but our model is so old. I thought about buying a complete cylinder but good luck in finding that anywhere. I also wish the WSM listed a part number for the special tool so I could find a picture of it somewhere.

Thanks for the quick reply!
 

SouthernSky

New member

Equipment
L3200 & L2650, 5' Modern cutter, 5' boxblade, LP FDR1672 mower
Sep 15, 2017
24
0
1
Deville, LA
Ignore the fact the rod is pushed in until it stopped.

My issue now is what looks like a snap ring on the flange except I can't get it out. It doesn't have the little holes for a snap ring pliers. I'm assuming I have to take this off to get the rod out. I was thinking it was rusted but I can't budge it or roll it. I have some PB Blaster soaking it now. This may be why the special tool is needed though I thought that was for reassembly only. Until I can get the flange off I'm stuck.

cylinder snap ring.jpg
 

Russell King

Well-known member
Lifetime Member

Equipment
L185F, Modern Ag Competitor 4’ shredder, Rhino tiller, rear dirt scoop
Jun 17, 2012
6,267
1,941
113
Austin, Texas
See if there is a slot (cut) in the side of the cylinder wall. Sometimes the retaining part has to be installed and removed through the slot.

I didn’t see any part on the parts list for anything that seemed to be there.

You may need to push inwards on something to release that before you can pry that out, there may be a small lip holding it in place.

You may need a pick set to help you pry it out (like this). Just wear leather gloves and don’t stab yourself when it slips out!

IMG_0425.jpeg
 

SouthernSky

New member

Equipment
L3200 & L2650, 5' Modern cutter, 5' boxblade, LP FDR1672 mower
Sep 15, 2017
24
0
1
Deville, LA
I used my pick set. It won’t budge or slide. Added more PB Blaster.

I’m not seeing anything on the cylinder or rod.

what does that bolt in the center (Ribeye’s pic) between the two flanges do? I can’t see behind it.
 

Ribeye

New member

Equipment
L2650
Jun 7, 2025
6
0
1
Texas
I used my pick set. It won’t budge or slide. Added more PB Blaster.

I’m not seeing anything on the cylinder or rod.

what does that bolt in the center (Ribeye’s pic) between the two flanges do? I can’t see behind it.
I am not thinking there are any snap rings to mess with. Unless I’m missing parts and this is the reason for my leak! For me I just had to give it a tap with the dead blow after prying one side off of the pins. By keeping the other side on the pins it kept the cylinder stationary enough for me to the flange and dislodge it from the cylinder.

If I remember correctly it only took about two whacks. Yours might be on there a little tighter, however.
 

Russell King

Well-known member
Lifetime Member

Equipment
L185F, Modern Ag Competitor 4’ shredder, Rhino tiller, rear dirt scoop
Jun 17, 2012
6,267
1,941
113
Austin, Texas
I am not thinking there are any snap rings to mess with. Unless I’m missing parts and this is the reason for my leak! For me I just had to give it a tap with the dead blow after prying one side off of the pins. By keeping the other side on the pins it kept the cylinder stationary enough for me to the flange and dislodge it from the cylinder.

If I remember correctly it only took about two whacks. Yours might be on there a little tighter, however.
Does yours have that same retainer ring as @SouthernSky shows in post#10?
 

Russell King

Well-known member
Lifetime Member

Equipment
L185F, Modern Ag Competitor 4’ shredder, Rhino tiller, rear dirt scoop
Jun 17, 2012
6,267
1,941
113
Austin, Texas
I used my pick set. It won’t budge or slide. Added more PB Blaster.

I’m not seeing anything on the cylinder or rod.

what does that bolt in the center (Ribeye’s pic) between the two flanges do? I can’t see behind it.
This bolt? It is the pivot point for the axle. It is above the cylinder as far as I know.
IMG_0427.jpeg
 

Ribeye

New member

Equipment
L2650
Jun 7, 2025
6
0
1
Texas
Does yours have that same retainer ring as @SouthernSky shows in post#10?
No I do not believe that it did. I didn’t remove anything other than the bolts and hydraulic hoses from the cylinder itself. The bolts go through the removable flange and appear to be all that hold the entire assembly together (aside from the dastardly pins of course).

I think that appears to just be a dust seal (part #100/150).

Long story short, if you have it off the pin, just whack that thing off man!
 

Attachments

SouthernSky

New member

Equipment
L3200 & L2650, 5' Modern cutter, 5' boxblade, LP FDR1672 mower
Sep 15, 2017
24
0
1
Deville, LA
No I do not believe that it did. I didn’t remove anything other than the bolts and hydraulic hoses from the cylinder itself. The bolts go through the removable flange and appear to be all that hold the entire assembly together (aside from the dastardly pins of course).

I think that appears to just be a dust seal (part #100/150).

Long story short, if you have it off the pin, just whack that thing off man!
I will keep you posted. Gonna try in the morning for sure.