L2502 3ph
- Thread starter awesome
- Start date

Runs With Scissors
Well-known member
Equipment
L2501 TLB , Grappel, Brush Hog, Box Blade, Ballast box, Forks, Tiller, PH digger


exactly. but I wanna keep my original pegs in case I need to revert back. A new set is 50$ CAD.
So I might just make my own with steel rods and square tubing.
That's cool by the way. those drawings are nice.
So I might just make my own with steel rods and square tubing.
That's cool by the way. those drawings are nice.
Runs With Scissors
Well-known member
Equipment
L2501 TLB , Grappel, Brush Hog, Box Blade, Ballast box, Forks, Tiller, PH digger
exactly. but I wanna keep my original pegs in case I need to revert back. A new set is 50$ CAD.
So I might just make my own with steel rods and square tubing.
That's cool by the way. those drawings are nice.
I think if you used some “cap screws” to attach the pin plates to the rods/bars (instead of welding them) you might be able to use your current ones, without ruining them.
Possibly saving 50 bones.
Just a thought.
Runs With Scissors
Well-known member
Equipment
L2501 TLB , Grappel, Brush Hog, Box Blade, Ballast box, Forks, Tiller, PH digger
Kind of like this.
By tapping the solid rod and securing it with something like a “cap screw” , I think 2 things will/might happen
1. You could save your originals


2. It might be possible to make it so that the head of the fastener goes into the existing bolt hole and acts as some sort of “locating pin”( purple headed thing)…This would of course have to be some “custom” fastener though…..

By tapping the solid rod and securing it with something like a “cap screw” , I think 2 things will/might happen
1. You could save your originals
2. It might be possible to make it so that the head of the fastener goes into the existing bolt hole and acts as some sort of “locating pin”( purple headed thing)…This would of course have to be some “custom” fastener though…..
The caps wont work because no matter the rotation, the hole is blocked by the casing of the tractor.Kind of like this.
By tapping the solid rod and securing it with something like a “cap screw” , I think 2 things will/might happen
1. You could save your originals
View attachment 162427
View attachment 162428
2. It might be possible to make it so that the head of the fastener goes into the existing bolt hole and acts as some sort of “locating pin”( purple headed thing)…This would of course have to be some “custom” fastener though…..
View attachment 162429
I tried doing a very rough prototype. There is little room to slide and extend. Also, it would need to be welded very precisely, otherwise it doesn't slide if there is the slighest angle

Runs With Scissors
Well-known member
Equipment
L2501 TLB , Grappel, Brush Hog, Box Blade, Ballast box, Forks, Tiller, PH digger
Looks like it certainly has a shot at working.
I am presuming it will be “easiest” to drill the “hair pin” hole when they are installed.
Keep us updated please.
I am presuming it will be “easiest” to drill the “hair pin” hole when they are installed.
Keep us updated please.
Gonna try this out it the field today with my blade.
I left the bolts in just to protect the threads, but they are not holding anything.
If that works, then it should be a quick and easy solution


I left the bolts in just to protect the threads, but they are not holding anything.
If that works, then it should be a quick and easy solution
Chanceywd
Well-known member
Lifetime Member
Equipment
Kubota L2501DT BH77 VIRNIG URG60-CT 1950 8N WC-68
I mentioned earlier in your thread that the OEM design with bolts probably is also to keep the pins from rotating and causing wear to the castings. All the wear is on the pins where the link balls ride.
Your design is going to allow the pins to rotate in the castings now.
I could be totally wrong about the whole subject.
I assume too that is why the backhoe and loaders use cross bolts on all their pins so the wear is in the greased areas.
Your design is going to allow the pins to rotate in the castings now.
I could be totally wrong about the whole subject.
I assume too that is why the backhoe and loaders use cross bolts on all their pins so the wear is in the greased areas.
Interesting. I'll have to consider this then. I'll update my designI mentioned earlier in your thread that the OEM design with bolts probably is also to keep the pins from rotating and causing wear to the castings. All the wear is on the pins where the link balls ride.
Your design is going to allow the pins to rotate in the castings now.
I could be totally wrong about the whole subject.
I assume too that is why the backhoe and loaders use cross bolts on all their pins so the wear is in the greased areas.
Russell King
Well-known member
Lifetime Member
Equipment
L185F, Modern Ag Competitor 4’ shredder, Rhino tiller, rear dirt scoop
You can just install studs in the threaded holes and let the pins slip over the stud/dowel.Interesting. I'll have to consider this then. I'll update my design
I would use this style

Actually you could just use these with a hole in them and a cross pin to hold your large pins in.
Runs With Scissors
Well-known member
Equipment
L2501 TLB , Grappel, Brush Hog, Box Blade, Ballast box, Forks, Tiller, PH digger
Looking good my man! ")
I’m gonna try some sort of “adaptation” of this design too.
@Russell King those studs are a fantasic idea in order to prevent the spinning.
So many talented people on this forum.
I’m gonna try some sort of “adaptation” of this design too.
@Russell King those studs are a fantasic idea in order to prevent the spinning.
So many talented people on this forum.
Chanceywd
Well-known member
Lifetime Member
Equipment
Kubota L2501DT BH77 VIRNIG URG60-CT 1950 8N WC-68
I looked at the bolts in there now, I believe they are 10mm-1.25. with 13 mm of thread.
Kind of an odd one. I searched mcmaster, grainger, global and fastenal. And of course ebay and bolt suppliers there. There are a few studs with that thread but not much with a smooth area.
I think it was fastenal that had a stud with a hole and a clip thru like I mentioned but it was in 10mm-1.5.
They did have some choices of bolts, some gold ones medium strength, 45mm long, about $2 each. that I think I could make pins from.
I tried and thought I set up an online personal account but couldn't get my cart to check out.
Thought too of trying the the 10mm-1.5studs and see if you could start a die on the course thread and get to the smooth area to make the 1.25 then cut off the crappy thread. I could try that idea with bolts if I have a die but haven't checked that yet.
Just spit balling here!
Bill
Nope wasn't fastenal with the studs, sorry I looked a lot last night had a dog keeping me awake so not sure.
Last edited:
Chanceywd
Well-known member
Lifetime Member
Equipment
Kubota L2501DT BH77 VIRNIG URG60-CT 1950 8N WC-68
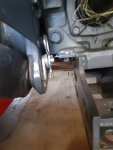
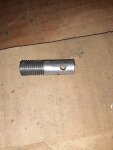
OK RWS, I couldn't get it out of my head today. Like the guy in Dirty Harry, "I just got to know" so I made one of my idea.
I had some m10-1.5 bolts so I started my m10-1.25 die and when it started cutting the smooth area I made about 5/8" of new thread. Then I cut off the damaged thread area. I did this just because I thought I would get a straighter thread than when starting from scratch.
Ran the die over it again and then put it in place to get a mark for the pin.
I left room for a washer and drilled it thru and then cut off the head.
It is about 1-3/8" overall length.
Not loctited in yet just in for a picture. I think I might cut to get one or two more threads so it is closer.
I think it would be a good idea to grind a little spot on that pin ear for prying to start the pin movement when i have it out to get a screwdriver point in there.
If you don't have pictures it didn't happen right?
Bill
Attachments
-
 367.8 KB Views: 75
 -
 448.5 KB Views: 80
 -
 759.4 KB Views: 74
OK RWS, I couldn't get it out of my head today. Like the guy in Dirty Harry, "I just got to know" so I made one of my idea.
I had some m10-1.5 bolts so I started my m10-1.25 die and when it started cutting the smooth area I made about 5/8" of new thread. Then I cut off the damaged thread area. I did this just because I thought I would get a straighter thread than when starting from scratch.
Ran the die over it again and then put it in place to get a mark for the pin.
I left room for a washer and drilled it thru and then cut off the head.
It is about 1-3/8" overall length.
Not loctited in yet just in for a picture. I think I might cut to get one or two more threads so it is closer.
I think it would be a good idea to grind a little spot on that pin ear for prying to start the pin movement when i have it out to get a screwdriver point in there.
If you don't have pictures it didn't happen right?
Bill
Take my money! I want it.
But I guess you're in US? Shipping to Canada would be a pain
Runs With Scissors
Well-known member
Equipment
L2501 TLB , Grappel, Brush Hog, Box Blade, Ballast box, Forks, Tiller, PH digger
That looks great!OK RWS, I couldn't get it out of my head today. Like the guy in Dirty Harry, "I just got to know" so I made one of my idea.
I had some m10-1.5 bolts so I started my m10-1.25 die and when it started cutting the smooth area I made about 5/8" of new thread. Then I cut off the damaged thread area. I did this just because I thought I would get a straighter thread than when starting from scratch.
Ran the die over it again and then put it in place to get a mark for the pin.
I left room for a washer and drilled it thru and then cut off the head.
It is about 1-3/8" overall length.
Not loctited in yet just in for a picture. I think I might cut to get one or two more threads so it is closer.
I think it would be a good idea to grind a little spot on that pin ear for prying to start the pin movement when i have it out to get a screwdriver point in there.
If you don't have pictures it didn't happen right?
Bill
And thanks for the pics. It helps me to “visualize” what I will need to do.
On one hand, I love your idea for it’s graceful simplicity, and on the other hand I want to try out my idea, just to “do it my way.” (and of course, so I can use my lathe
)Good job on making the “hair pin” point down too…….When I was an aircraft mechanic we had a “general rule of thumb" saying about fastener heads………..“Up, forward and inboard”
It will be a few weeks before I can get to it, but this “mod” has taken priority.
Chanceywd
Well-known member
Lifetime Member
Equipment
Kubota L2501DT BH77 VIRNIG URG60-CT 1950 8N WC-68
Thanks RWS,That looks great!
And thanks for the pics. It helps me to “visualize” what I will need to do.
On one hand, I love your idea for it’s graceful simplicity, and on the other hand I want to try out my idea, just to “do it my way.” (and of course, so I can use my lathe
Good job on making the “hair pin” point down too…….When I was an aircraft mechanic we had a “general rule of thumb" saying about fastener heads………..“Up, forward and inboard”
It will be a few weeks before I can get to it, but this “mod” has taken priority.
I have a mod in mind since I made this and I still need to make the second one .
I was thinking about the place to pry the main pin out and I think maybe welding a chain link in the center of the main pin would give me a grip and I could put a screwdriver thru that and the tip on the bolt pin I made and that would work pretty slick to start the main pin out. Also the leg of the hair pin could go thru that as a protection of the bolt/pin replacement from backing loose.
I also thought instead of welding might chuck the main pin in the lathe and drill and tap for a short 1/4-20 eye bolt instead of welding a chain link on. Either/or should both work but sometimes I feel guilty messing something up with weld when i could have done a more finished look.
Won't be happening today, i have a brother coming by from Buffalo NY to try and make me jealous of his Pontiac solstice he picked up recently. He has been jealous of my 2006 Miata for a while.
So there will be no work getting, done only some beer, a meal and a lot of BSing!
Bill
Chanceywd
Well-known member
Lifetime Member
Equipment
Kubota L2501DT BH77 VIRNIG URG60-CT 1950 8N WC-68
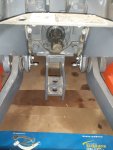
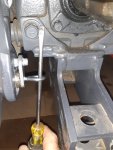
My finished design.
A long screwdriver thru the eye bolt up to the large hitch mounting bolt works really well to start the pin out. Putting the pin in works well in the normal fashion where you hold up the lower link.
But I don't have to struggle to line up the hole for the bolt threads now.
Bill
A long screwdriver thru the eye bolt up to the large hitch mounting bolt works really well to start the pin out. Putting the pin in works well in the normal fashion where you hold up the lower link.
But I don't have to struggle to line up the hole for the bolt threads now.
Bill
Attachments
-
 384.7 KB Views: 76
 -
 368.6 KB Views: 73
 -
 435.3 KB Views: 67
Last edited: