B7500 Instrument Panel Circuits Oxidation Help

OldB7500

New member

Equipment
B7500
Jul 19, 2021
9
0
1
Logsden, Oregon
Hey electrical service helpers,
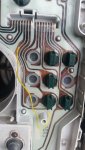
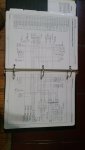
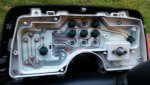
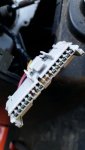
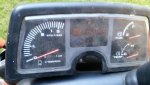
I am trying to find out if there is a way to repair these so my dash lights function again. I tried cleaning with DeOxit5 and now have a faint left turn indicator. Nothing else. Is there a way to bridge broken copper pcb traces? Could key switch be problem, note the 10 amp fuse looks ok?
 

Attachments

Jim L.

Active member
Jun 18, 2014
811
86
28
Texas
Is there a way to bridge broken copper pcb traces?

Yes, use ohm-meter to fault-isolate any breaks. Mark up picture of panel with good and bad so that you don't get confused. Breaks can be fixed by cleaning the copper trace, acid-free soldering a bare copper wire across the break, and then cleaning leftover flux with isopropyl alcohol and flux brush. If the whole trace is bad, then can jumper it with insulated wire, soldering at ends, and spot gluing wire to trace to hold it.

If the connector pins are bad, then save the connector by using a tool to remove the pins. Cutoff old pins, reattach new pins, and insert back into old connector, or into a new connector shell.

I would give higher suspicion to connector contacts, (both sides of connector mates) until you have thoroughly ohm'ed everything out. The problem may be inside the pins where the wire has corroded.
 
  • Like
Reactions: 1 user

OldB7500

New member

Equipment
B7500
Jul 19, 2021
9
0
1
Logsden, Oregon
Is there a way to bridge broken copper pcb traces?

Yes, use ohm-meter to fault-isolate any breaks. Mark up picture of panel with good and bad so that you don't get confused. Breaks can be fixed by cleaning the copper trace, acid-free soldering a bare copper wire across the break, and then cleaning leftover flux with isopropyl alcohol and flux brush. If the whole trace is bad, then can jumper it with insulated wire, soldering at ends, and spot gluing wire to trace to hold it.

If the connector pins are bad, then save the connector by using a tool to remove the pins. Cutoff old pins, reattach new pins, and insert back into old connector, or into a new connector shell.

I would give higher suspicion to connector contacts, (both sides of connector mates) until you have thoroughly ohm'ed everything out. The problem may be inside the pins where the wire has corroded.
Jim L:
Thank u for your quick and helpful reply. I just c went back out. I have one very solid bright left turn. Through only bare trace is circuit down 3 from the top on the bottom set of circuits looking from the back of the board. I can see I rubbed 2 hard and whie shows no copper in 3 spots on the plastic. I will work on the pins and wire next. What release tool works 2 remove terminal pins on B7500 wiring?
 

GreensvilleJay

Well-known member

Equipment
BX23-S,57 A-C D-14,58 A-C D-14, 57 A-C D-14,tiller,cults,Millcreek 25G spreader,
Apr 2, 2019
9,669
3,916
113
Greensville,Ontario,Canada
as Jim says plus...
where the bulbs twist in, after cleaning the copper to bright, tin the copper etches.
and yes, be sure to use 60/40 or 63/,37 'electronics' (resin) based solder NOT plumbers solder !
 
  • Like
Reactions: 1 user

OldB7500

New member

Equipment
B7500
Jul 19, 2021
9
0
1
Logsden, Oregon
as Jim says plus...
where the bulbs twist in, after cleaning the copper to bright, tin the copper etches.
and yes, be sure to use 60/40 or 63/,37 'electronics' (resin) based solder NOT plumbers solder !
OK great help on what to purchase also to build up the contacts. I am leaning towards corrosion in the pins since most of the board looks great.
 

Jim L.

Active member
Jun 18, 2014
811
86
28
Texas
What release tool works 2 remove terminal pins on B7500 wiring?

Look through automotive and motorsport connectors to find a manufacturer and connector type that matches your connector. Then you will find the manufacturer's pin tools, either metal or plastic.

If no luck on that, pins are held into the connector by spring metal. The trick is to insert a plastic or thin metal shim to press the locking metal, separating the pin and connector shell away from each other, then the pin can be gently pulled back from the shell while keeping the tool inserted.

Insertion is usually easy and may not require a tool to lock-in.

You might get something close connector-wise to practice before working on the real thing. I would not recommend an expensive tool bought for one connector. Once you understand the mechanism there are a number of ways to defeat it.

And there is an option of totally replacing both connectors with something else and skipping the de-pin part. However, that makes the machine non-standard and kicks the problem down the road for the next repair.

Also, talking about the console itself, plastic with copper traces, very easy to put too much heat while soldering and making a mess. Those with no experience should look at conductive glues to connect repair wires to the copper traces on plastic.
 
Last edited:
  • Like
Reactions: 1 user

GreensvilleJay

Well-known member

Equipment
BX23-S,57 A-C D-14,58 A-C D-14, 57 A-C D-14,tiller,cults,Millcreek 25G spreader,
Apr 2, 2019
9,669
3,916
113
Greensville,Ontario,Canada
while the official, proper removal tool is best..... I've used a couple of dental picks to GENTLY push in the 'retaining' portion of the clip then pull the wire/connector out. Once you figure out what 'tool' works, the rest of them are easy. You want JUST enough presure to retract the retaining portion but not enough to distort/damage it. Usually you can rebend just enough though to reseat the pin.
BEFORE you release any of them , take a few GOOD pictures and/or write down the wire's colours and loaction !
 
  • Like
Reactions: 1 user

OldB7500

New member

Equipment
B7500
Jul 19, 2021
9
0
1
Logsden, Oregon
In
while the official, proper removal tool is best..... I've used a couple of dental picks to GENTLY push in the 'retaining' portion of the clip then pull the wire/connector out. Once you figure out what 'tool' works, the rest of them are easy. You want JUST enough presure to retract the retaining portion but not enough to distort/damage it. Usually you can rebend just enough though to reseat the pin.
BEFORE you release any of them , take a few GOOD pictures and/or write down the wire's colours and loaction !
OK all good tech useful to my problem
Will post any progress.
 

KbotaL185DT

New member

Equipment
Kubota L185DT (sold),Kubota B7800, LA402, 5 foot Bush Hog Squealer
May 29, 2020
19
26
3
Rangeley, Maine
My fuel gauge was intermittent. I took my panel apart and saw corrosion as well. So I disconnected the battery took some steel wool to the ribbon cable and the pins. I also took a tiny electrical screwdriver and bent the pins outward to make a stronger contact. Last I took the air to blow out any steel wool pieces. Reconnected the battery and everything was working as it should.
 

OldB7500

New member

Equipment
B7500
Jul 19, 2021
9
0
1
Logsden, Oregon
My fuel gauge was intermittent. I took my panel apart and saw corrosion as well. So I disconnected the battery took some steel wool to the ribbon cable and the pins. I also took a tiny electrical screwdriver and bent the pins outward to make a stronger contact. Last I took the air to blow out any steel wool pieces. Reconnected the battery and everything was working as it should.
OK Kubota wirING help. Update. I used some adhesive backed copper
tape to help test. As of today all circuits except one have power to the terminal block pins. I amp going to use a piece of yellow copper phone line as a jumper to glow light indicator hot circuit.
All other dash lights,are illuminated except for charge lamp.
I do not have hot to the terminal block.
Backtracking to find dead circuit. What is best glue to bridge my phone wire across bare pcb copper trace?
 

Attachments

BobbyK

Active member

Equipment
1995 B2400
May 20, 2018
101
42
28
Petrolia, Ontario
I've used this method to fix thin copper ribbon traces before.

Using flux on both parts and loading up the soldering tip with solder, touch the soldering gun to the parts you want soldered.
The flux with immediately melt and the solder on the gun tip will flow onto the area the flux was.
This will minimize how hot the copper ribbon traces get but leave you with a "cooler" solder joint.
 

Jim L.

Active member
Jun 18, 2014
811
86
28
Texas
What is best glue to bridge my phone wire across bare pcb copper trace?

Something like MG Chemicals 8331 or 8330 in 6ml syringes. Needs to be highly conductive, and able to standup to hot-cold, vibration. You can go too cheap and the adhesive will flake away in conditions outside of living room. In other words, not a hobby adhesive.

Conductor needs to be of like size to conductor in wiring cable to handle current without excessive heating.

Important to physically, mechanically secure the conductor against vibration, especially close to end terminations.

In this application, there is plenty of room for round wire to flat conductor contact. More area will mean less resistance when using a conductive adhesive. Be sure not to scrimp on cure time.

Nice to hear progress.
 

BobbyK

Active member

Equipment
1995 B2400
May 20, 2018
101
42
28
Petrolia, Ontario
As far as the terminal ends go... you could try spraying some "electrical contact cleaner" on them.

Best would be to remove the terminals one at a time and manually clean the corrosion off.
 
  • Like
Reactions: 1 user

OldB7500

New member

Equipment
B7500
Jul 19, 2021
9
0
1
Logsden, Oregon
OK an update to all the tech help you shared.
1) Used Detoxit 5 $20 / can
2) Placed copper adhesive conductive tape on RH turn indicator where pins touch when terminal block plugged in.
3) Used one strand of old 4 wire phone cable to connect backside of terminal block to dash bulb socket contact green bulb socket . Glow lamp now working.
4) Used Phillips head screw on back of fuel Guage to run one strand of phone wire Solid copper about same AWG guage to backside terminal block, now temp coolant and fuel guage work.
6) I have power at white-red stripe wire for charge lamp at V Regulator terminal block but no hot at the plug on that circuit as well as dash background lighting.

All in all I would like to learn which side of the pins in the large terminal block plug to push on the barbed pins to release and what tool to use, also where to get the small wire size to dash and match the colors.
A new dash panel is $700 and scarce. All in all want to keep tractor original.
Also what size guage wire to look for.
 

Jim L.

Active member
Jun 18, 2014
811
86
28
Texas
All in all I would like to learn which side of the pins in the large terminal block plug to push on the barbed pins to release and what tool to use, also where to get the small wire size to dash and match the colors.

Round pins typically from the back, and rectangular pins from the front. Some connectors have a cover on the front hiding the round release holes. Usually the connectors become brittle over time so it takes some patience. A round hole on the front by an individual pin should accept a very small tool like a drift pin to release. Back releases may be done with a multitool pin remover from automotive supply store.

Small wire needs to be oil resistant, so an automotive type insulation. Any crimps must be done with stranded wire. Stranded wire is also better for vibration. However, in a pinch solid can be inserted into a pin but must be soldered. Don't want to go too small in size because the wire must be resistant to vibration.

If automotive store does not have the color that you want, Mouser, Digikey, Allied Electronics should have what you want. Again, automotive stranded wire resistant to oil (diesel). Conductors can also be color coded with colored heatshrink tubing.

Wiring diagram should have size marked for a conductor in metric size. Convert to AWG using a conversion table. Again, mechanical tie-down at each termination so that vibration does not cause the conductor to break.
 
  • Like
Reactions: 1 user

cliffboyer

Active member

Equipment
L3301 w/LA525 loader, G5200 mower w/RC48 deck, Kawasaki 610 Mule, DR mower
Nov 30, 2017
240
48
28
Southern IL
Clean pins in the connector with white vinegar. Submerging works best, but brushing will work too. Rinse with water. Applying thin film of dielectric grease will proect them from futher corrosion.
 

OldB7500

New member

Equipment
B7500
Jul 19, 2021
9
0
1
Logsden, Oregon
Just wanted to ad that to better fight or prevent the blue oxidation/corrosion to my dash traces I am going to use a product called Ford Motorcraft XG12 . It is an electric grease . Dialectic grease is not the best in this application..
 

Jim L.

Active member
Jun 18, 2014
811
86
28
Texas
Just wanted to ad that to better fight or prevent the blue oxidation/corrosion to my dash traces...

Motorcraft XG12 is for multipin connectors. I would not use it on traces. I would figure that at some point I may need to work the traces again without cleaning up grease or dried-up grease. If in a corrosive environment, I might consider either a clear or red insulating varnish. These can be brushed or sprayed on. At this point a conformal coating is probably not a good idea, as it is difficult to remove. Liquid tape tends to crack, and not sure if the trace tape will stay fastened to the plastic case with the extra weight of the liquid tape.