750d injection pump fears

IdahoNative

Active member

Equipment
Kubota B7100D 4x4, non-HST, FEL 1630
Jan 12, 2022
114
46
28
Florida, central
“It takes half your life before you discover life is a do-it-yourself project” a quote by Napoleon Hill.

No offense intended, but why are so many fearful of taking a 750D injection pump apart? It’s not rocket science; understand your limitations. You need to be careful, meticulous, take photos, take measurements, pay attention and be methodical. Do your research, have schematics available, even watch youtube. Understand what each component does. And have a good ultrasonic cleaner. Note, I am not talking about calibration…just taking it apart, cleaning it, installing new parts, freeing up seized pumps and putting it back together. Calibration is for the pros.

Many insist only the pros can work on a pump. But that’s not an option for some. Growing up, I watched dad fix everything…we couldn’t afford to let the pros handle it. That was obviously passed down to me. The pros didn’t fix our microwave, refrigerator, ice maker, A/C, wiring, washing machine, cars…even a Dodge Intrepid internal water pump. Now, I see my 22 year old son doing the same. It is very rewarding seeing him take on these challenges and I will encourage him every time. His skillset keeps growing. America needs people like this.

Besides, it didn’t make sense to take my pump to the shop. The cost of having them rebuild and calibrate it would be the same $850 if my pump was untouched or disassembled and clean in ziplock baggies. Minimal risk…$850 reward.

Let me know if you want to know how I got my injection pump working. If enough are interested, I’ll put a detailed post together.
 
  • Like
Reactions: 1 users

Torinodan

Active member

Equipment
T1600 X2, G4200, G5200, Ford 2810
Oct 14, 2021
172
77
28
Fayetteville GA
Hurts nothing to post what you did. Some of us might get something useful out of the info.
 
  • Like
Reactions: 1 user

JohnDB

Active member

Equipment
M4500DT
Jun 9, 2018
376
63
28
NZ
It's good to challenge assumptions. I like to repair stuff myself too when necessary, its very satisfying.

In my case I got the pros to overhaul the injectors and test the pump. Why... because of the tight tolerances, which are literally microscopic. I used a microscope to look at a delivery valve I pulled out of an in-line Bosch mini-K type pump. 1970's technology, how quaint :) I had wiped the delivery valve mating surfaces with a supposedly lint-free cloth. These surfaces are lapped to a polished finish... smooth, dead flat. Invisible to the naked eye, but clear under the microscope was a fragment of a cloth fibre, which would if it had gone back in, would have rendered the point of the lapped surfaces useless. How could I reassemble a pump and know that if didn't have fragments of fibre, dust, or anything else stick to critical surfaces? Blowing it off with air might clean it - temporarily, but what is that airsteam stirring up elsewhere that is so tiny you can't see it. I handed the job to the pros who seemed to me to have much better facilities for the work than I had.
 
  • Like
Reactions: 1 user

Grateful11

Member
Apr 20, 2010
86
7
8
Piedmont, NC
I like to repair to a point but our son just had a Bosch injection pump rebuilt and put back on the CaseIH Maxxum with a 5.9L Cummins today. This a tractor they depend on for a full-time operation. It was leaking pretty badly around one of the shafts. No room to do anything without removing it.
 

Dieseldonato

Well-known member

Equipment
B7510 hydro, yanmar ym146, cub cadet 1450, 582,782
Mar 15, 2022
728
437
63
Pa
Really there's nothing magical going on in an injection pump, can be torn apart and put backtogether by most anyone with the proper tools. Till its time to time and flow test it. It doesn't take much to get them off and it is something that directly affects engine performance. The Bosch mini pumps don't take any sort of special tools to take apart, many pumps do, and can only be purchased by dealers. So again your not gaining much. Do you have access to the specs for the pump in question, or the tools to accurately measure them? It's not just a let's take it apart and toss it backtogether kinda of thing even if it is a pretty simple devise.
 
  • Like
Reactions: 1 user

IdahoNative

Active member

Equipment
Kubota B7100D 4x4, non-HST, FEL 1630
Jan 12, 2022
114
46
28
Florida, central
I like to repair to a point but our son just had a Bosch injection pump rebuilt and put back on the CaseIH Maxxum with a 5.9L Cummins today. This a tractor they depend on for a full-time operation. It was leaking pretty badly around one of the shafts. No room to do anything without removing it.
If my tractor was used to make $$, I would definitely let the pros handle. When I owned my business, I never touched any of the vehicles…they all went to the shop.
 
  • Like
Reactions: 1 user

IdahoNative

Active member

Equipment
Kubota B7100D 4x4, non-HST, FEL 1630
Jan 12, 2022
114
46
28
Florida, central
Really there's nothing magical going on in an injection pump, can be torn apart and put backtogether by most anyone with the proper tools. Till its time to time and flow test it. It doesn't take much to get them off and it is something that directly affects engine performance. The Bosch mini pumps don't take any sort of special tools to take apart, many pumps do, and can only be purchased by dealers. So again your not gaining much. Do you have access to the specs for the pump in question, or the tools to accurately measure them? It's not just a let's take it apart and toss it backtogether kinda of thing even if it is a pretty simple devise.
I agree, it’s not just “let's take it apart and toss it backtogether kinda of thing”. That would be foolish. As I said, I was extremely anal about the process. I don’t have the equipment to accurately measure the flow rates, but a pre and post fountain test shows vast improvements. Before, would barely bubble out at an inch high. After the gunk and sticking pieces were cleaned and o rings replaced, they shoot fuel about 5”-6”, uniformity and consistently. This is a big gain, IMO. Injection timing wasn’t altered, I used the existing shims for each.
 

IdahoNative

Active member

Equipment
Kubota B7100D 4x4, non-HST, FEL 1630
Jan 12, 2022
114
46
28
Florida, central
Here’s how I tackled my injection pump….

Laminated and studied a copy of the injection pump parts schematic before hand. I snapped lots of before, during and after photos. I counted the number of threads needed to remove everything related to the pump assembly. Thoroughly cleaned the area and used my air compressor to try it.

Stapled 3 paper bowls to my work bench top to hold the parts. I labeled each bowl 1, 2, and 3. Bowl 1 was marked “front” and three “rear”. I also marked each injection pump assembly on the pump body.

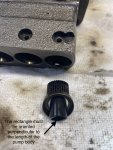
Removed the four nuts on top of the injection pump assembly. The horizontal position of my pump model is not controlled by these fasteners. They are all fixed horizontally. Pulled the pump straight up and out. At this point, I noticed a little notch out on the top of the housing (part of the engine block). The control rack lever must be aligned with this notch to remove and install. No gasket was present.

Turned the shop AC on and settled in my shop stool. Looking at the schematic, the pump assemblies have upper and lower components. To remove the upper pieces, I wrapped the pump assembly body in a rag, put it in my vice & gently tightened the vice just enough to hold the pump body upright. Removed position 1 delivery valve holder. Using my stick magnet, I removed everything, except for the delivery valve. I would later find out the valves had deposits on them and were stuck. I noted the orientation and position of each piece & laid them out on the bench. I verified the parts layout with the parts schematic. Because of the high humidity here, each piece was sprayed with WD40. Then placed the parts in bowl number one. This step was repeated for pump 2 & 3.

Now to remove the lower components (consisting of the control sleeve and everything below it)….

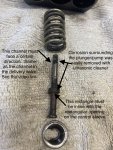
I removed the body from the vice and placed it on on the workbench, pin clamp side facing up. The pin clamp and tappet guide number 1 was removed with a dental pick. The tappet came out easily, but nothing else. I put the tappet and guide back in. I tried pushing each tappet up, but didn’t force them. Number 1 cycled with a little effort, but the others would barely move. So I gave each barrel a shot of PB blaster then gently pushed & wiggled each tappet. Within about 10 minutes, all moving a bit. Pulled number one guide pin and removed each piece with my magnet, placing them in bowl 1. Number 2 & 3 were then removed. The delivery valves finally dropped out. Looking at the individual pump components, almost all had deposits, especially the valves and plunger elements.

The control sleeves would not come out and the rack controller would not easily move. So the pump body went into the sonic cleaner for about 8 minutes. I used a 1:1 ratio of Simple Green and water. I rinsed the body in diesel fuel and used the air compressor to dry it. The sleeves came out by gently tugging them with needle nose pliers.

The rack controller still wouldn’t slide back and forth. I gently tapped it with a hard rubber hammer and removed it. The vertical splines had deposits as did its barrelI as did the delivery barrels. I attribute this to water in the fuel from the previous owner. I used diesel fuel and 800 grit wet sandpaper to remove most of it. Another 4 minutes in the ultrasonic cleaned them up….shiny and new looking!

Now I placed all parts for each pump into ziplock bags marked 1, 2 & 3 and into the ultrasonic cleaner for 8 mins. Again, they were shiny and clean!

Time to assemble. Click on the link for a video I used created by “tractor&marine Mechanic” to assemble the injection pump. It shows the process better than I can describe
. Pay attention how the control sleeves, delivery valves and plunger elements are installed. The video shows their orientation to the pump body.
Edit, video link didn’t work, google how I fix plunger stuck up and injection pump

Now the injection pump fountains at 5-6”. A vast improvement over the 1” max fountain during pre-pump removal. If required, I can remove the assembly and have a shop calibrate it.

E52CCA9C-EF27-41CB-937E-A68C10300D5D.jpeg 1A8EADAF-5253-4269-AF05-40EBFF12879F.jpeg
 
Last edited:

JohnDB

Active member

Equipment
M4500DT
Jun 9, 2018
376
63
28
NZ
A microscope…now that’s getting detailed!
And interesting too... its an old ex-university binocular style dissecting microscope so it has much better depth of field than the monocular ones. I learnt that there's no such thing as cloth that is "lint free". Excellent for examining wear on precision items like delivery valves, comparing with new.
 
  • Like
Reactions: 1 user