The B2650 Project: Turbo Edition

Hahnsolo

Active member

Equipment
B2650 Tractor, B2782B Snow Blower
Mar 13, 2023
106
175
43
Rocky Mountains
Hi Mike:

You know better than anybody what a nightmare it is to fabricate that first system. So many errors, cutoffs, redo's, and re-welds to get it all lined up. Ugh.

I was careful with my layout first and foremost to try to have as much distance between hot and cold parts as possible. Beyond that, there are several areas that I will by using a flexible heat shield material to (hopefully) prevent damage. I will be adding that later and testing viability before posting the results. I'm sure there are probably going to be several areas that will need special attention.

Solo
 
Last edited:
  • Like
Reactions: 1 users

drewzee87t

Active member

Equipment
L45 TLB, B2910 Turbo
May 20, 2016
176
93
28
misery
Hi Solo,

Coming along nicely. I wish I saw this earlier I would have suggested kubota parts for the oil send and return.

I did a turbo on my B2910 over the winter 2020-21. It's pretty similar but my V1505 is a 4 cyl. I got the turbo, intake/exhaust manifold, injector fuel tubes (needed to fit to turbo intake manifold) and turbo to intake pipes from a turbo v1505 part out off a golf course mower.

The turbo outlet with upward facing was hard to find, got that on amazon. Amazon had several turbo outlets facing up, sideways or to the rear and was the only place I could find them. I spent many hours on Kinuguwa trying to find solutions, but found a stock kubota part that works. I also had tight spacing behind the turbo to firewall. The exhaust pipe bolts on and is a slightly modified mid-pipe from a bobcat skid steer -also from amazon.

The oil feed and return including the part that plugs into the block were Kubota from a B3350 (Messicks). You could probably source those for whatever model your exhaust manifold came off of (assumed LX3310). Fits perfect and no arguments with the british thread people :)

I was able to flip the air filter housing backwards and used various radiator hose sections and a small piece of pipe to connect the turbo inlet. The air intake setup was temporary but it works great and I have over 150 hours on it with the turbo. I can still easily access the air filters without any tools.

I put a combo boost/egt guage on the steering column and the EGT probe right at the turbine inlet on the manifold.

I advanced the timing a couple degrees by removing shim on injection pump. I also turned up the fuel and tested how much fuel to turn up based on EGT. I kept it pretty cool @<1100. It builds 7psi when needed, spike up to 10psi. Wastegate is wired shut and fuel limits the boost.

I sourced an oil cooler from a motorcycle and after much wrangling did not install it. In normal usage I have no cooling problems. If I am mowing seriously thick, tall grass and the turbo is making boost constantly, the machine will get hot after a while and I have to stop for a couple minutes and run about 2000rpm idle and it cools right down. I may get a pusher fan to help with that but it's so rarely been a problem that I haven't done anything. I guess a custom/bigger radiator would be the proper solution, but I just keep my eye on the coolant temp. Just something to watch out for.

Pic from my last oil change a couple month ago
photo_2023-10-14_17-24-22.jpg photo_2023-10-14_17-24-16.jpg

Some pics from during the install that might or might not help anyone:
 

Attachments

Last edited:
  • Like
Reactions: 3 users

Hahnsolo

Active member

Equipment
B2650 Tractor, B2782B Snow Blower
Mar 13, 2023
106
175
43
Rocky Mountains
Thanks for the detailed post drewzee87t. It amazes me how many different ways there are to achieve the same result. It encourages me to see another successful turbo install that is producing power and working well. I still look at that tiny turbo and wonder if it will really work. LOL

So, it looks like you used 2" diameter pipe for most of your routing? The flex pipe on the exhaust output side really has me curious. I would think that the ripples inside the pipe would cause problems with turbulence. Have you seen any indications of that happening?

I didn't know that you could get original Kubota oil lines and fittings for the turbo lube system. It was a major PITA, but I'm really happy with how it turned out.

At this point, my turbo installation is complete and I just need to change the oil in the tractor and fire it up after instrumenting the EGT gauge. I will be posting the rest of the install in the next few posts. Thanks again for sharing your results.

Solo
 
  • Like
Reactions: 1 user

drewzee87t

Active member

Equipment
L45 TLB, B2910 Turbo
May 20, 2016
176
93
28
misery
Thanks for the detailed post drewzee87t. It amazes me how many different ways there are to achieve the same result. It encourages me to see another successful turbo install that is producing power and working well. I still look at that tiny turbo and wonder if it will really work. LOL

So, it looks like you used 2" diameter pipe for most of your routing? The flex pipe on the exhaust output side really has me curious. I would think that the ripples inside the pipe would cause problems with turbulence. Have you seen any indications of that happening?

I didn't know that you could get original Kubota oil lines and fittings for the turbo lube system. It was a major PITA, but I'm really happy with how it turned out.

At this point, my turbo installation is complete and I just need to change the oil in the tractor and fire it up after instrumenting the EGT gauge. I will be posting the rest of the install in the next few posts. Thanks again for sharing your results.

Solo
The exhaust pipe on there is huge compared to stock. The flex corrugation has no impact. It's like equivalent to putting an 8" exhaust on your turbo honda. I would have welded a proper exhaust and hard intake pipes but I don't have welding gear or skillz. This was almost completely a bolt-on kit with hardly any fab required as was done during covid when nobody could get anything done.

Looking at kits made by other members here, mine looks pretty amateur/shadetree in comparison. You guys did really nice work with your welded pipes and stuff. I need to learn how to weld as I am always messing with turbo z cars also and have to take stuff in to get fabricated at $$$$

Your setup should work great, keep us posted.
 
  • Like
Reactions: 1 users

GrizBota

Well-known member

Equipment
L3830HST/LA724, B2601/LA435/RCK54-32, RCR1872, CDI 66”grapple, pallet forks
Apr 26, 2023
1,142
727
113
Oregon
Well this is pretty interesting. I poked around and found out that Kubota has a turbo version of the D1803 engine in my L3830. Things that make you go hum…
 
  • Like
Reactions: 1 user

Hahnsolo

Active member

Equipment
B2650 Tractor, B2782B Snow Blower
Mar 13, 2023
106
175
43
Rocky Mountains
Hi drewzee87t:

It is pretty comical looking at the size of pipes people are putting on these tiny turbos. Definitely shouldn't have any airflow problems. LOL

Yours is a testament to getting things done against the odds. I don't have welding experience or a welder either, but I came up with a way to build it and found a guy who could weld it. I'll be detailing that in upcoming posts, so stay tuned.

Solo
 
  • Like
Reactions: 1 user

Hahnsolo

Active member

Equipment
B2650 Tractor, B2782B Snow Blower
Mar 13, 2023
106
175
43
Rocky Mountains
Hi GrizBota:

So, are you going to try to upgrade yours? Sounds like it could be a bolt-on project!

Solo
 
  • Like
Reactions: 1 user

GrizBota

Well-known member

Equipment
L3830HST/LA724, B2601/LA435/RCK54-32, RCR1872, CDI 66”grapple, pallet forks
Apr 26, 2023
1,142
727
113
Oregon
As to giving a go myself, I’d sure have to do a fair bit of research before I’d start procuring parts. You and @Rdrcr went through that phase a while a back.

Years ago my Dad told me “First you think it, then you say it, then you do it.” So I’m still in the thinking about it phase to be sure. I’d need to figure out what application the turboed D1803 was put on. I figured it out digging around in Kubota’s global engine sales web site that the turbo version of the engine in my L3830 exists (I think)


D1803-CR-TI-E4B Engine

The stock engine is indirect injection, whereas this turbo version is direct injection with Tier 4 emissions. So I’m not certain it’s just a matter of figuring out which turbo that engine comes with. I’m certainly not interested in changing ECUs, fuel injection systems and having emissions. But, it might be a turbo is a turbo with or without the other aspects.

For now I’ll live vicariously though your efforts. But I do have a buddy that is a welding fool…
 

drewzee87t

Active member

Equipment
L45 TLB, B2910 Turbo
May 20, 2016
176
93
28
misery
As to giving a go myself, I’d sure have to do a fair bit of research before I’d start procuring parts. You and @Rdrcr went through that phase a while a back.

Years ago my Dad told me “First you think it, then you say it, then you do it.” So I’m still in the thinking about it phase to be sure. I’d need to figure out what application the turboed D1803 was put on. I figured it out digging around in Kubota’s global engine sales web site that the turbo version of the engine in my L3830 exists (I think)


D1803-CR-TI-E4B Engine

The stock engine is indirect injection, whereas this turbo version is direct injection with Tier 4 emissions. So I’m not certain it’s just a matter of figuring out which turbo that engine comes with. I’m certainly not interested in changing ECUs, fuel injection systems and having emissions. But, it might be a turbo is a turbo with or without the other aspects.

For now I’ll live vicariously though your efforts. But I do have a buddy that is a welding fool…
Ebay

and a TD03 turbo. Some assembly required.
 
  • Like
Reactions: 1 users

GrizBota

Well-known member

Equipment
L3830HST/LA724, B2601/LA435/RCK54-32, RCR1872, CDI 66”grapple, pallet forks
Apr 26, 2023
1,142
727
113
Oregon
  • Like
Reactions: 1 user

Hahnsolo

Active member

Equipment
B2650 Tractor, B2782B Snow Blower
Mar 13, 2023
106
175
43
Rocky Mountains
Looks like you guys with the larger and 4-cylinder engines have more options than us little 3-cylinder guys. LOL. I don't think I would even be trying any of this with a bigger ECU controlled engine and EFI. There's comfort in the fact that these smaller tractors are dead nuts simple, engine wise.

Solo
 
  • Like
Reactions: 1 user

Rdrcr

Well-known member
Lifetime Member

Equipment
L2501 w/ S2T Turbo Kit = 35 PTO HP (Current), B2601 (Sold)
May 7, 2021
633
658
93
WA
Looks like you guys with the larger and 4-cylinder engines have more options than us little 3-cylinder guys. LOL. I don't think I would even be trying any of this with a bigger ECU controlled engine and EFI. There's comfort in the fact that these smaller tractors are dead nuts simple, engine wise.

Solo
Amen to that!

Mike
 

Hahnsolo

Active member

Equipment
B2650 Tractor, B2782B Snow Blower
Mar 13, 2023
106
175
43
Rocky Mountains
Good Afternoon:

Let's jump into the next phase of this build: The hose routing from the Turbocharger compressor side outlet to the air inlet side of the engine.

This was actually one of the easier parts of the build. The outlet from the turbocharger faces up about 45 degrees towards the right side of the engine, while the air inlet on the engine itself is almost directly across from it. This made visualizing a routing path fairly easy with a high confidence of success.

I decided to use silicone hoses and stainless steel couplers tied together with hose clamps to complete this assembly. The inlet to the engine is mounted on the side and requires an immediate upward turn (90°) due to room requirements and I had purchased several silicon fittings to accomplish this.

The inlet on the engine is 1-3/4" diameter, and I was able to find a fitting that had 1-3/4" diameter on one side and 2" on the other. it was a little long, so I trimmed off ~ 1-1/2" on the engine side to accommodate the tight space:

image0 (5).jpeg


image1 (5).jpeg


Then it was just a matter of pushing it onto the air inlet on the engine and tightening down the clamp:

image2 (4).jpeg


Using a piece of 2" diameter pipe, I cut a piece ~4" long and attached it to the first fitting with the hose clamp, with another 90° 2" hose fitting:

image3 (2).jpeg


On the other side of that fitting I cut another piece of 2" tubing ~3" long and inserted it into the open end, again using a hose clamp to hold it:

image4 (2).jpeg


Next, on the other side I attached a 2" to 1-1/2" reducer fitting:

image5 (4).jpeg


Using a 1-1/2" 45° stainless steel tube, I attached it into the open side, then inserted the other side into another reducer (1-1/2" to 1-1/4" diameter). Finally, the 1-1/4" end of the reducer was clamped onto the outlet from the turbocharger to complete the assembly:

image7 (2).jpeg


A couple of things to note: As can be seen in the picture, the 45° steel fitting and the turbocharger outlet are not exactly in line. Fortunately, there is enough flex in the reducer coupling to accommodate it. Secondly, the turbocharger outlet is very small (1"), and the reducer coupling is slightly larger (1-1/4"). By putting the clamp up a bit higher on the outlet, when tightened down it compresses enough to provide a tight fitting.

One final thought: When completed, I noticed the entire assembly could wiggle easily front to back. I just implemented a quick and dirty fix by attaching a small hose clamp around the support bar above and attaching it to one of the hose clamps on the assembly. Not pretty, but functional:
image1 (7).jpeg


The completed assembly functions well and looks reasonable (but nothing like Mike's masterpieces!).

Coming up: The meat of the matter - fabricating and installing the turbocharger exhaust pipe. The most challenging and frustrating part of the build. . .

Solo
 
Last edited:
  • Like
Reactions: 1 user

Rdrcr

Well-known member
Lifetime Member

Equipment
L2501 w/ S2T Turbo Kit = 35 PTO HP (Current), B2601 (Sold)
May 7, 2021
633
658
93
WA
^^^^^
I think it looks great!
Good work!

I can't wait to see the rest of the system and your conclusions.
You're almost there!

Mike
 

Hahnsolo

Active member

Equipment
B2650 Tractor, B2782B Snow Blower
Mar 13, 2023
106
175
43
Rocky Mountains
Thanks Mike. Spoiler alert: The system is complete and has been test fired. I’m just behind on my updates. Going to try to finish up this weekend.
 
  • Like
Reactions: 1 user

Rdrcr

Well-known member
Lifetime Member

Equipment
L2501 w/ S2T Turbo Kit = 35 PTO HP (Current), B2601 (Sold)
May 7, 2021
633
658
93
WA
^^^^
That's no spoiler to me, lol.

I had my Turbo system installed and operating for a least a month before I began posting my thread. I would just work on each chapter and then release it once I was finished. I enjoy writing but, it takes me quite some time to produce the content in my thread. It's been a fun journey and I really really have enjoyed the fruits of my labors. There's nothing like having that additional power supplied by Turbocharger.

Mike
 

Hahnsolo

Active member

Equipment
B2650 Tractor, B2782B Snow Blower
Mar 13, 2023
106
175
43
Rocky Mountains
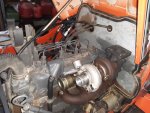
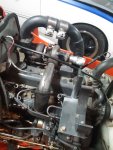
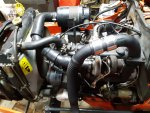
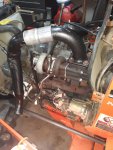
Ok, before we start cutting and fitting pipe, there are several things to consider when fabricating an exhaust pipe, specifically regarding steel selection. The two most likely types for a project like this will be stainless steel or mild steel. The choice and application of these two materials can mean the difference between a solid, reliable assembly, versus one that may be difficult to weld and potentially fail down the road.

The main difference is the metal used to form the steel alloy. Stainless steel is alloyed using chromium, whereas mild steel is alloyed using carbon. The two different alloys produce very different results in corrosion resistance, malleability and ease of fabrication, not to mention cost. It is this key difference that separates the two different kinds of steel. Let's take a look at the basic differences between these two alloyed metals as it relates to this project:

(Credit: Thyssen Krupp. https://www.thyssenkrupp-materials.co.uk/the-difference-between-stainless-steel-and-mild-steel.html).

Stainless Steel:

* Because stainless steel is alloyed with chromium, this metal has a much higher corrosion resistance than mild steel. The chrome in the stainless reacts with the oxygen in the air producing a natural ‘chromium oxide’ protective skin on the surface of the metal which means that as long as this layer is undamaged, the metal is naturally corrosion resistant. Different stainless steel grades contain varied elements to make them more suitable for different environments.

* As chrome is a hard alloy, stainless steels are much more impact resistant compared to mild steel and (although relatively easy to fabricate) are not as easy to fabricate as mild steel.

* Although stainless offers far superior life span and corrosion resistance over its mild counterpart, the various alloying elements (particularly chromium) make it more expensive. Coupled with the additional work required to fabricate, stainless steel is the more expensive option, however, the benefits are an aesthetic metal with superb corrosion resistance and low maintenance.

Mild Steel:

* Because mild steel is alloyed with carbon, it does not have the protective chromium oxide layer of stainless steel, and therefore reacts with moisture in the air to produce an iron oxide layer, or ‘rust’. Mild steel therefore requires further processing such as galvanization or painting in order to give it a protective surface.

* Mild steel is much more malleable compared to stainless and therefore used more extensively in general fabrication.

* Compared to stainless steel, the general cost of mild steel is less for a given quantity depending on the type used.


Whew! Ok, enough with the science class on metals. It may appear as if I am making a case for one type over the other. That is not the case. Each has their pros and cons, obviously, but there is one critical point left to make: Expansion.

As verbose as the above discussion was, this one is short. DON'T MIX THEM. Because of the alloys used to make the two types of steel, they have different coefficients of expansion. This is another deep rabbit hole that you can dive into for greater understanding, but basically, when heated, the two types will expand and contract differently with temperature.

Why is this so important? Two reasons:

First, when fabricating, if you are trying to weld stainless and mild steel together, it can lead to weaker welds or even cracking during the welding process. This can be mitigated with different welding techniques and materials, however, it takes a very experienced welder with the time, knowledge, and equipment to do it.

Second, because of the extreme heat cycling during operation of the tractor, the two different expansion rates of the metals will slowly start cracking the welds between the two, leading to exhaust leaks and a weakened assembly. If this were a room temperature application, you could most likely get away with it if the metals were not under high thermal or physical stress.

There is one more important consideration to make regarding steel type, and that is thermal conductivity. Stainless steel is approximately 3x less thermally conductive than mild steel. Why is this important? When routing the exhaust pipe through tight areas and past plastic or rubber parts, stainless steel will radiate much less heat than mild steel, have less negative affect on nearby parts, and remove more heat from the engine compartment than mild steel.

When looking at the big picture, these considerations will probably have more impact on the overall outcome than almost any other factors in the project. Chose one type of metal and keep the exhaust pipe homogeneous from the turbocharger outlet flange to the tailpipe, route it carefully to maximize distance to delicate materials, and use heat resistive tape or sheets if testing reveals hotspots.

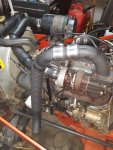
Huh. I thought I was going to start into the exhaust pipe fabrication process today, but decided it was more important to prep any potential builders on the whys and why-nots of steel selection and application.

It took most the afternoon to research and write up this post. I'm pooped! I promise, next post we start fabricating! Cheers until then. . .

Solo
 
Last edited:
  • Like
Reactions: 1 user

cthomas

Well-known member
Lifetime Member

Equipment
LX2610 HSDC
Jan 1, 2017
863
572
93
La Farge Wi
I would use this as I have access to a exhaust pipe bender and easy to weld and can be painted

Aluminized steel is more expensive than mild steel. But, compared to stainless, it is very affordable. It is also easier to work with than stainless steel.

The aluminized coating will protect the metal from rusting. However, if it is scratched or damaged, it will allow the metal to rust. Areas that scrape over a curb or get dinged by rocks will rust just like mild steel. Welded joints will rust as well.

A common problem with aluminized steel exhaust is rusting from the inside out. Moisture collects inside the exhaust when it's cold. If you only take short trips, the exhaust never gets hot enough to evaporate all of that moisture. That moisture causes the inside of the system to rust.

In a moderate climate, aluminized steel might last 3-5 years on a daily driver. In a dry climate, an aluminized exhaust system could last 8 years or more. I copied most of this from summit, but from the few people that have used this kind of pipe to make a "test pipe" on a deleted diesel pickup I have never heard of one rusting out. Also the pipe is a little thicker to allow stretching (its made for a pipe bender). Just a FYI, love the build and I will be copying parts of it for my LX2610 HSDC when the warranty has expired.
 
  • Like
Reactions: 1 user

Hahnsolo

Active member

Equipment
B2650 Tractor, B2782B Snow Blower
Mar 13, 2023
106
175
43
Rocky Mountains
Hi cthomas:

That is an interesting option to use for steel. I hadn't heard of aluminized steel. There are so many different way to do the same thing, it's amazing.

If you decide to modify your machine, please keep us posted on how things go. I'd be really interested to see how it all works out.

Solo
 
  • Like
Reactions: 1 user