Stump grinder build

Yooper

Well-known member
Lifetime Member

Equipment
3901 LA525
May 31, 2015
1,463
433
83
NE Wisconsin
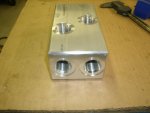
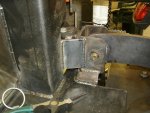
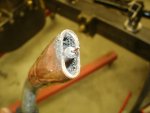
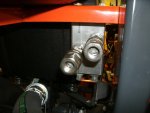
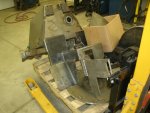
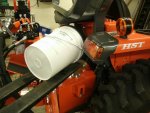
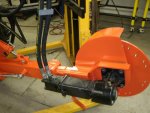
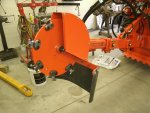
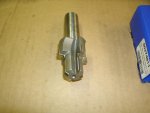
Got an idea for an aluminum manifold to supply the hydraulics from the tractor PB to the controls. I remembered I had bought a cutter for doing SAE 10 O-ring fittings and this is as good a time as any to put it to use. I've never done this before so I was looking forward to the challenge.

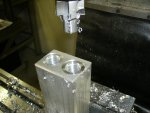
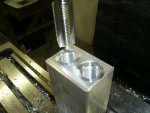
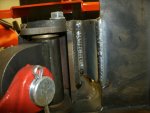
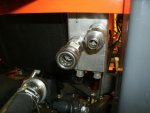
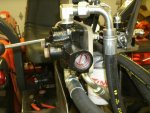
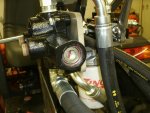
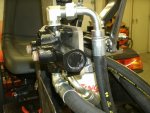
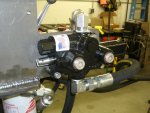
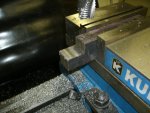
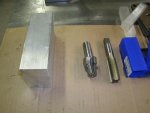
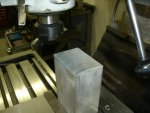
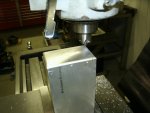
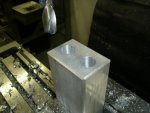
Got a piece of 2" X 3" aluminum rectangular stock that would work perfect and I started by cutting, milling square, rounding the corners (really didn't have to, just like the way it looks), and drill the starter holes for the ports. To be continued....
 

Attachments

Yooper

Well-known member
Lifetime Member

Equipment
3901 LA525
May 31, 2015
1,463
433
83
NE Wisconsin
Set the depth for the cutter and it cut the O-ring chamfer and faced the surface all in one operation. Easy peasy. The only thing left was to tap the hole. I mounted it on the under side of my seat mount on the right side. This is where the hook up to the PB is and it allows me to route the hydraulic hoses along the ROPS to the manifold.
 

Attachments

Yooper

Well-known member
Lifetime Member

Equipment
3901 LA525
May 31, 2015
1,463
433
83
NE Wisconsin
Yooper - total layman speaking, but I would keep the valve, and 3/4" hose, if that's what's called for.

As I said before, your welds are astounding!

I have had so much interest in your build - thanks so much!:D
Thank you!

As far as the valve goes, it just might come down to a coin flip. Will have to make that decision this week when all my fitting come in. Next up will be measuring for the hoses.
 

Yooper

Well-known member
Lifetime Member

Equipment
3901 LA525
May 31, 2015
1,463
433
83
NE Wisconsin
The upright for the controls needed some gussets to stiffen it up. I need to keep them out of the way so I don't trip over them entering and exiting the seat. The best way is shown in the first picture. Not too bad on the outside to weld, but the inside was a different story. Hard to tell from the picture, but the space to weld in towards the rear is very tight. I modified a nozzle for my MIG for just such situations and it was just the ticket for this weld.
 

Attachments

Yooper

Well-known member
Lifetime Member

Equipment
3901 LA525
May 31, 2015
1,463
433
83
NE Wisconsin
Starting to get the hoses figured out. Looks like a rats nest now, but there is a plan to tidy it up.

Then there is my old nemesis, the motor control valve. I discovered that when the valve is in one position, the inlet is totally shut off! This will not work on my system. So I figure I can still use it for the relief valve.
 

Attachments

Yooper

Well-known member
Lifetime Member

Equipment
3901 LA525
May 31, 2015
1,463
433
83
NE Wisconsin
So I removed the spool cover and found a couple of thick washers to use as spacers. This will prevent the spool from shutting of the oil flow from the pump. Reassembled the spool cover and removed the handle. Now I should be all set.

Two more hoses, a couple of fittings, hose clamps and paint and it should be ready for sea trials.
 

Attachments

skeets

Well-known member

Equipment
BX 2360 /B2601
Oct 2, 2009
14,189
2,852
113
SW Pa
Good golly my friend,, if this thing doesn't work I am going to be greatly disappointed
 

Yooper

Well-known member
Lifetime Member

Equipment
3901 LA525
May 31, 2015
1,463
433
83
NE Wisconsin
I guess that would make two of us.:D

Its going to work. The question is how well. There will be a learning curve along with some bugs to work out. Been down this road before.
 

Yooper

Well-known member
Lifetime Member

Equipment
3901 LA525
May 31, 2015
1,463
433
83
NE Wisconsin
Assembling the hydraulics today and when installing a fitting into the extend/retract spool valve, it had to point a certain direction. Just starting to get snug when pointed the right way, but not tight enough to seal. One more turn and 'tink', broke the casting. Arrrrrrr! At least this valve is on the shelf at the local Fleet Farm. NPT fittings versus ORB is no contest. I'll take ORB all day long.

Nice sunny and dry day today, so I thought I'd start making some parts that certain orange color.
 

Attachments

Yooper

Well-known member
Lifetime Member

Equipment
3901 LA525
May 31, 2015
1,463
433
83
NE Wisconsin
I want to support the hydraulic motor that drives the cutting wheel because it is only supported by the gear drive casting. It's going to be a simple bracket with a fully threaded bolt that will give it support from the underside. Got it machined and welded on and then loaded everything on a pallet. Off to powder coat we go.
 

Attachments

stoutakubota

New member

Equipment
B6200HSTD
Jul 11, 2016
12
0
0
Ontario Canada
Well i just got all caught up on this thread from start to where you are now, and i gotta say a big thank you for many things.
For sharing your knowledge and ability , for posting pics and taking us along for the ride and for the detail explanation at each stage.
Wonderful thread, learning a ton, very inspiring. I am in awe of engineering like this. I went down the electronics path to engineering ended up in management side but all my life really wanted to mess with steel and things like the machines in your shop.
I too can totally live without seeing a golf course etc but dont take my tools from me. Lol.
I have just got my first kubota tractor, been loving working on it, but know its only the start. Just got my first Mig welder and the protective gear to go with it and cant wait to get it now we have cooler weather. Thanks for a most enjoyable thread if you have a big head, well you deserve it which is more than one can say about many these days that have the head but its empty. ;) Thanks Yooper, but also all those that chimed in. I am not able to chime in with advise so just my thanks.
 

Yooper

Well-known member
Lifetime Member

Equipment
3901 LA525
May 31, 2015
1,463
433
83
NE Wisconsin
Well, thanks much stoutakubota! You made my day! One of the reasons I post my builds is to inspire people to roll up their sleeves and dive in and build it themselves. Anybody who takes on a project gets my respect, regardless of their ability! You get better by doing.
 

Yooper

Well-known member
Lifetime Member

Equipment
3901 LA525
May 31, 2015
1,463
433
83
NE Wisconsin
Took a picture of all the parts after they were powder coated. Loaded them in my truck and off to final assembly.

One thing to do before assembly is I have to shorten the stroke on the extend cylinder. Its been so long I can't remember if it was a design change or just a screw up, but the boom travels farther than the rear tighteners. Need to shorten the stroke up by at least two inches. Made it two and a half just to be on the safe side.

Machined a spacer and heated it up and shrunk it on.
 

Attachments

Yooper

Well-known member
Lifetime Member

Equipment
3901 LA525
May 31, 2015
1,463
433
83
NE Wisconsin
Getting the grinder ready for sea trials, I thought I'd fill the oil reservoir the smart way by cradling the pail on my manual forks. Wouldn't have done this in my younger years.

Got it set up outside and started working all the hydraulics. Naturally, I left one fitting loose so I had an initial oil leak. But I figure to leave one of thirty fittings loose isn't too bad of a record. Ran it for half an hour with no issues. I only had ten gallons in the oil reservoir, enough for a test. Tank will hold twenty seven gallons if filled right to the top, which I'm not going to do of course.

Brought it back inside and finished dressing it up. I ordered some flow control valves to control the speed of the swing cylinder. Being so small, its really hard to feather it to control the speed, which will be critical to keeping it smooth when grinding. Might need to do this also with the down cylinder, for the sake of controlling the depth of cut. Due to the tight location of the fittings, it will not allow for flow control valves. Thinking of machining some restrictor fittings.
 

Attachments

Yooper

Well-known member
Lifetime Member

Equipment
3901 LA525
May 31, 2015
1,463
433
83
NE Wisconsin
That's damn nice!!

Why couldn't you put flow control valves at the valve ends of the lines? That way they can be adjusted from the operators seat?
Just got done researching the controlling of speed on hydraulic cylinders and flow control valves are not a good choice. The reason is because of heat. This cylinder is going to be constantly moving and restricting flow creates heat. I'd be better off using a larger cylinder, which I have several in my collection to choose from. Stay tuned....
 

JackJ

Member

Equipment
BX1870-1
Mar 14, 2016
264
4
18
Indiana
Can't wait to see some video of this beautifully constructed and pristine machinery getting covered in stump dust!