Adding Aux Hydraulics to a B6000

ipz2222

Active member

Equipment
L235, bx2670
May 30, 2009
1,927
31
38
chickamauga ga usa
Consturctive critisim. It's free, if you don't like it , throw it in the trash.
My kind of guy. Let's build something!!!!
The upper arm, that goes from the rear hinge to the bucket. Half way between those where it makes the 40% bend(approx). That needs a flat gussett on both inside and ouside, maybe1/8 to 3/16 thick.
The small square tube that comes down to the front bumper<anchor>. That is going to bend right at the junction where it's welded to the front anchors. All that weight of the bucket and what's in it will be trying to twist the rear support fwd, pushing on the square tube fwd, bending the square tube that goes over to those anchor blocks.
These are my opinions (ipz2222) and do not represent "orangetractortalks",
unless of course they all agree. (BG)
Forgot one. It looks like that bucket will be able to go high. The higher that bucket goes up , the easier it is to turn over. BTDT
 

TopGear

Member
Mar 21, 2009
68
0
6
Australia
Hi Ipz2222

Thanks for the advice, its actually good to have people give some thoughts.
I had planned on adding a gussett as you suggest and wanted to incorporate the mounting pin for the bucket tip ram at this point. I thought I would just weld 4mm plate both sides for these. I haven't attached the front bucket tip rams yet but will hopefully do that this weekend and post some snaps. I wanted to do something similar to whats attached in the image below.
Regarding the cross brace smaller tube I will try and beef this up somehow. Again maybe weld some flat traingular sections where they attach? Any thoughts or suggestions? I went with 32x32x4mm square tube as I had this on hand and hoped it would be strong enough. So I will try beefing things up here as well. The loader attached in the images below on a B7100 seemed a little heavy so I have gone slightly smaller to fit the B6000 but used a similar attachment profile for the cross brace. I also think I will gusset the cross brace between the two loader arms as well with plate.

Regarding height the main lift arms lift to about 1.8m high. I wanted to be able to tip the bucket up and get around 2m height so I can dress sheep and pigs with it. Anyway I take your point and will no doubt make a shade cover (aka roll over bar) just to be on the safe side:D
The Kubota 1630 loaders from the manual specs seemed to have similar lift characteristics so I have tried to stick similar with that.

Anyway thanks for the feedback. keep it coming. It is really helpful.

Cheers John
 

Attachments

ipz2222

Active member

Equipment
L235, bx2670
May 30, 2009
1,927
31
38
chickamauga ga usa
""Again maybe weld some flat traingular sections where they attach? Any thoughts or suggestions? ""

I think that would do it. Just make sure it goes to the point where that anchor is welded to the frame<large cross bar>.
 

TopGear

Member
Mar 21, 2009
68
0
6
Australia
Well I have now pretty much finished all the welding. All rams are attached and gussets in place on loader arms and have attached the bucket. A few things to tidy up once I take it off again for painting. However I'm now ready to install the hydraulic lines and will go and get them made up this week. Planning on putting quick connects on the control valve so I can put the loader on and off as needed.

A few more photo's. Nearly there!!:D

Cheers John
 

Attachments

dusty-t

New member
Feb 17, 2009
974
2
0
Mountforest Ontario
Hey John, I was just wondering about that 1inch square tubing to the front of the tractor. The loader on my b8200 has something like 1/2 x 2 flatbar going to the front but the crossbar on the front is like 2 in pipe. Your subframe is super heavy so maybe you don't need much support to the front. I'm just wondering is all. All in all it's a lot better job than I could do. You are going to love the loader.:D
 

TopGear

Member
Mar 21, 2009
68
0
6
Australia
Well its finally finished. I got the hydraulic hoses hooked up this week and have spent all day trying it out.

The verdict - its a beauty:D 
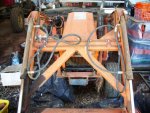
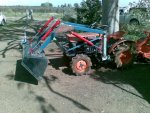
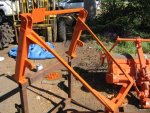
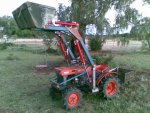
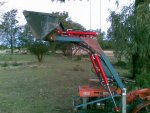
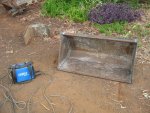
I can lift at least 200kg easily and it seems to work really well. The stock standard hydrualic pump works fine. Its maybe a little slow lifting main rams up but nothing I can't live with. Indeed it seems as strong as an ox:D

Anyway now I will pull it off and paint it and weld some of the harder to access places I couldn't get too when building it and also add some more bracing. Regarding the cross bracing I think its strong enough - 32mmx32mmx3mm RHS. I worked it pretty hard trying to break things today and couldn't seem to get anything to fail.

Anyway a big thank you to those on the list who helped out and gave some advice - Dusty T, Service Dept Vic, Todddrumey and all the others who helped.

I'll post some more photo's when I get it painted.

So whats better than a Kubota B6000? A B6000 with a loader:p !!!

Cheers John

P.S. Yes the Beast will also be painted as well - not just the loader!
 

Attachments

dusty-t

New member
Feb 17, 2009
974
2
0
Mountforest Ontario
Wow TopGear that look's fantastic. That loader lifts a lot higher than the one on my B8200. Mind you it was off of a B7200 but still no where near that high. I am thinking I will do some modifications. Great job. It takes a fair size set of stones to take on a project like that. Great job.:D
 

chiefbuzzbee

New member

Equipment
B6000 w/Loader 2013 L3800 w/Loader
Jul 29, 2009
69
2
0
73
New Hampton,NH
John,
I have been following your progress and must say Great Job! It looks great and very well done and you have to love that B6000 it is a Beast. I like your ballast box how did you come with the size? and weight? Also did you make wheel weights or are they factory if so where can I find them?

John one thing I would suggest get, build or what ever it takes a ROP for your safety the B6000 is easy to roll over so I found out. But luckily I got off before it did but if I hadn't it would have been real deadly. :eek: 
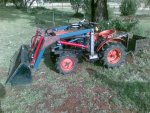
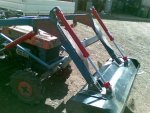
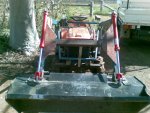
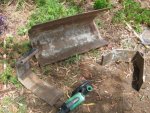
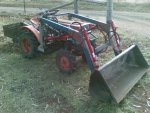
Besides I want to see what you come up with next......:D
 

TopGear

Member
Mar 21, 2009
68
0
6
Australia
Hi Guys

I built the blast box for the back. Based size on getting a roughly 250-300kg weight at the back to counter act the loader. Filled it with concrete which has a density of 2400 kg/m3

So 2400 x width in metres x height in metres x length in metres of the box will give the weight in kg. So my box dimensions are about 0.8m x 0.4m x 0.3m which is filled with concrete. The concrete weight is about 230kg and the box itself is about 50-60 kg. I don't have any wheel weights. One thing I also did which has been good was to add some small rippers onto the bottom of the box. These are about 15cm long and with the weight of the box they really dig in. I have found them handy for ripping up hard compacted dirt which the loader won't bite into. After a pass over with the rippers I can then get it with the loader.

Yes lift is pretty high which I have found pretty handy so far. But as a few have pointed out I will add a rops.

Anyway I will post some more photo's when I get it painted. I also made the loader quick detach which is really handy so you don't have to lump it around when slashing or rotary hoeing. I've had in on and off a few times now and it only take a minute or two to put on or off.

Cheers John
 

stevesb5100e

New member

Equipment
B5100e
Oct 11, 2009
2
0
0
Reardan, Washington, USA
Hi all, new member to the site. I just purchased a B5100e tractor from a local Kubota dealer. I am wanting to build a snow blade for it, and planned on building a frame work that attached at the rear (not sure where yet) and then ran along under the tractor and build a bracket that mounts to that front "bumper" area of the frame to attach the lift cylinder. My question is, where can I get hydraulics on this tractor? I dont really care if I am able to lift the 3ph and the front at the same time.... any info would be great..
 

TopGear

Member
Mar 21, 2009
68
0
6
Australia
Hi Steve

If you read this thread all the way through you should get an idea of the options available. If you only what a single acting cylinder than by far the easiest is to use the tap off port located between your legs. It has a valve which will direct the hydraulic flow to your cylinder and can be operated with the 3ph lever.

If you need double acting cylinder (i.e. push and pull both ways) then cut into the pressure line as documented in this thread. This is also reasonably easy. Just take the pressure line off (two bolts and I bracket) and take it to a hydraulic or tractor mechanic workshop and they will be able to cut and solder in fittings easily and cheaply. You will however have to then add an open centre hydraulic valve to control the cylinder. I'll take some photo's of my install and post here when I get a chance of this option.

Cheers John
 

stevesb5100e

New member

Equipment
B5100e
Oct 11, 2009
2
0
0
Reardan, Washington, USA
Thanks TopGear,

I just picked the tractor up today, it looks to be in fairly good condition, need a wax job for sure. It is a little hard starting... i'm going to check and see if both glow plugs are working..... aside from that, I wanted the hydraulics for a front mounted snow blade, and after talking to the dealer, They recomended buying one of the better ATV blades, and then just attaching a cylinder to lift it up, which could be done with the 3ph valve.. I'll take some pics when I get it into the shop... thanks again
 

TopGear

Member
Mar 21, 2009
68
0
6
Australia
Hi

Well I ran into a big problem with my loader;)

Its been too useful to take off and paint:D So as yet I haven't got a chance yet to paint it. Its also been too hot over here in our summer for painting so i will wait until it cools off a little.

I have however finished cutting the bucket down, took 8 9inch angle grinding wheels to do but it looks and operates a lot better and matches the loader size better too.

Anyway I am really happy with how it has turned out. How I just need to paint her! Don't worry I will post some more pics when its painted.

Cheers john
 

Attachments

TopGear

Member
Mar 21, 2009
68
0
6
Australia
Also built some forks for the loader as well over the weekend for picking up logs. They are a bit rough but they didn't cost me anything apart from time and they seem to do the trick.

So now all thats left to do is paint it all!
 

Attachments

TopGear

Member
Mar 21, 2009
68
0
6
Australia
Well painting has started. I decided to paint the 16inch rear rims to replace the 14 inch ones that were originally on the B6000 as my first job.
Previously I brought Kubota orange and blue paint for the main body but wasn't sure I had enough to do the wheels as well based on vic's suggested amount of cans. Anyway I went into a super cheap auto store to buy some white for the wheel rims. However they also had 'International Orange' so I thought I would try this out. Turns out its nearly a perfect match to the early Kubota orange - see attached photo's. Anyway at $3.50 a can it sure beats Kubota's paint at $27.50 a can!
Pity I've already brought enough Kubota paint for the main body and panels - but for any further paint jobs 'International Orange' looks like a real winner!
Especially for some of my home made implements!

Cheers John

Now to finish painting the rest!
 

Attachments

TopGear

Member
Mar 21, 2009
68
0
6
Australia
Well I have finished painting all the panels and the loader frame. Now just the blue bits left to go and then add the decals!

A few snaps attached. Found the $22 kubota paint no different to the $4 'International Orange':( 
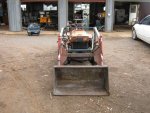
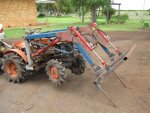
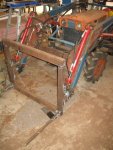
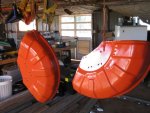
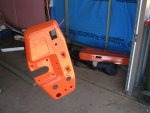
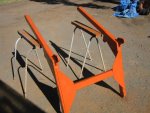
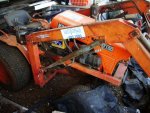
I used the kubota paint on the tractor panels and the 'International Orange' on the loader. Will be interesting to see if one or the other lasts longer.

Cheers John
 

Attachments