l3600dt-gst sudden hydraulic leak

Gwizz

New member

Equipment
l3600dt-gst
Nov 17, 2014
12
0
0
southern oregon
hello all, i have an l3600dt-gst that has suddenly started leaking hydraulic fluid profusely but i am having a hard time finding where it is actually coming from.

i was running the loader and as i was going back and forth i noticed dribble lines on the ground and i got off and looked under the tractor and there was fluid dripping is several spots. where the front drive shaft enters the front axle, all along the front drive shaft outer tubes and the oil pans and the case just behind the block along with what looked like a drain plug with a little nub in the center.


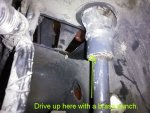
after parking and letting the drips stop i checked the hydraulic oil sight glass at the back and there was none visible. looking underneath it was still hard to see where the oil was coming out. it did seam that everything oil was dripping from was related to the 4x4 so i took it out of 4x4 and started it up. it ran fine loader worked and 3 point cycled up and down. it did not start leaking a bunch right away but did start to dip a bit and it seamed to be coming from that plug with the nub in the center. you can see it in the pic just behind the orange cross member. the little nub almost seams like a plunger and is free to wobble and can be pushed up with no resistance. i had seen this thing before and other than the oil it is no different.

any ideas on what this is and what might be the fluid leak problem. this was definately sudden on set. i changed engine oil last week and everything down there was bone dry no oil leaks and then just today it started puking. i am considering topping off the hydraulics and running it to see if it starts leaking again with more fluid available but it seams like if the loader and 3 point are working there should be enough to leak?

can you recomend any online source where i can buy a service manual and get it as an instant download?

dont know if it is related but earlier this season the PTO "broke" as in it will not disengage, i checked the adjustment but it seams to be an internal problem

also hydraulics to the loader seamed to be less than par towards the end of the season, it all worked but did not seam as strong. often had to bring the rpms up higher than expected to get the job done.

hope i can get this figured out asap as we have crops that need to come in and doing it by hand is not a happy thought.

thanks
kenny
 

North Idaho Wolfman

Moderator
Staff member
Lifetime Member

Equipment
L3450DT-GST, Woods FEL, B7100 HSD, FEL, 60" SB, 743 Bobcat with V2203, and more
Jun 9, 2013
28,982
5,324
113
Sandpoint, ID
The nut with a nib is a drain, supposed to drain any condensation out of the clutch housing.

Simply put you have blown a seal.
Complex part is your going to have to split the tractor to even find the leak and get to it.
 

Gwizz

New member

Equipment
l3600dt-gst
Nov 17, 2014
12
0
0
southern oregon
yes that does seem to be the case unfortunately

thank you for your reply
I did manage to find an online manual I was able to purchase and download now I just have to decide do I really want to tackle this job of splitting the tractor or am I just didn't have the boss drop it off at the shop and pay the piper

thank you for your help
 

Gwizz

New member

Equipment
l3600dt-gst
Nov 17, 2014
12
0
0
southern oregon
contemplating taking the plunge and spitting her open to find what needs a fix'n

i did get a copy of the WSM and have read a fair bit into it and am comfortable making the splits. seams pretty straight forward remove all the stuff in the way and then unbolt the major parts and slide them apart. i have a decent place to work on it out of the weather ( 20x90 greenhouse not in use till spring )

i am wondering if there are any hidden challenges with the project. is there a bunch of stuff that is going to fall out as the tractor is pulled apart, springs and such like that. is it a real bear to get it all lined back up to put it back together

once i get it split how do i figure out what seal/seals need replacing. it would be nice if i could see a chunk of torn seal just hanging there but if not. with the tractor open like that i cant start it up to see where the leak is coming from? any ideas? or should i just replace any and all seals?

any other input that may help me decide on doing the split or going for broke and taking it in to the shop

thanks
 

North Idaho Wolfman

Moderator
Staff member
Lifetime Member

Equipment
L3450DT-GST, Woods FEL, B7100 HSD, FEL, 60" SB, 743 Bobcat with V2203, and more
Jun 9, 2013
28,982
5,324
113
Sandpoint, ID
First if the space your going to work on it is dirt buy 2 sheets of 1 1/4 sub floor to work on.
Second if you don't have to drain fluid then you should be able to see a seeping leak, if not there is not that many seals, I would just replace them all. ;)
They are designed to be split, you should be able to handle it! :D
 

Gwizz

New member

Equipment
l3600dt-gst
Nov 17, 2014
12
0
0
southern oregon
thank you, sorry for not being a little quicker on the responses but the end of season root harvest without the tractor has been hectic to say the least.

the work space i have is hard packed and covered with weed barrier cloth. it is the propagation green house. would you still recommend the sheets of subfloor.

still got a bit to go before i can tear into this but i think about it every day

thanks, I'll keep in touch
 

Tooljunkie

Well-known member
Lifetime Member

Equipment
L1501,home built carry all, mini plow blade.
May 13, 2014
4,150
28
48
59
Lac Du Bonnet, Manitoba,Canada
You need a solid base to split a machine, for jacking and for the seperating the two pieces. Have seen timbers used, but a solid base increases your safety margin.
 

D2Cat

Well-known member
Lifetime Member

Equipment
L305DT, B7100HST, TG1860, TG1860D, L4240
Mar 27, 2014
13,094
4,466
113
40 miles south of Kansas City
The hard surface North Idaho Wolfman mentions is to provide a surface that will allow you to roll the two halves apart much easier. You need something to support the tractor as you disassemble it.
 

CaveCreekRay

Well-known member
Lifetime Member

Equipment
L3800 HST, KingKutter box scraper, KingKutter 66" rake, County Pride Subsoiler
Jul 11, 2014
2,631
93
48
Cave Creek, AZ
Somewhere on this forum, a guy has pictures of "training wheels" he welded up to support the two halves when he split his tractor. Made the job a heck of a lot easier, I am sure.

Best of luck.
 

North Idaho Wolfman

Moderator
Staff member
Lifetime Member

Equipment
L3450DT-GST, Woods FEL, B7100 HSD, FEL, 60" SB, 743 Bobcat with V2203, and more
Jun 9, 2013
28,982
5,324
113
Sandpoint, ID
thank you, sorry for not being a little quicker on the responses but the end of season root harvest without the tractor has been hectic to say the least.

the work space i have is hard packed and covered with weed barrier cloth. it is the propagation green house. would you still recommend the sheets of subfloor.

still got a bit to go before i can tear into this but i think about it every day

thanks, I'll keep in touch
Yes you need a surface that is very hard and flat to be able to jack, block and roll parts and sections of the tractor on.
The larger and harder the surface the better.
 

Gwizz

New member

Equipment
l3600dt-gst
Nov 17, 2014
12
0
0
southern oregon
thanks guys, i finally got the beast in out of the weather and started taking it apart step by step following the WSM unfortunately i didnt get far before coming to a problem. i have everything disconnected as described in the WSM for the removal of the "panel frame and steering assembly" as i try to hoist out the assembly it comes to a stop where the "shuttle shift rod U-joint" tries to pass through the hole in the assembly. the instructions just say to remove the "shuttle shift lever" with an arrow pointing to the lever you would grab while operating the tractor. there is no mention of removing the rod going down along the steering column but the hole in the frame is just a wee bit to small for the U-joint to pass through. the U-joint seams to be pressed or friction fit on a splined shaft and if i could remove the U-joint then i would be able to proceed but i have put some effort into getting the u-joint to come off the shaft with no sign of progress. dont see any way to put much more pressure on getting that point to separate without bending something else. at the very bottom of the shaft it is coupled right before it goes inside the housing/case and there seams to be a cross pin that may be holding it in place. it is in a very awkward position but i managed to give it a few firm taps to try and drive the pin out with no noticeable movement and dont want to strike it harder for fear of damaging the pin or other components. the thought of a dremel tool to enlarge the opening is creeping into my mind but i dont like cutting things up, especially when there should be a simpler solution. i am including pix so you can see what i am up against. hopefully someone has some insight that will save me from having to get all hack and slash to get this thing apart

thanks
kenny


top view looking down on the u-joint where it binds in the hole


here is an overview you can see i have the assembly up a few inches to where it is stopped because the u-joint wont pass through the hole


here is a shot looking through the access hole on the left side showing where the rod couples just above the top of the case. you can see a nub/bump on the left and there is the corresponding equivalent on the other side making me think it is a pin going through


here is another view through the same access hole looking up at the bottom of the u-joint


Gwizz

New member

Equipment
l3600dt-gst
Nov 17, 2014
12
0
0
southern oregon
here is a screen shot from the wsm showing an overall diagram of the shuttle shift linkage i am having difficulties with. i have not found any info or directions on how to dissemble or replace the different parts


here is what the wsm says about removing the shuttle shift lever #6


i can screen shot other parts of the directions of that would help anyone help me

thanks
kenny
 

North Idaho Wolfman

Moderator
Staff member
Lifetime Member

Equipment
L3450DT-GST, Woods FEL, B7100 HSD, FEL, 60" SB, 743 Bobcat with V2203, and more
Jun 9, 2013
28,982
5,324
113
Sandpoint, ID
The shaft right below the u-joint is a splined shaft.


Another way is to force it up off the splines it to put a chain or wire rope through the u-joint and pull up while tapping the coupler.


The bumps on the lower are 2 spring roll pins (#170 and #190), one inside the other, Very hard to remove, you must remove the center pin before removing the outer pin.
 

Attachments

Gwizz

New member

Equipment
l3600dt-gst
Nov 17, 2014
12
0
0
southern oregon
thanks, i guess i will be breaking out the hammer in the morning. it is a tight squeeze in there hope i can get an angle on it to strike not much room for back swing. at least i know it is supposed to come apart there without any special tricks.

does the splined hole in the u-joint go all the way through? would soaking with a penetrating oil overnight be any use or just a waste of time and lube

thanks
kenny
 

North Idaho Wolfman

Moderator
Staff member
Lifetime Member

Equipment
L3450DT-GST, Woods FEL, B7100 HSD, FEL, 60" SB, 743 Bobcat with V2203, and more
Jun 9, 2013
28,982
5,324
113
Sandpoint, ID
I don't know if it goes all the way through, but Oh yea spray it down with some penetrating lube!
 

Gwizz

New member

Equipment
l3600dt-gst
Nov 17, 2014
12
0
0
southern oregon
thanks, i figured why wait for morning so i went and gave it a whack. i didnt have any punches i could reach up from bellow but was able to et on it with a 3 pound slide hammer no action there so i strun a come-along from the rafters and put a good bind on it. tried rapping it on the side with a hammer and even the slide hammer some more with no luck. i left it with pressure on it from the come-along for the night with more penitrating oil and will give it another whack in the morning. if it doesnt come free i think am going to have to just open up the hole enough to clear the u-joint and proceed.

thanks for the help, i am sure i will have more questions as i go along

kenny
 

Gwizz

New member

Equipment
l3600dt-gst
Nov 17, 2014
12
0
0
southern oregon
i gave it everything i had but had to bust out the cutting tools and make the hole bigger. came apart without much fan fare after that. i was able to remove the "fender, floor seat and platform assembly" removed and cleaned away all the accumulated dirt and debris. fortunately it didnt seam to greasy or oily mostly packed dust dirt and plant fiber. going to study the WSM and pictures from the online parts catalog tonight and hopefully get it cracked up tomorrow. i am assuming with where i see the oil leaking i will need to split it at the clutch housing. i also need to deal with the non-disengaging pto while i have it torn open. not sure what other assemblies will need to be removed to deal with that. maybe i will see that in tonights studdy session.

thanks again
kenny
 

Gwizz

New member

Equipment
l3600dt-gst
Nov 17, 2014
12
0
0
southern oregon
well i got it apart and from what i can see the leak must be coming from the front propeller shaft


looking over the wsm and the online catalog and i dont see how the seals are accessed and from looking at the front of the clutch case i hope they are accessible from the other side so i started to remove the mid case and have it separated by a half inch or so but it feels like there is something blocking it from coming any further. it will wiggle and the top seams free but the bottom does not want to come forward any more. i am going to go back and look at more pictures and try and find more in the wsm but i am hoping there might be a simple thing i am missing. any helpful ideas or encouragement is greatly appreciated

kenny


Last edited:

North Idaho Wolfman

Moderator
Staff member
Lifetime Member

Equipment
L3450DT-GST, Woods FEL, B7100 HSD, FEL, 60" SB, 743 Bobcat with V2203, and more
Jun 9, 2013
28,982
5,324
113
Sandpoint, ID
I first noticed you haven't pulled the side cover, do that, it will be real enlightening on what's inside! ;)
I don't know if this helps as I don't have the WSM for your tractor, but on mine you have to pull the side cover and split it to the rear where it connects to the rear end first pull a few parts there and then it will split in the middle.