Buyers remorse, and the cure for it..........A pictorial guide on how to skillfully make a 2 hour job into an 8+ hour job

Runs With Scissors

Well-known member

Equipment
L2501 TLB , Grappel, Brush Hog, Box Blade, Ballast box, Forks, Tiller, PH digger
Jan 25, 2023
1,814
1,910
113
Michigan
Well there I am reading my credit card statement with a stiff drink in my hand, a tear rolling down my cheek and thinking to myself..."man did I really need that "Black Friday" safe?"

1704453214403.png


Then it pops into my head "Hell yes you did!"

But the one thing I hate/can't stand/worry about, is the "electronic lock" and the EMP that is going to lock me out of it, when it hits....(and it will hit...trust me).

I'm just a "mechanical combo guy" in my heart of hearts, but I have never changed out a "safe lock" in my life so this should be fun.

I did a little research, and found out that Sargent and Greenleaf are just about the only game in town. There are others of course, but S&G seems to be the "industry standard", at least for this style lock.


In reality, I wanted one with a 4 digit combo, but I had a hard time locating one and this one kept popping up, so I got lazy and figured my main threat was/is probably these 2 numb-skulls,

1704454244532.png


and I highly doubt they would ever be able to defeat a 3 digit combo.

So a few clicks, and 3 days later this shows up on my porch.


1704453353190.png


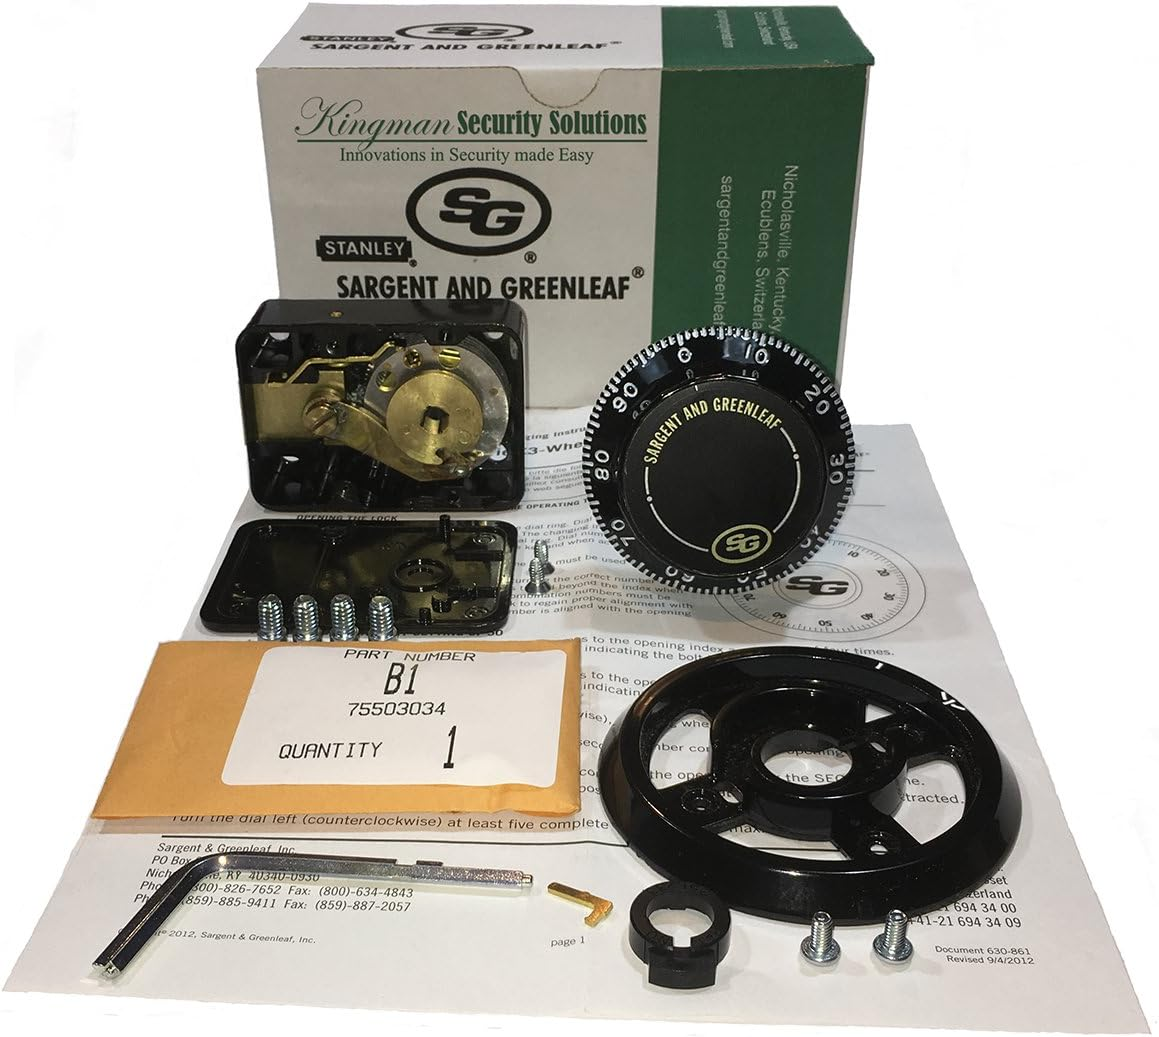
The one thing that I am missing, is the "dial ring alignment tool"

Now in all fairness, most/many of the reviewers said that during installation, they just "eyeballed it" and it worked fine.

Now I like buying new tools just as much as the next guy, However; I also like making things, so after a little looking around and contemplating, I decide to try to make an alignment tool and save the 120 bucks.

Off to the lathe we go......
 
  • Like
Reactions: 1 user

GreensvilleJay

Well-known member

Equipment
BX23-S,57 A-C D-14,58 A-C D-14, 57 A-C D-14,tiller,cults,Millcreek 25G spreader,
Apr 2, 2019
9,910
4,066
113
Greensville,Ontario,Canada
The sad thing is I have the S&G tool here, somewhere. probably locked in the safe I needed it for and lost the combination......
The really sad thing is you'll have made the tool in less time than it took me to replace the 'dorman 83244' gear shift indicator bracket in my F150. A piece of plastic, size of two sugar cubes,buried under the dash.
Some guy on utube said he did his in 10 minutes.I'd paid his airfare to show me. 70 year old body didn't like being under the dash.
 
  • Haha
Reactions: 1 user

jimh406

Well-known member
Lifetime Member

Equipment
Kubota L2501 with R4 tires
Jan 29, 2021
2,159
1,558
113
Western MT
From what I understand, most safes are defeated with angle grinders from the side or top although generally mechanical locks make a lot of sense to me. ;).

You might also consider making the top/sides harder to reach or add steel plate or other wood etc to make access more difficult.
 
  • Like
Reactions: 1 user

Runs With Scissors

Well-known member

Equipment
L2501 TLB , Grappel, Brush Hog, Box Blade, Ballast box, Forks, Tiller, PH digger
Jan 25, 2023
1,814
1,910
113
Michigan
So the "down and dirty" part is that I need to basically make 2 bushings and use a reasonably straight rod as the alignment tool.

So off to the scrap pile I go and find a couple of scrap pieces to chuck up.

Now keep in mind, this most likely going to a be a "1 time use" type of tool, but I want it to work, so I want to be "reasonably accurate". So I find some candidates for "bushing making" in the "Land of Misfit Projects" AKA the "scrape pile"


20231203_130653[1].jpg


By happenstance, the rod I picked was the perfect diameter so I just needed to "clean up the ends".


20231203_131120[1].jpg


Then I got down to business with the bushing making

20231203_131259[1].jpg


a little while later, the OD of the bushing is turning out nice, and fits "very snug"

20231203_131938[1].jpg


So it's now time to do the ID of the bushing, and here's where the "cheese starts to fall off the cracker".

For some stupid reason I have this "thing" in my head that keeps telling me that using a drill bit produces "triangular" shaped holes, so I want to make this thing "better" than that. So I get the idea to drill it out smaller than required and "creep up" on the ID using a boring bar.

20231203_132642[1].jpg


Now I will "simply bore it out"

Holy Sh!t.....I tried every damn thing I could think of to get that F'ing boring bar to cut, but I have no idea what I was doing wrong. The only way I could think of to "get it centered" was to line it up on the OD, thinking that should produce a "nice cut" in the ID.

20231203_133214[1].jpg


At first the problem was obvious, the boring bar was too big and the bottom of it would it barely hit.

20231203_133646[1].jpg


That was an easy fix. Just get a smaller boring bar. Well the problem with that was the one that would fit, would "flex" so much that it was basically worthless.


So I just keep making pass after pass, for what seems like an eternity, with the boring bar flexing more and more..........then that F'ing boring bar "catches" and "wallers out that hole" real good. Now it's as "loose as a goose" (what ever that means?)
 

lynnmor

Well-known member

Equipment
B2601-1
May 3, 2021
1,320
1,036
113
Red Lion
Looks like your boring tool is made for cutting an internal groove. Grind it so that just a single point contacts the bore.
 

Runs With Scissors

Well-known member

Equipment
L2501 TLB , Grappel, Brush Hog, Box Blade, Ballast box, Forks, Tiller, PH digger
Jan 25, 2023
1,814
1,910
113
Michigan
At this point, I don't have a ton of time into it, so I'm not too pissed off...... I just "shrug it off" and commence to starting over.

It's also at this point that a revelation occurs.....

The alignment bar doesn't need to be the diameter of the "lock box' hole....It needs to be the diameter of the threaded brass piece thats connected to the dial...

Well hells bells......That's embarrassing.

So once again, it's off to the "Land of Misfit Projects" for another donor to the cause.


Here what I find, and I roll it on my version of a "surface plate" to check it for straightness....hahaha


20231209_102633[1].jpg


20231209_101747[1].jpg


I'm "hogging" it out with this bit, but I soon realize that I need to "turn it to a shoulder" to get a nice square fit.

20231209_104405[1].jpg


I switch to what I have been using as a "facing tool" to be able to square it up.

20231209_105705[1].jpg


the OD comes out pretty nice. At least that's not bad "for me" anyway. LOL


20231209_111001[1].jpg


I end up with a nice "snug fit" and mark it for length. I remember that I did not want it to protrude for some reason, but I don't remember why....

20231209_111257[1].jpg


In hindsight I should have just turned it to the Proper length instead of having to "part off" the unwanted section.

I can't recall why I did it this way, but I'm sure I had a good reason.

Anyhow now to make it the proper length.

20231209_111546[1].jpg


In the end, they came out pretty good.


20231209_125757[1].jpg


A little later I decide to put "thumb screws" in them like the ones I saw on the internet have.
Screenshot (124).png


Screenshot (129).png
 
Last edited:

Runs With Scissors

Well-known member

Equipment
L2501 TLB , Grappel, Brush Hog, Box Blade, Ballast box, Forks, Tiller, PH digger
Jan 25, 2023
1,814
1,910
113
Michigan
Now to tap them to 8/32......Well that's embarrassing.....I can't find my damn 8/32 tap because my eyes can't see the number on the small taps.....after about 30 minutes of looking I switch to a 10/32 tap (just because that's the smallest one I can see with my glasses on...LOL)

Screenshot (133).png


Screenshot (141).png


hopefully it works.
 
Last edited:

Runs With Scissors

Well-known member

Equipment
L2501 TLB , Grappel, Brush Hog, Box Blade, Ballast box, Forks, Tiller, PH digger
Jan 25, 2023
1,814
1,910
113
Michigan
So what's the left hand with the long finger nails doing?
Aahahah. If my dad saw those fingernails he would would have said "either cut them, or paint them Nancy"

I have to use my hand as a backdrop to get the camera to focus.
 

Runs With Scissors

Well-known member

Equipment
L2501 TLB , Grappel, Brush Hog, Box Blade, Ballast box, Forks, Tiller, PH digger
Jan 25, 2023
1,814
1,910
113
Michigan
So now for the install.

Lock install 1.jpg


Removing the door was very strait forward. 3 upper screws and just lift the panel out of the lover C channel.

So here is the electronic lock and the relocker. (I think thats what its called)

Lock install 2.jpg


Lock install 3.jpg


I first removed the "relocker holder upper" ( I have no idea what its actually called)

Lock install 4.jpg


Then I removed the lock itself, so I am left with just having to remove the front part of the lock.

Lock install 5.jpg


I finally figured out that you just have to "firmly lift up on the button pad. It took a few minutes but luckily I didn't break anything.

Lock install 6.jpg


The new lock "base plate" was drilled with the proper hole spacing so after some loc-tite was applied I just screwed it on gently so it could move a little to get it aligned, before a final "snug up".

Lock install 7.jpg


Then I installed my new alignment tool. For those of you that know how to do this, I am making a mistake, but don't know it yet.

If you don't know what I'm doing wrong, welcome to the "fat, dumb, and happy" hour....hahahahha

Lock install 8.jpg
 
Last edited:
  • Like
Reactions: 1 user

GrizBota

Well-known member

Equipment
L3830HST/LA724, B2601/LA435/RCK54-32, RCR1872, CDI 66”grapple, pallet forks
Apr 26, 2023
1,129
721
113
Oregon
Huh, no keyed lock behind the digital pad. I note yours in made in the USA. Maybe it’s the knock offs or lower end boxes that come with a keyed lock under the digital pad.

But love your adventures, I’m sure you’ll come out on top and get ‘er done.
 
  • Like
Reactions: 1 user

Runs With Scissors

Well-known member

Equipment
L2501 TLB , Grappel, Brush Hog, Box Blade, Ballast box, Forks, Tiller, PH digger
Jan 25, 2023
1,814
1,910
113
Michigan
Here is the "alignment tool protruding through just like it's supposed to.

Lock install 9.jpg


I decide to just reuse the old screws (another "Fat, dumb and happy" moment).

Lock install 10.jpg


As it turns out, the new screws below were not out of the kindness of S&G's heart....The long screws needed to be discarded due to the "shoulder" they have. The new lock would not tighten up against the plate.


Lock install 11.jpg


Not a huge deal, so after changing them out it's now on to the front.

I see this thing out of the corner of my eye, but it still has not hit me yet that this piece is the "bearing" that the dial rides on......

Lock install 12.jpg


And yep....you guessed it. It needs to be put on BEFORE the dial base is installed.

A few "whimsical MFer's" later and I finally figure it out, and place the bearing in its proper spot.

Lock install 13.jpg


there she is...."snug as a bug, in a rug" .....

Lock install 14.jpg


Now heres the potential problem.....Way back when, I made my "bushing" to fit the "big hole" not the bearing.......F............

Well as luck would have it, it just so happens that the bearing sits just a "wee bit" below the dial plate surface.

Whew!!!!!! that was close.....

so the tool actually worked.
Lock install 8.jpg
 
Last edited:

Runs With Scissors

Well-known member

Equipment
L2501 TLB , Grappel, Brush Hog, Box Blade, Ballast box, Forks, Tiller, PH digger
Jan 25, 2023
1,814
1,910
113
Michigan
Now I have to cut that long brass rod to the proper length. So after snugging everything up, I put the dial on and the now the long brass threaded rod has to be trimmed.

So I thread the "dial thing" on and marked it with a Sharpie, and its off to the vice and hacksaw to cut it off.

Lock install 16.jpg


Lock install 17.jpg


Now one thing I learned was that most people spin the "dial thing" back on to act as sort of a die to clean the threads up after cutting and filing.

I did remember to do this...but I forgot to bring up a damn FILE....ARRRRGGGHHHHHH...
 

D2Cat

Well-known member
Lifetime Member

Equipment
L305DT, B7100HST, TG1860, TG1860D, L4240
Mar 27, 2014
13,017
4,391
113
40 miles south of Kansas City
That is a lot work to change a lock on a safe. Glad I don't have anything valuable enough to need a safe !!! ;)
 

Runs With Scissors

Well-known member

Equipment
L2501 TLB , Grappel, Brush Hog, Box Blade, Ballast box, Forks, Tiller, PH digger
Jan 25, 2023
1,814
1,910
113
Michigan
But I decide to get as far as I can....To hell with it, off to the vice.

Lock install 25.jpg


Lock install 26.jpg


Then as I'm walking back in, it hits me......My Gerber tool has a file.....YAY!!!!!!!

Gerber to the rescue.....I love that damn tool.....


Lock install 35.jpg


Lock install 27.jpg
 

Runs With Scissors

Well-known member

Equipment
L2501 TLB , Grappel, Brush Hog, Box Blade, Ballast box, Forks, Tiller, PH digger
Jan 25, 2023
1,814
1,910
113
Michigan
Looking good.

Lock install 28.jpg


Now i didn't take any close ups but the "dial thing" has markings on the back.

My lock was installed in a Vertical Down configuration so I have to line up the VD mark with the brass rod keyway and tap in a small "drift key"

I had to use the needle nose to prevent me from hitting my fat fingers. and after a few times dropping it, and a few choice words.

Its in.

Lock install 29.jpg


Lock install 31.jpg
 
Last edited:

Runs With Scissors

Well-known member

Equipment
L2501 TLB , Grappel, Brush Hog, Box Blade, Ballast box, Forks, Tiller, PH digger
Jan 25, 2023
1,814
1,910
113
Michigan
Setting the combo had me perplexed for about an hour......according to the directions you spin it 4 or 5 times (I can't remember which way) then put the "Change Key" in, twist it and use the "set mark" to dial your combo, then twist the key back.

Lock install 40.jpg


Well my key would not go in. I had to take the back off and line the holes up by eye, put the cover back on and then the key went it, and I was able to set the combo.

I tested it about 6 times and then put the relocker thingy back on, and buttoned her up.

Lock install 41.jpg


The End....
 
Last edited:

Runs With Scissors

Well-known member

Equipment
L2501 TLB , Grappel, Brush Hog, Box Blade, Ballast box, Forks, Tiller, PH digger
Jan 25, 2023
1,814
1,910
113
Michigan
Looks like your boring tool is made for cutting an internal groove. Grind it so that just a single point contacts the bore.
That could very well be.....

I'll have to do more research and practice with one.

I figured you just set it to center, and fed it in.........kind of like a lathe bit I suppose.

Either way, I just couldn't get it to cut properly.
 
  • Like
Reactions: 1 user