Add hyd top link to L185

ShaunBlake

New member
Lifetime Member

Equipment
B6100D; B219; Piranha bar; Hodge stabilizers; Filled Ag rears; R322T w/48" deck
Dec 21, 2014
899
1
0
81
Sugar Hill -- next door to Buford, GA
... made a drawing taking the dimensions off the casting. You're welcome to use the drawing but know that I have not made the adapter yet and the drawing is unproven...
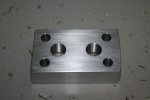
First, thank you for sharing this journey. I have a (mild) interest in adding hydraulic assistance on my 3PH and my B6100 is so similar to your L185 that I can, to a great extent, directly apply your wisdom.

Second, what app are you using to generate the drawings? (And why does the height in the side view differ from that of the end view?)

Finally, is your tractor down until you finish this fab, or did you just open the block and measure, then re-assemble? What steps did you take to ensure that the hydraulics were not contaminated?
 

bharleyh

New member

Equipment
L 185
Nov 8, 2012
9
0
0
Mission Viejo CA
I hope this does help some one with a similar project. I could not find any details or dimensions for making this adapter block on the internet so I'm posting them as I go.
The program I'm using for the drawings is TurboCAD 16 2D/3D. It's a full blown CAD program with a steep learning curve. I've only learned how to use 10 or 15% of the features. I can save the drawings as TurboCAD JPG's to my desktop and then upload them to the internet.
I'm not sure where you are seeing different dimensions between the end view and side view.
I unbolted the four bolts holding the casting and tapped it lightly with the ratchet handle and it popped loose. I lifted the casting straight up (and spilled the oil within the casting). Then with 6" dial calipers measured the holes and hole patterns and took the photos. I laid a towel on the base to cover the openings while I took the dimensions. The casting was off for about one hour then reinstalled. I don't believe the was any contamination of the oil.
I hope to be buying the material for the block this week. I'm planning on using aluminum bar stock 2" wide by 1" thick. This should allow me enough thickness to thread the block for the hose fittings.
 

bharleyh

New member

Equipment
L 185
Nov 8, 2012
9
0
0
Mission Viejo CA
Ok, it's been a really long time since i posted an update. I'm sorry for the delay.
I did make the adapter for tying into the Kubota hydraulic system using the dimensions in my drawing. The important dimensions is the pattern between the holes. I've got a weird dimension for a side dimension on the drawing for some reason so I'll have to re-do it.
I got all the parts from Surplus Center and once the adapter was installed all the hoses, valve, and cylinder went in easily. However my geometry was off on my plan and I ended up with an over center condition that you can see in my previous drawing.
I had to extend the mounting location for the cylinder above and forward of the bucket to keep it from binding up. As you can see from the pics because I had to move the mount location the bucket will only dump to about 45 degrees. This dumps the sand I'm working with but it wont dump damp earth. I'll have to figure a way to change the geometry. Back to the drawing board.
As far as the hydraulics are concerned everything works great. The Kubota has no problem running the extra cylinder. The only thing is you cant raise the bucket at the same time you tilt (dump) it. Each operation has to be done separately. I don't know why this is happening but I'll just do one operation at a time, not a major problem for me.
I'm going to have to post for the other pics since I can't post more than 5 pics at one time. More pics to follow. If you have any suggestions or questions I'll reply as soon as I can. I'll be on vacation the last week in October so I wont be able to reply then.
 

Attachments

bharleyh

New member

Equipment
L 185
Nov 8, 2012
9
0
0
Mission Viejo CA
The first post showed the part I made and the parts I got from surplus Center. This set shows how the parts are installed and the change I had to make to the mounting location on the bucket.
The extra pieces of steel on the bucket are temporary until I can re-figure some way to change the geometry. I'll need to change something to get that bucket to dump more than 45 degrees.
Since I'm able to dump sand (which is the only soil at my desert property) I'm not sure when I'll get around to it. If you guys have any suggestions I would love to see them.
 

Attachments

coachgeo

Well-known member

Equipment
L225 w/woods Few Mowers & Back Blade, D722 in Motorcycle (Triumph Tiger), LMTV
Nov 16, 2012
2,460
32
48
Southern OH
not a machinist..... and understand what has been said here that dealing with cast items is easy to Fubar....... butt?? wondering if it might be made less complicated by first filling the holes original holes with Led or Epoxy


like pull the plug on the one end, plug the verticle holes with??? and poor in molten lead or fill/pack it with Epoxy? Then drill thru the lead/epoxy the original ports out but leaving enough to plug up center between the two verticle holes.

Now ones only got to deal with the cast issue in drilling one port at opposite end from the one you filled thru, but with that area now also filled with lead or epoxy would this not lessen issues with drilling the cast metal?
 
Last edited:

North Idaho Wolfman

Moderator
Staff member
Lifetime Member

Equipment
L3450DT-GST, Woods FEL, B7100 HSD, FEL, 60" SB, 743 Bobcat with V2203, and more
Jun 9, 2013
28,697
5,121
113
Sandpoint, ID
Wondering if it might be made less complicated by first filling the holes original holes with Lead or Epoxy?
That would not work as neither lead or epoxy can hold up to pressure of the hydraulic pressures!

But you could run a tap through the side hole into the center crossover hole, insert a plug, then tap out the outer hole one size larger, then with a plug it with a allen plug, then yes drill 2 holes through the existing holes to the back side and then tap for hose fittings. ;)
 
Last edited:

coachgeo

Well-known member

Equipment
L225 w/woods Few Mowers & Back Blade, D722 in Motorcycle (Triumph Tiger), LMTV
Nov 16, 2012
2,460
32
48
Southern OH
That would not work as neither lead or epoxy can hold up to pressure of the hydraulic pressures!
makes since

But you could run a tap through the side hole into the center crossover hole, insert a plug, then tap out the outer hole one size larger, then with a plug it, then yes drill 2 holes through the existing holes to the back side and then tap for hose fittings. ;)
If one had a drill bit long enough would it possibly be less hassle instead of drilling two holes (in and out)as described; but instead go thru the side hole with a long bit and drill out opposite end for the out. Then do as you described; "run a tap through the side hole into the center crossover hole, insert a plug".

This way your only adding one hole instead of two. little less chance for a FUBAR to occur?

Also allows you to go back to stock by plugging both outer holes after removing the center plug. Assume the center plug is Allen head?
 
Last edited: