Yet another B7100 FEL build

torch

Well-known member

Equipment
B7100HSD, B2789, B2550, B4672, 48" cultivator, homemade FEL and Cab
Jun 10, 2016
2,593
836
113
Muskoka, Ont.
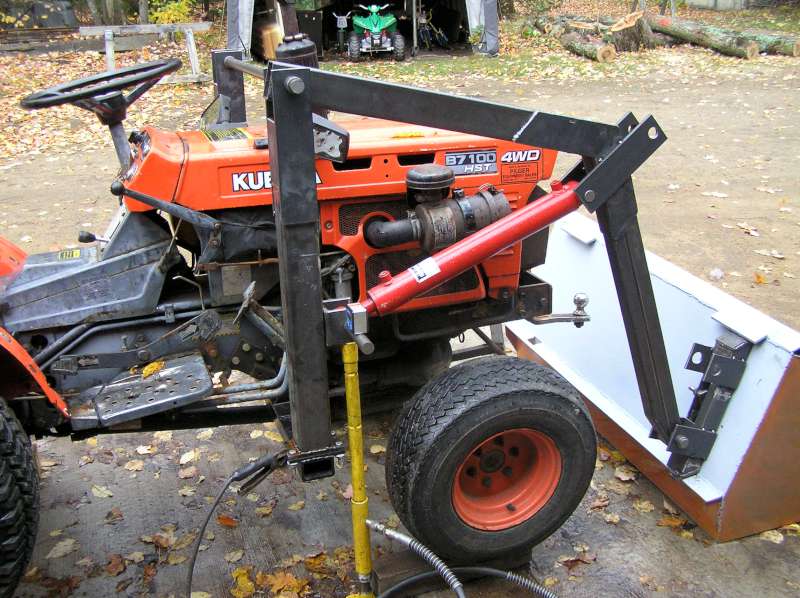
After a lot of research and tinkering with design ideas, I've finally settled on a plan and started work:


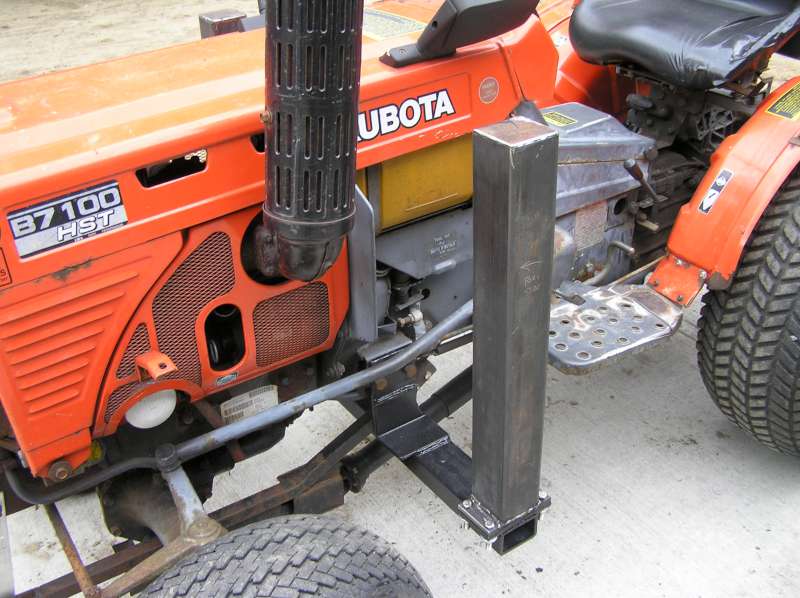
EDIT 2023/01/04: Six years later and I'm working on my third clutch. I think I've tracked the problem down to a flaw in the subframe design, as shown in the above photo. In the later version of the B7100, Kubota provided a FEL mount -- the three bolts on each side holding up my support, located just behind the engine. The newer design made splitting the tractor for service easier -- earlier versions had a sub-frame that mounted to the side of the engine itself so the entire subframe had to be removed to split the tractor.

The engine is not bolted directly to the bell housing. There is a heavy steel adapter plate between them. I finally discovered my plate was warped, causing a misalignment and eventual failure of the clutch. I think the warpage was caused by the stress of supporting the FEL only on one side of the joint and possibly overloading the FEL.

I have now reinforced the joint by extending the subframe from the tower support beam to the engine with a pair of bolt-on braces. The braces can be easily removed to split the tractor if necessary, but reinforce the joint and prevent any flexing under load. I added a piece of 5/16" thick plate 3" thick notched 2" x 3" to fit around the support beam. The brace is bolted to that with a pair of 3/8" Gr. 8 bolts. A piece of 1/4" flat bar 2" x 6" is secured to the engine with the existing bolts. Doubled .120 wall 1" square tubes are welded between. The bracing is repeated on the left side.


Last edited:
  • Like
Reactions: 1 user

torch

Well-known member

Equipment
B7100HSD, B2789, B2550, B4672, 48" cultivator, homemade FEL and Cab
Jun 10, 2016
2,593
836
113
Muskoka, Ont.
They were on the tractor when I got it. They appear to be some sort of universal-fit automotive mirror. They are of limited usefulness, but better than nothing.
 

North Idaho Wolfman

Moderator
Staff member
Lifetime Member

Equipment
L3450DT-GST, Woods FEL, B7100 HSD, FEL, 60" SB, 743 Bobcat with V2203, and more
Jun 9, 2013
28,605
5,067
113
Sandpoint, ID
Overall looks good. :)
Just a little concerened that your towers wont hold up with them just lightly bolted to the flange. ;)
 

torch

Well-known member

Equipment
B7100HSD, B2789, B2550, B4672, 48" cultivator, homemade FEL and Cab
Jun 10, 2016
2,593
836
113
Muskoka, Ont.
Overall looks good. :)
Just a little concerened that your towers wont hold up with them just lightly bolted to the flange. ;)
The towers will also be braced to the front of the tractor. I just haven't gotten that far yet.
 

D2Cat

Well-known member
Lifetime Member

Equipment
L305DT, B7100HST, TG1860, TG1860D, L4240
Mar 27, 2014
12,982
4,365
113
40 miles south of Kansas City
" Yet another B7100 FEL build"

What should we expect from a guy who's moniker is TORCH?

Turn your welder up and melt that iron together good!
 

torch

Well-known member

Equipment
B7100HSD, B2789, B2550, B4672, 48" cultivator, homemade FEL and Cab
Jun 10, 2016
2,593
836
113
Muskoka, Ont.
Are you putting axle bars on it?
That was the original plan. I'm now debating the idea of a single pin at the drawbar mount. Easily detached and should suffice for the purpose of pushing the FEL into a pile of dirt. But the OEM design of separate attachments at each axle does seem more rigid.
 

torch

Well-known member

Equipment
B7100HSD, B2789, B2550, B4672, 48" cultivator, homemade FEL and Cab
Jun 10, 2016
2,593
836
113
Muskoka, Ont.
Through the week, I turned some sleeves for the arm pivots. I pinned both arms together temporarily while tacking the sleeves to ensure everything is perfectly aligned. (Well, "perfectly" meaning within 0.002". I turned the bushings 0.014" oversize and the temporary alignment pins 0.012" oversize. :D )


Today I got most of the bucket done:


I will eventually run a bead of hard-facing on the leading edges of the wear edges:


I decided on the skid steer quick-attach method. This is as far as I got when I ran out of wire. Will have to switch to stick tomorrow, as it's a holiday weekend up here!


torch

Well-known member

Equipment
B7100HSD, B2789, B2550, B4672, 48" cultivator, homemade FEL and Cab
Jun 10, 2016
2,593
836
113
Muskoka, Ont.
I hope to mount a blower to the arms down the road, so I need to keep the area between the arms clear. This rules out the traditional skid steer QA lever arrangement that has them rotate to the centre.

Instead, I shamelessly stole a design posted by "mwb' on tractor by net, making only minor modifications to suit my own needs. I spent the day on the lathe and mill making parts. I've test assembled one and these should work out quite nicely.


torch

Well-known member

Equipment
B7100HSD, B2789, B2550, B4672, 48" cultivator, homemade FEL and Cab
Jun 10, 2016
2,593
836
113
Muskoka, Ont.
And this is why we test fit things...

I figured it was time to start putting the pieces together today. To make sure I had all the angles right before committing, I laid an arm out on the floor and tacked the cylinder mounts in place:


Looking pretty snazzy if I do say so myself. An extended cylinder just clears the arm when in the full dump position:


Uh oh, not so fast. In all my measuring and calculating and figuring and second guessing, I failed to allow sufficient clearance for the fitting!:eek: :


Fortunately, things were just tacked, so it didn't take too long to lower the QA an inch:


Whew. Crisis averted. :cool:

After that I figured it was time for a break from welding. Off to the mill to produce a hydraulic block or two. I managed to get one squared and dressed before calling it quits for the night.


Lil Foot

Well-known member
Lifetime Member

Equipment
1979 B7100DT Gear, Nissan Hanix N150-2 Excavator
May 19, 2011
7,281
2,233
113
Peoria, AZ
Looking good. Also interesting design on the flycutter. Looks beefy.
 

North Idaho Wolfman

Moderator
Staff member
Lifetime Member

Equipment
L3450DT-GST, Woods FEL, B7100 HSD, FEL, 60" SB, 743 Bobcat with V2203, and more
Jun 9, 2013
28,605
5,067
113
Sandpoint, ID
2 things I noticed, and I could be wrong:

1: You need stops on the extension or you'll bend the rams.
2: You need stops on the roll back as it looks now that you'll roll the bucket back so far as to dump out the rear of the bucket.

Also:
Is it an illusion or are the dump cylinders larger than the lift cylinders?
How are you going to grease the pins?
How is it that the Latch design "not going to be in the center" as they connect together via a rod? and what about the cross tube?
How are you thinking a snow blower will work on the loader?

I not knocking, I'm just curious as to your ultimate goal.
 
Last edited:

torch

Well-known member

Equipment
B7100HSD, B2789, B2550, B4672, 48" cultivator, homemade FEL and Cab
Jun 10, 2016
2,593
836
113
Muskoka, Ont.
Also interesting design on the flycutter. Looks beefy.
Yeah, it uses 3 lathe bits at 120°. Smoother than the traditional single bit style.

2 things I noticed, and I could be wrong:

1: You need stops on the extension or you'll bend the rams.
2: You need stops on the roll back as it looks now that you'll roll the bucket back so far as to dump out the rear of the bucket.
I'm not sure how I would bend the rams -- the ram will go to full extension without touching anything. The curl will be less than horizontal at ground level. Yes, if the operator does not tip the bucket, it could potentially dump out the rear at full height. I did explore parallel lift, but the added weight of the mechanism would eat into the loader capacity, so it's a trade-off.


Also:
Is it an illusion or are the dump cylinders larger than the lift cylinders?
How are you going to grease the pins?
How is it that the Latch design "not going to be in the center" as they connect together via a rod? and what about the cross tube?
How are you thinking a snow blower will work on the loader?

I not knocking, I'm just curious as to your ultimate goal.
Illusion. All cylinders are exactly the same. 2" diameter, 16" travel.

The pins will be bored 1/2 way and grooved, with a grease nipple at the end of the pin.

I did modify the QA design slightly, eliminating the rod and cross tube in favour of separate actuation levers for each side. If you look way back in the beginning of this thread, you will see I built things around the mid-PTO extension to the front blower.

My thought is to modify the front blower, removing the supplied sub-frame and mounting it to QA mounts so I can pop the bucket off and replace it with a blower. It may or may not work out, and the front mount blower I have is in pretty rough shape. It will need a fair bit of TLC so I may be using the 3ph mount blower this winter. Baby steps, baby steps... :D
 

North Idaho Wolfman

Moderator
Staff member
Lifetime Member

Equipment
L3450DT-GST, Woods FEL, B7100 HSD, FEL, 60" SB, 743 Bobcat with V2203, and more
Jun 9, 2013
28,605
5,067
113
Sandpoint, ID
I did modify the QA design slightly, eliminating the rod and cross tube in favour of separate actuation levers for each side.

You cant eliminate the cross tube!
Well you can, but you'll find out real quick that your SSQA is now worthless, as the landing pads will not stay in sync with each other making hitching up near to impossible. ;)

And how the ram can get bent is from the force of the bucket pulling the ram farther down (second picture down) also it is very possible that it will pop the gland nut right out of the cylinder end, as it will also pull the cylinder rod out of the cylinder.
 
Last edited:

torch

Well-known member

Equipment
B7100HSD, B2789, B2550, B4672, 48" cultivator, homemade FEL and Cab
Jun 10, 2016
2,593
836
113
Muskoka, Ont.
You cant eliminate the cross tube!
Well you can, but you'll find out real quick that your SSQA is now worthless, as the landing pads will not stay in sync with each other making hitching up near to impossible. ;)
You may be right. If I find it is a problem I'll make a removable cross tube, but I don't think there's any place to put it and still accommodate the blower. I'm hoping that the difference between cylinders will be minimal over the few degrees it takes to detach and reattach.

And how the ram can get bent is from the force of the bucket pulling the ram farther down (second picture down) also it is very possible that it will pop the gland nut right out of the cylinder end, as it will also pull the cylinder rod out of the cylinder.
Ok, I see what you are driving at there. I'm not sure it would actually pull the cylinder apart -- those cylinders are rated over 9,400 lbs each, but bending might be possible if the tractor was driven forward with the bucket fully tipped and jammed against something. I should be able to easily add a hard stop to prevent that.
 

North Idaho Wolfman

Moderator
Staff member
Lifetime Member

Equipment
L3450DT-GST, Woods FEL, B7100 HSD, FEL, 60" SB, 743 Bobcat with V2203, and more
Jun 9, 2013
28,605
5,067
113
Sandpoint, ID
You may be right. If I find it is a problem I'll make a removable cross tube, but I don't think there's any place to put it and still accommodate the blower. I'm hoping that the difference between cylinders will be minimal over the few degrees it takes to detach and reattach.
It won't be minimal, one cylinder and one pad will move all the way to the end of it's ark, then when it stops the other will go, you'll find out when you get it going.

I'm not really understanding why the blower can't go just in front of the SSQA?
I'm setting mine for just that, granted I'm using a bobcat and hydraulics to do it so no drive shaft to worry about, but all you would have to do is make sure the cross bar is not in the way of the driveshaft. ;)
 

torch

Well-known member

Equipment
B7100HSD, B2789, B2550, B4672, 48" cultivator, homemade FEL and Cab
Jun 10, 2016
2,593
836
113
Muskoka, Ont.
It won't be minimal, one cylinder and one pad will move all the way to the end of it's ark, then when it stops the other will go, you'll find out when you get it going.
I can see that happening with nothing attached. But I suspect, assuming roughly equal friction from side to side, that the weight of the attachment will balance the motion. So, starting with them way out of line, if I "point the toes" so that they are fully tipped down, then tuck them under the lip of the attachment and lift ever so slightly with the arms, curling back the weight of the attachment will cause them to move equally.

Option B is that it should be possible to move one by hand and the other will move in the opposite direction.

I'm not really understanding why the blower can't go just in front of the SSQA?
I'm setting mine for just that, granted I'm using a bobcat and hydraulics to do it so no drive shaft to worry about, but all you would have to do is make sure the cross bar is not in the way of the driveshaft. ;)
Given a long enough driveshaft, I guess it could. Given the driveshaft that I have, I think the gearbox and impeller housing needs to be between the arms. The 2 shaft sections were rusted together. I've been soaking them and just recently got them separated so it's possible it could be further out than I originally thought. That said, I prefer to keep it close to the front of the tractor for the best maneuverability.

(the blower acts like a rudder in deep snow. The further out the blower is from the front wheels, the greater the leverage that the wheels are fighting)
 
Last edited:

torch

Well-known member

Equipment
B7100HSD, B2789, B2550, B4672, 48" cultivator, homemade FEL and Cab
Jun 10, 2016
2,593
836
113
Muskoka, Ont.
Ok, hydraulic block done:


Back to the welding. First, I set the arm pivots, using a long bar as a single hinge pin to ensure all points are concentric. I have a magnetic electronic protractor/level that can be zeroed at any angle. It's been quite handy for this project. For example, the bar is exactly parallel to the support beam under the posts, and the posts are at exactly 90° to the support beam. The 4 ton power pony ram + extensions are equally handy at this stage.


Then some fiddling setting the bottom pin of the boom piston. In another FEL build thread the author commented about how much effect even small changes here have. He's right. After some considerable trial-and-error, I settled for a lower limit of the bottom of the level bucket 2" below grade and a maximum lift of 5'-10":


This angle gives an idea of bucket proportion:


Once I'd got that all sorted, it was time to duplicate the pivot points on the other post and boom, using the originals as templates and more pieces of 1" round bar to pin them together.


  • Like
Reactions: 1 users