water temperature gauge not working on 345
- Thread starter jimmearl
- Start date
Yes, stuck a new gauge in today and still doesn't move the new needle..Do you have power to the gauge ?
When I am looking at the wiring diagrams what does AV 0.5 stand for or mean ? This is on a L345Yes, stuck a new gauge in today and still doesn't move the new needle..
GreensvilleJay
Well-known member
Equipment
BX23-S,57 A-C D-14,58 A-C D-14, 57 A-C D-14,tiller,cults,Millcreek 25G spreader,
0.5mm is the wire size METRICALLY speaking. There's gotta be a 'conversion chart' to NORMAL sizes on the net somewhere......")
If you short out the sensor ( ie: ground the signal wire) BRIEFLY, the guage should jump to really,really hot.
?? did you replace the sensor with the correct Kubota unit for your tractor ?
If you short out the sensor ( ie: ground the signal wire) BRIEFLY, the guage should jump to really,really hot.
?? did you replace the sensor with the correct Kubota unit for your tractor ?
0.5mm is the wire size METRICALLY speaking. There's gotta be a 'conversion chart' to NORMAL sizes on the net somewhere......
If you short out the sensor ( ie: ground the signal wire) BRIEFLY, the guage should jump to really,really hot.
?? did you replace the sensor with the correct Kubota unit for your tractor ?
Attachments
-
 326.2 KB Views: 45
 -
 388.5 KB Views: 43
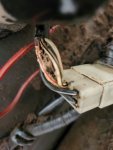
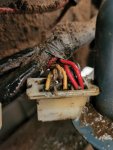
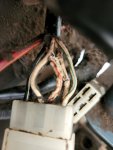
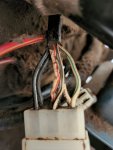
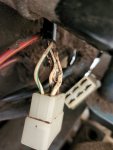
I had bought a 2nd temp Guage and Sensor, and thermostat and radiator cap form Kubota dealer, when I ground the sensor wire the gauge doesn't move, then when I ground at the terminal at the gauge no movement... then on the hot terminal on the Guage shows power, so got another Guage from dealer today same identical issues , then I found the wires fused together at a 6 pin connector, I guess something is back feeding the temp gauge ? Including attached pictures , I guess it will require a new harness..
Attachments
-
 287.2 KB Views: 44
 -
 276.6 KB Views: 43
 -
 283.7 KB Views: 41
GreensvilleJay
Well-known member
Equipment
BX23-S,57 A-C D-14,58 A-C D-14, 57 A-C D-14,tiller,cults,Millcreek 25G spreader,
You may not need a complete harness ($$$$ if available !! )
You 'should' remove it though, clean it, then carefully slice away the sheathing for about 8-10" from that connector. If it's OK,just cut near the connector and splice in new wire to replace the damages sections. As long as you have 3/4" of 'connector ends' of the wires,it is repairable. If you can 'offset' cut the wires ( ie: NOT all the same length, then remove the plastic 'sleeve' from 'butt' connectors. Slide heat shrink onto a wire, crimp the bare 'butt',tug the wires to confirm a good crimp. Then heat the heat shrink, repeat 5 more times. Try to use wires with colors that match the original or at least take a few pictures .
When this is done, connect and test, if OK, THEN use black tape to wrap the harness up 'goo as new'.
For sure get a wiring diagram ( from WSM),make notes on it what you did. As well try to figure out what CAUSED the wires to 'fry'. Check all the fuses, besure they're the correct values, before powering up.
You may not need a complete harness ($$$$ if available !! )
You 'should' remove it though, clean it, then carefully slice away the sheathing for about 8-10" from that connector. If it's OK,just cut near the connector and splice in new wire to replace the damages sections. As long as you have 3/4" of 'connector ends' of the wires,it is repairable. If you can 'offset' cut the wires ( ie: NOT all the same length, then remove the plastic 'sleeve' from 'butt' connectors. Slide heat shrink onto a wire, crimp the bare 'butt',tug the wires to confirm a good crimp. Then heat the heat shrink, repeat 5 more times. Try to use wires with colors that match the original or at least take a few pictures .
When this is done, connect and test, if OK, THEN use black tape to wrap the harness up 'goo as new'.
For sure get a wiring diagram ( from WSM),make notes on it what you did. As well try to figure out what CAUSED the wires to 'fry'. Check all the fuses, besure they're the correct values, before powering up.