Kubota B6000 Restoration

flangefrog

Member

Equipment
Kubota B6000
Nov 29, 2021
38
5
8
31
Auckland, New Zealand
Hi! A short introduction: I've lived my whole life on a farm in Auckland, New Zealand surrounded with tractors. Mostly old David Browns at this point but also a couple of Kubota's. I'm not really experienced with fixing tractors but I've done some basic work on them before including repairing electrical stuff. I've also rebuilt a mower engine before.

On the farm there is an old Kubota B6000. It's one of the first tractors I ever drove. It's also the first tractor I ever worked on, repairing the fuel line and later the electrics. I often used it for towing trailers or moving heavy items. I love how small but capable it is and it's my favourite tractor. It worked pretty well but had a few issues like a hard to move throttle. Several years ago the steering completely stopped working. It's been left out and has unfortunately deteriorated a lot recently.

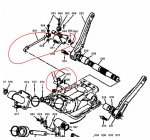
About a year ago I had another look at the steering and tried welding new teeth onto the sector gear as they were worn in the shape of the worm gear. It worked for just a short while but then stopped again. The teeth weren't even engaging with the worm gear.

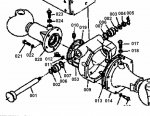
Just recently I've been looking at the tractor again and this time I've found the parts, service and operating manuals as well as this forum and some youtube videos. The steering assembly is the "old style". I can see now that the problem with the steering was that there were no bearings (actually I found about 2 balls from the lower bearing when cleaning it). I had assumed the worm gear was held in the correct place with bearings in the outer shaft cover but actually the shaft had been rubbing against the edge of the upper bearing race and oil seal, grinding a lot of it away.

20211127_150650.jpg

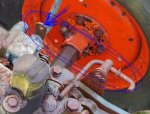
Getting the bottom race out of the steering box was difficult. I first used penetrant and tried to lever it out or bang a screwdriver around the edges. I then heated the case up with my hot air gun - I'm not sure that made a difference. - then I managed to get the race out by knocking on the base of the case with a hammer.

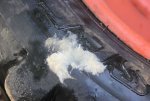
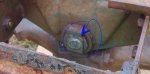
I removed the two oils seals by banging a screwdriver in around the edge then using it to bend the metals outer ring of the seals in and lever them out. Below is the original sector gear shaft oil seal. It reads AE1245E 24 - 35 8.

20211129_100758.jpg

The tractor is technically not mine and I'm not sure it will stay around for me to use so I'm not wanting to put too much money into fixing it.

Today I went to Bearing Supplies and bought a new upper and lower bearing, oil seals, loose balls, and RTV silicone gasket maker and then I went to Waitemata Hydraulics and Mitre 10 for some washers, a rubber plug, some bolts and circlips.

The upper bearing (66591-41140) is 40mm x ~17mm x 11mm. The following seem to be equivalent:
ACS0304
VBT17Z-3

The lower bearing (66591-41130) is 35mm x 15mm x 11mm with the following equivalent items:
ACS0304-2
VBT15Z-2
15BSW02

The two bearings I bought are ACS0304 and 15BSW02. About $20 NZD each. They don't feel very smooth against the races on the steering shaft but the shaft is rusted and pitted. I think it will be OK.

The oil seals are 32mm x ~17mm x 8mm for the steering shaft seal above the top bearing and 35mm x 24mm x 8mm for the sector gear shaft seal. The model numbers of the parts I got were TC12419 (17-32-7), TC12413 (16-32-7, in case it fits better for the rusted steering shaft) and TC12455 (24-35-7). All about $3.50 each. Note they are only 7mm thick instead of 8mm but I don't think it matters much.

The bolts I got were flange head Grade 8.8 M8 yellow zinc coated at lengths of 16 and 20mm. I think they are standard(course)/JIS thread pitch at 1.25mm but I'll have to check. Mitre 10 SKUs 225886/7.

I lost the original circlip (04611-00190) that holds the adjusting screw in the sector gear shaft. I bought 18 and 20mm internal circlips, I think 20mm should be correct. The single large ball bearing (07715-01605) appears to be 5/16 and the 20 smaller balls (07715-03203) appear to be 3/32. Do you think that sounds correct as opposed to being metric sizes like 8mm and 2.3mm? They didn't have the smaller size in stock at Bearing Supplies so I got some 2.5mm bearings to try, otherwise I can use the original ones.

I bought a rubber plug to replace part 61011-18142 that fits into the end of the adjusting screw nut. The part is Stopper Rubber Small #00 (SKU 337552) for $2 at Mitre 10.

I installed the lower bearing race and made a quick assembly tonight but it seems the sector gear I built up with welding is now a bit too big and I'll need to grind the teeth down.

The tractor has a whole lot of other issues and I'll update this thread as I continue fixing the steering and other issues. I'll also post some more photos soon.

B6000 Parts book
B6000 Operators manual
B6000 Service manual

The parts book is also available online here: https://kubota.co.nz/part/parts-catalogue/
 
Last edited:
  • Like
Reactions: 1 user

Nicksacco

Well-known member

Equipment
Kubota L35 TLB
Sep 15, 2021
573
317
63
Bahama, NC
Hello,
I can appreciate your efforts having restored a beat up L35 myself.

If you haven't already, you can check Messicks or MB Kubota parts (links below) to potentially obtain sizes of things.
Sometimes the sizes are listed in the Parts book - sometimes not.
I didn't look at your parts book link.
I doubt that there are any non-metric sized parts on the tractor - but that's just me.

Do you think it worth doing anything if the thing is not going to be around much longer?
I guess you could make an offer if you really wanted to invest timer and money - worst that can be said is "no".


flangefrog

Member

Equipment
Kubota B6000
Nov 29, 2021
38
5
8
31
Auckland, New Zealand
I've looked at various sites to find the sizes of parts but most of these old parts are just listed with no photo or description. It's far too expensive to import most of the parts or to buy them here.

Unfortunately the actual owner of the tractor is in dispute otherwise I'd definitely make an offer. Can't be worth that much more than scrap metal at this point. I know if I don't fix it, it will just be left to rust away. I've got a lot of time at the moment - although not much money - so I don't plan on buying too many more parts for it. It shouldn't take that much work to get it usable - after the steering the main things will be fixing the radiator and brakes.
 

flangefrog

Member

Equipment
Kubota B6000
Nov 29, 2021
38
5
8
31
Auckland, New Zealand
I ground the sector gear down a lot more. I don't really know what the original shape was but hopefully it will work ok. In the second photo you can see the area around the seal has rusted away. I'll need to build this up by welding it and then file it smooth for it to seal properly.
20211130_121051.jpg 20211130_121035.jpg

I removed the sector gear oil seal and installed the new one. I used a bicycle bearing race/cup remover to knock the new oil seal in.
20211130_121436.jpg 20211130_121726.jpg 20211130_121936.jpg

I used a stiff wire brush on an angle grinder to clean up all the old gaskets. There seems to be a minor crack in the bottom of the gear case.
20211130_121206.jpg

This shows how the bearings fit on the steering shaft. The shaft is grey because I sprayed some zinc paint on it.
20211130_121250.jpg

I used some sticky grease to put the new small bearings on the adjuster bolt. 20 of the 2.5mm bearings was just a little too big to fit closely together but there's enough room in the sector gear that I think it will work. The thick washer fits over the bearings. I flipped it upside down as the bearings had worn a groove around the original side. The 0.25mm shim washer goes on the top. It was very worn but I couldn't find another one.
20211130_123125 (1).jpg 20211130_123247.jpg

The larger 5/16 ball bearing goes in the sector gear.
20211130_123446 (1).jpg
 
Last edited:

flangefrog

Member

Equipment
Kubota B6000
Nov 29, 2021
38
5
8
31
Auckland, New Zealand
Continued...

After placing the adjuster bolt in the sector gear (with a lot of grease) it needs to be secured with the internal circlip. The 20mm one didn't fit but 18mm seems perfect. It seems to spin much more smoothly than it did before.
20211130_124257.jpg

I've assembled everything without any oil for now. I also forgot to install the upper oil seal. I had bought a few copper washers to fit above the top bearing as a shim, but I don't think it needs it as there is no up and down movement of the shaft once the shaft cover is tightened down to the gear case. I chopped a centimetre or so off the top of the outer steering shaft tube as it was rusted away. It does seem to have a little bit of play and I'm not sure I can remove it with the adjuster due to the welded and ground sector gear teeth. But at least it works now. The 16mm M8 bolts seemed be a good length for everything on the steering box. I think the gold bolts look pretty fab against the Kubota blue, but the coating seems to be wearing off easily.
20211130_131215.jpg

I installed the steering box on the tractor. 20mm bolts seemed a bit short, 25mm probably would have been right. I used a metal bar as a temporary steering wheel bolted onto the female splined ring from the old car steering wheel it used to have. Both male and female splines are almost completely worn and rusted so the steering wheel slips without much force applied.
20211130_143427_HDR.jpg

I completely filled the radiator and then attempted to start the tractor. It took quite a lot of glow plug to start it. I wanted to be a bit careful as the glow plug is directly connected without the "controller" indicator light which is broken. But once it was started it seemed to run fairly well. The hi-lo gear selector was broken off so it's stuck in low for now. I managed to drive it to in front of my shed. I hadn't noticed before but one of the front tires is completely shredded. The radiator has a bit of a leak (might last 10 min running at low revs) and at high revs it blows water droplets back at the engine. Much of the steering play seems to be from the entire front diff, axle and wheels moving forward and backward. I think the diff mustn't be secured to the chassis properly.
20211130_150048_HDR.jpg

Below are the original plates and serial number from this tractor.
20211130_150248_HDR.jpg 20211130_150236_HDR.jpg
 
Last edited:

flangefrog

Member

Equipment
Kubota B6000
Nov 29, 2021
38
5
8
31
Auckland, New Zealand
I removed the radiator. Any part of the frame the radiator fits into crumbled away when I touched it. The radiator seems to be in OK condition. I cleaned it out with a hose and there was a lot of gunk and rust in it. The tractor itself seemed fairly clean when running water through it. I'm still not sure where the leaks are so I might see if I can run pressurised water through it.
20211130_181424_HDR.jpg 20211130_183936_HDR.jpg 20211130_200527_HDR.jpg

I also managed to remove the remains of the right side mudguard, free up the stuck hi-lo shifter and get the throttle moving a lot easier.

The front diff appears to be sliding back and forth on the pivot bolt. I haven't looked closely yet but maybe I need to replace the bushes (or just put a washer in there).

I found what looks like a place for another lever that's just behind the PTO gear selector. You can see it in the photo of the tractor in front of my shed, partially hidden behind the left brake rod. There's no actual lever installed but there is a piece of tube with a pin through it. It doesn't look like the lever has just broken off or anything. Any ideas what this is?

The tyres seem to be 4.00-10 front and 7-14 rear. According to the info I've found, B6000s should usually have bigger tyres and the B5000 usually has these sizes. Do you think the wheels and tyres might be off a B5000?
 
Last edited:
  • Like
Reactions: 1 users

Nicksacco

Well-known member

Equipment
Kubota L35 TLB
Sep 15, 2021
573
317
63
Bahama, NC
You Sir, are a master of ingenuity and focus!
Nice work getting that steering column back.
I'd be on my way to you for this project if you were closer!
I don't think the tractor is hopeless - Mine was pretty bad too with lots of rust and damaged parts.

But as you know it's going to take quite a bit of work.
I downloaded the parts to see more clearly and the steering bearing (66811-41140) is readily available from many sources including Amazon (https://www.amazon.com/66811-41140-Kubota-Tractor-Steering-Bearing/dp/B06XCJWFKQ)
But it sounds as if you've conquered that already. Welding or brazing the shaft with "make up" metal for the seal is a great idea and that's how my steering cylinder rod was repaired. If you didn't have a lathe, you likely can use a decent drill press to turn it.

Do you think it possible to use a "stop leak" (such as Bar's stop leak) in the radiator or is it too far gone?
Mine was so bad, half the core was missing - rotted away.
Some folks hate the liquid fixes, but for a quick fix to be addressed later it might work.
I ended up doing a lot of shopping online for a suitable replacement that had the right dimensions.

Looking at the front axle mounting the Pin 66591-56115 seems to be the main component with bushings and such keeping things tight. I'm guessing the bush are worn out (looks like the machine hasn't seen grease for a long time). Hopefully the frame isn't wallowed out or broken.

I'm not sure I understand the part you're looking at behind the PTO lever.
Is this what you're talking about?

I don't know about the tires - perhaps someone here with the B6000 can offer some help.

Good project - I'm interested to see your progression
 

kubotasam

Well-known member

Equipment
B2410, B7100dt, B7500,Woods BH750,Landpride 2660RFM, Tiller, B2781 Snowblower
Apr 26, 2010
1,200
125
63
Alfred Maine
I think the "missing lever" spot is where the differential lock pedal would have connected.
 

flangefrog

Member

Equipment
Kubota B6000
Nov 29, 2021
38
5
8
31
Auckland, New Zealand
Thanks Nick!

That bearing doesn't look like a bad price - about $27 NZD. But then the shipping price is a whopping $161 NZD! The same item from the same seller is also on eBay but the shipping cost is still $51 NZD. It's the same with with almost any other US supplier. US to NZ shipping is very expensive and there's only a few places with cheap shipping costs.

I don't have a lathe and don't think I have access to a drill press at the moment. Actually I'm not even sure there's a welder I can use right now. I was just planning on grinding and then hand filing the sector gear after welding. It doesn't need to be perfectly round as that part is only going to be touching the oil seal.

I wasn't actually aware of a stop leak product until now. But the radiator hole would have been too big for that.

I took another look at the front axle pivot bolt and I can't see anything that looks like a bushing on it. There's only the pin that goes through and then the washer and castle nut on the other end. The pin seems to have a bit welded on the head to stop it turning - not sure if that's original or not. It's not clear from the parts book whether the bushings are supposed to go against the inside or outside of the chassis.

The lever position is definitely not the one mentioned in that thread. It's not the diff lock pedal either - that's still intact and on the other side.

Here is a close up showing that extra lever spot I'm talking about (on the right). Also does anyone know what the rusted piece of metal is near the bottom of the chassis held on by two bolts? There's a piece like that on the other side too.
20211201_124211_HDR.jpg

I did a little bit of work on the tractor yesterday. I managed to remove the left brake rod, ready to be welded back together.

I removed the gear ratio plate which had a whole lot of rust underneath it. I've cleaned it up with a wire brush. It's rusted through in some places but doesn't look too bad. I might try building it up with welding and grinding it flat.
20211201_123224_HDR.jpg 20211201_124143_HDR.jpg

I removed the air filter. It's completely rusted underneath - I'm not sure if that will affect how it works though? I'm guessing it's not original as the bolt holes have been ovalised to fit. The gasket wasn't placed very well and was partially covering the hole.
20211201_131345_HDR.jpg 20211201_131349_HDR.jpg

The fuel pump is something I'll need to look at. I did a quick and dirty fix last year. If I remember correctly, I found that it was not turning, apart from a tiny bit when power was first applied. So I hooked up a relay, configured to open and close continuously by connecting the NC contacts in series with the coil. This gives a pulsed waveform to the motor and enables it to run, although probably not at full capacity.
20211201_130557_HDR.jpg

The radiator was full of gunk and the water ran brown/orange for a long, long time while cleaning it. It looked like normal iron rust but I'm guessing it was from brass/copper corrosion.

I found the hole in the radiator by putting a hose through the outlet while covering the inlet with my hand. It wasn't too big. But it was impossible to clean it enough to solder it, and any time I even lightly touched it, the hole would grow bigger and I'd damage the surrounding tubes. They were basically paper thin from corrosion. I gave up after a while and left it for today.
20211201_160923(1).jpg

Today I made another attempt at soldering the radiator. But it still wasn't happening. Any time I made a little fix and tested it, more and more holes would appear. I looked up some info online and one person talked about removing the whole tube and plugging the top and bottom. By that way, this radiator is brass/copper - I think the tanks and core tubes are brass, while the fins are copper. This method was much, much easier.

I sliced the tube about two centimetres from the tank on each side with a utility knife and sliced the fins next to it. After heating it up for a while with my hot air gun, I was able to use pliers to easily pull out the tube. The remaining hole was clean and it was very easy to use solder to plug it up. I used plumbers solder, probably 50/50 or 60/40 with a lot of flux. All the soldering was also done with the hot air gun. It was not hard to solder one tube while not disturbing the adjacent ones too much.
20211202_154305_HDR.jpg 20211202_163445_HDR.jpg

Many of the tubes around the first hole were extremely thin and corroded and easy to cut. In contrast, those on the other side where I also took out a couple of tubes were much thicker and harder.

I ended up removing 8 tubes out of a total of 56. The radiator actually has two layers of tubes and fins. 28 on the front and 28 on the back. All the tubes and fins on the front are still intact. So at the worst, the radiator only has 86% of its original cooling capacity. But actually most of the tubes and fins remain, even if water isn't flowing through. So while the water to radiator thermal conduction will have dropped a bit, the radiator to air conduction won't have reduced so much.

One other issue was that the connection for the overflow hose was blocked. I fixed that easily. I might also look at adding an expansion tank to it as per this thread: https://www.orangetractortalks.com/forums/threads/b6000-overheating-cured.40625/
20211202_170514_HDR.jpg
 
Last edited:

Nicksacco

Well-known member

Equipment
Kubota L35 TLB
Sep 15, 2021
573
317
63
Bahama, NC
Hey Flange--
Good photos!
I hate that shipping is so forbidding for you - that makes things tougher for sure.
Here are some thoughts:

The rusty piece of metal appears to me to be a remnant of the rear fenders. Look at the "Seat and Fender
Group" in the parts manual. That's my guess.

The "extra lever" you mention looks like the photo below from the "Speed CHange Group" in the parts manual. Does that make sense?

Bar's Stop Leak has been around for a long time and it is also recommended for its lubricating properties in a vintage bike I own. (This lubrication property is in addition to its more common stop leak promise.)
You have a double row radiator in a vertical flow configuration. You don't necessarily have to replace the radiator with the same style, there are cross-flow and single row radiators that will probably work fine as long as they aren't too small and have the similar cooling capacity. You still have the shroud and such with is good. Perhaps you can scavenge a radiator for somewhere there in NZ?
I would also have recommended the epoxy called JB Weld for repairs, but sounds like you nailed the leaks shut eh? Again, you have great patience as old radiators crumble easily. The Bar's (or similar) still might be a good thing to add as an extra measure of leak prevention. Overflow tanks are always a good idea!

The air cleaner is definitely someone's add on. If you want to fix it you can use Bondo and some fiberglass and a measure of sandpaper and elbow grease and it will look like new. Have you used Bondo before? Can you find a round air filter to fit the add-on?

You might consider JB Weld for the gear ratio plate area too. I don't know if the welding would harm any seals in the area. Of course you also could prevent heat damage when welding also. You could sand the area to get to the bare metal and remove any oils with brake cleaner before epoxying as a suggestion.

The electric lift pump you mention looks fixable. I would imagine the usual bearings, impeller and rubber seals/orings. The relay idea is interesting - I think you're right about running at a lower capacity with the relay - but interesting temporary fix!

The front axle pivot bushings are Part #6 in the parts diagram. My guess is that the OEM bushings wore out and someone removed what was left. The bushings are a slip fit into the axle and then the pin goes thru the axle - thru the bushings. (I had a similar situation with some bushings in my L35). I would think that the pin or axle would also have a grease fitting somewhere too, but I can't tell from the drawing. It might be that the pin bushings are oiled from the gear case and that's the reason for the orings (part #2) on either side.

With all of the sweat equity you are delivering, I hope you can get this for your own!
 

Attachments

flangefrog

Member

Equipment
Kubota B6000
Nov 29, 2021
38
5
8
31
Auckland, New Zealand
Ok, I see the rusty metal piece was a part of a rear footboard inside the rear fenders. I managed to remove the right hand side one but the bolts are far to gone on the one in the photo. Maybe I can weld a piece of metal on the bolts to get some leverage?

That's the lever position I'm talking about. So it looks like it doesn't come with a lever installed from the factory, but it does seem like it would do something. The diagram is not very clear but maybe something to do with the PTO?

I'll definitely look at adding a stop leak solution to the radiator. I'm happy I didn't use epoxy at first as I'm sure it would just have failed again soon as there was so much corrosion. I'm pretty sure all the most corroded tubes are now blocked off. I did have a look at an auction site for more radiators, but there are not many listed. I'm sure I could find a second hand one by looking in person but I doubt it would be easy to find one of a similar size. I'd prefer to just use the original for now and it will save money too.

I need to build a new frame for mounting the radiator as the old one is completely rusted away. I think I've found some U channel steel that will work.

I haven't used Bondo before, but it looks sort of like polyester Builder's Bog that I've used to repair a wooden floor. I'll google it, but first I want to check the availability of replacement paper air filters for this one, or even if I could get a new air filter cheap.

JB weld sounds like it could be a good idea for the gear ratio plate area. I don't think welding will harm any seals or anything, but do you think it would weaken the metal? I was wanting to weld it as it's a structural piece of the chassis and I figured adding a bit more thickness to it would be good.

I had another look at the pivot bolt. I had thought the pivot bushings were between the chassis and diff, but I understand now they're actually between the bolt and the diff, on the inside? I didn't take the pivot bolt out to look at the bushings as it would have hit my jack but I tightened up the castle nut. It was very loose, I'm assuming from wear of the outside of the diff or inside of the chassis. That removed all of the slack in the steering apart from the sector gear. Looking down from the top, the chassis looks like it might be slightly bent inwards, so perhaps putting a washer between the diff and chassis is a good idea.

I removed the old tyre. Parts of it are still stuck on the rim. The rim doesn't seem like it's in great shape but I think it will still be usable after I clean it up.
20211203_202342_HDR.jpg

I found an auction for two unused Kenda 4.00-10 tractor tyres. It was listed at $90 NZD but I offered $70 and received a counter-offer of $75. I think that's a really good deal considering the cheapest new tyres I could find online were $90 each! It's near where my sister lives so hopefully she can bring them up at christmas time.

I removed the rear brakes and spent a while loosening and then removing the brake arms. I then cleaned up the covers. One of the brakes had been locked on before I managed to unstick it (from the exterior) last year, breaking the rusty brake rod in the process. The shoes and drum on that side have some deep grooves but should be ok. The brake shoes look to me like they have a fair amount of life left in them.
20211203_201519_HDR.jpg 20211203_201603_HDR.jpg 20211203_201638_HDR.jpg

The brake arms were quite rusty on the shaft near the outside, and the outside o-rings were both damaged. I'll be removing a bit more rust then replacing all the o-rings before reassembling them. The o-rings appear to be 17mm ID x 21mm OD x 2mm thickness. The shaft they go on to is 20mm and the o-ring groove is 17mm.
20211203_201721_HDR.jpg

I removed all of the brake and clutch pedals. I want to clean up the rust and replace the old rusted split pins. I was hoping there was a bushing I could replace so the pedals weren't so wobbly, but it looks like the pedals themselves are worn so there isn't much I can do about it.

One other thing I need to do is consider what I'm going to do about painting the tractor. I'd really like to paint it in it's original colours but that's a bit expensive at the moment. I think I might just apply some zinc paint for now. That can probably be overcoated later and will protect the parts from rust in the meantime.
 
Last edited:

Nicksacco

Well-known member

Equipment
Kubota L35 TLB
Sep 15, 2021
573
317
63
Bahama, NC
Good stuff!
This poor, forgotten tractor will soon be tearing up the land eh?

I just can't really make out that shaft in the parts list. PTO maybe. Could it be a HIGH/LOW gear range?

Yes, stuck bolts with rounded heads - the classic cure is to weld an oversize nut on the bolt remnant and use the appropriate wrench and cheater bar. The heat from the welding really breaks the bolt remnant loose. I found that the best way (after going through about 5 nuts) was to build up the bolt remnant with weld while the oversize nut was held in place. Weld as much as you can to the sides of the bolt remnant and the inside of the oversize nut. Don't just fill up the nut and only weld the top of the bolt remnant. I wish I had pics. Does that make sense?

Given the work you did on the radiator, I doubt the JB Weld would've held, but it could be good for a backup. It's hard for me to tell without being there. I guess you'll find out once it gets hot and such.
I've included pics of a radiator support I made from 1" square tube and flat plate for your consideration. Notice I also managed to find an aluminum aftermarket radiator that was approx size for the tractor.

Hmmm, the cover plate on the axle. I'm assuming that the metal is steel and welding wouldn't hurt it, but I suggested JB Weld (not thinking structural) because you could smooth it down to look like metal once you've built it up, and it cures very hard. If you want to add structural strength to the area, I guess welding would be the way - I would only ask if it was really necessary - like you suspected cracking and such.

Bondo is a body filler and I've used it on auto, car, and motorcycle, as well as to fill in gaps in other things. It's a 2 part body filler that cures rapidly and is not meant to provide strength - it's just a nice way to smooth things out. Bondo does make a fiberglass stranded product that is stronger however - and then there are epoxy -type fillers as well that do provide more strength.
I think you're wise to look around for alternate air filters - even an external something or other.

That rim doesn't look that bad if you can get it reasonably smooth and painted. JB weld works great if you've got gashes or really bad areas of rust. Once a tire is mounted, and if it leaks, you can try a product as I show in the attachments below that has fibers in the goop that seal leaks. Both my front tires were leaking around the bead and this cured the problem in about 10 minutes. It took 1/2 gallon in each tire. I have used similar products in my motorcycles (as they act as balancing medium too) and they work well.
I hope you can get the tires you need. Take your sister out for a meal!

The brake work you did looks great. You aren't racing the tractor so as long as they work the grooves shouldn't matter. Once you test them, you'll know. I ended up disassembling things I wasn't sure if I needed to due to rust, sticking and such - what a mess, but in the end it all works as it's supposed to if not perfect. Maybe you can add some shims/washers here and there to remove some slop.

The front axle pin appears to me also to go thru the dif housing and the bushings are inside the housing. Once you get it cleaned up I'd like to see what you find. If the frame is tweaked, hopefully it isn't bad enough to affect steering or assembly.

I use and recommend some sort of anti-seize product on the fasteners too - maybe you do that already, but I like Permatex and Loctite.


I am always surprised when I restore a motorcycle or other equipment at what neglect of simple maintenance will do. Or worse - poorly implemented "repairs"!! It makes our work more challenging eh?

Once you get her ready for painting, that will be a great day! I would agree to paint it with something meantime however. Does it now sit inside your barn - I hope?
 

Attachments

flangefrog

Member

Equipment
Kubota B6000
Nov 29, 2021
38
5
8
31
Auckland, New Zealand
Well might be a little while before it's running again as it seems like I'm going for a full disassembly at this rate.

That radiator and support looks good. What's the mini radiator in front for?

I think I understand about welding the bolts. While the heads are rusted I don't think they should be too hard to remove, the other side didn't need too much force. There's also a bigger bolt directly opposite the hydraulic hard line which I should probably remove and replace. The nut on the hard line itself has also rusted away.
20211205_211807.jpg

I looked for alternative air cleaners (I think that's what they're called? Or air cleaner housings) but the only new ones I could find (apart from those for small petrol engines) were oil bath filters. I found one second hand air cleaner similar to the one I have but at $100 NZD it's not worth it right now. I also found some B6000s around this forum where the owners had installed a paper air filter with no cover except to block the outside :https://www.orangetractortalks.com/forums/threads/b6000-custom-air-cleaner.20607/ I think the air cleaner I have is a bit better as it will prevent the filter getting wet or dirty. I can get replacement paper filters for the one I have fairly easily so I think it's worth using it for now. I think it would be fairly easy to fabricate a new air cleaner housing later on.

I'm very familiar with tubeless tyre sealant due to using it with bicycles. Is it normal to use tubeless instead of tubes for tractor tyres?

I have a big can of Shimano Anti-Seize paste with a brush in the lid. They don't say exactly what's in it but I'm sure it will be ok.

I don't have a covered area to work in unfortunately. It's still parked outside my little storage shed I just set up which has my tools in it. After it's drivable I might be able to find some space I could park it in or maybe make a simple cover. Of course I don't want to just leave it out in the rain after restoring it.
20211205_204830.jpg 20211205_204739.jpg

I did quite a bit of disassembly today.

I removed the front weight tray. It wasn't much use (the concrete weight was probably only 10-20kg) and the bolts were rusting away. I'll need to weld a new front piece of steel to the chassis.
20211205_194409_HDR.jpg 20211205_194435_HDR.jpg

I removed the seat. I may be able to salvage the U brackets with three seat positions but I'll have to do some work to fix up the bracket they fit on to.
20211205_194342_HDR.jpg

I removed the rear three point hitch and attachment. It looks to me like none of this is original and it's probably custom fabricated.
20211205_194331_HDR.jpg

The tow bar had a big bearing on it and an adapter, presumably to convert the B6000 PTO to a standard size.
20211205_194312_HDR.jpg

There was a lot of oil around the PTO, hopefully it just needs a new oil seal. I can make out NOK 15 on the existing seal. All the bolts around the three point linkage were fairly easy to undo with some sort of anti-seize or grease applied. This was probably the most recent work the tractor has had from around 10 years ago.
20211205_194139_HDR.jpg 20211205_210435_HDR.jpg
 
Last edited:

flangefrog

Member

Equipment
Kubota B6000
Nov 29, 2021
38
5
8
31
Auckland, New Zealand
Continued...

The rod attached between the hydraulic arm and lever that's supposed to limit the maximum and minimum height has a 90 degree bend in it. I think it's supposed to be straight?
20211205_194353_HDR.jpg 20211205_195931_HDR.jpg

The bolts on the rubber seat bumper snapped when undoing them but hopefully they'll be easy enough to remove from the rear trans housing. The bumper is not in great shape but should be usable for now.
20211205_204634.jpg 20211205_204711.jpg

Here is one of the oil seals from the hydraulic lift arms. It just popped out on it's own after taking the arm off. It reads A10 S0 28 40 5 and is 28x40x5mm.
20211205_210635_HDR.jpg

The bolt which I believe is the adjuster for the down speed of the hydraulic arms was quite rusted up. I think the rust around the bottom was what was left of the lock nut it was supposed to have. I managed to free it up. The bolt has an o-ring at the bottom. This o-ring appears to measure approximately 6.5mm OD, 3.2mm ID and 1.65mm thickness. The bolt it goes on to is 6mm diameter and the o-ring groove is 4mm diameter.
20211205_210744_HDR.jpg

I removed the brake drums. They came off very easily after removing the circlip. Everything seemed in fairly good condition but there was a bit of dirt/dust at the bottom. The shaft oil seals say NOK AE1351E. One side also said 14 while the other said 20. Looking it up online, this seal appears to be 25x47x8mm.
20211205_212328.jpg 20211205_211456.jpg

I checked the oil levels and appearance. In the crankcase the levels were very low (just touching the dipstick) but the tractor is on a bit of an uphill angle. The oil in the rear trans was full but very light brown and watery.

I've been doing a bit of research on the oil requirements for this tractor. The B6000 manual says SAE 30 engine oil for the crankcase and SAE 80 gear oil for the transmission case, front axle case, front wheel gear cases and steering case. Neither of those seem to be available. Aparrently later advice from Kubota was to use Kubota UDT or Super UDT oil for the transmission as it runs the transmission and hydraulics from the same fluid.

The crankcase needs 2L of engine oil. The transmission gear case needs 9L and with the front axle, front wheel gear cases and steering case it adds up to a total of 9.9L gear/UDT oil.

From what I've been reading, oil comes in different types according to the additives that are used. The three types that are relevant here are engine oil, gear oil, universal trans oil (sometimes known as UTTO) and multipurpose oil (or STOU).

Engine oil is just for the engine. Gear oil is usually just for the gears (but original manual specs it for hydraulics too). Universal trans oil can be used for any gears or hydraulics, but not for the engine. Kubota UDT is this type of oil. And multipurpose oil can be used anywhere including the engine.

It seems that multipurpose oil is generally a bit higher viscosity than universal trans oil. Multipurpose oil seems to use the SAE engine oil scale while universal trans fluid uses the SAE gear oil scale. You can see the difference here: https://bobistheoilguy.com/viscosity-charts/

I'm not too sure if multipurpose oil can be used in the transmission/hydraulics of the B6000 specifically.

There's a useful cross-reference page I found which shows different brands and the equivalent products in each category. https://prolube.com.au/wp-content/uploads/2019/01/Copy-of-Cross-Reference.pdf

Castrol has a page showing recommend oils for each part of the B6000. https://rego2oil.castrol.com/vehicl...hinery/995_KUBOTA_Tractors_/7375_B6000E_B6000. They recommend their multipurpose oil for everything except the transmission where they recommend universal trans oil. Interestingly they recommend multipurpose oil over diesel engine oil for the crankcase.

I've seen other people recommend 15W-40 diesel oil as a replacement for SAE 30 for the crankcase/engine.

The best priced oils I've found are the following:

Universal trans oil:
Mobilfluid 424 20L $124.99 at 4WDbits.co.nz
Gulf Western Agritrans UTTF 10W-20 20L $123.99 at Supercheap Auto
Gulf Western Agritrans UTTF 10W-20 5L $38 at Tinkr
All of these say they're compatible with Kubota UDT.

Multipurpose oil:
Mobil Agri Super 15W-40 20L $156.99 at 4WDbits.co.nz
Castrol Agri MP Plus 20W-40 20L $138 at Waitemata Hydraulics

Diesel engine oils are easy to find relatively cheaply. I'm not actually sure yet if I need to buy any oil, I'll see what we've got around here first.
 
Last edited:

Nicksacco

Well-known member

Equipment
Kubota L35 TLB
Sep 15, 2021
573
317
63
Bahama, NC
This is a great project and I hope you'll be able to find the parts as you need them.
It's kind of crazy how certain parts rust such as the seat and the bolt head opposite the hard line while others don't. Likely oil film helps. I know mine was a giant rust bucket and once I got the rust removed (horrible job) the rest was just mechanical. At times I felt I was defeated before I'd start. Glad I had a respirator!

So, that bolt opposite the hard line - is it a drain plug do you think or does it hold the hard line in place? I can't tell from the drawing and pic.
The hard line appears to be in good shape - a blessing since Kubota is so fond of these pricewise.

Air filter: I've never been a fan of K&N filters so if you can repair what you have or find something similar - all the better. Repairing that housing you have doesn't seem that difficult anyway - but certainly low on the list. It's a good rainy day project eh?

Tires: I don't know which (tube or tubeless) are more common on tractors. I would assume tubeless - but perhaps someone here might know for sure. It probably depends upon age as well since there's always improvements being made. What I do know is that the rim's bead has a lot to do with how the rubber tire seals on it. For example, some motorcycle rims in the early 70's can't use tubeless tires (without a tube) due to the rim bead configuration.

The rod you ask about (bent 90 deg) I believe should be straight. See the pics below and see if they make sense. That's how it links to the limits, I guess.

The steering pin, last pic appears to have a welded collar that prevents it from turning. Looks OEM based upon my experience.

I liked the spider next to the seal in your last pic. He looks like your inspector.

Have you drained any oil or hydraulic fluid yet? Curious and hopeful that it isn't full of water.

What are your next steps going to be?
 

Attachments

flangefrog

Member

Equipment
Kubota B6000
Nov 29, 2021
38
5
8
31
Auckland, New Zealand
Yeah, I think some of the parts collect surface water easier which makes them rust faster.

It looks from the parts book and operators manual that that bolt isn't anything too special. The transmission case drain plugs are under under the brakes on each side. It might just be an extra drain plug, although higher up. The bolt holding the hydraulic hard line on however is also the oil filter.

The rod on the hydraulic lift arms seems to have a bolt welded to it that I'm not sure is supposed to be there.

Interestingly, the parts book I have doesn't show the square part welded on the diff pivot pin. But it is shown in manuals for later models and I agree it looks OEM.

I haven't yet drained any oil, I need to find a drain pan first. The two drain plugs for the transmission case are also completely rusted.

I've done a lot of disassembly today. I want to disassemble it a bit further so I could access inside the middle chassis piece and maybe weld the gear ratio plate area from both sides. I also need to buy some more new seals and o-rings. I want to dissassible the transmission case at least a bit so I can check and clean it. There may be a bearing that needs replacing on one of the lift arms.

After I've finished with all the disassembly I'm planning on cleaning all the parts and then putting rust converter or paint on the parts that need it. The engine actually looks to be in pretty good condition, it was protected by the bonnet most of its life so the paint is still mostly ok.

The fuel tank comes off by undoing and bending out the straps. The fuel hose comes from the bottom of the tank and needs to be removed from the right side of the fuel filter with the tap (I put a rubber stopper in it) then pulled behind the hydraulic hard line. After removing the tank the rubber strips are removed and the straps can be removed by pulling them outwards.
20211206_135005_HDR.jpg 20211206_135409_HDR.jpg 20211206_135416_HDR.jpg

The toolbox is bolted to the chassis with the four bolts inside it.
20211206_135509_HDR (1).jpg 20211206_140331_HDR.jpg 20211206_140324_HDR.jpg

The panel between the engine and fuel tank/battery is removed with two bolts. One of them is the bolt holding the inline fuel filter.
20211206_135733_HDR.jpg

The panel under the starter motor is removed with two of the bolts attaching the chassis to the engine.
20211206_152819_HDR.jpg
 
Last edited:

flangefrog

Member

Equipment
Kubota B6000
Nov 29, 2021
38
5
8
31
Auckland, New Zealand
Continued...

The starter motor is removed with two nuts.
20211206_152757_HDR.jpg 20211206_152846_HDR.jpg

The manifold came off fairly easily after removing the four bolts.
20211206_152855_HDR.jpg 20211206_153236_HDR (1).jpg

I removed the diff lock pedal and actuating rod.
20211206_152914_HDR.jpg

The lower water outlet had a bit of rust. It seems to be threaded onto the engine but I couldn't remove it.
20211206_161736_HDR.jpg

I jacked the tractor up under the middle until the front wheels were loose, then removed the bolts connecting the chassis to the engine and rolled the chassis and front wheels forward.
20211206_155715_HDR.jpg 20211206_155830_HDR.jpg 20211206_155835_HDR.jpg
 

flangefrog

Member

Equipment
Kubota B6000
Nov 29, 2021
38
5
8
31
Auckland, New Zealand
Continued...

I removed the idler pulley. I think the bearing may need to be replaced on this.
20211206_174237_HDR.jpg 20211206_174311_HDR.jpg

The V belt says M29. This appears to be a cheap, standard and widely available type. It's 29" (737mm) length, 10mm width and 5.5mm thickness.
20211206_174849_HDR.jpg

The nut on the engine pulley was quite hard to remove. After a lot of penetrating oil, I managed to remove it by sticking a screwdriver in the teeth of the gear the starter motor meshes against (to stop the engine turning) and then used some impact on a large spanner. I then removed the pulley using a gear puller.
20211206_172906_HDR.jpg 20211206_173024_HDR.jpg 20211206_174222_HDR.jpg

The oil seal around the engine shaft under the pulley (part 09550-00007) says NOK AH2048G6. I haven't measured it yet but it could be similar to AE2048K0 which would make it 35x48x8mm. A photo on keymax.de shows it as 33x48.3x8mm but it's close enough and probably just a measuring error. It looks like I should replace this but I'm not sure it's a good idea to disassemble the engine at this stage.
20211206_175357.jpg

There's a plug or cap on the bell housing. Part 66592-35170. It reads NOK RCA 42 8 48 EZ5027A 1 2.
20211206_180256_HDR.jpg

This is how the tractor looks now. Pretty clean and stripped.
20211206_182124_HDR.jpg
 
Last edited:

Nicksacco

Well-known member

Equipment
Kubota L35 TLB
Sep 15, 2021
573
317
63
Bahama, NC
Great work!
As the tractor sits now, you have access to everything and can really inspect every little component!

Something strange happened when I replied yesterday - The remainder of your post wasn't there when I replied so I never saw the stuff beginning with; " The bolt which I believe is the adjuster for the down speed of the hydraulic arms". Anyway you've provided a lot of oil-related stuff and it was pretty interesting. Oil is something everyone has an opinion on.

My L35 has 4 drain plugs on the bottom to drain the transmission so I wouldn't be surprised if yours has multiple as well. Bummer they are rusted but perhaps you'll be able to remove them using the welding nut idea. If so, they likely just can be reused.

The engine looks fabulous. A good cleaning and some paint and it'll look new! The muffler must've fallen away a long time ago eh? The parts diagram show it as one piece assembly with the two exhaust headers.
If you can get the injectors out and clean them and inspect from the pump forward, I think would save you some time later knowing the fuel system was clean.
I know you've got the engine sitting on the oil pan but since it would be so easy, what do you think about dropping the pan for a lower end engine inspection, cleaning and resealing?

That rusty radiator pipe in the engine probably does screw out, but you probably don't need to remove it. Based on what I see, flushing the engine after hitting the area with some sandpaper around a dowel and chucked in a drill or something would probably be enough. What are your thoughts?

That plug in the bell housing? An inspection plug I guess.

Once you get this far with a tractor, it's almost easy to keep going! The front oil seal might be ok, but You may want to be concerned more with the rear. The reason being that the front will be a lot easier to fix later than the rear - although both are kind of a pain - the front won't require splitting the tractor!

I think you said the engine ran for awhile. Did you notice oil leaks at all? What of the water pump?

Two products I've used for rust are Corroseal and Rustoleum rust reformer. Both work well and you've probably already got something in mind there also.


RUSTOLEUM RUST REFORMER

This is good stuff! Once you get things coated with the rust converter, you can throw a tarp over it and not worry. That will be excellent.

Your Auckland weather looks pretty good now so at least that's in your favor. I used to work for Caltex, but never made it to NZ. I spent most of my time in Singapore and Indonesia - Jakarta and Rumbai Sumatra.
Ah, I miss those days!
 

flangefrog

Member

Equipment
Kubota B6000
Nov 29, 2021
38
5
8
31
Auckland, New Zealand
Sometimes I post a reply before I'm finished writing all of it. You must have caught me in the middle of editing the post.

The tractor did have a muffler at one time (rusted through the bottom) but it dropped off a long time ago. I'll clean the injectors soon.

I don't have to remove the radiator pipe but I would have liked to so I could put anti-seize on the threads and stop it corroding further.

I think I will take the engine off the bell housing so I guess that should give me access to the rear oil seal.

I didn't notice any oil leaks when running. This tractor doesn't have a water pump (thermosyphon) but the only leaks were from the radiator.

I already have some CRC rust converter that I've used before on another project. It seemed to work pretty well.

Yeah the weather here is not too bad. There's still a little occasional rain though but that should hopefully stop after christmas. Getting to spend your time there sounds nice. I'd like to visit some of those countries myself.

I drained the crankcase. The oil was pretty black but the filter was not too dirty and the oil seemed clean. Total amount of oil was about 1.75L.
20211207_172742_HDR.jpg

I managed to loosen all the rusted screws on the transmission case just by tapping on them with a hammer. Then I was able to turn them by hand. A lot of water gushed out when I first opened one rear wheel drain plug. Maybe 0.5 to 1L. The oil looked very light brown and milky. I opened the other wheel's plug and the same amount of water came out that side too. I think I recovered almost 10L of oil,/water mix and that's not including a lot of the water. The filter was very dirty.
20211207_173935_HDR.jpg 20211207_175812_HDR.jpg

I removed the hydraulic hard lines. The larger one has o-rings on both sides of each end.
20211207_181007_HDR.jpg

There was a lot of corrosion around the top water outlet. I removed the alternator/fan and even more can be seen inside the engine. I think I might run a calcium lime rust remover through the engine and radiator.
20211207_190728_HDR.jpg 20211207_191416_HDR.jpg 20211207_191459_HDR.jpg

The hydraulic pump was a little hard to remove. The bolt in the bell housing behind it needs to be undone a little so there's space to move the pump back far enough.
20211207_182009_HDR.jpg

I removed the sump. Everything looked good including inside the engine. The original gasket broke (like almost every gasket on this tractor). It would have been nice to have a proper gasket for this piece due to the grooves on the flange but I reattached it using gasket sealer.
20211207_191445_HDR.jpg

I removed, cleaned and reattached this piece. There's a cover with steel wool stuffed inside and a removable plate behind it. I guess it's an oil filter. There's an intact gasket between the cover and plate, but it had gasket sealer between the plate and engine. It would be better to have another gasket there for easier maintenance.
20211207_195301_HDR.jpg
 
Last edited: