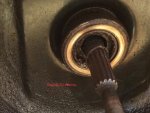
For the shaft coupling:
Look closely at the rear roll pin location, as some will have one roll pin inside another roll pin to lock it in.
And when you put the roll pin back in safety wire it in.
If the roll pin / pins are out the shaft it will slide forward if it doesn't, it's just caught up on worn splines on the coupler try twisting it to the right of left when you pull.
The throw-out bearing holder should just slide out after removing the clutch pedal fork and spring.
If it's not sliding out, look at the back of it for grease / dirt / junk buildup.
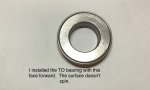
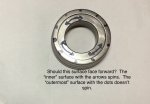
Pay particular attention ( pictures of the part assembled helps) on the direction of the throw out bearing. When installing the new one, it will look like your putting it on backwards, just make sure it goes on the same way as original.
The seals for the clutch sleeve, that are in the clutch housing are really easy to get out, but require some ingenuity to put them back in.
Wolfman,
I resurrected this thread with an update and questions for you. Bare with me, this is kinda long because I want you to have all the info.
After I finished installing the new clutch, with the motor at idle, the clutch will not disengage. Pedal adjustment was per the IT shop manual. While setting the pplate fingers, I noticed the threads on the pplate finger studs are very sloppy. If I slightly bumped or lightly pushed/pulled on a finger, the finger would be out of spec. The tolerances seem very tight and almost impossible to retain under these circumstances.
I pulled it apart again. Focusing on the pplate fingers, sure enough, they were all out of spec. I recently purchased a B7100D rear half that matches mine, from another member. $200 for everything behind the bellhousing except for the seat and tires. He knew I was having clutch issues, so he threw in the flywheel.
I used the flywheel and mocked up the disc & pplate on my work bench. But again, after lightly wiggling the fingers, they would be out of spec. I replaced the studs and castle nuts with cap screws and double nuts. The caps fit below the flywheel surface. Now the fingers are per spec. Put the tractor together...and it still will not disengage! A few questions...
You warned me about installing the TO bearing backwards. If it is backwards, would it not disengage the disc? And why?
I checked the TO bearing travel distance on my extra rear half, 1/2". My tractor TO travels 3/8". How much is needed to disengage the clutch?
When the old pplate finger fell apart, it stopped the tractor in a heart beat. It lodged itself between the housing and the flywheel teeth, seizing everything. We had no choice to tow it about 100 yds to my shop. Could the sudden seizing or pulling it home cause damage to the tranny?
I am going to split it for the third time. But I am leaning to using my entire extra rear half this time, in case something internal is the cause. ANY input or guidance you can offer is greatly appreciated.