B2601 3rd function switch repair

rScotty

New member

Equipment
Kubota M59, JD530, Deere 310SG
Aug 19, 2010
28
11
3
Colorado Mountains
I agree when this switch fails just moving to marine toggle
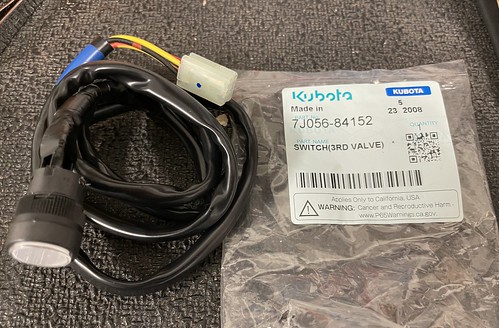
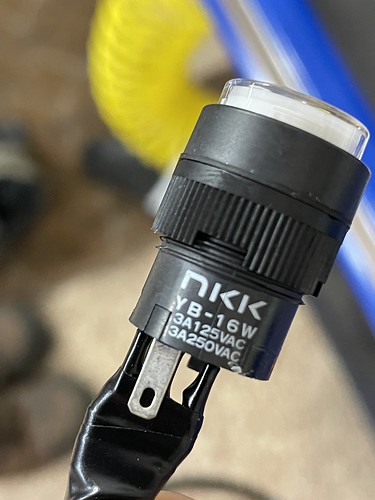
I've been reading this thread with interest as I've also got a problem that involves that same switch. And I would love to replace it with something better. It is used on the Kubota M59 TLB where it does the same thing: controls the relay that activates the 3rd Function valve. But mine is broken

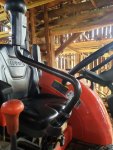
It is mounted next to the FEL control, which in turn is mounted on the plastic lever control assembly cover just to the right of the operator's seat. All of the PTO, 3pt, and HST controls stick up through slots in this plastic assembly cover. (photo attached).
The cover itself is part 040 in the diagram, and the shaded areas indicate slots where levers poke through. Only one lever #010 is shown, with its knob #030. However There are at least half a dozen levers and knobs.

The problem I have is I need to lift that plastic assembly cover to mount the switch we are talking about... and also need to lube the FEL wobble plate & control cables. But I cannot figure out how to lift that plastic assembly cover off of the various control levers. The knobs on top of the levers don't come off and are too big to fit through the slots. I'm perplexed.... just cannot figure how to get those knobs off so that the cover can be lifted.

I don't want to saw the assembly cover into pieces, it makes more sense to grind the knobs off of all the levers and then make new knobs, but there are a bunch: PTO, Range Shift, Throttle, HST controls...and so on. That's a lot of knobs to replace.
I'm missing something here. Any ideas?
rScotty
Lever Assembly Cover_M59.jpg
 

DustyRusty

Well-known member

Equipment
2020 BX23S, BX2822 Snowblower, Curtis Deluxe Cab,
Nov 8, 2015
5,137
3,821
113
North East CT
You have to grab the knob with one hand, and pull up while rocking it side to side. I just had mine off on my BX23S to install the replacement loader valve knob. The plastic is retained by 2 short bolts on the BX23S, one in the middle at the top, and one on the right side about 3" down from the top. Both screws require that you remove the rear wheel and tire to access them. At the bottom of the plastic panel, are 2 tabs that fit into the steel fender, and you lift the plastic from the top towards the front of the tractor to disengage these tabs. Also makes it easier if you remove the rubber boot from the shaft once you have the knobs off.
Looking at the picture you posted, there are a bolts that can be accessed from the top making it a lot easier than the BX23S. I went into the detail for the BX23S because I know that this question is going to be researched at some time in the future, and it might be helpful to both you and others that come to this thread later on.
 

rScotty

New member

Equipment
Kubota M59, JD530, Deere 310SG
Aug 19, 2010
28
11
3
Colorado Mountains
You have to grab the knob with one hand, and pull up while rocking it side to side. I just had mine off on my BX23S to install the replacement loader valve knob. The plastic is retained by 2 short bolts on the BX23S, one in the middle at the top, and one on the right side about 3" down from the top. Both screws require that you remove the rear wheel and tire to access them. At the bottom of the plastic panel, are 2 tabs that fit into the steel fender, and you lift the plastic from the top towards the front of the tractor to disengage these tabs. Also makes it easier if you remove the rubber boot from the shaft once you have the knobs off.
Looking at the picture you posted, there are a bolts that can be accessed from the top making it a lot easier than the BX23S. I went into the detail for the BX23S because I know that this question is going to be researched at some time in the future, and it might be helpful to both you and others that come to this thread later on.
DustyRusty, thanks for the thoughts. Unfortunately it doesn't seems to be the same with the M59. There just isn't any way that those knobs are going to come off those levers as simply as you describe. The levers seem to be strong high quality steel so no danger of bending them, but knobs don't move.

I do need to remove the cover. Not just for the switch that started this thread, but that cover has to be removed for routine lube and cleaning of the FEL joystick wobble plate and oiling the push/pull cables that go to the remote FEL actuating valve assembly (see 2nd photo).

At this point don't think it is wise to put any more pulling or rocking force into whatever each lever is attached to. It is obvious that no amount of unaided force is going to cause any knob to loosen from it's lever. I suspect that they are hot-molded on after the plastic cover is installed.

Alternatives:
1. Heat the knob with a heat gun. Tried that before & didn't work, but more heat may be necessary.

2. Hmmm.....I could just leave the knobs on - after all, they work fine and I like them - they just are too big to fit through the slots in the cover. Perhaps I should use a Dremel and rotary cutter bit to widen a portion of each slot in the plastic cover. I like this solution and will look closer to see how much cutting would necessary and where to cut for each knob clearance.

3. Using a vibrating cutter like the Milwaukee "multi tool" I could carefully carve at each knob to remove or make it thinner. Ultimately make new knobs that mount with screws.

As for the plastic cover, one the knobs are off that part looks easy. There are 4 x 12mm bolts that screw the cover down to the metal of the tractor. Easy to remove enough to lift the cover a few inches even though it ultimately will not go over the knobs.
Going to think about it some more....
rScotty

M59_Control Knobs.JPG


loader control valve & actuator cables.JPG
 

DustyRusty

Well-known member

Equipment
2020 BX23S, BX2822 Snowblower, Curtis Deluxe Cab,
Nov 8, 2015
5,137
3,821
113
North East CT
Those knobs look identical to the knobs on my BX23S. I had the same problem getting the knobs off of my old BX22, and these were the instructions that I was given back then. Try placing a narrow wrench on the shaft, and then with a small soft blow hammer, tap the wrench in a upward direction, and that should dislodge them. With age, they might get tighter on the shaft, as the plastic shrinks. Don't force it, get a bigger hammer!
 

Ukfan

New member

Equipment
M7060
Jul 28, 2021
9
2
3
Kentucky
https://www.amazon.com/gp/product/B07D2C1FXT/ref=ppx_yo_dt_b_asin_title_o00_s00?ie=UTF8&psc=1

This is the switch I went with after considering the HD toggle. It is a spdt switch with a green light. I soldered it in place to keep it from hanging down to low. If I had a plastic cover concealing it and had enough room I would install it with the available wiring harness for purchase to make replacing it easier the next time.

A couple things of note. There is an older version of this switch that does not have an available harness for purchase and is not an updated version like this one. Feedback from others state it didn't work after soldering. If soldering, be careful not to leave the iron on the connector very long. Tin your leads before soldering to the switch and use Flux to help with flow. Connect it like this when using the Kubota harness wires 1.Yellow/Red Common 2.Red/Black Normally Open 3.Black negative led 4.Yellow +led. This is the way it was connected from the factory and the switch manual tells you to do it another way so don't let that confuse you.

I picked this switch because it felt reasonably durable, is less likely than a plastic toggle to get broken off if hit, and the button is raised versus recessed. Many other switches online are hard to turn on because you have to fit your finger inside the switch.. Not sure how well it would do being left outside all the time but has a ip65 rating.

B737 has a picture of the oem"micro switch guts broken from its upper half" at the beginning of this thread. As illustrated, this is the weak point on the oem switch. I pulled hard on the bottom of this switch and could not get it break. Having said that, do not twist the bottom base to tighten it because it will spin the wires ruining the switch. There is not much room but I was able to use a deep well socket to turn the nut.
 

Attachments

Last edited:
  • Like
Reactions: 1 user

rScotty

New member

Equipment
Kubota M59, JD530, Deere 310SG
Aug 19, 2010
28
11
3
Colorado Mountains
Ukfan, thanks for posting that link. I just ordered one like the one you ordered above, the
I also ordered the harness set just to see if it will make installation easier.

Then just for fun I also ordered a similar unit from a different mfg.
These things are inexpensive and I am curious which is more rugged.
rScotty
 

skeets

Well-known member

Equipment
BX 2360 /B2601
Oct 2, 2009
14,140
2,789
113
SW Pa
Just entering this for the forum archive should anyone go searching in the future. I couldn't find much here when I searched.

If you have a B2601 with dealer installed 3rd function kit "B1653" it has an on/off switch on the loader joystick. It will fail in short order if it gets wet. The part number for this switch is 7J056-84152 (superseded 7J056-84150). Kubota charges $150 for it. The switch is a $20 "NKK YB-16w". It is a latching SPDT microswitch. Incidentally, NKK makes a spring loaded guarded cover for this switch which would be handy, part# NKK AT4175, but it's difficult to get.

My dealer dropped off a new switch to me since it's under warranty, a quick 5 minute job to swap it out, but im sure I will have this problem again soon.

The switch has a 4 pin plug at the joystick base, with 4 wires going to the switch. The two wires that arm the system are the yellow w/red, and red w/black. When this dies again, I will cut the switch off, discard the two wires for the led light, and install a quality toggle switch to the ones mentioned above. I'll move it to the plastic fender trim where the levers are.

casting this off to the forum archive 👋

this is the micro switch guts broken from its upper half


new switch with its plug


switch component
How did you get the switch out of the holder ?
 

whitetiger

Moderator
Staff member

Equipment
Kubota tech..BX2370, RCK60, B7100HST, RTV900 w plow, Ford 1100 FWA
Nov 20, 2011
2,582
1,101
113
Kansas City, KS
At this point don't think it is wise to put any more pulling or rocking force into whatever each lever is attached to. It is obvious that no amount of unaided force is going to cause any knob to loosen from it's lever. I suspect that they are hot-molded on after the plastic cover is installed.
The knobs are the same as on the BX series, they just slip onto the steel lever. They will stick over time so one method is to heat them and twist them while pulling the knob.
Sometimes I just use a radiator hose removal tool, slipping it under the knob and going around the circumference of the lever, then pulling off the plastic knob.
 
  • Like
Reactions: 1 user

traumadoc2b

Member

Equipment
B2650 LA534 BH77 bucket forks snow blade box blade flail grapple harrow rake
Oct 31, 2017
42
4
8
Indiana
If you have a B2601 with dealer installed 3rd function kit "B1653" it has an on/off switch on the loader joystick.
I have a B2650 and noticed that the cap on the LED popped off or was otherwise knocked off.

missing.jpg

The dealer was of course unhelpful in finding the actual parts that I wanted. I originally was looking for a cap, then started looking for the switch based upon this thread.

I took the switch out (appreciate the helpful advice from others in the thread), by first pulling out the wires/connection, and then unscrewing the top of the switch housing and briefly holding the threaded bushing/ring underneath the loader joystick housing.

switch.jpg

I reconnected the wires to see what it looks like. Seems that it will only connect in one orientation - I think there is some asymmetry to the grooves.

connection.jpg

After looking at the NKK YB parts catalog and reviewing the part number codes, as well as the available accessories, I ordered the following and will see how everything works once received. Some of the stuff is on backorder for perhaps 5-6 months...

AT4175​
Switch Bezels / Switch Caps PROTECTIVE GUARD SPRING LOADED​
YB16WCKW01-5F12-JB​
Pushbutton Switches ON-ON RND SEALED 12V GRN LED CLR/WHT CAP​
AT089​
Switch Hardware O-RING FOR YB PANEL SEAL​
AT112​
Switch Hardware SOCKET WRENCH LB​
AT4115​
Switch Cases / Switch Covers DUST COVER​

I have been lucky I guess - I have not had a problem with the switch malfunctioning or just not working. I use the tractor in the snow and rain sometimes - I'm sure the switch has gotten wet, maybe just not wet enough to fail.

The problem I have noticed is that I keep hitting the switch - turning it on or off - with my hand, especially when I have gloves on in the winter and I am using the 3rd function to control the angle of my snow plow. That's why I ordered that spring loaded guard and the dust cover. I am hoping that one or both of them will prevent unintentional button pushing.

The socket wrench is just a couple of bucks and should make it easier to reinstall or remove the switch by fitting the grooves in the threaded bushing.

The dust cover should be the actual part that I was looking for in the first place. Assuming the LED and the switch still work, and the dust cover/lens is the only part that popped off (in the first picture).

As you can see, I decided to order a bright LED, 12v with clear/white cap, which is one suggestion from the thread. Hopefully that's the direct replacement.
 
  • Like
Reactions: 2 users

bird dogger

Well-known member
Vendor Member

Equipment
Kubota B2650 and lots of other equipment
Feb 24, 2019
1,571
1,416
113
North Dakota
The problem I have noticed is that I keep hitting the switch - turning it on or off - with my hand, especially when I have gloves on in the winter and I am using the 3rd function to control the angle of my snow plow. That's why I ordered that spring loaded guard and the dust cover. I am hoping that one or both of them will prevent unintentional button pushing.
It shouldn't be too difficult to completely abandon the ON/OFF switch in your joystick handle. You could then either re-route those wires, or disconnect them at their source and add new wiring to a more robust weatherproof toggle switch relocated to a new remote but handy spot of your choosing.
 
  • Like
Reactions: 1 user

traumadoc2b

Member

Equipment
B2650 LA534 BH77 bucket forks snow blade box blade flail grapple harrow rake
Oct 31, 2017
42
4
8
Indiana
It shouldn't be too difficult to completely abandon the ON/OFF switch in your joystick handle.
That's assuming I want to move it. Then I also still have the metal housing on the joystick for the 3rd function switch which just has a hole in it and serves no purpose.

I sort of like having the button there and I have been lucky to not have an issue with moisture. The cap only fell off after 5 years of use.

I'm hoping that this spring loaded switch guard will fix the only real issue that I had - unintentionally deactivating the switch with thick gloves on.

Screenshot 2022-10-06 10.31.04.png
Plus, it has the added bonus of looking like it is for launching rockets! My only concern is that the square edges might stick out beyond the rounded profile of the metal housing for the LED switch. It was only about $3, so not much to gamble and try it out.

I have installed some custom switches for work lights on my canopy, which is another issue because I would want to find a place to put the 3rd function switch that doesn't disrupt the clean look I have created.

lights.jpg

And that would take a bunch of extra time that I just don't have to spend on this right now - lots of other ongoing projects.
 
Last edited:
  • Like
Reactions: 1 user

traumadoc2b

Member

Equipment
B2650 LA534 BH77 bucket forks snow blade box blade flail grapple harrow rake
Oct 31, 2017
42
4
8
Indiana
So, I finally got some of the parts and attempted to fix the switch. No dice. The lens cover was very difficult to get to fit into place, then I could never get it to spring back up. There appears to be thin, fragile plastic in the switch housing and a rubber gasket that must provide some spring action. Maybe this is just worn or something bent so that it won't work.

Back to the drawing board. The 12v resistor switch, which I listed a part number for above, is backordered everywhere. I wonder if the original switch didn't have the 5v resistor - that's what I ordered now and will try next. Considered the Baomain switch, but they're sold out on Amazon too.

YB16WCKW01-5F05-JF
 
  • Sad
Reactions: 1 user

ranger danger

Well-known member

Equipment
Kubota M6060, MEB 802A tactically quiet generator
Jun 11, 2017
310
293
63
East of Placerville Ca
So the switch on my M6060 just went bad. What would be the proper wiring if I just want to put a simple marine on/off switch in its place? What wires would connect where? If my understanding is correct, if I get a simple on/off toggle and connect the red/black wire and the yellow/red wire then the system should work. Am I correct?
 
Last edited:

ranger danger

Well-known member

Equipment
Kubota M6060, MEB 802A tactically quiet generator
Jun 11, 2017
310
293
63
East of Placerville Ca
I figured it out. The red with black stripe is power. Yellow with red stripe is power out. I got a simple on/off marine switch. Third function now works. This is a short term fix for me. I'll find a premium water proof 4 pin switch and change it out later.
 
  • Like
Reactions: 1 user

traumadoc2b

Member

Equipment
B2650 LA534 BH77 bucket forks snow blade box blade flail grapple harrow rake
Oct 31, 2017
42
4
8
Indiana
YB16WCKW01-5F05-JF
Just installed the above switch. Only thing that seems different from the original is that the lens is green instead of frosted. Makes it difficult to tell if the switch is activated in sunlight, as the light is green too.

I did include the spring loaded switch guard, which is easy to flip up to push the button and isn't used very often. It keeps me from unintentionally deactivating the switch, especially with bulky gloves on. Will see how it holds up over time, definitely not super durable.

Replacing the switch was a little bit of a pain. I had to solder on new wires - I used short pigtails for each because the cable was going to be too short otherwise, so I also had to connect the pigtails to the cable.

on IMG20230129135900.jpg < ON OFF > off IMG20230129135909.jpg
ON (light is yellow-green) OFF (lens cover is green)

switch IMG20230129135935.jpg open IMG20230129140004.jpg wires IMG20230129140033.jpg

If you're ordering, suggest getting the AT 716 quick connect (you can solder connections to cable/wires, then push to connect the switch for $3) and the AT 106 socket wrench ($2) which makes it easier to tighten the threaded bezel, as there's not much room for your fingers under that metal housing. You will have to use the quick connect to use the socket (or some other connection along the cable) or you won't be able to get the socket off the wires.
 
Last edited:

Hughski

New member

Equipment
B2650
Mar 20, 2019
6
0
1
Placerville, Ca, US
Just installed the above switch. Only thing that seems different from the original is that the lens is green instead of frosted. Makes it difficult to tell if the switch is activated in sunlight, as the light is green too.

I did include the spring loaded switch guard, which is easy to flip up to push the button and isn't used very often. It keeps me from unintentionally deactivating the switch, especially with bulky gloves on. Will see how it holds up over time, definitely not super durable.

Replacing the switch was a little bit of a pain. I had to solder on new wires - I used short pigtails for each because the cable was going to be too short otherwise, so I also had to connect the pigtails to the cable.

View attachment 94830 < ON OFF > View attachment 94831
ON (light is yellow-green) OFF (lens cover is green)

View attachment 94832 View attachment 94833 View attachment 94834

If you're ordering, suggest getting the AT 716 quick connect (you can solder connections to cable/wires, then push to connect the switch for $3) and the AT 106 socket wrench ($2) which makes it easier to tighten the threaded bezel, as there's not much room for your fingers under that metal housing. You will have to use the quick connect to use the socket (or some other connection along the cable) or you won't be able to get the socket off the wires.

traumadoc2b-

How is that switch working out? Need to replace mine and wanted to ask. Also what was the wiring details. I can't find any except above or buying a new$129 dollar replacement. Thanks!