B211 loader subframe pics or description wanted.

barts

Member

Equipment
4wd B5100, FEL with Piranaha bar, box blade, log arch, 3 point hitch adaptor
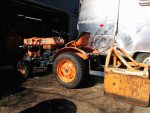
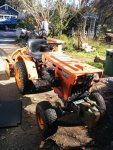
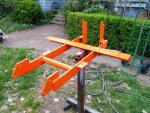
I have a new-to-me B5100 4wd tractor, and a small Kubota FEL - but the subframe doesn't quite fit on the tractor. Does anyone have any pictures (aside from the youtube video) of the B211 loader subframe that was optional on these little guys?

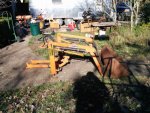
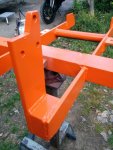
I'm going to fab up a new subframe that fits my tractor properly; the one I have is largely made from 2.5" x .5" steel bar and that looks pretty much like what's in the video afaict.

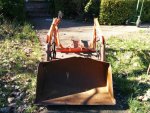
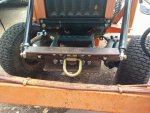
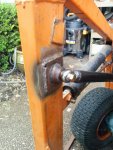
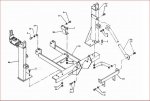
I've like to know how the B211 fastened to the rear diff; the loader I have looks a lot like a B219 according to pics I found in the B219 manual here:
http://www.kubotabooks.com/AutoIndex/index.php?dir=Loaders and buckets/.

Any pictures or descriptions appreciated; I don't want to break my tractor!

Thanks -

- Bart
 

North Idaho Wolfman

Moderator
Staff member
Lifetime Member

Equipment
L3450DT-GST, Woods FEL, B7100 HSD, FEL, 60" SB, 743 Bobcat with V2203, and more
Jun 9, 2013
28,605
5,066
113
Sandpoint, ID
Does this help you out?
The four holes that bolt #4 goes in bolts to the axle cases
The six holes for #6 bolt to the motor
Four more go to bracket #35 and the transmission


Attachments

barts

Member

Equipment
4wd B5100, FEL with Piranaha bar, box blade, log arch, 3 point hitch adaptor
Does this help you out?
The four holes that bolt #4 goes in bolts to the axle cases
The six holes for #6 bolt to the motor
Four more go to bracket #35 and the transmission
Perfect! Thank you - exactly what I was looking fo!

Off to pick up some steel tomorrow :)

Thanks again -

- Bart
 

mickeyd

Active member
Lifetime Member

Equipment
2014 L3200 DT w/LA524 FEL, 2019 Kubota Z121S w/ 48" Pro Dec, TG1860G w/RCK54TG
Mar 21, 2014
1,192
17
38
Guin, AL
Welcome to the forum from Alabama. Please post pictures as you progress for all of us to learn.
 

barts

Member

Equipment
4wd B5100, FEL with Piranaha bar, box blade, log arch, 3 point hitch adaptor
Welcome to the forum from Alabama. Please post pictures as you progress for all of us to learn.

Thanks :).

I'll post pictures; when I get started I'll start a new thread and add a reference to that thread to this one.

I'm also adding a hydraulic pump to the front of the tractor to drive the loader's 2" cylinders; the B211 loader that was for the B5100 used the built-in pump, but also had 1.5" cylinders so it moved almost twice as fast.

http://www.orangetractortalks.com/forums/showthread.php?t=17284&page=3 has the info on the hydraulics :).

- Bart
 

barts

Member

Equipment
4wd B5100, FEL with Piranaha bar, box blade, log arch, 3 point hitch adaptor
Thanks for the manual tip.

I thought I'd post some pictures of the tractor and the FEL. Picked up some steel and started cutting today; need to lay out and drill some holes tomorrow.
I don't have much in the way of metric bolts, so Mcmaster is getting another order tomorrow :).

- Bart
 

Attachments

OldeEnglish

New member

Equipment
B7100D, MMM, B205 Dozer Blade, woods m48, b2910
Jul 13, 2014
768
5
0
Western, MA
Sweet tractor :D Looks like it's in nice shape!

How in the world does someone bend a bucket like that??:eek: Please let me know so that I don't ever do that! :confused:
 

OldeEnglish

New member

Equipment
B7100D, MMM, B205 Dozer Blade, woods m48, b2910
Jul 13, 2014
768
5
0
Western, MA
It doesn't look like the edges are rolled/folded or have any reinforcement so it's probably fairly easy to do.... If you get that puppy straight I would weld some angle iron across the top to reinforce it... Good luck!
 

barts

Member

Equipment
4wd B5100, FEL with Piranaha bar, box blade, log arch, 3 point hitch adaptor
Had a couple of days to spend on the Kubota... got the subframe welded and rattle canned.... a little overbuilt, but since I can still lift it and it doesn't have to fly, I'm happy.

Made it from about 7' of 3" x 1/2" flat bar, the original uneven leg angle, and some misc. 2" pipe and 3/8" plate for the rear mounts to the axle. I a ran a bunch of sticks of 7018 w/ DCEP at 125 amps... it's probably not going to break :).

Now for more paint on the bottom, and then time to bolt it up again. Next up comes the hydraulic pump mount and drive assembly. This will take a bit of machining... also need to replace all the hoses on the loader, and will change out all the 1/4" schedule 40 street ells on the cylinders to proper hydraulic fittings - they're cheap enough at surplus center, and one of the street ells is broken off in the cylinder as it is. Another hobby of mine is steam boats, and I have come to distrust screwed schedule 40 pipe for anything that could see any mechanical loading. Schedule 80 for everything that sees steam.

- Bart
 

Attachments

D2Cat

Well-known member
Lifetime Member

Equipment
L305DT, B7100HST, TG1860, TG1860D, L4240
Mar 27, 2014
12,980
4,364
113
40 miles south of Kansas City
Bart, nice work. You make it look simple with it all painted up, but I know it's a task to get all that iron square to the world and ALL the holes to match the tractor. Yep, you've got enough iron in it!
 

OldeEnglish

New member

Equipment
B7100D, MMM, B205 Dozer Blade, woods m48, b2910
Jul 13, 2014
768
5
0
Western, MA
Nice job on the subframe, it looks great! Your absolutely right about SCH 40, 80 black pipe should always be used on hydraulics or steam. ST fittings are always prone to leaking and usually require Teflon to get them to hold pressure, which is a no no for hydraulics. If you have to make a tight turn with black fittings, make sure to use a space nipple and not a close nipple. A SCH 80 close nip is basically SCH 40 by the time the threads are cut in. Having a space nip gives a little more meat between the two threads on the nipple, thus making it stronger.

It doesn't take much force to shear off SCH 40 at the threads. Happens a lot with roof top gas piping when there is an excessive snow load that weighs down a flat roof. The roof will move enough to shear the pipe off at the threads.
 

barts

Member

Equipment
4wd B5100, FEL with Piranaha bar, box blade, log arch, 3 point hitch adaptor
Got some more time in on the tractor. Welded up a front assembly to support the braces for the loader uprights and made new braces; I had to remove the original braces welded to the loader uprights since they hit the air cleaner and muffler on this tractor. I used rod ends because it made things simple.

I also gave up looking for that splined sprocket and used a Fenner 'B-Lok' shrink disc to clamp the drive adaptor I machined up onto the splined front of the crankshaft. This worked well, but the amount of shrink is pretty limited so tolerances are pretty tight - around .001" clearance is ideal.

I'm going to use dual Lovejoy couplings to drive the pump; there's no room for the chain drive sprocket approach since the sprocket is in front of the crank now instead of over it.
 

Attachments