40 ft Span Bridge

PoTreeBoy

Well-known member
Lifetime Member

Equipment
L35 Ford 3930
Mar 24, 2020
2,407
1,219
113
WestTn/NoMs
Thought I'd share my bridge project. On our family land, there's about 30 - 40 acres cut off by a running stream that, over the years, has developed 8 to 10 ft high banks. This has prevented equipment access for maintaining trails etc. Maybe 20 years ago, Dad threw a culvert in and covered it with local soil but within a year it had washed out. About 5 years ago we had timber cut and a neighbor let the loggers haul across him but this wasn't a long-term solution.
So, newly retired and with a little money from the timber sale, I decided a bridge would be a good project. I wanted it capable of supporting a pickup truck and tractor with bush hog or other attachments. (Sorry, at the time we didn't have the Kubota L35, so you'll see blue here.) So I started with a 6,000# live load design. The site is accessed from a trail that doesn't allow heavy equipment, concrete truck, etc. This meant headwalls wouldn't be practical. Therefore it's supported on pads set back from the bank edge. This increased the span, but made the project more DIY'able.
1. I calculated using W16x26# beams at 36,000 psi yield strength. But when I contacted the steel supplier, I was pleasantly informed that 50,000 psi was standard. So the final product has about 11,000# live load capacity. I was in a bit of a hurry and wasn't sure I'd even be able to get the beams across the ditch, so I didn't fab and weld clips on before proceeding. The beams were delivered to a clearing on top of the hill.
AA0908171116.jpg
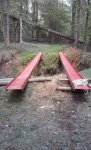
Rolled a coat of red primer all over.
AC0908171308.jpg
When they were dry, I dragged them down to the site.
2. There was a fair sized tree on the other side, so I anchored a wire cable on it as high as I could reach, went to a block chained to the beam, back to a block chained up the tree and then to the pull tractor. This gave me a 2:1 advantage. Throughout this process I made sure to keep the beams blocked up. Sweetgum sap is an amazing lubricant!
AF0910171102.jpg i
(It was while dragging the rigging across the ditch that my sister showed up to check on progress. When she asked why I stopped, literally, mid-stream I had to tell her I was staring down a water moccasin. He eventually tired of the game and slithered off.)
I ended up using the tractor as a movable anchor and pulling the tow line like a bow string to move the beam. This let me yank it to pop the end of the beam up as it got near the far side and tended to drop. Without too much trouble, both beams were across and laying on cribbage.
1606258550262.png

These lightweight beams are narrow and not very stiff laterally. You can see the bow under their own weight. But they are strong enough to carry me and a wheelbarrow of concrete.
3. I planned on 6'-8" between the beams. This put them just outside tractor and truck tread and allowed me to cut the 20' cross bracing angles in thirds. So I formed 2 ft square x 8" thick pads with 2 layers of wire mesh and, with the help of my sister and brother-in-law, mixed and poured concrete. We put 2 anchor bolts in each pad.
AK1005171525.jpg
4. After the concrete cured, it was time to set the beams in place.
AP1112171259.jpg
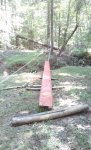
Using a lever, it wasn't too hard to get them in place, but standing them up was another matter. I wrapped a chain around the near end and used the tractor lift to twist it. But besides limber, these beams are also 'twisty'. Just as the far end nears vertical, it springs through and the whole thing ends up laying on the other side. But eventually they were standing up and braced against turning over.
5. The next step was installing cross-bracing. Since these beams are limber laterally, they require quite a bit of bracing to develop their full strength - 5 feet.
AN1111171220a.jpg
I cut 2x2x1/4 angle and primed it for bracing. Since I had decided to weld the bracing instead of welding on clips and bolting the bracing to them, the braces required some tricky angle cutting. If I were doing this again, I'd use clips and bolts.
AS1225171429.jpg
I welded the braces on each end and laid the others out to use to support some boards so I could cross to do some clean up work. One of the boards broke, I fell through, broke my arm, slight concussion, surgery, recovery, etc. Besides the delay in construction, it cemented my decision to hire professionals to do the cross-brace welding. After they finished, we had this frame:
(See Part 2, can't attach more pictures)
 

Attachments

Last edited:
  • Like
Reactions: 5 users

JimmyJazz

Well-known member

Equipment
B2601
Aug 8, 2020
1,098
644
113
Pittsburgh, Pa
I had hoped to build a bridge over a creek that looks just like yours not long ago here in Western Pennsylvania. I made the mistake of asking about permitting. The application just about made me cry. I was told most people hire an engineer to complete the application and design the bridge and that this of course would cost several thousand dollars. Furthermore ,if I built it "hillbilly style" without properly obeying the law I could be liable for fines in the six figure range. You are at least able to calculate the live load. If you have a plan you would be willing to share I would greatly appreciate it. Other than the broken arm it looks like a fun project. Thanks
 
Last edited:

PoTreeBoy

Well-known member
Lifetime Member

Equipment
L35 Ford 3930
Mar 24, 2020
2,407
1,219
113
WestTn/NoMs
PART 2
After the professionals finished, we had the basic frame:
AW0806181642.jpg
In this picture I have jacked the beams up to set them on some asphalt-impregnated expansion joint material to isolate them from the concrete, welded on the anchor bolt clips, and started welding on the stringer clips.
You can also see one set of sway bracing. There will be 4 sets, each 10 ft long. I say 'will be' because I still haven't done the other 3. Oh well, there's no noticeable side sway.
6. I had decided to use 3x8 pressure treated pine decking, screwed to 3x8 stringers lying flat. I looked at u-bolts to attach the stringers to the beams, but the price was too much for a PoTreeBoy. I ended up using 1/2" bolts and straps cut and drilled from 1/4x1-1/2 flat bar. I didn't want to weaken the beam flanges by drilling into them, so I welded ears on them instead. These straps and ears had to located to fall in the 2" gap between deck boards so the deck could sit flat on the stringers.
AX0806181903.jpg
I had to deck in 2 phases since my welding leads wouldn't reach all the way across.
BA0819181639.jpg
The deck is fastened with 5" torx screws.
7. After completing the deck, the bridge needed some head walls to support ramps up to it.
BO0824181312.jpg
I had left the 2x8's used for the outside of the concrete pads and blocked up and used 3x8's and 4x's to make a wall to hold the road fill.
BP0824181339_HDR.jpg
After building the ramps,
BW0825181701.jpg
It's ready to use
BT0825181340_HDR.jpg
I haven't installed runners. I'm not sure they're needed for the light use it gets. And I've considered curbs to tie the deck board ends together, but I need to finish those sway braces first because I'll need to remove some boards to do that.
Next job was to get rid of that fallen tree blocking the old trail.
 
  • Like
Reactions: 8 users

PoTreeBoy

Well-known member
Lifetime Member

Equipment
L35 Ford 3930
Mar 24, 2020
2,407
1,219
113
WestTn/NoMs
I had hoped to build a bridge over a creek that looks just like yours not long ago here in Western Pennsylvania. I made the mistake of asking about permitting. The application just about made me cry. I was told most people hire an engineer to complete the application and design the bridge and that this of course would cost several thousand dollars. Furthermore ,if I built it "hillbilly style" without properly obeying the law I could be liable for fines in the six figure range. You are at least able to calculate the live load. If you have a plan you would be willing to share I would greatly appreciate it. Other than the broken arm it looks like a fun project. Thanks
I didn't use written plans. Just back of the envelope, you know 'hillbilly style'! LOL I do have more pictures if that would help. I have an engineering degree, but no registration so my design probably wouldn't help you with the authorities anyway. I didn't include dynamic loading, non-symmetric loading and other things that real bridge design would entail.
But it meets our needs and if there is anything I can share, let me know.

This is located in the north Mississippi hill country. It's pretty useless for anything but tree farming. And pure enjoyment - I call it 'land with character'. Being older and spending more time on it has given me a new respect for the people who scratched a living out of it with no electricity, running water, telephone, internet, Kubota . . .
I built this bridge the way I did in order to minimize the impact to the stream and surrounding land. (And to save PoTreeBoy a buck.)
And in Mississippi if you don't have written permission from the landowner, you are trespassing so hopefully potential liability is lessened.
 

JimmyJazz

Well-known member

Equipment
B2601
Aug 8, 2020
1,098
644
113
Pittsburgh, Pa
I didn't use written plans. Just back of the envelope, you know 'hillbilly style'! LOL I do have more pictures if that would help. I have an engineering degree, but no registration so my design probably wouldn't help you with the authorities anyway. I didn't include dynamic loading, non-symmetric loading and other things that real bridge design would entail.
But it meets our needs and if there is anything I can share, let me know.

This is located in the north Mississippi hill country. It's pretty useless for anything but tree farming. And pure enjoyment - I call it 'land with character'. Being older and spending more time on it has given me a new respect for the people who scratched a living out of it with no electricity, running water, telephone, internet, Kubota . . .
I built this bridge the way I did in order to minimize the impact to the stream and surrounding land. (And to save PoTreeBoy a buck.)
And in Mississippi if you don't have written permission from the landowner, you are trespassing so hopefully potential liability is lessened.
A very nice job is all I have to say. Thanks for the offer. I could tell this was no ordinary hillbilly effort. My wife calls my farm my "happy place" . 40 acres of marginal mountain land. Pasture, woods, and hay. There are few places as beautiful in my opinion. Enjoy your new bridge and Happy Thanksgiving.
 
  • Like
Reactions: 1 user

Russell King

Well-known member

Equipment
L185F, Modern Ag Competitor 4’ shredder, Rhino tiller, rear dirt scoop
Jun 17, 2012
4,655
994
113
Austin, Texas
I had hoped to build a bridge over a creek that looks just like yours not long ago here in Western Pennsylvania. I made the mistake of asking about permitting. The application just about made me cry. I was told most people hire an engineer to complete the application and design the bridge and that this of course would cost several thousand dollars.
You may want to look around and see if you can buy a used bridge and have it installed. There are companies around Texas that have bridges from older roads that were replaced for sale and install them on private property.
 

JimmyJazz

Well-known member

Equipment
B2601
Aug 8, 2020
1,098
644
113
Pittsburgh, Pa
You may want to look around and see if you can buy a used bridge and have it installed. There are companies around Texas that have bridges from older roads that were replaced for sale and install them on private property.
Interesting. I never thought of that. I was kind of looking forward to the "doing it myself" aspect. Thanks for the idea.
 

D2Cat

Well-known member
Lifetime Member

Equipment
L305DT, B7100HST, TG1860, TG1860D, L4240
Mar 27, 2014
12,985
4,365
113
40 miles south of Kansas City
Might check with some trucking companies and locate a flat bed trailer they are parting with. I see them in Kansas City for sale from $400-$1000, for 40 footers.
 
  • Like
Reactions: 3 users

BigG

Well-known member

Equipment
l2501, FEL, BB, Rotary cutter, rake,spreader, roller, etc. New Holland TL80 A
Sep 14, 2018
1,950
774
113
West Central,FL
Use the round cardboard forms that you can buy at the box stores as forms for the pilings to support the ends of the trailer. Using a post hole digger to save a bunch of work. Make sure you go deep enough to go past the frost line.

Also watch CL or FB for straight truck flatbeds that have been removed from an old truck if you need a shorter bridge.

I would also build a curb along each edge of the bridge. The ranch I worked on had a wooden bridge back in the woods. Between the algae/moss that grew on the shadow covered bridge and the mud on the tires the surface often became very slick. And yes a damn guest on the ranch slid the front tire of his 4 x 4 truck off the edge. A big JD and a short chain picked him up and back onto the bridge.
 
Last edited:

PoTreeBoy

Well-known member
Lifetime Member

Equipment
L35 Ford 3930
Mar 24, 2020
2,407
1,219
113
WestTn/NoMs
In addition to Russell's suggestion I'm including links to some things I found when noodling mine:
1. https://intrans.iastate.edu/app/uploads/2018/08/smallwood10taylor.pdf
2. https://fpr.vermont.gov/skidder-bridges
3. https://pdfs.semanticscholar.org/c52d/68ec033eab1034d4231a6c6d64f77016a95b.pdf
4. https://www.shortspansteelbridges.org/
There's a lot on the 'net if you have time to use Google or DuckDuckGo and search for 'forestry bridge', 'temporary bridge', and similar terms. State forestry and wildlife agencies have some suggestions.
 
  • Like
Reactions: 1 users

GeoHorn

Well-known member
Lifetime Member

Equipment
M4700DT, LA1002FEL, Ferguson5-8B Compactor-Roller, 10KDumpTrailer, RTV-X900
May 18, 2018
5,686
3,012
113
Texas
Old railroad flat-cars make perfect bridges, as that sort of loading is what they support between the trucks. They are used here in Texas and sell for $2000/up.
 
  • Like
Reactions: 3 users

BigG

Well-known member

Equipment
l2501, FEL, BB, Rotary cutter, rake,spreader, roller, etc. New Holland TL80 A
Sep 14, 2018
1,950
774
113
West Central,FL
Old railroad flat-cars make perfect bridges, as that sort of loading is what they support between the trucks. They are used here in Texas and sell for $2000/up.

Now that would be a bridge.
 

ctfjr

Well-known member
Lifetime Member

Equipment
L3800HST
Dec 7, 2009
1,700
1,911
113
central ct
Years ago we had a small amateur radio group that wanted to put up a repeater and 160' tower. We didn't have a lot of money and the property owner who was going to let us put up the tower in his yard had construction equipment kept there. In order to keep from having a real sad story if one of the booms caught a guy wire we decided to elevate the anchor points well above ground level.
I went to a junk yard that had a load of excess 'bridge steel' they were selling at scrap prices. These were 'real' I beams, the webs were probably 20" and the flanges 12" or so. We picked out 3 20 footers. Fortunately the yard loaded them on our flatbed and the property owner used one of his big backhoes to take them off and stand them upright in our 5' deep holes (that he dug for us).
Its 30+ years later and they haven't moved :)
 

random

Well-known member

Equipment
L3301, bucket, backhoe, grader, plow, harrow, cultivator
Nov 2, 2020
717
401
63
NC
Some interesting suggestions here. I'm looking at trying to fix a piece of my road that's eroding, getting worse every year. If I can't figure out a good way to repair the erosion and prevent more in the future, I may have to look at putting in a bridge.

Anyone whose done it care to help me prepare for the costs involved?
 

PoTreeBoy

Well-known member
Lifetime Member

Equipment
L35 Ford 3930
Mar 24, 2020
2,407
1,219
113
WestTn/NoMs
Some interesting suggestions here. I'm looking at trying to fix a piece of my road that's eroding, getting worse every year. If I can't figure out a good way to repair the erosion and prevent more in the future, I may have to look at putting in a bridge.

Anyone whose done it care to help me prepare for the costs involved?
Costwise, I came out pretty good. I'll try to list it out after Thanksgiving. The steel was about $1500 per-tariff if I remember and the decking was bought at pre-ridiculous prices. It was still more than the steel. Logistics was more of an issue. The steel yard gave free delivery but I didn't have a way to offload at the farm. Fortunately, my BIL has a lumber store, so they delivered there and my nephew delivered it to the farm on a smaller truck.
(I had tried to get some 1-1/2x3 light tubing delivered to my house to re-build my fence gates. They had a policy of not allowing their trucks on residential streets, so I put that project on hold. So I had that steel delivered with the bridge steel, 100 miles away, cut it at the farm, and hauled it 100 miles back [6 or 8 miles from the vendor], and welded it up at my house.)

Random, how about starting a new thread in this section and state your problem. Include a couple of picture and I'm sure the brain trust here will have some ideas to help you. A new thread will probably get you more response.
 

JimmyJazz

Well-known member

Equipment
B2601
Aug 8, 2020
1,098
644
113
Pittsburgh, Pa
In addition to Russell's suggestion I'm including links to some things I found when noodling mine:
1. https://intrans.iastate.edu/app/uploads/2018/08/smallwood10taylor.pdf
2. https://fpr.vermont.gov/skidder-bridges
3. https://pdfs.semanticscholar.org/c52d/68ec033eab1034d4231a6c6d64f77016a95b.pdf
4. https://www.shortspansteelbridges.org/
There's a lot on the 'net if you have time to use Google or DuckDuckGo and search for 'forestry bridge', 'temporary bridge', and similar terms. State forestry and wildlife agencies have some suggestions.
This is great! Thanks
 

PoTreeBoy

Well-known member
Lifetime Member

Equipment
L35 Ford 3930
Mar 24, 2020
2,407
1,219
113
WestTn/NoMs
Here's what it cost at the time:

Beams, angle, flat. . . . . .$1,400 Aug '17
60 - 3x8-12, PT timbers . 1,800 Sep '18
Misc lumber, bolts, screws
rebar, all-thread, etc. . . . . .400 Sep '18
Sakcrete 20 - 80# . . . . . . . . 100
Weld x-bracing. . . . . . . . . . .800 2018
Labor, tools etc. . . . . Priceless
Total, excl labor. . . . . . . .$4,500

Other costs were tools, welding rod, sheaves, wire rope, etc.
Cutting and drilling all those braces, straps and ears required a lot of time since I used a small bandsaw and hand drill and grinder. My goal was to minimize cash outlay.
As mentioned before, if I were doing it again, I would weld clips on the beams for the cross bracing. I could have probably done this myself instead of hiring it. Then the cross bracing could have been bolted on rather than welding hanging over the ditch. Also, I would weld bolts or studs to the beams rather than use those ears to bolt down the straps holding the stringers.
 

skeets

Well-known member

Equipment
BX 2360 /B2601
Oct 2, 2009
14,142
2,797
113
SW Pa
I dont know how wide your ditch is, but down at dads lil bro found some used black plastic culvert pipe I think they are 4 foot, we laid 3 side by side because that what he stol ,,,errr found :)
And zip screwed them together just told them in place and back filled along side and over the top with what ever rip rap we cold find mostly old pieces of concrete then some RR ties over top to level things off and dirt. That was maybe 15 years ago and the creek use to get up pretty high but it never washed away,, and the kids loved playing in those pipes and creek inthe summer