Just wanted to throw some images up here since Facebook is horrid for keeping up information.
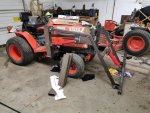
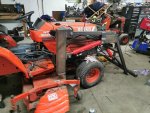
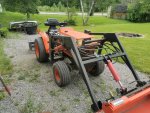
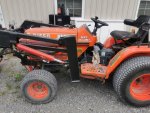
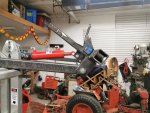
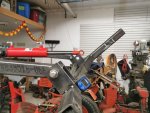
Basic front end loader for a Kubota B1550. 72" pin hieght, basically a full copy (dimensions wise) of a BX23 size loader.
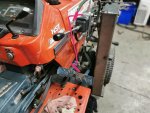
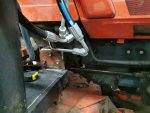
Loader cylinders: 2016 (2" bore 16" stroke) 6orb
Curl cylinder: 2508 (2-1/2" bore 8" stroke) 6orb
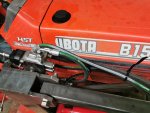
Control valve: BM40 2-spool joystick (6/8/10orb)
Tractor side pump fittings: 3/8" BPTM x 3/8" JICM
Hard lines: 3/8" SS .045" wall
Soft lines: 3/8" single braid with 3/8" JICF swivels
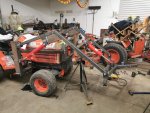
Steel needed;
1" pin, 6 pieces all at 4"
3/4" pin, 4 pieces all at 4"
2"x2" 3/16" wall box tube 240" or so
2"x4" 1/8" wall rec tube 80"
3"X5" 3/16" wall rec tube 60"
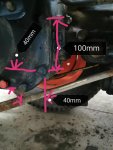
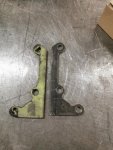
All brackets made from 1/2" and 3/8" plate
Bumper brackets built from 1/4" plate and 1-1/4" sch40 pipe.
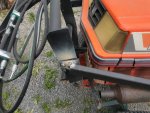
I'll update more and drawings when I get up to it. Making a new style quick connect. I don't like the levers and that, I like simple. 3 slip pins and done. We'll see how it goes.
Basic front end loader for a Kubota B1550. 72" pin hieght, basically a full copy (dimensions wise) of a BX23 size loader.
Loader cylinders: 2016 (2" bore 16" stroke) 6orb
Curl cylinder: 2508 (2-1/2" bore 8" stroke) 6orb
Control valve: BM40 2-spool joystick (6/8/10orb)
Tractor side pump fittings: 3/8" BPTM x 3/8" JICM
Hard lines: 3/8" SS .045" wall
Soft lines: 3/8" single braid with 3/8" JICF swivels
Steel needed;
1" pin, 6 pieces all at 4"
3/4" pin, 4 pieces all at 4"
2"x2" 3/16" wall box tube 240" or so
2"x4" 1/8" wall rec tube 80"
3"X5" 3/16" wall rec tube 60"
All brackets made from 1/2" and 3/8" plate
Bumper brackets built from 1/4" plate and 1-1/4" sch40 pipe.
I'll update more and drawings when I get up to it. Making a new style quick connect. I don't like the levers and that, I like simple. 3 slip pins and done. We'll see how it goes.
Attachments
-
 126.8 KB Views: 1,271
 -
 115.8 KB Views: 988
 -
 108.7 KB Views: 1,727