Third Function or Diverter on BX2350?

B737

Well-known member
Lifetime Member

Equipment
LX3310
Jun 9, 2019
2,024
2,194
113
New Jersey
has anyone here installed a 3rd function or diverter on an older BX? I have searched and come up empty handed for anything earlier than 2360 and 2380.

I dont even know for sure if a 2350 has a power beyond loop since the machine isnt outfitted for a backhoe...
If you have done this please share the details.
=============

EDIT installation starts at post #16
 
Last edited:

Dave_eng

Well-known member
Lifetime Member

Equipment
M7040, Nuffield 465
Oct 6, 2012
5,123
931
113
Williamstown Ontario Canada
Do you have a loader?

If you do then likely you have the optional hydraulic block which states in the owners' manual that any valve connected to the hydraulic block must have a power beyond feature.

As a check, if you have a loader, how many lines connect to it.... 6 or 7?

What are you trying to do with additional hydraulics?

Dave
 

Attachments

B737

Well-known member
Lifetime Member

Equipment
LX3310
Jun 9, 2019
2,024
2,194
113
New Jersey
Thanks Dave,
i read the book and didnt even know that was in there.

Im okay with either the diverter, or 3rd function. i havent found anyone who has posted about doing such a mod to a pre-bx2380.

When i look at my hydraulic pump in the back i only see 4 lines.

 
Last edited:

Dave_eng

Well-known member
Lifetime Member

Equipment
M7040, Nuffield 465
Oct 6, 2012
5,123
931
113
Williamstown Ontario Canada
The actual valve for the loader must have more than 4 hoses. There would be 4 hoses going to the lift arms and bucket but.... there also has to be a supply line and a return line at least. The relief valve in the loader valve has to be able to dump oil back into the reservoir and would use the return line for that function.

Lastly, according to the owners' manual, there should be a power beyond line.

Plse check again.

Dave
 

B737

Well-known member
Lifetime Member

Equipment
LX3310
Jun 9, 2019
2,024
2,194
113
New Jersey
continuing my research for this mod...
My dealer has been helpful, they have pointed me toward the Land Pride 380-137A 3rd function kit. He said while it may not explicitly say it is compatible for BX2350 but it is compatible with LA243 loader so it should be good to go.

I need to continue reading up on this to figure out if i can self install or if i should use the dealer. The kit is about $750, install doesnt look too bad

https://www.landpride.com/ari/attach/lp/public/manuals/380-145m.pdf
 

B737

Well-known member
Lifetime Member

Equipment
LX3310
Jun 9, 2019
2,024
2,194
113
New Jersey
BX power beyond port ID:

found it....


Ordered the kit from Messicks. Will update on the install.
 
Last edited:

B737

Well-known member
Lifetime Member

Equipment
LX3310
Jun 9, 2019
2,024
2,194
113
New Jersey
So I had two short hoses made today. My thought was if I connected the loader curl hoses (red and blue) to the 3rd function it would be a test to see if it was working properly.

what happened was; when I pushed one button, the bucket would very slowly curl, and the other button nothing would happen.

I have exactly zero knowledge of hydraulics outside of power steering and brakes on cars...

either my test is flawed because I dont know enough about how the circuit works or I installed my kit wrong. Anyone have any ideas?
 

eserv

Well-known member

Equipment
BX24, A1000 Kubota Generator
May 27, 2009
2,110
112
63
Hardisty, Alberta
So I had two short hoses made today. My thought was if I connected the loader curl hoses (red and blue) to the 3rd function it would be a test to see if it was working properly.

what happened was; when I pushed one button, the bucket would very slowly curl, and the other button nothing would happen.

I have exactly zero knowledge of hydraulics outside of power steering and brakes on cars...

either my test is flawed because I dont know enough about how the circuit works or I installed my kit wrong. Anyone have any ideas?
The oil is flowing backwards through the third function valve. You have it connected to the PB fitting where it should be connected to the P fitting at the power beyond block. It will work that way if you swap the two hoses on the third function valve. It IS recommended that the third function valve gets oil before the loader valve though.
 
Last edited:

B737

Well-known member
Lifetime Member

Equipment
LX3310
Jun 9, 2019
2,024
2,194
113
New Jersey
eserv thank you, this is where im confused. The instructions are conflicting. Top section is one set, the bottom section is another set of instructions for the exact same kit.


You are saying I need to put the hose on the Pump outlet at the rear block from the P fitting at the 3rd function? Not to the PB.
 
Last edited:

eserv

Well-known member

Equipment
BX24, A1000 Kubota Generator
May 27, 2009
2,110
112
63
Hardisty, Alberta
eserv thank you, this is where im confused. The instructions are conflicting.


you are saying i need to put the hose on the Pump oulet at the rear block from the P fitting at the 3rd function? not to the PB.


reference:
That is correct. This makes the flow of oil go to the third function valve first, and because the oil is coming out the p fitting it will go the right way through the third function valve ( the oil must go in the p port and out the T port on the third function valve) The PB port is oil returning from the loader valve to feed what ever is beyond ( in this case the three point hitch) thus it is called the PB (power beyond) line and port.
 

B737

Well-known member
Lifetime Member

Equipment
LX3310
Jun 9, 2019
2,024
2,194
113
New Jersey
craaaaap.
Ok that makes sense. I did it that way by direction of the tech at Messicks. Looks like tomorrow I will be swapping the hose to the pump port.

Thank you for catching this. arghhhhh :(
 

eserv

Well-known member

Equipment
BX24, A1000 Kubota Generator
May 27, 2009
2,110
112
63
Hardisty, Alberta
You can simply reverse the two lines on the third function valve and it will work. The problem with that is if you are using any loader function and hit either third function button the grapple or whatever will release because there is no flow through it when the loader is activated.
 

B737

Well-known member
Lifetime Member

Equipment
LX3310
Jun 9, 2019
2,024
2,194
113
New Jersey
That makes sense, but I think id rather have it hooked up the right way like you said. I'll get on it tomorrow :(
 
Last edited:

B737

Well-known member
Lifetime Member

Equipment
LX3310
Jun 9, 2019
2,024
2,194
113
New Jersey
The hoses I was using to test the valve had the wrong ends. put the right ends on the test hoses, now I can curl / uncurl the bucket with the 3rd function, it works like a charm.

In an effort to check my work I only created more confusion.

Given what I learned from eserv I have the plumbing to the P-Port as described in the 60/70 series instructions.
 
Last edited:

B737

Well-known member
Lifetime Member

Equipment
LX3310
Jun 9, 2019
2,024
2,194
113
New Jersey
Okay, take two, rewriting the DIY here with the corrections from eserv in post #11

Land Pride 380-137A 3rd Function for BX


put the tractor up, take off rear right wheel...


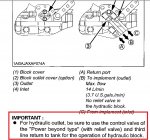
There is some conflicting information, the Land Pride 380-137A instructions say to "hook up to the power beyond from the loader valve". However, there is another set of "dealer instructions" from Land Pride specific to the 2360 and 2370 series that say to hook up to the pump outlet on the rear block, with a clear corresponding photo. I originally hooked up the unit to PB, but changed it to the pump port. Pump port instructions follow.

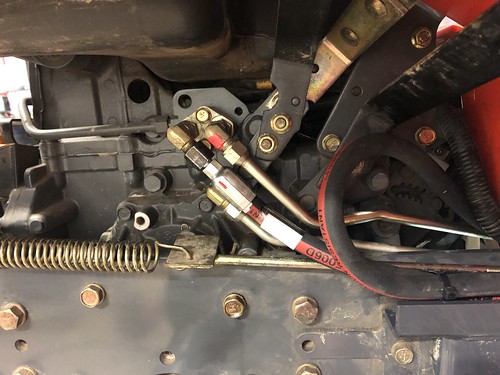
You remove the metal hydraulic line from Pump outlet to where it connects to the next line just forward of the fan. In the photo below it is the line next to and immediately behind the one marked with red.


Under the foot deck, forward of the fan, the pump line is marked in blue (power beyond marked in red shown with a plug in it). There is very little room here. I did not have wrenches small enough to fit in this space. Removing the foot deck takes all but 15 minutes, just a few nuts and its up out of the way. Lots of room now.


from above. (shown with hose already attached)


this section of the pump line comes out


You attach the long 62" hose to the line under the tractor, and the other end of this hose goes to the "T" Port on the valve body. The hose will travel back, loop up and inside the frame, it will go between the frame and the existing metal lines, keeping it well clear of the fan.

The 42" hose goes from the P port on the valve body to the Pump port at the block on the rear.


There was barely enough hose length, I had a few more inches to work with, and no tension on the connections, if I ran the hoses straight down from the valve through the brake pedal slot under the foot deck. There is enough room to keep the hoses clear even if full brake travel is applied.


Continued below...
 
Last edited:

B737

Well-known member
Lifetime Member

Equipment
LX3310
Jun 9, 2019
2,024
2,194
113
New Jersey
may not look like it, but the hoses are clear of moving parts, barely.


The stand mounts to the foot deck with just one bolt.
Tighten all the fittings on the valve block, they come loose from the factory.

Wiring is very straight forward. 4 wires from the knob, 2 red and 2 black. When attaching the knob with the set screws, be sure to make sure the wires are clear of the set screw. This is a common failure. The two red wires get 12 volts, I tapped them into an ignition switched circuit, the instructions tell you to put them directly to the battery i didnt want to do that. There are only two wires coming from the valve itself, the black one goes to a black wire, the white one goes to the other black wire, both coming from the handle.


I removed about 2 inches from the end of the loader joystick as well

With the wires connected and cleaned up, attach the holder to the front tube, slip on the covers, attach the fittings, and hoses.


I don't have a 3rd function implement, but I wanted to check it. As a test, i had a set of hoses made up. I attached the red and blue bucket curl hoses to the 3rd function with these test hoses (initially my hoses had the wrong fittings causing some confusion for me). With the test hoses hooked up, operate the boom up, and allow the 3rd function to curl and uncurl the bucket. The lights on the solenoid should work and the bucket should move just as it would if you were using the joystick. Don't forget to top off the hydraulic fluid, I had to add about a cup.


that's it, like most jobs on this machine i was lucky enough to do this one twice too :rolleyes:
im thankful this thing is pretty forgiving to work on.
 
Last edited:
  • Like
Reactions: 1 user

bluedunn

Active member

Equipment
BX1860, FEL, MMM, Heavy Hitch Back Plow Blade
Aug 29, 2019
298
36
28
Thetford, VT
I'm considering adding a third function kit to my BX1860 as I eventually plan to get a grapple. This post really helped me to understand some of the work involved. Overall looks pretty straightforward with the exception of the initial plumbing at the block. @B737, are you saying that the instructions supplied with the kit are not correct? I have almost no experience with hydraulics so trying to get as much info. as possible before I try and do this.

Thanks again!
 

B737

Well-known member
Lifetime Member

Equipment
LX3310
Jun 9, 2019
2,024
2,194
113
New Jersey
I'm considering adding a third function kit to my BX1860 as I eventually plan to get a grapple. This post really helped me to understand some of the work involved. Overall looks pretty straightforward with the exception of the initial plumbing at the block. @B737, are you saying that the instructions supplied with the kit are not correct? I have almost no experience with hydraulics so trying to get as much info. as possible before I try and do this.

Blue, was my thoughts too, I wanted to familiarize myself before buying. When I searched I didnt find anyone with specific info. I did find some posts, but those people had the dealer install it, there were no details, and it was not on models below bx2360 either. Aside from working on cars I have no knowledge or experience with hydraulics. The kit itself is very basic, but the workings of the tractor hydraulics arent (to me). The fittings are forgiving and even after doing some of them twice I am leak free (knocks on wood). They are less finicky than the tiny flared compression fittings you find on cars. I didnt want to schlep the machine and pay the dealer the quoted $500 to install.

There are two sets of instructions that came with the landpride kit. One set was was labeled "dealer training" specific to the BX2360/70 series the other was more generic. I will try to link them below. The generic set says "hook to Power Beyond from loader" and the other set says use the Pump port (in photo above). I did it to PB port first, then based on what I learned here from Eserv I switched it to pump.

I bought the kit from Messicks, they were receptive to my questions regarding install in non-BX2360 but never followed up with me. My local dealer did confirm compatibility with LA243 loader but also never heard back from kubota about installation on anything other than the 2360/70 either. Ive used the tractor and loader a lot since installing the kit everything has been totally normal. And given the bucket curl test, I am confident future implements will work as they should.

After the install I wrapped hose protector around the lines, I would do this before the install. I used Pre-Cut Spiral Wrap Hose Protector, 0.67" OD, 25'

If you install through the forward part of brake pedal slot, the foot deck will need a slot cut in it to be removed in the future, (or the lines themselves removed). I was okay with this as it removed the stress on the fittings


Dealer training instructions here: http://messicks.com/uploads/assets/380-137A_color_copy.pdf

and the generic set here: http://messicks.com/uploads/assets/380-137A_Install_Instructions.pdf
 
Last edited:

bluedunn

Active member

Equipment
BX1860, FEL, MMM, Heavy Hitch Back Plow Blade
Aug 29, 2019
298
36
28
Thetford, VT
Thanks for the additional info B737 - very helpful! Did you find any other differences between the dealer instructions and the more generic instructions? I've perused both and the dealer instructions seem to be very in-depth and do provide a good level of detail.