B7001 3pt hitch problem

howald

New member

Equipment
B7001
Apr 2, 2009
37
0
0
Fruitvale, BC, Canada
Hi,

I just got my aftermarket 3-pt hitch and I'm thinking I might have gotten the wrong one :-(

As far as I can see, there is now (proper) way I can attach this to my B7001.

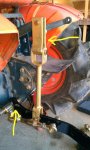
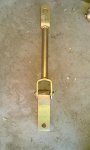
If you look at this picture, I would think that the non-adjustable leveling arm (is this what it is called?) should be inverted to what I have installed here but this was the only way I could get the holes to line up and the pins to fit.
I've also installed the arm backwards (IMO) but since the arm 'bends' I can't get it to fit any other way.


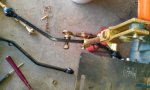
So if you look at how it is attached -the arms are no square:


Any advice or help on how I can make this work?
Maybe I should have bought this one (though it says for 25HP):
http://cgi.ebay.com/3-Point-Hitch-Kit-CAT-1-25-45HP-Compact-Tractor-GD-/230616540767?item35b1d1265f

Instead of:
http://cgi.ebay.com/3-POINT-HITCH-KIT-KUBOTA-ISEKI-AND-OTHER-TRACTOR-/330559552352?pt=LH_DefaultDomain_0&hash=item4cf6e27b60


I'm feeling kind of dumb at this point (pun intended) ;-)
 

Attachments

HickoryNut

New member

Equipment
BX25DLB/PForks,Front Blade,3PH,and 3Pt STUFF, BXPanded UA, Piranha, BH Dolly,Rip
Apr 15, 2011
130
0
0
NE Georgia
I think you want to reverese the lift arms so the offset is toward the implement hook up. The ball ends need to be outside the sway chain hookups. Just my 2cents YMMV.
 

stuart

Member
Lifetime Member

Equipment
B7001 with loader & tiller, 3 point hitch and 4' rear blade
Aug 9, 2009
280
0
16
Aldergrove, BC, Canada
I bought the 3 point from Vic, and set it up according to the diagram he sent. There are some pics of the completed assembly in my portfolio here. I can't find the diagram right now, but here are the pics.


I reversed the pins on the blade so they point inwards, now there ls lots of clearance to the tires.
I noticed that the hole and pin sizes are set so you can't put it together the 'wrong' way.
 

howald

New member

Equipment
B7001
Apr 2, 2009
37
0
0
Fruitvale, BC, Canada
Thanks Guys.

HickoryNut - that was how I tried it originally but I can't get the non-adjustable leveling arm to fit on the lift arm.

Stuart - if you find that diagram please send it on.

If you take a look at the pictures, you can see the the leveling arm is 'straight' so when I try to attach it as described above it is trying to attach to an 'angled' part of the lift arm so it won't fit.

Stuart - can you tell me the length of you leveling arm and maybe send me a closeup of how you have things set up on the tractor?

I admit I was REALLY tired yesterday (after a camp night out with the local Beaver colony) so maybe I missed something.

I'm really itching to get out and play with my new box blade that came in on Sunday. I promise pics if I can get everything working!!
 

HickoryNut

New member

Equipment
BX25DLB/PForks,Front Blade,3PH,and 3Pt STUFF, BXPanded UA, Piranha, BH Dolly,Rip
Apr 15, 2011
130
0
0
NE Georgia
I think I see what you mean. I just ordered new side links from "H" in TX, but they are ball end not like yours. I don't see any bend or offset in Stuarts setup which looks the same as yours. Good Luck!
 

stuart

Member
Lifetime Member

Equipment
B7001 with loader & tiller, 3 point hitch and 4' rear blade
Aug 9, 2009
280
0
16
Aldergrove, BC, Canada
Maybe karma will reward me for going out in the rain to take these....


close up of right hand connection to back blade. Note the small curved brackets to hold the hitch pins when the implement is off.


Right hand side hitch attachment to tractor. It took me a while to get the shaft and brackets in correctly. Check chains are now turnbuckles but are still called by the old name. You can see the increased clearance to the tires by having the pins on the back blade facing in rather than out.


close up of left side. out of focus bit is the top link and top link adjuster arm.
 

howald

New member

Equipment
B7001
Apr 2, 2009
37
0
0
Fruitvale, BC, Canada
Thanks Stuart, I'm going to try and look at this before the rain gets here!!

I'm off to Kelowna for the week so I might not get back on this thread until the weekend.

If anyone else has advice, please let me know..
 

stuart

Member
Lifetime Member

Equipment
B7001 with loader & tiller, 3 point hitch and 4' rear blade
Aug 9, 2009
280
0
16
Aldergrove, BC, Canada
Some things I forgot to mention.
- there is a hole strategically placed in the wheel to allow the shaft to go through, so you don't have to take the wheel off to get the shaft that goes through the gearbox slid into place. Looks like you have that solved already.
- there are more pictures in my album, similar shots to the ones posted but slightly different angles.
- the one you list as 'perhaps should have' is missing the shaft that goes through the gearbox, so would not work as is.
- the other one looks identical to the one I got through Vic, but it is missing the top link bracket - the tractor end of the top link. I see you have the bracket and it is much cleaner than the rest of the gearbox so you must have solved that problem.
- also, I put the set screw collars outboard of the lower link and check chain mounts, in the picture they are inboard. Unless the length of the shaft is perfect, I think there would be too much side to side play in the setup to suit me. I like the collars to hold everything in place, then the pins to prevent something coming off the end if the set screws work loose.
 
Last edited:

howald

New member

Equipment
B7001
Apr 2, 2009
37
0
0
Fruitvale, BC, Canada
I think I may see the problem.
Stuart, is your levelling arm straight or is it at an angle?
From your gallery it looks like there is an angle but mine is straight.


Attachments

Last edited:

stuart

Member
Lifetime Member

Equipment
B7001 with loader & tiller, 3 point hitch and 4' rear blade
Aug 9, 2009
280
0
16
Aldergrove, BC, Canada
I had thought this was called the lift link, but that does not matter - I have seen it called both in looking at other set ups today.
This link looks the same as mine - you get 3 degrees of freedom - top, bottom, and hinge in the middle. The free play using the pins on the top and bottom should allow it to conform properly. I do not recall seeing any bend in these links, but it looks like the bottom of the fixed link is rotated about 20 degrees. I'll check that in the morning. The pictures can be deceiving.

When you mount the lower links with the little bracket on the implement (rear) end, then the check chain attaches inboard of the lift link. This gives a more favorable leverage, and lines up the holes properly. I noticed on mine the hole sizes are such that you have to do it this way.
(Note to self - do not post the pictures of all the different incorrect ways I had this before I got it right)

I have looked for the diagram, but no luck so far. I'll try the other computer later tonight.
 

HickoryNut

New member

Equipment
BX25DLB/PForks,Front Blade,3PH,and 3Pt STUFF, BXPanded UA, Piranha, BH Dolly,Rip
Apr 15, 2011
130
0
0
NE Georgia
Stuart, sorry this is off topic. I gotta ask what size are your rear tires? I just put 8-16 on (Armstrong) and feel inadequate as I didn't get near that wide or deep of a lug
 

stuart

Member
Lifetime Member

Equipment
B7001 with loader & tiller, 3 point hitch and 4' rear blade
Aug 9, 2009
280
0
16
Aldergrove, BC, Canada
This is a grey market B7001, with the rice paddy tires. When the tide goes out here I'll check the tire size and lift link angle. Forecast is for rain through Sunday.
 

howald

New member

Equipment
B7001
Apr 2, 2009
37
0
0
Fruitvale, BC, Canada
Thanks Vic,

It definitely looks like the leveling arm in this picture (picture 1) is at an angle. I think I'll need to get it re-welded once I figure out what angle it should be.

Can you explain what you mean by:
"You may need to grind away a bit of the tractors factory lift arm on the rock shaft so the aftermarket lift arm attachment pivots without binding. Lifting the hitch manually should tell you if you have a binding issue."

I'm not sure I understand which part might need some grinding.

Thanks,
Nick
 

HickoryNut

New member

Equipment
BX25DLB/PForks,Front Blade,3PH,and 3Pt STUFF, BXPanded UA, Piranha, BH Dolly,Rip
Apr 15, 2011
130
0
0
NE Georgia
Vic you rock! I'll have to post a couple pics of the :eek: Yanmar Sidelinks and chains I just retrofitted to the B7100 1. Cause I had them and 2. NOT Orange tractor parts need love too. :D
 

stuart

Member
Lifetime Member

Equipment
B7001 with loader & tiller, 3 point hitch and 4' rear blade
Aug 9, 2009
280
0
16
Aldergrove, BC, Canada
Here's a few pics of the aftermarket 3 point hitch we sell and install.

This is mounted on a B-5000. Notice the stabilizers are located inboard of the lower three point arms, and are installed 'first' on the round bar, then a spacer, then the three point arm and it's opposite end is bolted to the lower three point arm ahead of the lift arm attachment.

Hi Vic
Two questions
1 - I am 'reasonably' sure I followed the diagram you sent when I assembled my hitch. I have the stabilizers outboard of the lower links on the bar. It works fine this way - is it likely to cause any problems?
2 - I see the PTO shaft on your unit is quite long and has two keyways(?) for securing the drive shaft for powered implements. Mine B7001 came with the Kubota tiller, and the shaft is quite short with only one keyway. Is this going to cause a problem attaching a 42" brush cutter? That was to be my next purchase.
What about other attachments?

I mentioned the forecast was rain through Sunday - It's Wednesday already and still raining here.
 

stuart

Member
Lifetime Member

Equipment
B7001 with loader & tiller, 3 point hitch and 4' rear blade
Aug 9, 2009
280
0
16
Aldergrove, BC, Canada
Hi Stuart.

Any luck having a look at the back of your tractor to see if there is a 20deg bend on the fixed link?
Yes there is rotation to the bottom connector of the fixed lift link. I would say it is the same angle as the offset on the lower links. Does not have to be exact, as the pins are quite long and will give some freedom there. Just oval the holes slightly on the lower link and the lift link if you miss on the angle.
 

bgbill

New member

Equipment
BX25
May 12, 2011
30
0
0
BG, Ohio
What Cat # is the back blade ? It looks pretty heavy. Could it be that it is Cat 2 and the 3 point is Cat 1 ??? That would kinda explain why reversing the pins worked.

BGBill
 

stuart

Member
Lifetime Member

Equipment
B7001 with loader & tiller, 3 point hitch and 4' rear blade
Aug 9, 2009
280
0
16
Aldergrove, BC, Canada
What Cat # is the back blade ? It looks pretty heavy. Could it be that it is Cat 2 and the 3 point is Cat 1 ??? That would kinda explain why reversing the pins worked.

BGBill
Assuming you mean my blade.....

Welcome to the forum. Lots of very friendly and helpful people here.

That is a standard cat 1 hitch and cat 1 back blade. The pins on the blade are the same size at the holes on the lower links, so we know it is correct. Cat 2 and 3 hitches and implements have larger diameter pins and holes.

The issue is that my Kubota is really narrow, (under 4' total width) and the lower links are fairly short. The combination meant that it was almost impossible to get the lower links over the pins, and then they rubbed on the tires. There were 3 choices
- move the tires out on the axle
- switch the tires to opposite sides
- move the pins inboard instead of outboard.

First two were a fair bit of work and may not have entirely solved the problem. It would leave me with a wider track at the back than the front, which may cause other complications.

Option 3 took about 10 minutes. Most of that was taken finding an 1 1/8 socket and a very long wrench.

That blade is not particularly heavy - I need a fair bit more weight back there when I have a full loader bucket.

There was a thread about this dated Sept 2009.
 

bgbill

New member

Equipment
BX25
May 12, 2011
30
0
0
BG, Ohio
I am learning. Good info on the Cat sizes. I have to go thru the 3 point hitch dilemma yet. My BX25 didn't come with a 3 pt. I will have get one and a back blade similar to yours before next winter.

Glad you got yours installed.

BGBill