BX Snow Cab

SidecarFlip

Banned

Equipment
M9000HDCC3, M9000HD, Kubota GS850 Sidekick
Oct 28, 2018
7,197
546
83
USA
Reminds me of when I was a kid, driving an ancient (at that time VW bug). The heater was basically non functional as was the defrost and up here, no defrost in the winter is no see out the glass so I took a piece of sheet metal and sat a can of sterno in front of the windshield to defrost it.

Froze my buns off but the windows were de-iced. VW's made ice on the inside of the windshield, not the outside....lol

Those were the days...
 

Ping

Active member

Equipment
BX2370-1
Dec 25, 2018
298
173
43
Troy, Ohio
First off, AWESOME build and I will absolutely be using your experience when I build my own! You say it's far from perfect, but it's a hell of a lot closer than most any other DIY cab builds I've seen!

I'm curious, have you run this in cold weather yet? And if so how is the fogging/icing of the glass? I assume I'll need a heater and ducting to the glass when I build mine... but maybe not?

I'll be snowplowing in anything from 0C to -20C so the least bit of moisture will fog/ice up windows in a heartbeat.

Also, did you mention cost? If you don't want to, that's fine. I'm mostly curious about the glass since I'm assuming that was the most expensive part.
DanR,
Thanks. Im happy with how it turned out. No way was I going to throw together something that looked like a Red Green Handyman project! I sure miss that show. In my mind, Perfect = 0 defects! For one, I really need to improve on my body work skills. Good thing that's not my day job!
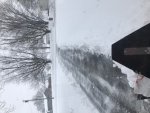
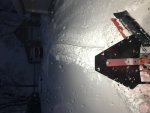
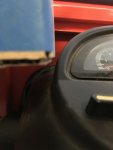
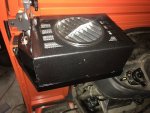
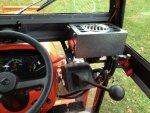
I have less than 2 hours run time with the cab on. Outside temps in the low to mid 40's (F). I didn't notice any issues with fogging of the windows. However, I have not yet installed any form of auxiliary heat other than my fat behind!. I do have a fan to blow across the windshield and left both front and rear windows operational to allow even more fresh air in. I've tried to seal up the exterior gaps between the tractor and cab but, haven't done a lot with all the interior penetrations other than throwing a couple old bath towels under the seat. All the floorpan holes for hydrostat peddle, etc are still wide open. I plan to run this winter without aux heat and see how things go. At least, I***8217;ll be out of the wind. If the windows fog up too bad or decide I really need to be plowing in shirt sleeves, I'll add a heater next year.
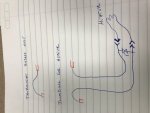
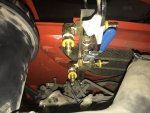
Because I intend to remove the cab during the late spring, summer, fall time of the year, I haven't yet come up with an easy solution to install/remove the coolant lines. I know I can remove the bypass hose and install heater lines but, won't that just allow coolant to flow out? After all the level in the radiator is substantially above the bypass hose. What I'm looking for is an easily dis-connectable solution that will be compatible with the antifreeze and not restrict flow too much. I thought about mold coolant quick couplers (similar to air line quick connects) but rated for temp and pressure. Not sure if they have enough flow? I've got all winter to figure this out.
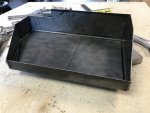
As for cost, no, I never mentioned $. Some of the materials I had laying around. If I had to go out and buy everything, I'm shy of $2k. And, you're right, glass and rubber gasket alone was over 35% of that. It's expensive but, I only have to cry once. I ended up going laminated based on my local glass guy saving me a few dollars over tempered. And, if I break a pane, it'll stay intact or I can use my templates (assuming I can find them) to have a replacement made.
If your BX is an 80 or 60 series an older, the cab doesn't have to be as tall as mine in order to keep the ROPS in place. If I would have chosen to remove the upper portion of mine, I could have shortened the overall height about 6" without limiting level forward visibility if that makes sense. If you were to fix the front windshield and move the wiper to the bottom, you could gain another couple inches. I say that because bigger & taller comes at a price. More steel, more glass, more paint, etc.
Hope this helps and let me know if I can help in any way.
Regards
 
Last edited:

chim

Well-known member

Equipment
L4240HSTC with FEL, Ford 1210
Jan 19, 2013
1,769
860
113
Near Lancaster, PA, USA
.................And if so how is the fogging/icing of the glass? I assume I'll need a heater and ducting to the glass when I build mine... but maybe not?.................................
Experience from another DIY cab - Depending on how much snow I track into the cab, the heater and its fan are sometimes enough to take care of the condensation. When it's not, the two-speed "bus driver" fan almost always does the trick.

The rare times when the glass needs a swipe with a rag (or shirt sleeve) are when the wind changes and the snow blower discharge tosses snow on the rear window. The extra chill on the glass temporarily causes the glass to sweat.

Heater is a 20,000BTU that runs off of the engine coolant. It heats the cab comfortably on the coldest nights:

https://www.ebay.com/p/Northern-Ah454-Auxiliary-Heater-12-Volt-20-000-BTU/1117769575
 

chim

Well-known member

Equipment
L4240HSTC with FEL, Ford 1210
Jan 19, 2013
1,769
860
113
Near Lancaster, PA, USA
Here's where I mounted mine. The grille can be rotated to direct the air. This is an earlier photo from before I hard piped it. It was easy enough to loosen the hose clamps and tie the hoses back out of the way.

My cab is sectional for removal, but I only removed it the first Summer. After that I just lifted the doors off. That takes less than a minute each. The cab and tinted glass offer some shade.

The valves under the heater allowed cab removal with the loss of only ounces of engine coolant. The third valve is the necessary bypass connection. When I hard piped the lines I relocated the valves to the engine compartment.
 

Attachments

Ping

Active member

Equipment
BX2370-1
Dec 25, 2018
298
173
43
Troy, Ohio
Thanks for the info guys. I'll see how those sizes fit the space I'm thinking of mounting it in. Hopefully one will work, if not, I was originally considering a Maradyne 503012. Only 12,500 BTUs but may work, any concerns?

Do either of you have any experience or thoughts as to the amount of coolant loss if I were to just remove the bypass hose and plumb the heater direct, reversing the process in the spring?
Regards
 

bearbait

Well-known member
Lifetime Member

Equipment
L3560, 64" snowblower, 72" back blade
Dec 9, 2011
4,007
751
113
New Glasgow Canada
Thanks for the info guys. I'll see how those sizes fit the space I'm thinking of mounting it in. Hopefully one will work, if not, I was originally considering a Maradyne 503012. Only 12,500 BTUs but may work, any concerns?

Do either of you have any experience or thoughts as to the amount of coolant loss if I were to just remove the bypass hose and plumb the heater direct, reversing the process in the spring?
Regards
I found this which may help with your pluming :eek: and give you some ideas how other people have done it. If you pinch off the rad hose you shouldn't loose too much.

http://www.orangetractortalks.com/forums/showthread.php?t=17129
 

Ping

Active member

Equipment
BX2370-1
Dec 25, 2018
298
173
43
Troy, Ohio
Bearbait,
Thanks much for the info. Wife says I need all the help I can get:rolleyes:
Thanks again and stay warm up there.
 

chim

Well-known member

Equipment
L4240HSTC with FEL, Ford 1210
Jan 19, 2013
1,769
860
113
Near Lancaster, PA, USA
.............................Do either of you have any experience or thoughts as to the amount of coolant loss if I were to just remove the bypass hose and plumb the heater direct, reversing the process in the spring?
Regards
Catch the coolant in a clean bucket and put it back in. Make the bypass hose long enough to have it couple together in a loop outside of the engine compartment, then tuck it in when it's together.

Removing the bypass hose where it's connected on my engine would result inn dumping coolant on the top of the engine. If you do it that way, at least drain the cooling system to get the liquid below the ports you will be opening.
 

NoJacketRequired

Active member

Equipment
B7510 & LA302 FEL & B2782 blower, B7510 & B2781 blower, B2410 & B2550 blower
May 25, 2016
415
47
28
Ottawa, Ontario
Thanks for the info guys. I'll see how those sizes fit the space I'm thinking of mounting it in. Hopefully one will work, if not, I was originally considering a Maradyne 503012. Only 12,500 BTUs but may work, any concerns?

Do either of you have any experience or thoughts as to the amount of coolant loss if I were to just remove the bypass hose and plumb the heater direct, reversing the process in the spring?
Regards
Ping - rather than messing around up in the engine bay at every seasonal change, why not plumb from the thermostat bypass somewhat permanently back to a demarcation point near the front edge of the cab. At that demarcation point install quick-disconnect fittings (if they work for hydraulics they will certainly work for coolant). On the tractor side, install a Tee in the pressure and return hoses, then install a quarter-turn ball valve between them.

In the winter time, coolant flows through the lines, the quick disconnects, the heater core in the tractor, and back to the engine. The quarter-turn ball valve between pressure and return is in the OFF position to allow this to work. The thermostat bypass circuit is now a complete flow circuit through the cab heater core.

When it's summer time, disconnect the cab with the quick disconnects. Since the quick disconnects remove the cab heater core you will now also have removed the complete flow circuit for the thermostat bypass. That's what that quarter-turn ball valve is for - turn the valve to the ON position, thus re-establishing a complete flow circuit for the thermostat bypass.

BTW this morning I was using the tractor I built up for my father (see the link here http://www.orangetractortalks.com/forums/showthread.php?t=39257&highlight=NoJacketRequired ). The outside temperature was -20C. I made the mistake of wearing my winter coat in the cab. Within about 20 minutes I was too warm, even with the circulating fan running only on its lowest speed. Don't scrimp on the size of your heater - 10K Btu isn't enough if you haven't really sealed up your cab. My neighbor has a 10K Btu on his F-series tractor and it's never warm in that cab. It's got enough juice to take the edge off the cold, but not nearly enough heat to get to the point where you might want to unzip your coat.
 

Ping

Active member

Equipment
BX2370-1
Dec 25, 2018
298
173
43
Troy, Ohio
Thanks everyone. My heater planning will continue but, install will likely have to wait until this summer. Boss lady has cracked the whip and I'm back to knocking projects off her list.
I did get about 4 hours of seat time this past weekend. We got 7-8" of heavy wet snow. Temperature was 28-30F. Ran for about 1.5 hours before I started to fog up a bit. Cracked the front window open a bit and problem solved. I'm going to install a heater if for no other reason than keeping the windows clear. I will say it was a blessing being out of the wind. The pair of 18W LEDs front and rear provided plenty of light. And, the backup camera worked well, I just have to get used to it.
Regards
 

Attachments

NoJacketRequired

Active member

Equipment
B7510 & LA302 FEL & B2782 blower, B7510 & B2781 blower, B2410 & B2550 blower
May 25, 2016
415
47
28
Ottawa, Ontario
You nailed it, Ping. The ball valve preserves the thermostat bypass flow path whenever the cab heater is disconnected. Quick disconnects in the lines should limit fluid loss to almost nothing.
 

Ping

Active member

Equipment
BX2370-1
Dec 25, 2018
298
173
43
Troy, Ohio
Update: We got another 6 inches or so of dry fluffy stuff last weekend. A lot colder (15-20F) and WINDY! Had no issues with the windows fogging up this time. Boss Lady musta been felling sorry for me when she asked how it was. Told her fine except my feet got really cold. This is when she springs the "well then, why don't you just put your heater in"? So, full steam ahead!

I took the advise of others suggestions and went with a 20k BTU heater. I don't have a lot of room beside the dash and wasn't really keen on locating the heater beside or behind the seat as it would block visibility so, I started mocking up the different models I had been looking at to set the fitment in the cab. I ended up with a Northern Radiator AH454 which appeared to just squeeze into the area between the door latch and dash panel. Remember the blind hog finding the acorn....it applies here, I got lucky!

I'll add pictures of the mounting bracket with heater installed as work progresses.
Thanks to all that's offered their advice and suggestion with this build.
Hope you enjoy.
 

Attachments

reamer

Member

Equipment
B2400, BX1500
Jun 6, 2018
54
0
6
Ashford CT
I must of missed how you mounted the glass, Did you "make the cab fit stock size glass" or had glass "cut to fit your openings?"
Where did you locate the rubber for mounting the glass?
Fantastic Job!
Reamer
 

Ping

Active member

Equipment
BX2370-1
Dec 25, 2018
298
173
43
Troy, Ohio
Reamer,
Thanks!
I had the glass cut to fit my openings. Used the cheapest paneling i could find and traced patterns of each size opening. I then drew another line inside of that panel opening to correspond with the gasket thickness. Think lanes on a running track. My glass man custom cut each pane to my inside line. He stocks 1/4" laminated at his shop and worked my job in as he had time to save me a little $. Everything went together as expected. Just so you know, the larger panes are actually easier to install but, take about the same time as the smaller ones.
The glass is set in 1 piece locking gasket; Trim-Lok LK1522. You need to size it based on panel & glass thickness. Their website is pretty detailed. After I decided what i needed in terms of gasket, I ended up getting it off Amazon because their distribution/sales office about 45minutes away doesn't do direct sales, go figure:rolleyes:
Let me know if you have any more questions. Hoping to get pictures of the heater progress up today.
Regards
 

reamer

Member

Equipment
B2400, BX1500
Jun 6, 2018
54
0
6
Ashford CT
Thank you!
I have a BX 1500, and last Wednesday night, Plowing here in northern CT, it was -7F and 20 mph winds.
Once was enough for me. I have to seriously build a cab.
This is the guidance I need!
Reamer
 

Ping

Active member

Equipment
BX2370-1
Dec 25, 2018
298
173
43
Troy, Ohio
Heater Update, Part2:
A little paint and a few wires...…
I chose to run the power down out of my switch panel instead of mounting the high/low fan switch up top. In doing it this way, I only had to fish 2 wired thru the A pillar channel instead of 3. I was short on room and chose the former path.
Clearances were as expected IF someone would have been paying attention during the mockup! Notice anything odd with the first picture in post 55? Well the dummy mocking everything up left the windshield open! When closed, there's a bracket that wants to occupy the same space as the front left corner of the heater box. Nothing a Dremel, some aluminum and JB weld didn't cure. I need to fire that SOB off this job before he makes any more mistakes!
The hoses and means of easily disconnecting them has been a challenge. Since I have no idea at the flow rate across the bypass hose, I opted to not use hydraulic quick couplers. They need to get crazy big if you look at a flow vs pressure chart! I'm planning on valving off the heater supply after the bypass loop and disconnecting the cab heater via SAE flare swivel connections. I'm not sure why, but this little voice is telling me I'm making this way tooooooooo complicated. Good thing I'm nearly done.
I've included pictures of the completed heater install, clearance to dash and mock up of my bypass valve mount.
Feel free to ask questions & hope you enjoy.
Regards
 

Attachments

Ping

Active member

Equipment
BX2370-1
Dec 25, 2018
298
173
43
Troy, Ohio
Thank you!
I have a BX 1500, and last Wednesday night, Plowing here in northern CT, it was -7F and 20 mph winds.
Once was enough for me. I have to seriously build a cab.
This is the guidance I need!
Reamer
Good luck if you chose to build. Best advise I can give it to be patient and think things thru before you start cutting material.
PS: Don't forget to post pictures!